Featured Articles
PAGE CONTENT:
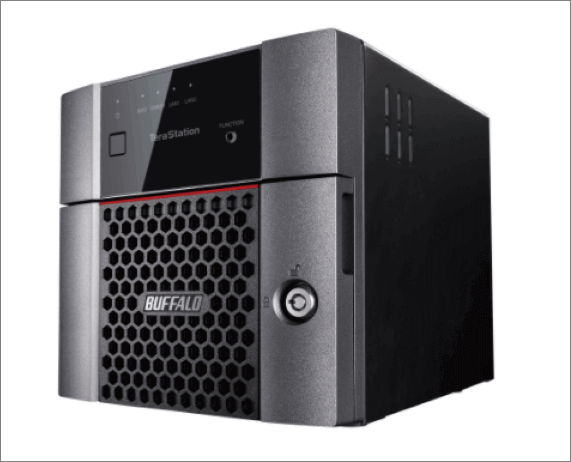
What Is Buffalo NAS Device
The Buffalo NAS device is a network-attached storage option that allows authorized on-site and remote-access users to access files, documents, and other important data without requiring a direct connection. Now the Buffalo mainly has two series of NAS devices, LinkStation and TeraStation. It works as a cloud-based data storage system, which helps you protect and backup important data at a relatively low cost.
Benefits of Buffalo NAS File System:
- Offer a variety of options.
- Share files in a more efficient manner.
- Maximize production by reducing maintenance downtime.
- Support a variety of workstations while ensuring data availability.
- Protect data and offer reliable access even when software or hardware fails.
Powerful Tool: Buffalo NAS Data Recovery Software
Buffalo offers a nice network-attached storage option, but it can be pretty hard when you try to restore lost Buffalo NAS data. Imagine that you have to find the exact files and documents that need to be stored first from a huge database, and then try very hard to recover them. It sounds complicated, doesn’t it? What makes matters worse is that sometimes Buffalo NAS data recovery is still not successful, even though we have tried many methods.
Fortunately, the Buffalo NAS data recovery process can be very easy if you have downloaded EaseUS NAS data recovery software on your PC. With this capable tool, you can recover lost files and documents stored on the Buffalo NAS device without much effort.
EaseUS data recovery software supports nearly all the versions of Buffalo NAS Linkstation and TeraStation servers.
| Buffalo Linkstation | Buffalo TeraStation |
|---|---|
|
|
Full Guidance to Restore Buffalo NAS Data
Since EaseUS Data Recovery Wizard was launched, it has been praised for its effective data recovery performance. What makes it distinct from other data recovery methods is that it allows users to quickly restore important NAS data without taking out disks. Users are also able to preview the lost data before recovery while using it.
Apart from the Buffalo NAS device, it also supports other commonly used NAS brands like Synology, DLink, Seagate, etc. What's more, it has no downtime, which means it can be used whenever you wish to recover lost NAS data caused by various situations.
When you wish to recover lost Buffalo NAS data, you can refer to the following step-by-step guide.
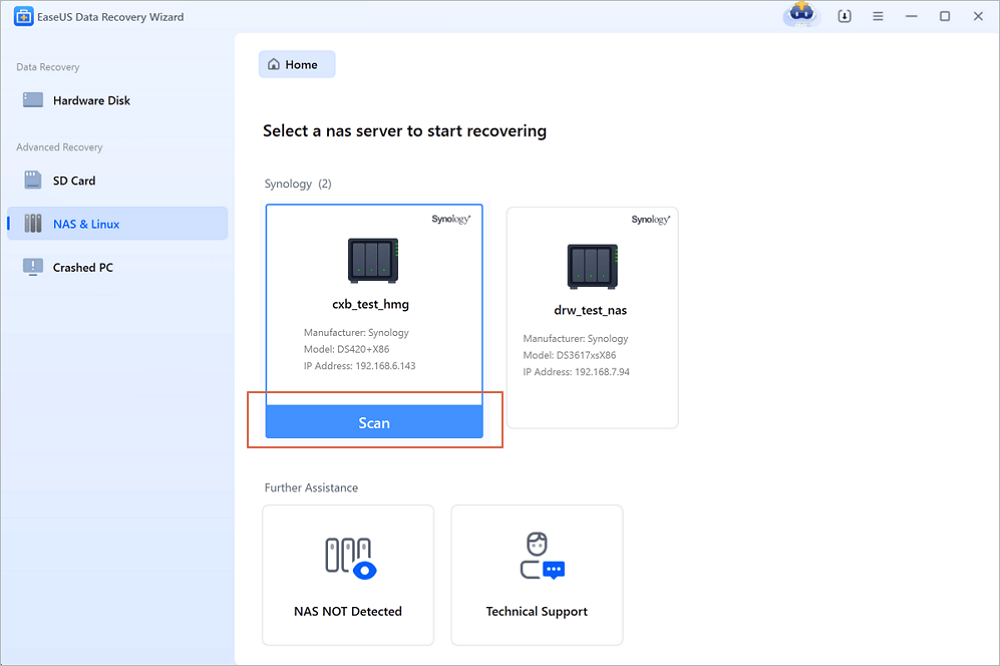
Step 1. Select a NAS server and start recovering.
Download and install EaseUS Data Recovery Wizard on your Windows 11/10 64-bit computer. When you open this software, select "NAS&Linux" and choose "NAS Recovery". All the NAS servers will be automatically listed, choose your target NAS device and click "Scan".
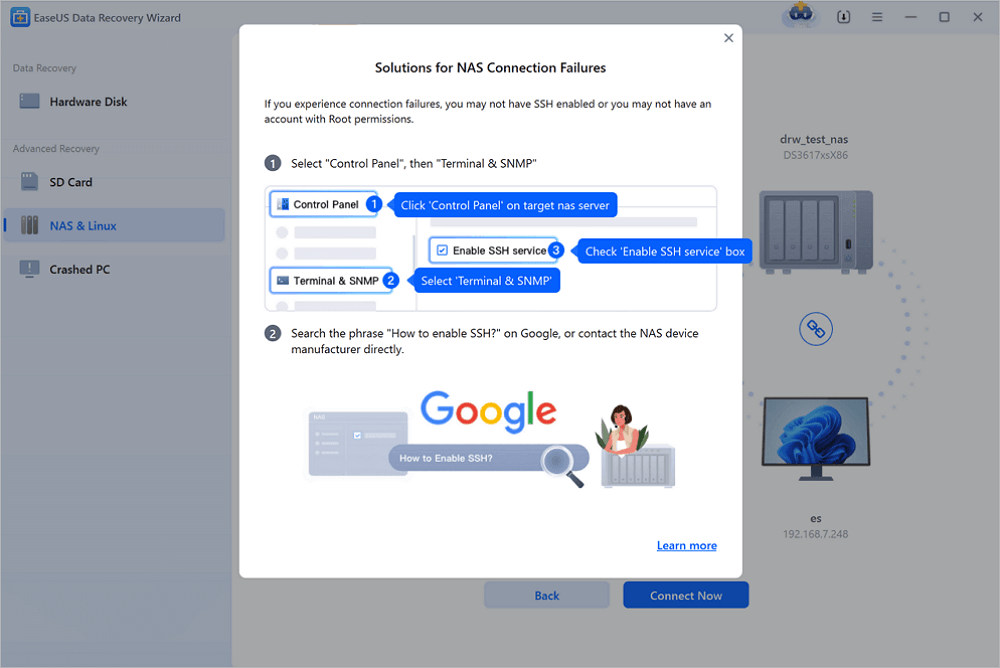
Step 2. Enable SSH service on the NAS server.
Go to "Control Panel > Terminal & SNMP" to check the "Enable SSH service" box. Then view and remember the port for remote access open EaseUS Data Recovery Wizard and click "Next".
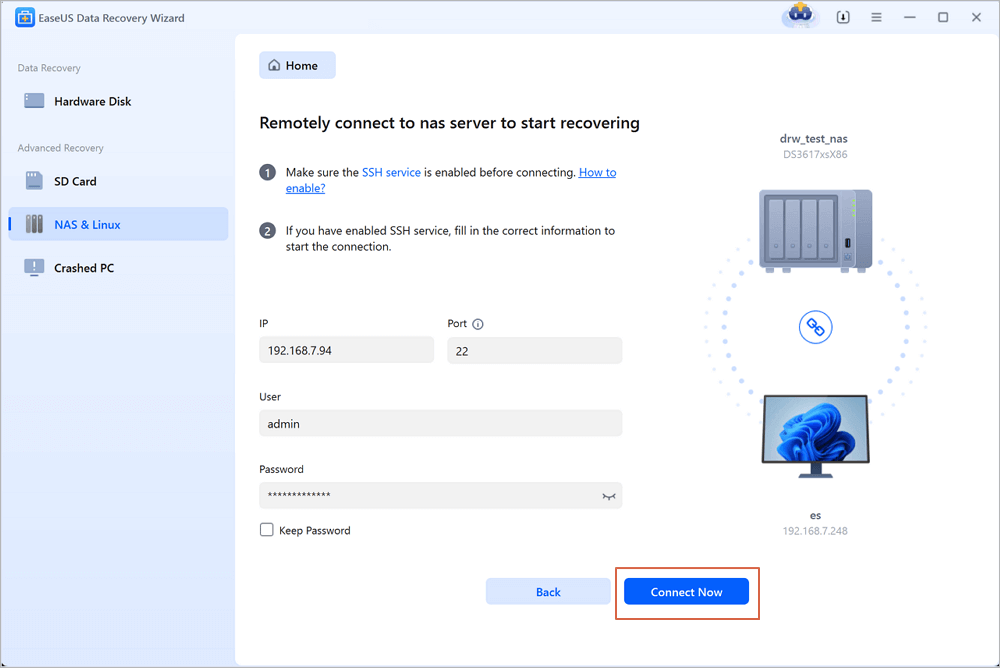
Step 3. Connect to the NAS server remotely.
This software will detect your IP and Port automatically. All you need to do is input the user name and password. If the IP address or Port is not right, you can correct it manually. Then, click "Connect Now".
Step 4. Recover lost/deleted NAS data
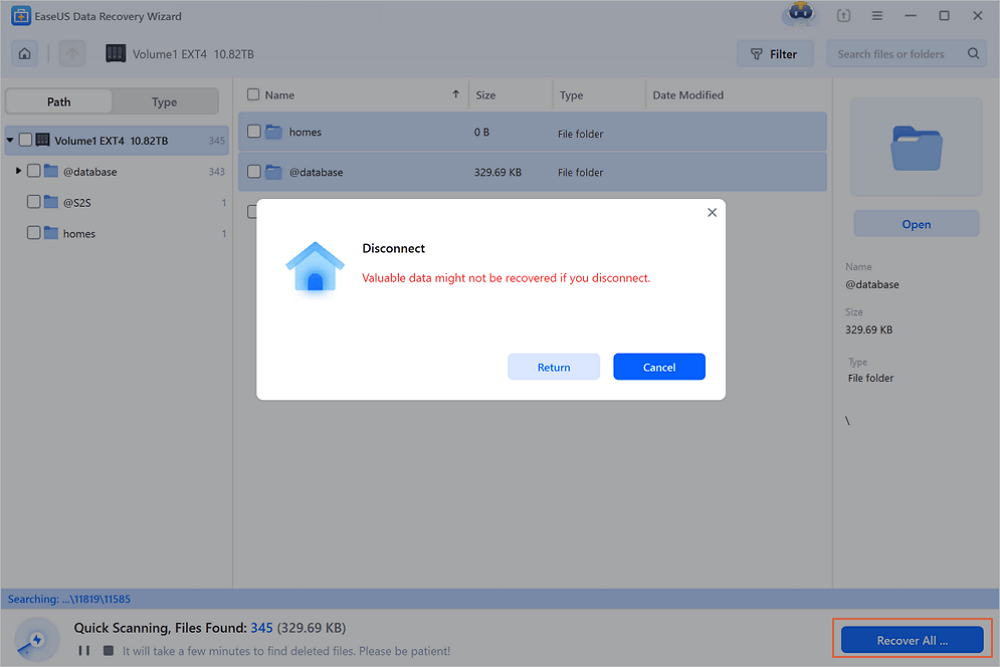
Then, EaseUS data recovery software will connect to your NAS and start a NAS device scanning. After the scan, you will see all the deleted, lost, or existing files on your NAS server.
You can apply the "Filter" feature or click the "Search files or folders" option to find the lost files on the hard drive. Select wanted NAS files that you lost on the server and click "Recover" to save them to another location.
Click the "Recover" button to restore deleted NAS files.
💡Tip: You can restore data on the local disks, external hard drives, and also the cloud storage.
Additional Help - Buffalo Data Recovery Service
EaseUS also offers NAS (Network Attached Storage) data recovery for all manufacturers, operating systems, and configurations. Your data is our priority. Contact our experts to restore Buffalo data as soon as possible.

Consult with EaseUS data recovery experts for one-on-one manual recovery service. We could offer the following services after FREE diagnosis. Our decades-experienced engineers are knowledgeable and can repair the damaged RAID structure and restore data from all RAID levels.
- Restore data from all RAID levels, including RAID 0, RAID 1, RAID 5, RAID 6, RAID 10, etc.
- Recover data from enterprise RAIDs such as QNAP, Synology, WD, Buffalo, etc.
- Retrieve lost RAID data caused by any issues
- Fix disks that become GPT protected partitions
- Recover data from RAID remotely, no need to ship
FAQs About Buffalo NAS Data Recovery
If you wish to address more lost/deleted NAS recovery issues more smoothly, you need to know more information and grasp more skills related to not only Buffalo NAS devices, but NAS devices of other brands.
1. How do I access my Buffalo NAS?
Step 1. Use an Ethernet cable to connect the Buffalo NAS device and turn it on.
Step 2. Press the Power button or turn on the power switch.
Step 3. Wait for the power LED to stop blinking.
Step 4. Open a web browser and enter the IP address of the NAS device. (Use NAS Navigator if IP address is unknown.)
2. What file system does Buffalo LinkStation use?
XFS file system is used by Buffalo LinkStation to store the data.
3. How do I copy a file in Buffalo LinkStation?
Step 1. Connect to USB devices to the Buffalo LinkStation.
Step 2. Copy data automatically from the USB to the LinkStation by pressing the blue function button.
Step 3. Remove the USB after it is dismounted.
4. How do I update Buffalo LinkStation firmware?
Step 1. Enter the model number on the Buffalo downloads page.
Step 2. Select the firmware update utility from the firmware section.
Step 3. Right-click the zip file and select "Extract All".
Step 4. Click file "TSUpdater.exe" and select the exact unit to update.
Step 5. Enter the admin password for the unit and click OK.
5. How do I recover files from a Synology NAS hard drive?
Step 1. Start File Station and find the shared folder with the Recycle Bin feature enabled.
Step 2. Find the Recycle subfolder and right-click on the retrieved folders or files.
Step 3. Find Copy to/Move to… and choose Move to… to recover deleted data.
Conclusion
Whether you have deleted important data stored on the Buffalo NAS device by accident or not, you can try EaseUS Data Recovery Wizard to help you recover the lost data quickly. This easy-to-use data recovery software not only works well in restoring Buffalo NAS data but also supports other NAS brands, including QNAP, Synology, Lacie, Iodate, etc.
In case the stored files and documents are frequently lost, you can also try to use EaseUS Todo Backup. With this reliable software, you can choose to back up data manually or automatically on a daily, weekly, or even monthly basis.
Below is the step-by-step tutorial for using this effective data backup software.
Step 1. To start backup, click the Select backup contents.

Step 2. There are four data backup categories: File, Disk, OS, and Mail.

Step 3. On the left-hand side, you'll see a list of local and network files. Selecting the files to be backed up by expanding the directory.

Step 4. Follow the instructions on the screen and pick the location where you wish to store the backup.

In Backup Options, click Options to encrypt the backup with a password, specify the backup schedule, and choose whether or not to start the backup at a certain event in Backup Scheme. There are a variety of customizable features available for you to explore, and you may tailor the backup operation to meet your specific requirements.

Step 5. Backups can be stored on a local disk, in EaseUS's cloud service, or on a network attached storage device (NAS).

Step 6. EaseUS Todo Backup allows customers to back up data to a third-party cloud drive or the company's own cloud storage.
If you wish to back up your data to a third-party cloud drive, select Local Drive, scroll down to add Cloud Device and enter your account information.

You may also use EaseUS's own cloud storage service. Click EaseUS Cloud, create an account using your EaseUS Account, then log in to your account.

Step 7. To begin a backup, choose Backup Now. It will appear in the shape of a card on the left-hand panel when the backup process has been successfully finished. To handle the backup job in more detail, right-click on it.

Was This Page Helpful?
Jean is recognized as one of the most professional writers in EaseUS. She has kept improving her writing skills over the past 10 years and helped millions of her readers solve their tech problems on PC, Mac, and iOS devices.
Approved by Evan Galasso
Evan Galasso is a digital forensics and data recovery engineer with over 10 years of experience in the field. He presents opinions on the current state of storage media, reverse engineering of storage systems and firmware, and electro-mechanical systems of SSDs and HDDs.
Related Articles
-
Corrupt Master File Table | Windows Cannot Recover Master File Table [Fixed]
![author icon]() Tracy King/Jun 09, 2026
Tracy King/Jun 09, 2026 -
Windows.old Restore: How to Restore Files from Windows.old Folder
![author icon]() Tracy King/Jun 09, 2026
Tracy King/Jun 09, 2026 -
Where Are Steam Games Stored in SteamOS/Windows/macOS
![author icon]() Dany/Jun 09, 2026
Dany/Jun 09, 2026 -
Baldur's Gate 3 Missing Saves [BG3 Fixes]
![author icon]() Dany/Jun 09, 2026
Dany/Jun 09, 2026