Why Should I Dual Boot Two macOS Versions
Have you ever tried to dual boot two macOS versions on Mac? If you are a developer that builds apps for macOS, you will want to test if your app performs well across different versions of macOS. Or use a legacy application that doesn't support macOS Ventura but does with macOS Monterey. You can install and dual boot macOS Ventura and Monterey from one Mac device.
Also, suppose you do not want to upgrade to macOS Ventura and only want to download macOS Ventura's beta software and try it out before you upgrade to it. In that case, you can enable dual Booting of two macOS versions on your Mac machine and see if you like it.
How to Dual Boot macOS Ventura and Monterey on a Mac
It is a simple process to dual boot macOS Ventura and Monterey. To simplify it, we have a video for you to help you set up the Booting of macOS Ventura and Monterey on the same Mac.
These are the following timestamps you should check:
- 00:25 Download the macOS Ventura installer
- 00:50 Creating a new volume
- 04:30 Booting into macOS Ventura Beta
Preparations You Need to Do Before Dual Boot Two macOS Versions
Before you set up your Mac to dual boot macOS Ventura and Monterey, you will first need to create free storage space on your Mac.
Here is how to do that:
Step 1. Click on the "Apple" logo on the menu bar and select "About This Mac."

Step 2. Now, click on "Storage" and then select "Manage."
Step 3. On the left side, you will see what is taking up a lot of space. Click on the section that is taking up lots of space and delete files you do not need anymore.
Step 4. Now that you have freed up space on your Mac, create a backup as well so that, if something happens, your files are safe. But to create a backup, you will need a USB flash drive.
Okay, now that you know why you should create a backup of your Mac and what you need, here is what you need to do:
Step 1. Open Spotlight and search for "Time Machine."

Step 2. Now plug the USB drive into your Mac.
Step 3. Select the USB drive from the list, select the option "Encrypt backups," then click on "Use disk."
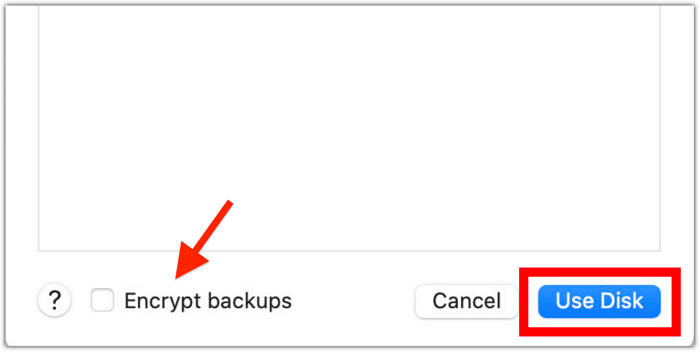
Step 4. Now your files will start backing up. Allow some time for this to complete.
Now that you have freed up space and created a backup of your Mac, you can recover data from Time Machine backups. You should create a new volume before downloading macOS Monterey or macOS Ventura.
How to Add a New Volume on Mac to Dual Boot Two macOS Versions
Okay, here is why adding a new volume to your Mac is crucial: When you want to download and install another macOS, you cannot install and access it from the existing Volume. That is why you should create a new volume over the existing one.
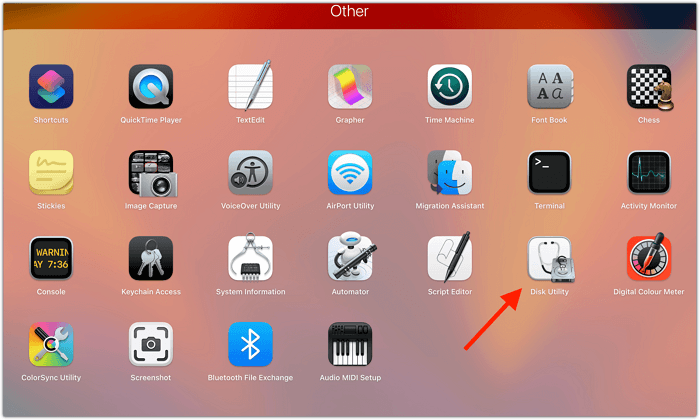
Step 1. Open Launchpad, then open the "Other" folder.
Step 2. Now, open "Disk Utility."
Step 3. Expand "Apple SSD" and then select "Container disk3."
Step 4. In the "Volume" section on the top, click on the "+" icon.
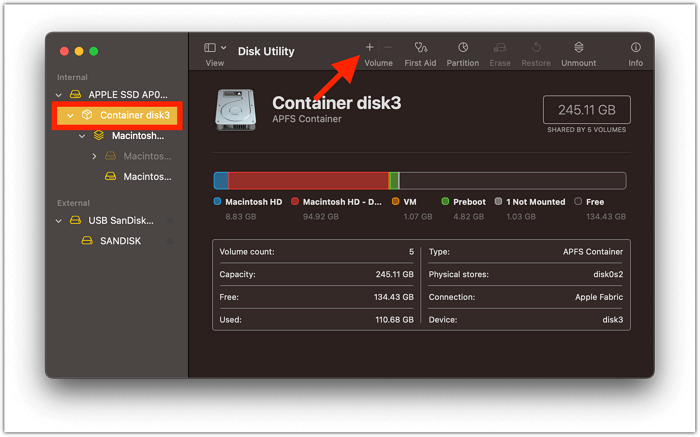
Step 5. Give a name to the Volume.
Step 6. Now click on "Done."
You will now have created a new volume on your Mac to download and install macOS Ventura.
Download and Install macOS on the New Volume
Now to dual boot both macOS Monterey and macOS Ventura, you will need to download and install macOS Ventura on the new Volume you created.
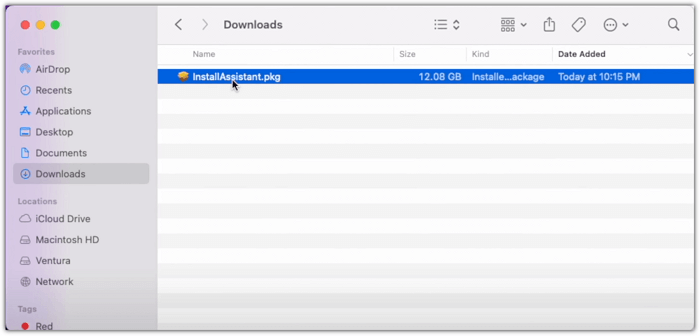
Step 1. If you want to download the beta version of macOS, find the macOS Ventura Beta resource and download it.
Step 2. Once the install assistant is downloaded, open it.
Step 3. Click on "Continue" and then click on "Install".
Step 4. Enter your Mac's password and click on "Install Software."
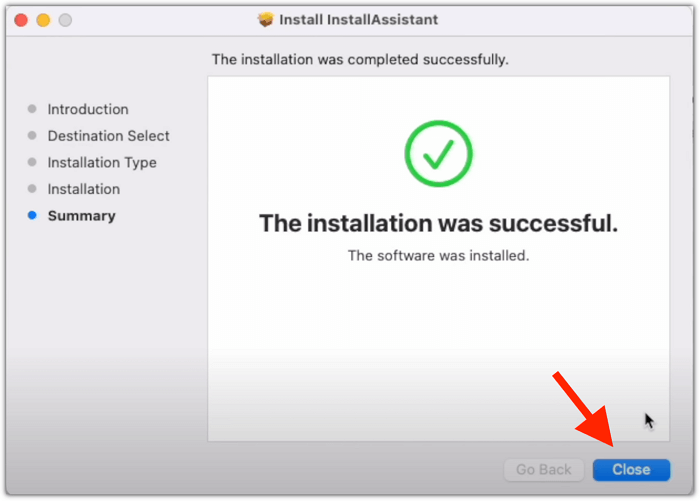
Step 5. Once it has been installed, click on "Close."
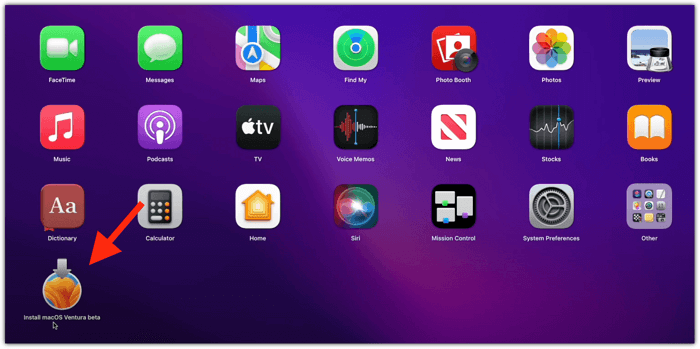
Step 6. Open "Launchpad" and then open "Install macOS Ventura Beta."
Step 7. Click on "Continue."
Step 8. Agree to the terms by clicking on "Agree." Click on "Agree" again when it confirms your decision.
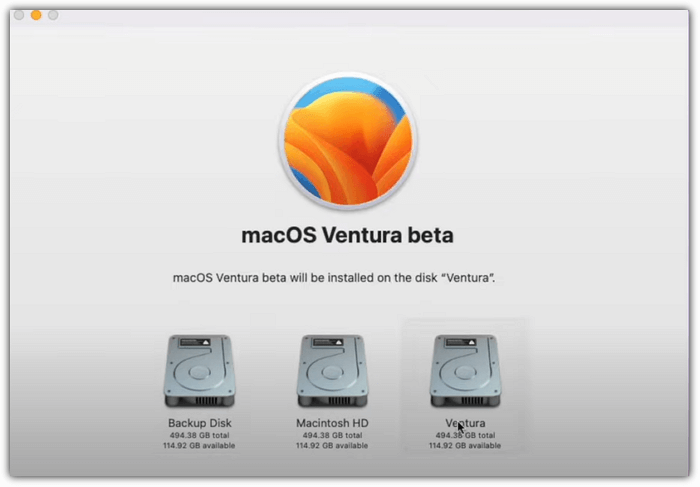
Step 9. Click on "Show All Disks" Select the Volume you created and click on "Continue." Then you can choose which disk to install.
Step 10. Now, select "Install" and enter your Mac's password.
Step 11. Once installed, you will be prompted to restart your Mac. Click on "Restart."
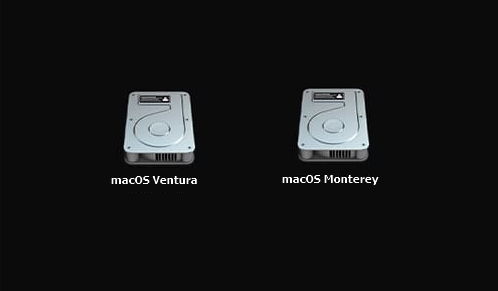
Step 12. After restarting, it will boot macOS Ventura. Finish the setup process to complete the installation.
How to Switch Between macOS Ventura and Monterey
So, now that you have installed both macOS Monterey and macOS Ventura on the same Mac device, here is how to switch between macOS Ventura and macOS Monterey.
Step 1. Restart your Mac.
Step 2. Click on the FN key and turn on your Mac if you use an M-series Mac. If you are using an Intel-based Mac, press the "Command" button and power on your Mac.
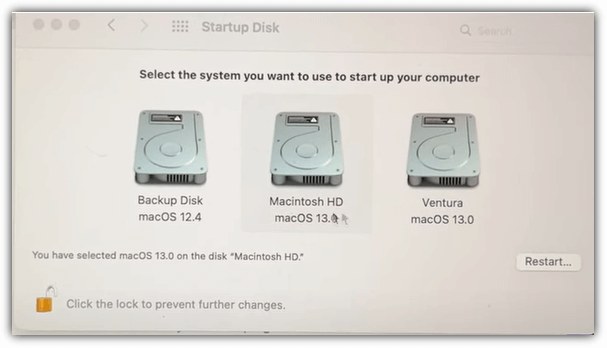
Step 3. Now the "Startup Options" will open. Select what OS you want to boot into. Click on the Volume you created to open macOS Ventura. If you're going to open macOS Monterey, select the right Volume.
Step 4. Enter your account password to log in if you selected to boot macOS Ventura.
Step 5. You can change the macOS system in startup disk windows also.
Note: If you encounter bugs and issues on macOS Ventura, you can click this link to fix macOS Ventura issues.
Recover Lost Data from macOS Ventura and Monterey with Software
If you did not create a backup of your data and you lost data while setting up macOS Ventura and Monterey, do not worry. You can easily recover it with EaseUS Data Recovery Wizard for Mac.
Yes, it is true that once your files are deleted, it is expensive or sometimes impossible to recover them. But this data recovery software is specially designed to recover deleted files on macOS Ventura. EaseUS Data Recovery Wizard for Mac can help you recover accidentally deleted photos, videos, documents, audio, and many other files from various storage media, including USB flash drives, SD cards, local Macs and MacBooks, etc.
This handy macOS recovery tool can recover data with one click. Check the detailed tutorial below and retrieve lost data:
Step 1. Search for lost files
Select the disk location to search for lost files (it can be an internal HDD/SSD or an external hard drive) where you lost data and files. Click the "Search for lost files" button.
Note: Before data recovery, you'd better click "Disk Backup" from the left sidebar to create a backup of your HDD/SSD to avoid further data loss. After backing up, the software can recover data from your disk backup, and you can use the HDD or SSD again.

Step 2. Go through the scanning results
This software will immediately scan your selected disk volume and display pictures, documents, audio, videos, and emails on the left pane.

Step 3. Select the file(s) and recover
Click the data to preview, and click the "Recover" button to have them back.

Summary
Your Apple Mac is a very customizable computer machine. You can dual-boot different macOS versions as well as different operating systems entirely.
You can also boot Windows or Linux on Mac or use them on your Mac using a virtual machine. You can't do the same on a Windows or a Linux machine, which is why Apple Macs are very customizable and user-friendly.
We hope the above guide has helped you install both macOS Ventura and Monterey on the same Mac. If you encounter data loss while using macOS Ventura and Monterey, use EaseUS Data Recovery Wizard for Mac to return essential files and data.
Dual Boot macOS Ventura and Monterey FAQs
Four questions are below to help you get more information about dual boot macOS Ventura and Monterey.
Can I have two operating systems on my Mac?
You can have two operating systems on your Mac. If you want Windows on your Mac, Download and install Parallels, and it is a virtual machine, and you can use Windows on your M1 and Intel Macs using Parallels.
How to downgrade macOS Ventura to Monterey?
If you find macOS Ventura is not performing well on your Mac, you can downgrade macOS Ventura to Monterey.
- 1. Downgrade macOS Ventura to Monterey with Time Machine.
- 2. Downgrade macOS Ventura to Monterey with macOS Recovery.
- 3. Downgrade macOS Ventura to Monterey with the bootable installer.
Can I dual-boot macOS Ventura and Monterey on an M1 Mac?
Yes! You can dual boot macOS Ventura and Monterey on an M1 Mac by creating a new Volume on your Mac and installing macOS Ventura or Monterey on this new Volume. You are supposed to switch macOS Ventura and Monterey on the same Mac.
Can I dual-boot Windows 10 and macOS Ventura on a Mac?
On an Intel Mac, you can dual-boot Windows 10 and macOS Ventura. The method of running Windows 10 on Mac is similar to dual boot macOS Ventura and Monterey on a Mac. You need to create a new Volume and install one of the target operating systems in this new Volume. The same is not true with Apple silicon Macs.
Was This Page Helpful?
Dany is an editor of EaseUS who lives and works in Chengdu, China. She focuses on writing articles about data recovery on Mac devices and PCs. She is devoted to improving her writing skills and enriching her professional knowledge. Dany also enjoys reading detective novels in her spare time.
Related Articles
-
[Fixed]Unable To Update Minecraft Native Launcher 2024
![author icon]() Daisy/2024-01-11
Daisy/2024-01-11 -
Fix macOS Ventura Update Not Showing Up on Mac in 5 Proven Ways
![author icon]() Dany/2024-07-01
Dany/2024-07-01 -
How to Stop If Windows 11 Automatically Update BIOS
![author icon]() Jerry/2024-05-15
Jerry/2024-05-15 -
[Fixed] How to Resolve Error Code 43 on Mac with 4 Workable Plans
![author icon]() Dany/2024-01-11
Dany/2024-01-11

EaseUS Data Recovery Services
EaseUS data recovery experts have uneaqualed expertise to repair disks/systems and salvage data from all devices like RAID, HDD, SSD, USB, etc.