| Workable Solutions | Step-by-step Troubleshooting |
|---|---|
| Fix 1. Check the Supported Devices | Click the black Apple icon in the corner of your screen. Click "About this Mac"...Full steps |
| Fix 2. Check the Internet Connection | Choose the Apple menu by clicking the Apple icon. Click the "System Preferences"...Full steps |
| Fix 3. Check the Apple System Status | Sometimes the Software update servers may not available, but this situation is not happening frequently...Full steps |
| Fix 4. Refresh the Software Update | Click the "Advanced Settings". Click the first option, "Check for updates". Then the...Full steps |
| Fix 5. Search in App Store | Go to open the App Store window on Mac. Type in macOS Ventura and search...Full steps |
| Fix 6. Boot from USB | Another alternative is to try creating a bootable installation for macOS Ventura...Full steps |
6 Ways to Fix macOS Ventura Update Not Showing Up [Tested]
macOS Ventura was published in Oct 2022, a brand new macOS base system. Many Mac users are excited to download macOS Ventura to experience the Continuity Camera, new Stage Manager, scheduled email, and many new features. Most users will upgrade to macOS Ventura successfully, but macOS Ventura issues like macOS Ventura update not showing up will sometimes happen for many reasons:
- Unstable internet connection.
- Unsupported Mac devices.
- Incorrect time settings.
- Mac Software Update servers are down.
We will introduce several solutions to help you solve the macOS Ventura update not showing. Before our written tutorial, you could check the video to have a general idea about how to solve this problem. The list of key points can help you skip to the most important parts.
- 00:16 How to upgrade to macOS Ventura.
- 01:13 Check the Software Update settings.
- 03:39 Install macOS Ventura.
As we discussed in the beginning, many reasons may cause the macOS Ventura update not to appear on your Mac or MacBook. Many other similar issues will happen when you decide to upgrade your Mac devices, like Mac check for macOS update stuck, unable to certify macOS Ventura, macOS 13 Ventura installation failed, etc. Don't worry! We will help you solve the problem and install macOS without data loss.
Fix 1. Check the Supported Macs or MacBooks of macOS Ventura
You should know that macOS Ventura is not available for all Mac devices, and you should check your Mac model by following the steps below:
Step 1. Click the black Apple icon in the corner of your screen.
Step 2. Click "About this Mac".

Step 3. You will see detailed information about your Mac.

Now, you should know your Mac model. Then you can check the list to see if your Mac model is on the list or not:
- iMac 2017 and later
- iMac Pro 2017 and later
- MacBook Pro 2017 and later
- MacBook 2017 and later
- MacBook Air 2018 and later
- Mac Mini 2018 and later
- Mac Pro 2019 and later
- Mac Studio 2022
If you cannot find your model from this list, your Mac is probably unable to download and install macOS Ventura. Maybe you can download OpenCore Legacy Patcher and install macOS Ventura on an unsupported Mac.
Fix 2. Check the Internet Connection on Mac/MacBook
If your Mac is available for macOS Ventura, the internet connection is the first thing you should check. The fastest way to check your internet is by opening a website in Safari or sending a message with your social media. You can also check your network status in system settings.
Step 1. Choose the Apple menu by clicking the Apple icon.
Step 2. Click the "System Preferences".
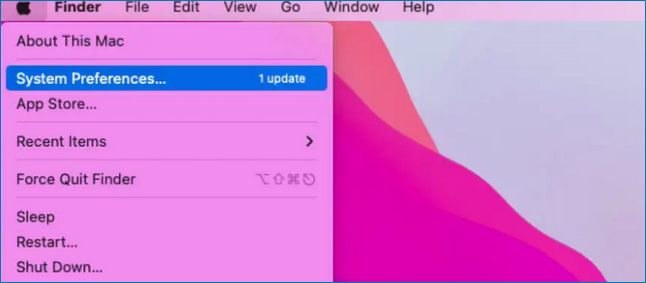
Step 3. Click the "Network". If you are connected to your home Wi-Fi, maybe it is better to check the router.
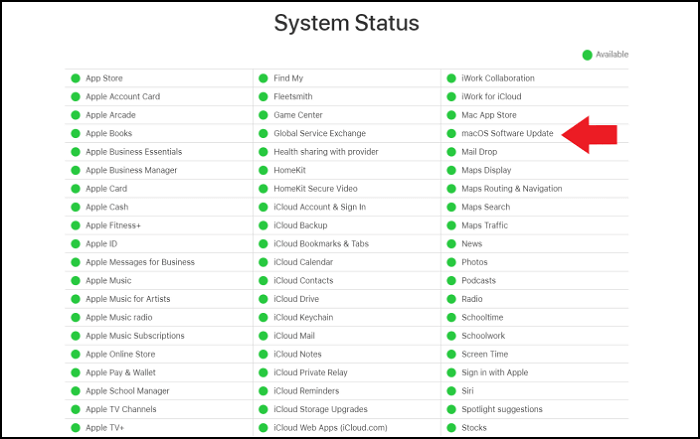
Fix 3. Check the Apple System Status to Solve Update Not Showing
Sometimes the Software update servers may not be available, but this situation only happens occasionally. When the new macOS operating system is published, too many users ask for updates, then problems will occur. You can check Apple servers' status quickly at Apple System Status.
Fix 4. Refresh the Software Update to Show macOS Ventura Update
When you come to the Software Update window and find no available updates for your Mac or you see the "Unable to check for update" error appear. You can try to refresh the Software Update on Mac by pressing the Command and R keys together. If it is not working for your Mac, try this method:
Step 1. Click the "Advanced Settings".
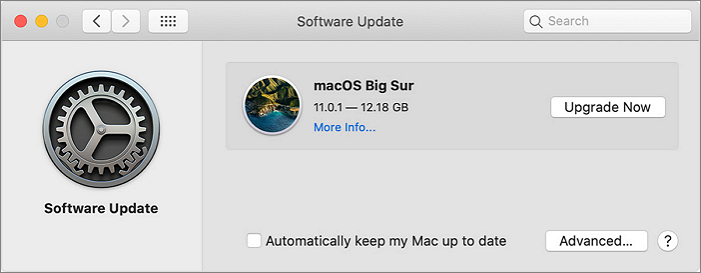
Step 2. Click the first option, "Check for updates". Then the Software Update will refresh.
Step 3. Restart your Mac if you still cannot see the macOS Ventura update.
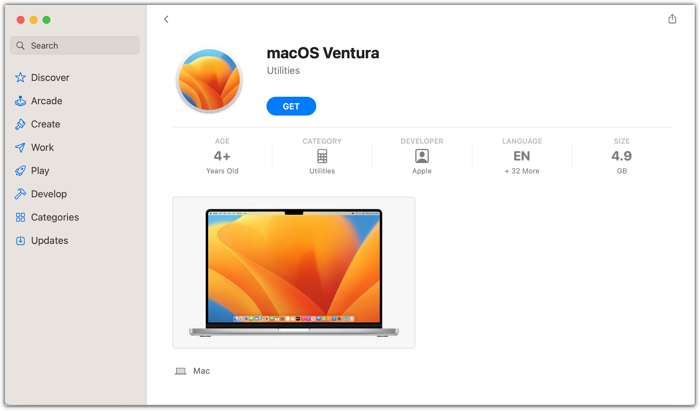
Fix 5. Search and Download macOS Ventura in App Store
If you cannot upgrade to macOS Ventura in Software Update, maybe you can try App Store. It is simple to download and install macOS Ventura by searching it in App Store on a Mac.
Step 1. Go to open the App Store window on Mac.
Step 2. Type in macOS Ventura and search.
Step 3. Click the "Get" button and enter your Apple ID if needed.
Fix 6. Create macOS Installer Boot Drive
Another alternative is to try creating a bootable installation for macOS Ventura with the reliable EaseUS Data Recovery Wizard for Mac. The useful program includes the macOS Installer, a free utility. It may also easily assist you in downloading and upgrading macOS versions from USB drives. Obtain this software and test it out for free! Try this useful function for free right now!
Step 1. Select macOS installer
Launch EaseUS Data Recovery Wizard for Mac and click "macOS Installer" on the left side. In tab 1, unfold the macOS version list by clicking "Select macOS intaller". You can also select "Refresh" button after downloading the macOS installer from App Store.
You can download macOS installer to upgrade or downgrade macOS, and you can find all the available versions, no matter the latest or older versions. Morever, you can apply macOS installer to dual boot Mac and run two macOS together.

Step 2. Format the USB flash drive
Connect a USB flash drive (larger than 16 GB) to the Mac as your macOS boot drive. Choose the USB drive you prepared in tab 2 and click the "Erase and create" option in the pop-up window to format your USB flash drive. Then click the "Create macOS installer" button to start the creating.
- Important: This progress will delete all data on your USB flash drive, please back up the data before, or use EaseUS data recovery software to recover your data.

Step 3. Create the macOS installer boot drive
Click the "Finish" button after the macOS installer creating is finished. Follow the prompts on the interface to perform subsequent installation operations.

How to Retrieve Lost Files After macOS Ventura Update
Usually, users will upgrade to macOS Ventura directly when they see it is available, or the Mac will automatically upgrade to the latest macOS version without a backup. You may lose essential files after the macOS Ventura update. It is possible to encounter issues like macOS Ventura upgrade failing, downloading stuck, can't install macOS Ventura, etc. These kinds of problems may cause data loss on your Mac, also.
How to recover lost files after macOS Ventura update? The easiest way to get back your files is by applying macOS Ventura data recovery software. Don't worry about which data recovery software to use, we already pick one for you - EaseUS Data Recovery Wizard for Mac. And this tool supports Mac Trash recovery even after emptying the Trash, and you can check its highlights below:
Retrieve Lost Files on macOS Ventura
- Recover deleted files Mac, including documents, photos, audio, music, and emails after the macOS Ventura update.
- Recover files from formatted hard drive on Mac, emptied recycle bin, memory card, flash drive, digital camera, and camcorders.
- Support data recovery for sudden deletion, formatting, hard drive corruption, virus attack, and system crash under different situations.
Step 1. Select the location to scan
Launch EaseUS Data Recovery Wizard for Mac and choose the hard drive, SSD, SD card, USB flash drive, or TF card where you lost data. Click "Search for lost files" to start scanning.

Step 2. Filter lost Mac data
The software will automatically scan for lost data on MacBook/iMac. When the scan completes, filter wanted data through the "Type" and "Path" buttons.

Step 3. Recover lost data or files
Double-click a file to preview it. Then, click the "Recover" button to restore the lost data to another place.

Bottom Line
We hope you can solve the macOS Ventura update not showing by reading this article. If you have issues like data loss after upgrading to macOS Ventura, it is an excellent choice to recover lost or deleted data with EaseUS Data Recovery Wizard for Mac.
macOS Ventura Update Not Working FAQs
If you have further questions about the macOS Ventura update not showing, reading the following questions and answers may help a lot.
How to fix the macOS Ventura upgrade failure?
You can fix the macOS Ventura upgrade failed in many ways:
- 1. Restart your Mac device.
- 2. Run a Virus scan or remove the virus.
- 3. Check the internet connection and make sure you are in a stable network environment.
- 4. Check your Mac model.
- 5. Check your storage space on your Mac.
Why is the macOS Ventura update not showing up on my Mac?
Many situations can cause this problem. You are in an unstable internet environment, your Mac is available for the latest macOS version, or you turn off the Software Update. You can fix the problem by rechecking all the settings on your Mac or refreshing the Software Update.
How to fix the "Unable to check for update" error on Mac?
If you encounter the "Unable to check for update" error on your Mac, you can refresh the Software Update by pressing the Command and R keys together or clicking the advanced settings to refresh it.
How to recover lost files after the macOS Ventura update?
You can recover lost files after the macOS Ventura update from Time Machine, iCloud, or with professional recovery software - EaseUS Data Recovery Wizard for Mac.
- 1. Select the target disk to scan the lost files.
- 2. Filter lost files, and you can preview the files.
- 3. Recover lost data or files after the macOS Ventura update.
Was This Page Helpful?
Jaden is one of the editors of EaseUS, who focuses on topics concerning PCs and Mac data recovery. Jaden is committed to enhancing professional IT knowledge and writing abilities. She is always keen on new and intelligent products.
Dany is an editor of EaseUS who lives and works in Chengdu, China. She focuses on writing articles about data recovery on Mac devices and PCs. She is devoted to improving her writing skills and enriching her professional knowledge. Dany also enjoys reading detective novels in her spare time.
Related Articles
-
How to Fix Raw SD Card Won't Format Error [3 Efficient Solutions]
![author icon]() Sherly/2024-08-26
Sherly/2024-08-26 -
How to See What Is Taking Up Space on C Drive
![author icon]() Tracy King/2024-08-26
Tracy King/2024-08-26 -
How to Factory Reset an Acer Laptop on Windows 10/8/7
![author icon]() Brithny/2024-09-27
Brithny/2024-09-27 -
Guide on Image Capture on Mac/MacBook Pro [with Shortcut]
![author icon]() Brithny/2024-10-10
Brithny/2024-10-10

EaseUS Data Recovery Services
EaseUS data recovery experts have uneaqualed expertise to repair disks/systems and salvage data from all devices like RAID, HDD, SSD, USB, etc.