PAGE CONTENT:
Prerequisites: Before Downgrading
Have you been dealing with battery drainage issues or third-party applications not working after upgrading your system to Monterey? It's a common issue that users often complain about! Hence, a downgrade from Monterey to Big Sur could be the best solution until the new macOS system is fool-proof.
Understandably, you have installed the macOS 12 Monterey software to use the brand-new OS features. But you have encountered nothing but lagging and network connection errors! What should one do in this circumstance? How to downgrade from Monterey to Big Sur? Before moving to the solution to downgrade macOS Monterey, users can do these major things:
- 🎒Create a backup. A rudimentary step to ensure the documents, files, and folders are built while using Beta isn't disoriented. You may either upload those files to cloud services like iCloud or shift them to an external drive for protection.
- ⚙️Check the Mac setting. In order to check the elementary details about your Mac, opt for the Apple menu > About This Mac. It's also possible to get this information from the General settings, where you may observe more details, such as repair coverage and warranty, and create a detailed system report.
- 💽Enable the booting from the external drive option. You may allow booting from an external drive. You might need to do it using a MacBook Pro, Mac Mini, or MacBook Air.
If you still have no idea about downgrading, read more about the comparison of macOS Big Sur and Monterey.
2023 Comparison: macOS Monterey vs Big Sur
Do you want to upgrade your macOS to Monterey? What are the main differences between macOS Big Sur vs Monterey?
Then, read the following parts to learn how to downgrade the macOS version quickly with the below-mentioned three steps.
Downgrade from Monterey to Big Sur with Bootable USB
Does your MacBook come with preloaded Big Sur? If yes, you can return to Big Sur using the internet retrieval method. This is how you can downgrade from Monterey to Big Sur with a bootable USB drive and make a bootable USB on Mac:
Step 1. You will need a USB drive, such as USB C ports. If you have a USB drive, you might utilize an adapter to change it to USB C. Regardless of the format you select; it will require approximately 16GB of space and even more.
Step 2. Install Big Sur.
Step 3. Look for the Mac Terminal by hitting the Spotlight symbol.
Step 4. Type sudo in the Terminal window, and hit the Space bar.
Step 5. Opt for the "Show Package Contents" by right-clicking the copy of Big Sur you installed in the Finder window.
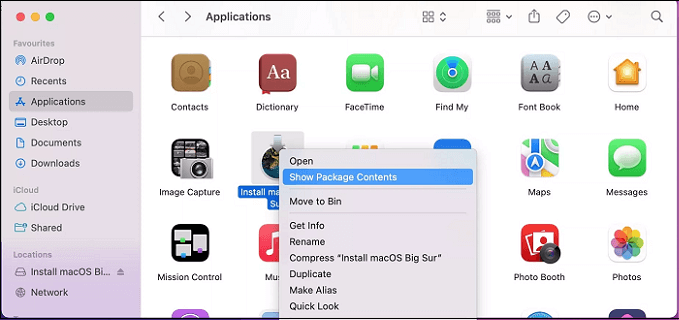
Step 6. Choose the "Resources folder" after opening the Contents folder.
Step 7. "createinstallmedia" symbol needs to be discovered and dragged onto the Terminal window. The subsequent part of the location will quickly fill in:
![]()
Step 8. Hit the Finder symbol, opt for the Go menu located at the screen's top, and finally select the "Go to Folder."
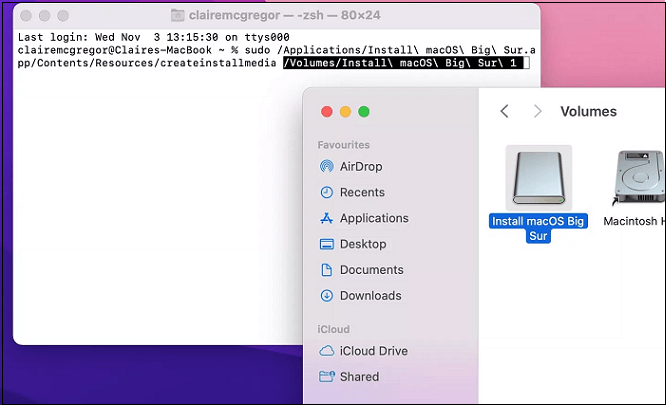
Step 9. Hit the return button after typing "/Volumes" in the search bar.
You should plug in your USB drive if you haven't done it yet. This will pop up in the volumes window. The remaining portion of the path will be filled in when you drag the USB volume onto the Terminal application window.
To start the procedure of downgrading after opening the Mac Terminal, you should:
Step 1. Hit the "Return" key.
Step 2. Type the password, and hit the return button after that.
Step 3. You need to tap the return key by typing Y.
Step 4. Hit the "OK" button if the Terminal needs your permission to access files.
The procedure to downgrade from Monterey to Big Sur will start. It will automatically delete files on the USB drive prior to copying through the Big Sur installer files.
If you don't like the text tutorial, try on the video guideline:
- 00: 08 - Download the Big Sur Setup file from Mac App Store
- 00: 52 - How to create a bootable drive
- 01: 54 - How to install Big Sur on Intel Mac
- 02: 13 - How to install macOS Big Sur on M1 Mac
How to Downgrade macOS Monterey from Time Machine
Employing a Time Machine backup is one of the simplest ways to install an outdated macOS version, such as Big Sur. In order to downgrade macOS Monterey using a Time Machine backup, you must follow the steps below:
Step 1. Connect your Time Machine drive, then shut down or resume your Mac.
Step 2. Boot the device into its Retrieval mode by holding Cmd + R for an Intel Mac. In the case of Apple Silicon Macs, for example, M1 & M2 models, you must keep holding the Power button until you notice the "Loading Startup Options" text. Choose "Options" to kickstart the Recovery mode on the subsequent screen.
Step 3. Choose "Restore from Time Machine Backup" when the macOS Utilities screen pops up and hit the continue button.
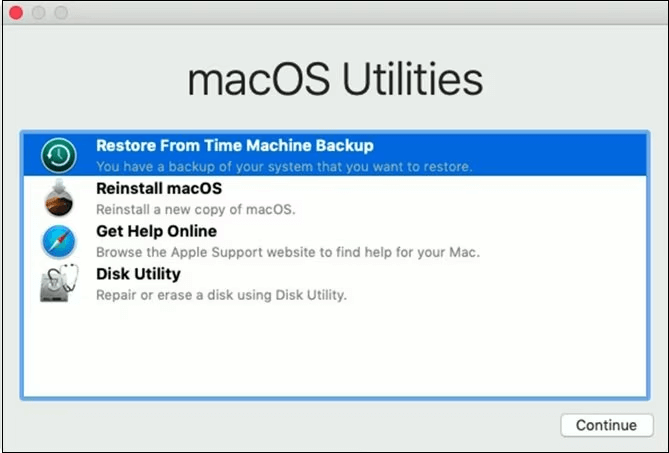
Step 4. Select "Continue" again on the next screen.
Step 5. Opt for your Restore Source. In that case, it will be the backup drive you plugged in ahead of time.
Step 6. Opt for the desired backup, which you're willing to restore from. You may now notice which macOS version was used to generate that backup.
Step 7. Go through the screen instructions carefully to finish the reinstallation. After that, you may retrieve the files from the generated Time Machine backup.
Downgrade Monterey and Install Big Sur in Recovery macOS
You can downgrade from Monterey to Big Sur in Recovery macOS. So, here are the detailed steps to install macOS Big Sur:
If your Mac has previously installed Big Sur, follow the steps below:
Step 1. Switch your Mac off, and restart it by pressing the Shift + Option + Command + R keys.
Step 2. The step mentioned above will kickstart your Mac in Recovery Mode - all you need to do is opt for Reinstall macOS Big Sur in the operating system X utilities chooser window.
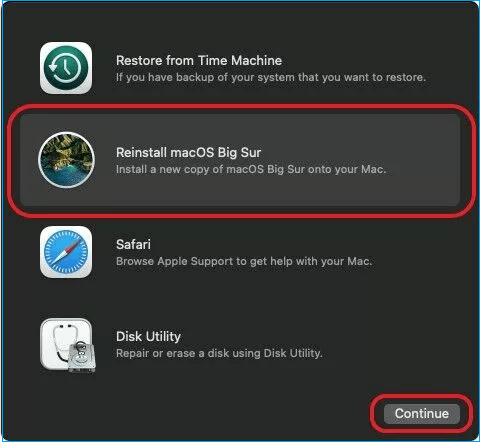
Step 3. Go through the instructions on the screen to reinstall macOS 11 Big Sur on your MacBook.
If one of the methods is helpful to downgrade from Monterey to Big Sur, share it on Facebook, Twitter, Instagram, and other social media platforms!
How to Recover Lost Data When Downgrading macOS
It's necessary to recover deleted files on Mac from the backup in case you have generated a data backup on iCloud or Time Machine. Nevertheless, suppose you've not made the data backup and would like to retrieve the available data on Mac prior to deleting the hard drive. In that case, there will be a possibility to recuperate it.
A professional tool like EaseUS Data Recovery Wizard for Mac will help you recuperate every lost data. It has been created to help recover data from file system errors, failures, and unintentional deletions. The software's intuitive design allows even inexperienced users to retrieve deleted files rapidly. Moreover, it's robust and simple-to-use data retrieval software supporting several file types for recovery, which provides the following different features:
- Recover trash Mac: retrieve data from accidental deletion and Trash bin.
- Fix several difficult data loss scenarios, and recover videos, images, documents, music files, and emails.
- Generates hard drive's disk image, with poor sectors and susceptible to failure, to ease protection and fast retrieval.
- Retrieves data from the eliminated Mac partition.
In a nutshell, EaseUS Data Recovery Wizard for Mac is the best data retrieval solution for every business and service provider. Download it now and follow the step to get your data back:
Step 1. Search for lost files
Select the disk location to search for lost files (it can be an internal HDD/SSD or a removable storage device) on macOS Sierra, High Sierra, Mojave, Catalina, Big Sur, Monterey, Ventura, and the latest Sonoma. Click the "Search for lost files" button.

Step 2. Go through the scanning results
EaseUS Data Recovery Wizard for Mac will immediately scan your selected disk volume and display the scanning results.

Step 3. Select the file(s) and recover
In the scan results, select the file(s) to preview and click the "Recover" button to have them back.

Final Words
So, that's it! These are the 3 best ways to downgrade from Monterey to Big Sur quickly. MacBook beta versions often malfunction due to bugs, showing unanticipated issues. This is why it's crucial to install those on a second device. Moreover, the macOS Monterey's update stuck can quickly be resolved following the abovementioned guidance.
The Beta and earliest public releases of macOS occasionally come with bugs and minor problems. Hopefully, you will soon be able to use the wonderful characteristics of this new macOS, despite the fact that Apple will soon release updates to address the problems still present in macOS 12 Monterey. If the data has been lost while downgrading to Big Sur, installing EaseUS Data Recovery Wizard for Mac is advisable.
Downgrade from Monterey to Big Sur FAQs
Follow the below-mentioned FAQs to downgrade from Monterey to Big Sur easily:
1. How to downgrade from Monterey to Big Sur without USB?
If you're using Intel MacOS, follow the steps below to downgrade from Monterey to Big Sur:
- Shut your MacBook down.
- Switch on your PC, and hold the Shift + Option + Cmd + R buttons.
- Select Reinstall macOS (or Reinstall OS X) and hit Continue when the macOS utility screen has loaded.
- Go through the prompts, and opt for your startup disk.
- Hit the install button.
- Retrieve your files from the backup after the installation is over.
2. How to downgrade from Ventura to Monterey?
You may downgrade from Ventura to Monterey with keyboard commands. Follow the steps below:
- Turn your Mac off to process the downgrading.
- Hit the Power button.
- Quickly press the Shift + Option + Command + R.
- Type the password when prompted.
- Hit the continue button.
- Go through the on-screen instructions until when the reinstall macOS button appears.
3. Can I uninstall Monterey on my Mac?
It cannot be "uninstalled." You may download the operating system you want to use and use that to generate a bootable USB installer. The previous OS is then installed after booting from that and wiping the HDD. Afterward, you may transfer using your backup.
4. How to install older versions of macOS or OS X separately?
You may install the older versions of macOS isolated by downloading the version of Mac OS X or macOS you need and installing it using a bootable installer.
Was This Page Helpful?
Jaden is one of the editors of EaseUS, who focuses on topics concerning PCs and Mac data recovery. Jaden is committed to enhancing professional IT knowledge and writing abilities. She is always keen on new and intelligent products.
Related Articles
-
How to Fix macOS 13 Ventura Installation Failed/Stuck/Frozen (2024 Tips)
![author icon]() Brithny/2024-10-10
Brithny/2024-10-10 -
Fix: Blue Yeti Not Recognized on Windows 10/11 [Step by Step]
![author icon]() Daisy/2024-01-11
Daisy/2024-01-11 -
Solved: You Must Enable System Protection on This Drive
![author icon]() Daisy/2024-01-11
Daisy/2024-01-11 -
External Hard Drive Takes Forever to Load
![author icon]() Jean/2024-08-22
Jean/2024-08-22

EaseUS Data Recovery Services
EaseUS data recovery experts have uneaqualed expertise to repair disks/systems and salvage data from all devices like RAID, HDD, SSD, USB, etc.