- EaseUS Freeware
- Free Data Recovery Software
- Free Backup Software
- Free Partition Manager
Posted on Feb 23, 2016 by Abby Haines to Backup and Recovery
- Summary:
- What is the best way to roll back Windows 10 Redstone 14267 to previous version without losing data? Backup your system in advance and restore it to the original state from the backup image when something bad happen.
Microsoft has released a new Windows 10 Redstone preview build 14267 to the Insider members on the Fast ring. This version comes with some new features as well as some bugs. Some users reported that Windows 10 hangs on Startup and Shutdown after updating to Windows 10 Redstone 14267. So, to help you solve this problem, we would like to introduce you how to roll back Windows 10 Redstone 14267 to previous version without data loss in two ways step by step. Hope it is helpful!
Can I downgrade Windows 10 Redstone 14267 to previous version?
I have some issues after I upgraded my computer to Windows 10 build 14267. Installation seems fine except that the system hangs when restarting or shutting down. On restarting, for example, I get the blue screen with the word 'Restarting' and the circling dots. I have to power down the laptop and when I power up windows 10 starts as normal. Has anyone else had this problem and found the solution? If there is not a reliable solution, should I uninstall windows 10 update and go back to previous build? But I don't know how can I downgrade Windows 10 Redstone 14267 to previous version without losing my data. Can anyone help?
Roll back Windows 10 Redstone 14267 to previous version
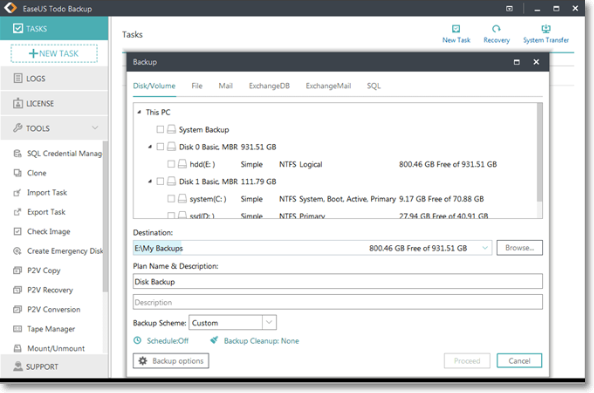
Similar to the above cases, many people who have updated to Windows 10 build 14267 complained about how they weren't able to start or shut their PC because Windows 10 was hanging on startup or shutdown. In fact, the problem can be solved easily with EaseUS system backup software. It allows roll back Windows 10 Redstone 14267 to previous version without data loss in an ease and safe way.
You can use this tool to backup system before Windows 10 build 14267 update and restore your system to the original state from the backup image when something bad happen. During the process, all the content on the hard drive including the system, your personal data, installed programs and even settings will be backed up. So data loss disaster won't happen after system roll back.
For a detailed guide, please refer to system recovery.
Uninstall Windows 10 Redstone 14267 and downgrade to previous build in Settings
1. Click on Start Menu and click on Settings > Update & Security > Recovery
2. Click on on Get Started under Go back to an earlier build.
Note: You can only do this when you've upgraded recently (should be less than 30 days from the last update) and you've not deleted Windows.old folder.
If everything is fine, you'll see Getting things ready, it won't take long screen, otherwise, you'll get We're sorry, but you can't go back, The files we need to take you to a previous version of Windows were removed from this PC.
Related Articles - ALSO ON EaseUS SOFTWARE
-
2 Steps to Backup Windows 7 File/PC to External Hard Drive
2018-03-09 15:10:45

Tracy King - Are you looking for a simple way to backup your files or computer data in Windows 7 to an external hard drive so to free…
-
How to Fix 'Windows Could Not Complete the Installation' Error
2018-02-07 17:27:25

Jean - You are stuck on a screen with an error message saying 'Windows could not complete the installation. To install Windows …
-
Download WinPE Builder for All Windows
2017-11-08 17:14:44
Jean - This recommended WinPE builder is especically for all Windows from Windows XP to Windows 10, to help users create a Wind…
-
Fix it Now! Windows 10 Computer Freezes When Playing Games
2018-04-11 17:00:22

Brithny - Here are some fixes that will help users solve'computer freezes when playing games' problem. You may not need to try the…