Table of Contents
![]() About the Author
About the Author
![]() Related Posts
Related Posts
AI-Enhanced

- Fix videos with different issues, such as broken, unplayable, no sound, etc.
- Repair corrupted images and enhance their quality with advanced AI algorithms.
- Fix documents in various formats, including PDF, Word, Excel, and PowerPoint files.
100% Safe Download
In this article, you'll learn:
- About the Image Is Overly Compressed
- Fix 1. Fix Overly Compressed Photos with Photo Repair Software🔥
- Fix 2. Fix Overly Compressed Images with Online Tool
- Fix 3. How to Repair Overly Compressed Photos in Photoshop
- Bonus Tip: How to Avoid Blurry or Corrupted Images
You make compelling and eye-appealing graphics for uploading to CMS, social media, or similar and compress them! Besides, even sharing photos over email or WhatsApp sometimes compresses the images too much. Sometimes, there's a size limit to sharing on specific platforms, so compression becomes a must. For example, you might see the error message: "image is overly compressed. Please use a compression ratio that is less than 20:1".
In either of the scenarios, sometimes the pictures turn out too blurry or pixelated due to over-compression. So, if you are facing issues and looking to fix overly compressed photos, we have covered all of how to unblur a picture!
About the Image Is Overly Compressed
Before finding how to fix an overly compressed photo, you should know what causes it. There are many reasons why your picture-perfect moments and excellent graphics lose their quality due to compression. Excessive compression can result in image sharpness, decreased color vibrancy, and loss of resolution.
Here are four reasons that usually cause overly compressed photos:
- 🌐Social Media and Messaging Apps: Social media platforms and messaging apps like WhatsApp apply automatic compression to photos you upload or send.
- ⛓️Storage Constraints: Photos undergo compression to save storage space on your device or cloud storage. This occurs when your device is set to save pictures in a lower-quality format or it is nearing its storage limit. You should then take measures to improve the image's quality.
- 📧Email Attachments: Some email providers may automatically compress photos to fit within email size limits when you send photos as attachments. This can result in a decrease in image quality.
- 🧩Image Hosting Services: Websites that host images, such as image-sharing platforms or cloud storage services, can apply aggressive compression to the photos you upload.
Thus, dealing with overly compressed photos can be frustrating because they fail to capture the essence of the original moments you tried to preserve. Fortunately, the good news is that you can often rectify this issue and restore your photos to their former state.
Here is a tutorial about how to compress your image into a better condition:
- 02:18 - How to compress your image into a better compression ratio
- 02:58 - JPG Settings
- 03:54 - Applying the compressed image
- 04:24 - Uploading the image
Fix 1. Fix Overly Compressed Photos with Photo Repair Software
Whether compression lowers your image quality or it's a blurry shot initially, you can fix it with no hassle. You don't need hands-on expertise with graphic tools, as the photo repair software makes it easier to do so!
EaseUS Fixo Photo Repair is like a magician for your photos. It's a reliable tool designed to restore your damaged or low-quality pictures to life.
- Corrupted or Damaged Photos: Sometimes, photos get messed up due to transfer issues, storage problems, or accidental deletions. EaseUS Fixo Photo Repair can help you repair damaged JPEG files.
- Overly Compressed Photos: This tool can reverse the damage caused by excessive compression, making your images sharp and vibrant again.
- Scratched or Flawed Images: EaseUS Fixo Photo Repair can automatically remove these blemishes, leaving you with flawless pictures.
Now download EaseUS Fixo and follow the steps to see how to fix overly compressed photos.
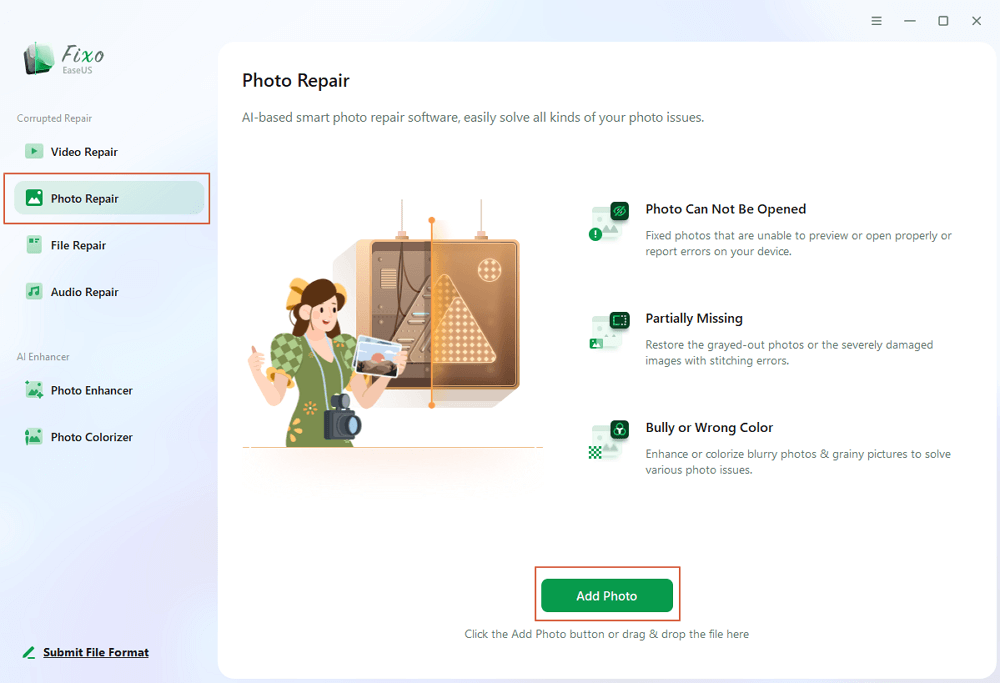
✨Step 1. Download, install and luanch EaseUS Fixo Photo Repair
Download Fixo in official ways and launch it. Select "Photo Repair" > "Add Photos" to fix the damaged images from a local disk or external hard drives.
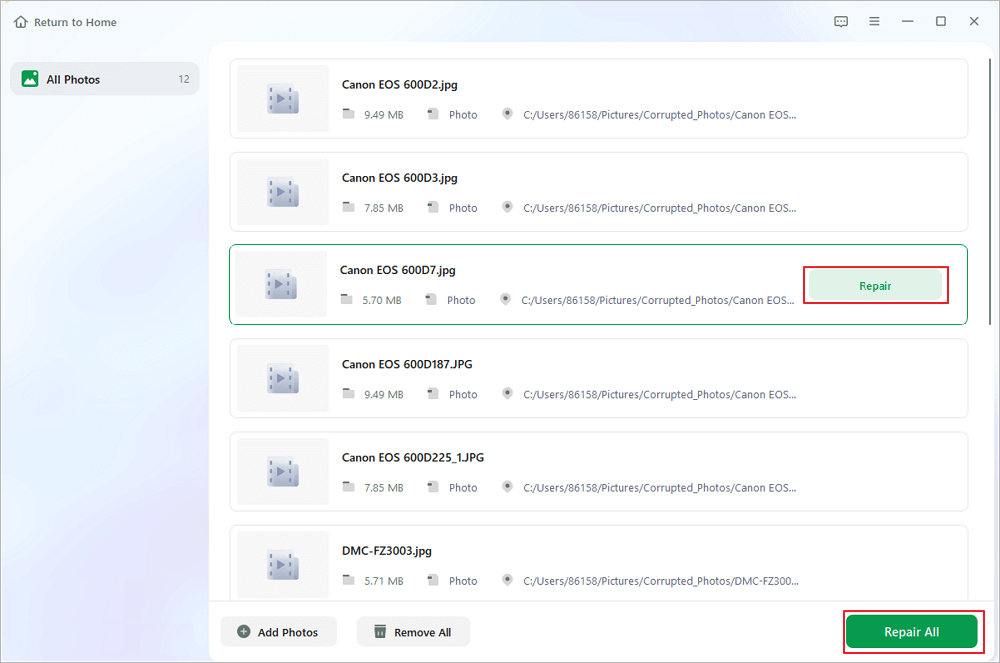
✨Step 2. Start the photo repair process now
If you have uploaded multiple pictures at once, it is better to click "Repair All" to fix all the photos in this list at once. By the way, it is also okay to repair a single photo, just choose "Repair" after finding the photo you want to fix.
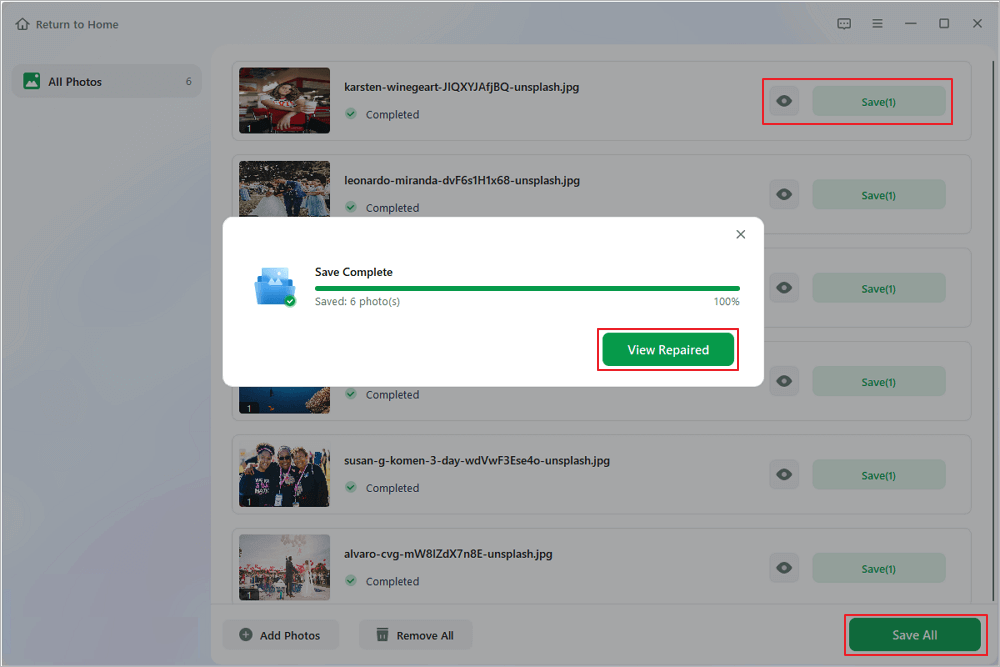
✨Step 3. Preview and save the images
Preview the repaired photos by clicking the eye icon. Click "Save All" to save these photos, and you can choose "View Repaired" in the pop-up window to quickly locate these repaired items.
If you found this tool for restoring and enhancing your precious photos valuable, why not spread the help? Please share this page on your favorite social media platforms and help your friends and family save their cherished memories.
Fix 2. Fix Overly Compressed Photos with Online Tool
Often, all your pictures need is enhancing image resolution, and here's where image enhancer tools help! But amongst many existing ones, most don't use effective algorithms; some have plenty of ads or give unsatisfactory results. Here's where EaseUS Photo Enhancer is another blessing in disguise.
Why Choose EaseUS Photo Enhancer?
EaseUS Photo Enhancer is your trusted companion for elevating your photo's details and sharpening its pixels. It's a powerful and reliable online tool that effortlessly fixes grainy photos, ensuring they shine like never before.
There are several situations where EaseUS Photo Enhancer comes into the picture!
- Low-Light or Dark Photos: If your photos turned out too dark due to poor lighting conditions, EaseUS Photo Enhancer brightens them up. It even preserves their details, making your subjects shine.
- Restore old photos for cherished memories: Vintage images lose their luster over time, but this tool can breathe new life into them by removing dust and scratches and colorizing photo online free.
- Unblur image with advanced AI face enhancement: Blurry photos are common, but EaseUS Photo Enhancer can sharpen them, bringing back clarity and focus.
Some key features of EaseUS Photo Enhancer, one of the best old photo restoration software, include a user-friendly interface, instant enhancements, high-quality results, online convenience, safety, and security.
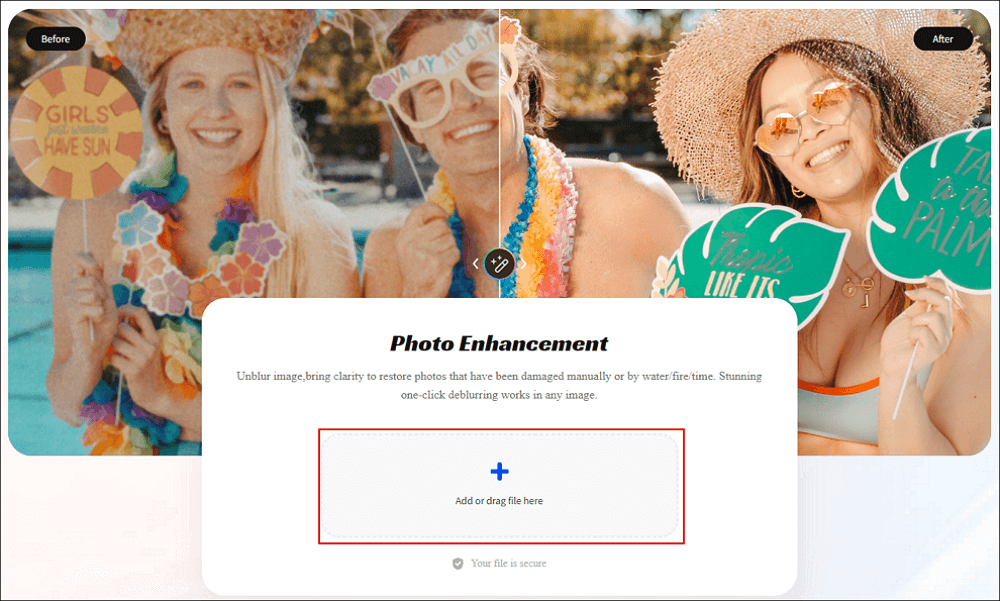
Step 1. Open EaseUS Enhancer and Upload Images
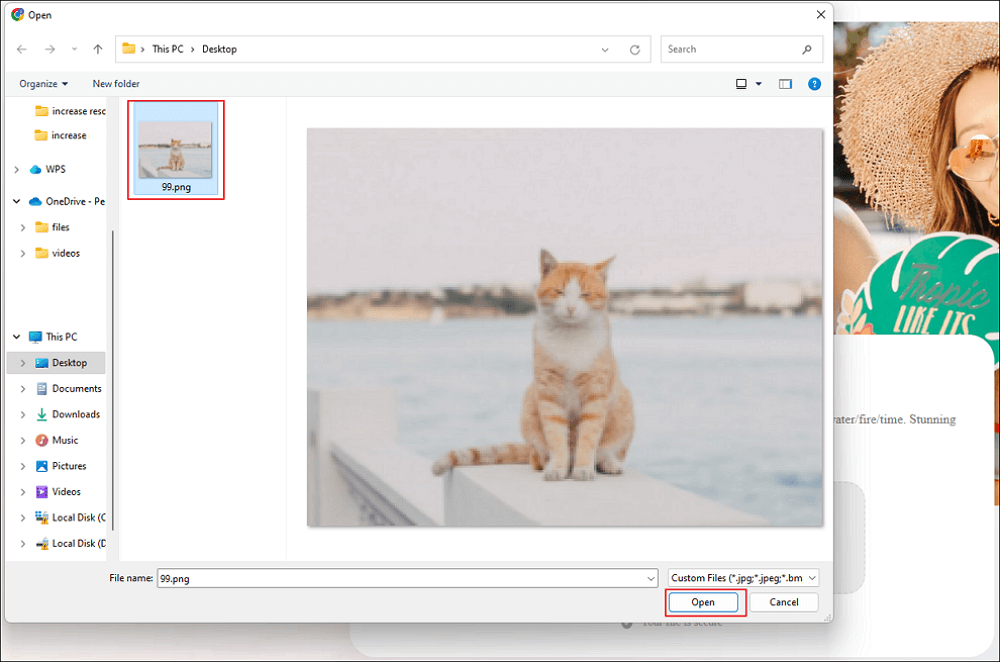
Open EaseUS Photo Enhancer web page: https://repair.easeus.com/photo-enhancer/. Click the plus button in the middle to upload images you want to enhance. (You can also drag photos to the box directly.)
Step 2. Click Open and Start Repairing Video
After the File Explorer window pops up, select the photo and click "Open" to upload and enhance with EaseUS Photo Enhancer. You can easily unblur images, restore old photos, colorize black and white photos with this online tool.
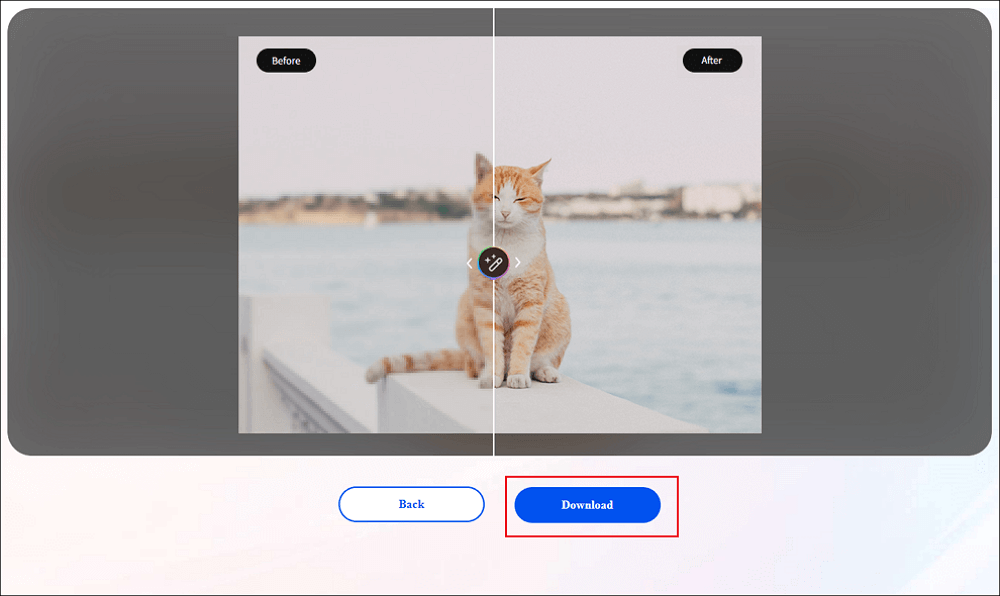
Step 3. Wait for the Automatic Enhance Process and Download Photo
EaseUS Photo Enhancer will automatically repair and improve image quality, and the photo processing will last a few seconds. After that, you can freely preview the enhanced pictures, and click "Download" to save it.
If EaseUS Photo Enhancer has worked great for your photos, Share the secret with your friends and followers!
Fix 3. How to Repair Overly Compressed Photos in Photoshop
You got the point to fix overly compressed problems with two methods using software and online tools. But you know you can do this by yourself? Many guessed it right; Photoshop lets you do much better than any other photo editing software!
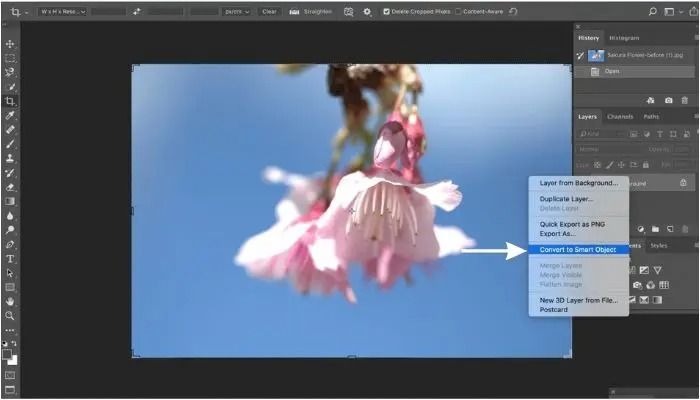
Step 1. Launch Photoshop and open the image you want to sharpen.
Step 2. In the Layers panel, click the layer that contains your photo. Navigate to the Filter" menu at the top.
Step 3. To maintain flexibility and avoid making permanent changes to your photo, choose "Convert for Smart Filters" from the menu. Using it, you can sharpen the image in PS without altering the original image.
Step 4. Return to the Filter menu with your photo layer selected and Smart Filters enabled. Select "Sharpen" from there and then choose "Unsharp Mask".
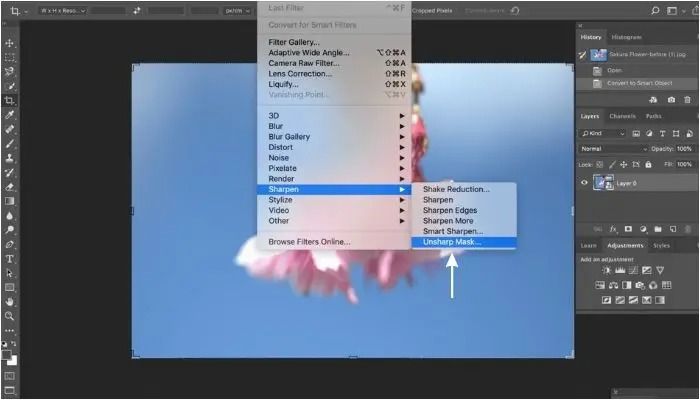
Step 5. A dialog box will appear, presenting you with sliders to fine-tune the sharpening effect.
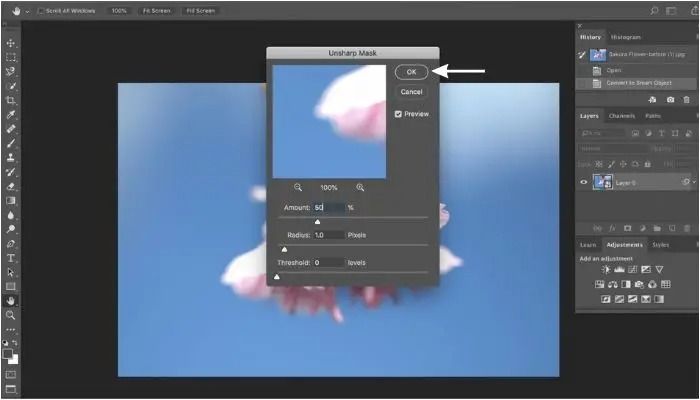
Step 6. Experiment with the sliders until you achieve the best sharpness that suits your image. Remember to strike a balance to avoid over-sharpening.
Step 7. Once you're satisfied with the sharpening effect, save your image. This way, you'll have both the original and the sharpened version for future reference.
However, doing so requires a powerful device and a lot of editing; hence, third-party tools are a rescue.
How to Increase Resolution of Image in Photoshop (Quick Fixes)
Learn from this tutorial how to increase the resolution of images in Photoshop. Find out more about the recommended image resolutions. Read more >>
Bonus Tip: How to Avoid Blurry or Corrupted Images
Photography is an art that relies on precision, and capturing sharp, clear images is essential. Whether you're a beginner or an enthusiast, here are some tips to help you achieve sharper photographs.
📌1. Keep your Hands Steady
A shaking camera is a common issue when shooting handheld. To minimize it, hold your camera close to your body with both hands and tuck your elbows in for stability. Avoid sudden movements like pressing the shutter button too hard or lifting your finger too quickly.
Pay attention to your breathing; holding or exhaling slowly while taking the shot can reduce camera shake. Find a comfortable and stable hand position to improve your stability while shooting.
📌2. Use a Tripod
Tripods are a reliable tool for stabilizing your camera. Ensure it's firmly grounded, especially on uneven terrain, and extend the legs fully to prevent sudden movements. Lowering your tripod's height increases stability. Extend the thicker sections of the tripod legs when shooting from a higher angle.
Secure your camera firmly to the tripod to prevent accidents. Using a long or heavy lens, use the tripod collar to mount to balance the weight.
📌3. Use a Timer or Remote Control
Even small movements like pressing the shutter button quickly can cause blur. Use a self-timer or a remote control when your camera is on a tripod or stable surface to eliminate this risk. This technique is especially beneficial for capturing sharp, long-exposure shots, like star trails or city light streaks.
📌4. Check Your Focus
Blurriness results from improper focus. Ensure your camera focuses on the right subject area. If using autofocus, half-press the shutter button to lock focus on your subject before taking the shot.
For smartphone photographers, utilize the tap-to-focus feature to control where your device focuses.
📌5. Activate Image Stabilization
Many modern cameras and lenses feature image stabilization (IS), which helps counteract camera shake. When shooting handheld, use the general rule of setting your shutter speed to match your focal length. With IS, you can shoot at slower speeds, enhancing your flexibility.
However, be mindful of turning off IS when shooting on a tripod or stable surface, as it may attempt to correct nonexistent vibrations, potentially affecting image sharpness. Experiment to determine when IS benefits your setup.
By implementing these tips, you can significantly improve the sharpness and clarity of your photos.
How to Fix Overly Compressed Photo FAQs
We have been through so much knowledge in this article by going through the methods for How to fix an overly compressed photo most readily to the best tips to avoid this type of mistake. Now it's time to take some of the frequently asked questions by your side:
1. What does it mean if my photo is overly compressed?
Overly compressed photos have reduced quality and detail due to significant size reduction, often resulting in pixelation and loss of clarity.
2. Is it possible to uncompress a photo?
Fully restoring an overly compressed photo to its original quality is challenging, as data loss is usually irreversible.
3. Can compressed images be restored?
While some restoration is possible, overly compressed images often suffer from permanent quality loss, limiting the extent of recovery.
4. How do I compress a picture to reduce file size?
You can use various software or online tools to compress images, typically by adjusting the quality settings or resizing the dimensions to reduce the file size while maintaining acceptable visual quality.
Conclusion
In addition to these valuable photography tips, consider using EaseUS Fixo Photo Repair software. This digital magic wand effortlessly revives damaged or low-quality photos, ensuring your good memories look their best. It perfectly complements the techniques discussed in this article.
We strongly recommend trying EaseUS Fixo Photo Repair to unlock a world of photo restoration and editing possibilities. Download it now to enhance and preserve your cherished moments like never before.
Was This Page Helpful?
About the Author
Jaden is one of the editors of EaseUS, who focuses on topics concerning PCs and Mac data recovery. Jaden is committed to enhancing professional IT knowledge and writing abilities. She is always keen on new and intelligent products.