Table of Contents
![]() About the Author
About the Author
![]() Related Posts
Related Posts
AI-Enhanced

- Fix videos with different issues, such as broken, unplayable, no sound, etc.
- Repair corrupted images and enhance their quality with advanced AI algorithms.
- Fix documents in various formats, including PDF, Word, Excel, and PowerPoint files.
100% Safe Download
In this article, you'll learn:
- Why Are My Photos Blurry
- How to Unblur a Picture Free 🏆
- How to Unblur a Picture in Photoshop
- Tips to Avoid Blurry Images
Digital photography has advanced significantly as a result of technology. Any photo you take on a camera or smartphone will mainly be blurry compared to the outcome if it was supposed to be. Don't freak out if your vital image turns out fuzzy.
Because of how technologically advanced and many image sharpeners exist to assist you in sharpening those images, thus, keep reading to learn how to unblur a picture, which is present in most photo editors, to correct fuzzy pictures.
Why Are My Photos Blurry
Even if it appears that you are about to capture a perfect shot, a variety of problems could cause your image to become blurry after you get the picture:
- 🤳A trembling camera
- 🔆Inadequate light settings
- 🔎Focusing on the subject wrongly
- 📸Faulty shutter speed
Most of these issues can be solved quickly with little changes. However, if you're still having difficulties getting clear pictures, consider the image corruption when you convert or compress the image source. The next part will mention how to repair and unblur the corrupted pictures.
How to Unblur a Picture Free
Knowing the programs that unblur pictures is essential because fuzzy photos are a cause for concern, even though blunders could ruin the event. Unblur Picture Tools make it easier to get rid of blurriness.
📌Sharpen Image with EaseUS Fixo Photo Repair
In this case, the best solution is a specialized online file repair tool. Try using an EaseUS Fixo Photo Repair to unblur a picture. It incorporates repair features to assist users in quickly and effectively fixing unsatisfied files. This file repair website supports fixing various types of pictures, including PNG, JPEG, and BMP.
- Enhance image resolution that are fuzzy and grainy.
- Damaged pictures can be fixed in few seconds.
- After the repairing, view the restored images first.
- Save the corrected JPG images wherever you need to.
Free try this file repair tool to unblur a picture and reopen them:
Step 1. Launch EaseUS photo enhancer on your Windows computer, and choose "Photo Enhancer". You can click "Add Photo" to enhance, unblur, upscale, and improve the quality of your photos with AI power.

Step 2. You can choose the General or Face AI model and the resolution in this section. If you are enhancing a portrait, Face mode can improve the facial features better. Then, click "Start Enhancing" to enhance the uploaded images.

Step 3. Wait a moment and save all the enhanced photos on your PC by choosing the "Sava All" button.

If the tool is helpful to unblur your picture, share it on Facebook, Twitter, Instagram, and other social media platforms!
How to Unblur a Picture in Photoshop
There are numerous tools in Photoshop that can be used to improve different areas of visual composition and eliminate extraneous features. The software's Smart Sharpen filter works as described in the following.
- Note:
- Photoshop boosts contrast and smoothes out blurry images but can't fix severe blur. Use AI-based technologies for missing detail addition.
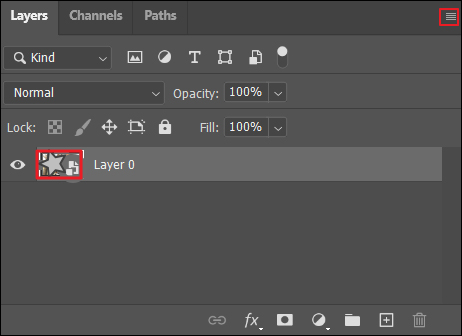
📌Before Editing: Convert to Smart Object
Without delving into too much technical detail, you can reverse the changes done to a layer by turning it into a Smart Object in the event that you make a mistake when editing; this may be helpful.
Convert to Smart Object can be selected from the menu by clicking on the tiny button in Photoshop's Layers window's upper right corner. A small icon should appear in the bottom right corner when a layer is transformed into a Smart Object.
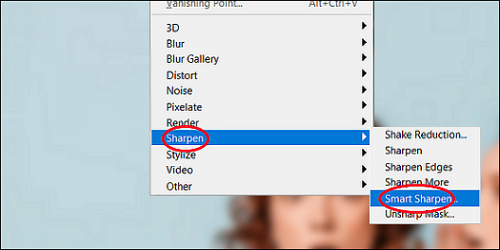
1. Apply the Smart Sharpen Filter to the Layer
Step 1. Select "Filter" from the menu bar above.
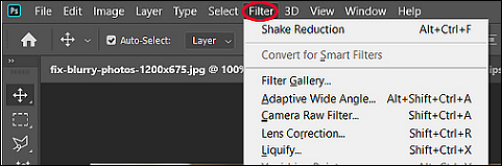
Step 2. Choose "Sharpen" from the dropdown menu.
Step 3. Click "Smart Sharpen" with the appropriate layer.
2. Resize the Dialog Box
Step 1. Widen the window when the Smart Sharpen dialog box appears so you can see the complete image.
Step 2. View the image as its whole. Thus, it will give you a better idea of how the image will appear once it has been sharpened because the preview in the window shows your picture with a 1:1 pixel ratio to your screen.
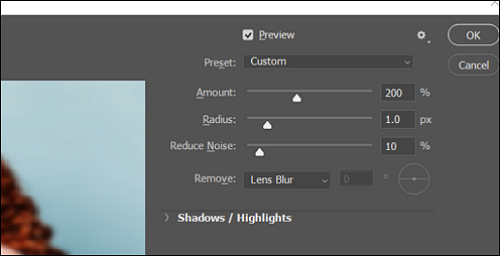
3. Select Sharpen Filter Settings
The Smart Sharpen filter has the following three settings:

- Amount: This slider will make light pixels brighter and dark pixels darker by increasing the contrast on edge pixels. This will improve the contrast between two nearby pixels and sharpen the image.
- Reduce Noise: The image's noise - bright pixels strewn about - is reduced by moving this slider. To see the changes when you move the Reduce Noise slider, take a look at the preview.
- Radius: The radius determines how big the boundaries of the image are. The radius of the edge is, by default, set to 1 (2 pixels, one for each of the lighter and darker pixels). The edges get broader and more prominent when the radius is increased.
Tips to Avoid Blurry Images
While EaseUS Fixo Photo Repair is available to fix blurry images, it helps to be aware of how to avoid them in the first place so that you may concentrate on the more enjoyable aspects of image editing. Fortunately, most of the issues we identified before are simple to resolve. Here are some pointers to help you take better images both during and after editing:
- Focus properly to prevent image blur. For example, utilizing a tripod can keep the devices from trembling.
- The shutter speed should increase as the lens length increases. For instance, a shutter speed of at least 1/60 is required to prevent blur in photographs taken with a 60mm lens.
- Unblur images by increasing the aperture setting.
- Don't rely on auto-focus. Auto-focus may struggle to locate a moving subject or focus on the incorrect object. Blur can be avoided, and more control is provided by manual focus.
If you want to restore the blurry image due to it being too old to be clear, read the linked page.

Best Old Photo Restoration Software [8 Best Ones in 2023]
Are you wondering about the best old photo restoration software out there? This article will give you the perfect list that suits your needs. Read more >>
How to Unblur a Picture FAQs
Here are 4 additional questions about unblurring a picture. Check here for the answers.
1. How do you Unblur a blurry picture?
Download EaseUS Fixo Photo Repair and follow the steps:
- Launch EaseUS Fixo Photo Repair on your computer.
- Upload the fuzzy pictures.
- Wait for the repairing process
- Choose "save" to save the repaired images.
2. How do I take the blur out of a picture?
- Open Photoshop and load the image.
- Select Shake Reduction under Filter > Sharpen.
Photoshop will automatically assess the area of the image that will benefit from shake reduction, identify the type of blur, and apply the necessary adjustments to the entire image.
3. Is there a website to Unblur blurred photos?
A powerful and user-friendly tool for repairing old photos is EaseUS Fixo Photo Repair. It has powerful features for repairing photographs that have been harmed. It can unblur these photos with simple clicks.
Conclusion
If you have a tool that can assist you, deblurring images in picture editing is simple. These methods mentioned before will assist you in figuring out how to unblur a picture in just a few easy actions. EaseUS Fixo Photo Repair and Photoshop are options for manually changing the photo's saturation or adding your own likeness.
Was This Page Helpful?
About the Author
Jaden is one of the editors of EaseUS, who focuses on topics concerning PCs and Mac data recovery. Jaden is committed to enhancing professional IT knowledge and writing abilities. She is always keen on new and intelligent products.