
Content
Page Table of Contents
About the Author
Hot Topics
PAGE CONTENT:
When the "automatically unlock" option in BitLocker Drive Encryption is greyed out, it usually means Windows is preventing the feature due to missing requirements, incorrect settings, or system restrictions. This guide from EaseUS Software explains exactly why it happens and provides clear, practical solutions.
What Does "Automatically Unlock" Do
BitLocker Automatically Unlock is a feature in BitLocker Drive Encryption that lets encrypted data drives (non-OS drives) unlock automatically when you sign in to Windows, so you don't need to manually enter a BitLocker password or recovery key each time.
It works by securely storing an encrypted unlock key on the system (OS) drive, allowing Windows to automatically unlock connected data drives once the operating system is authenticated and protected.
Why Is "Automatically Unlock" Greyed Out
Before jumping into fixes, here are the key reasons:
- Your OS drive isn't encrypted
- You're trying to enable it on the system drive
- The drive is currently locked
- Group Policy is restricting the feature
- BitLocker isn't properly configured
- TPM or system settings are misconfigured
How to Fix BitLocker Automatically Unlock My Drive Greyed Out
This section provides six effective solutions to fix the issue. Please read on to learn how to resolve it step by step.
Fix 1. Use EaseUS Partition Master
The "Automatically Unlock" feature in BitLocker may be greyed out if your data drives have configuration issues, such as unallocated space, unsupported partition types, or misaligned partitions. EaseUS Partition Master helps resolve these problems by safely resizing, moving, merging, or converting partitions without data loss.
By optimizing your drive layout and ensuring it meets BitLocker's requirements, this tool restores the ability for BitLocker Automatic Device Encryption and decryption, so your encrypted drives open seamlessly when you log in to Windows.
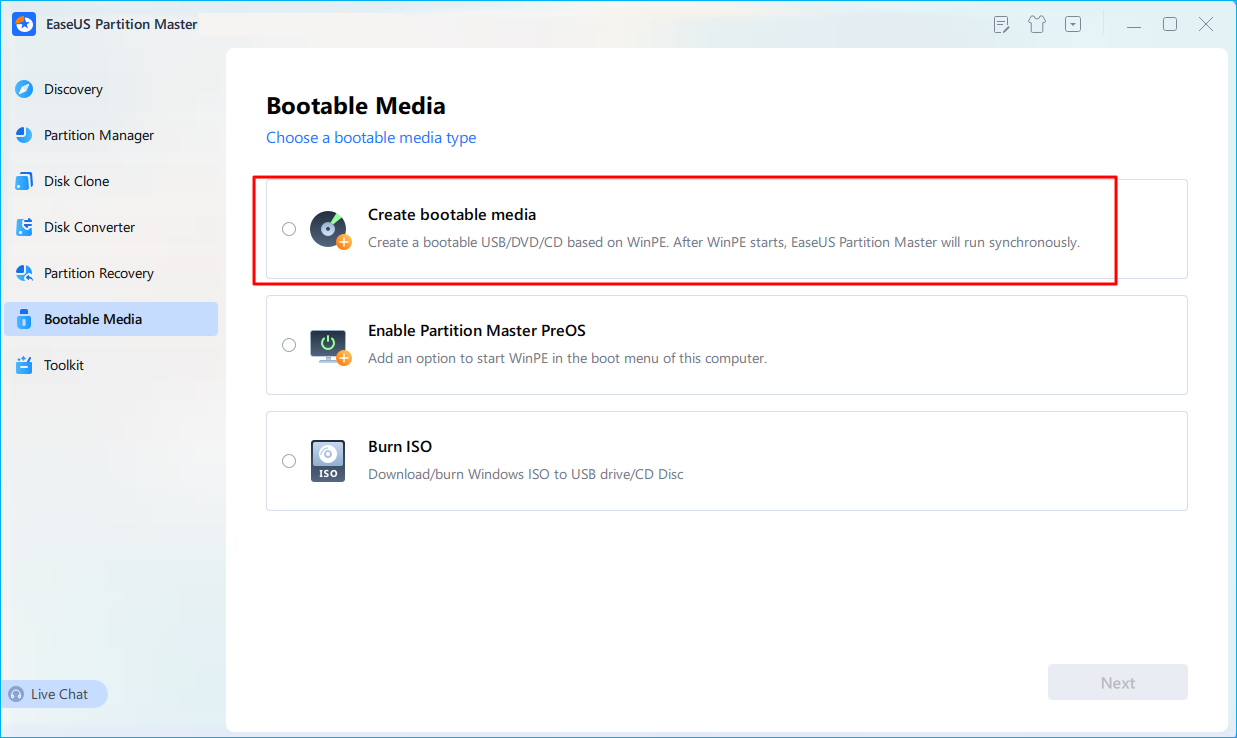
Step 1. First, connect a USB to the PC running properly. Launch EaseUS Partition Master, navigate to "Bootable Media" section, and click "Create bootable media" option. Click "Next" to continue.
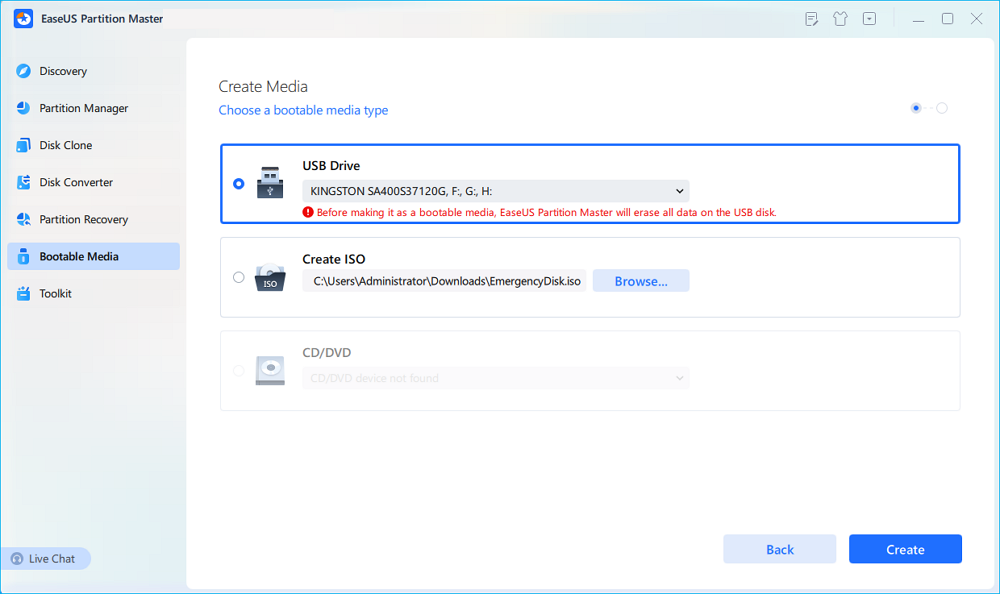
Step 2. Select the target USB drive and click "Create" to continue. Please back up your data in advance since this will erase all data on the USB drive. Then, click "yes" to confirm when you see the warning. Do not exit EaseUS Partition Master until it's done.
Step 3. Connect the bootable USB to the BitLocker encrypted PC and restart PC. During the reboot, press the BIOS key (F2/F8/F12/DEL/ESC) to access BIOS and set the bootable USB as the boot drive. This PC will automatically boot from the USB disk.
Step 4. EaseUS Partition Master will automatically unlock the BitLocker encrypted drive and you can see a "unlock" icon.
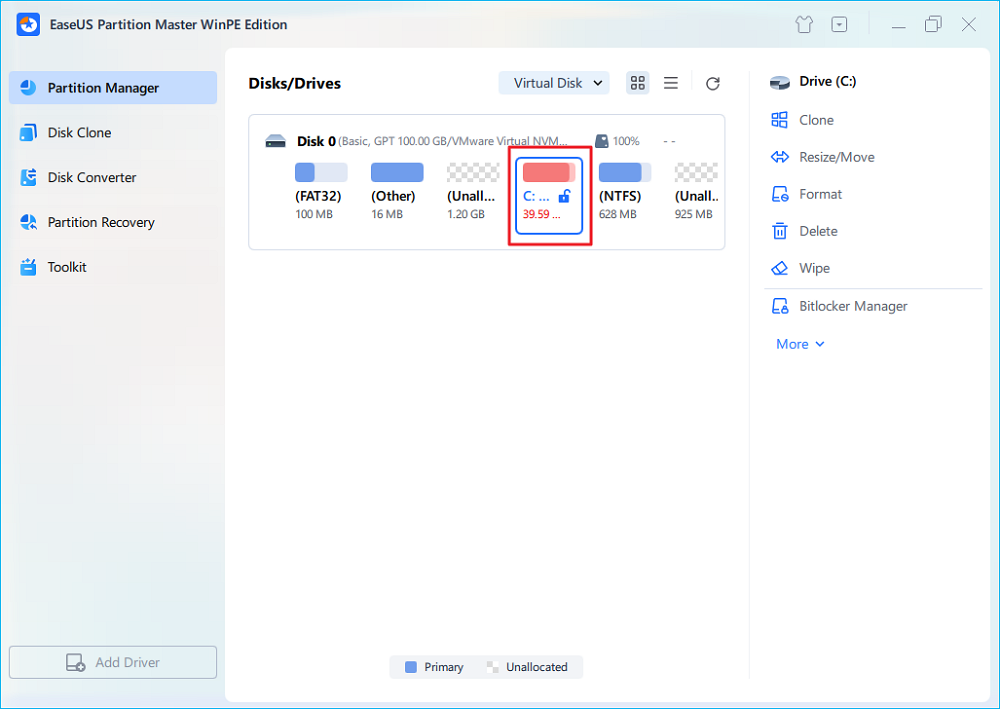
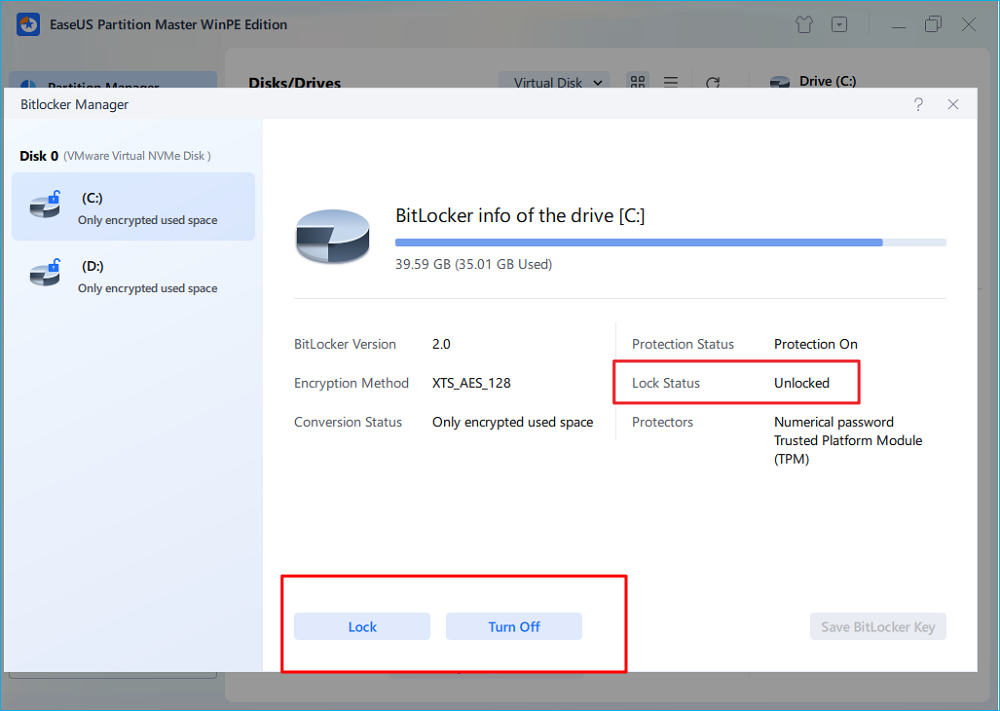
Step 5. Hover the mouse on the BitLocker partition; you can see more info of this partition and manage the BitLocker partition such as locking it or turning off BitLocker.
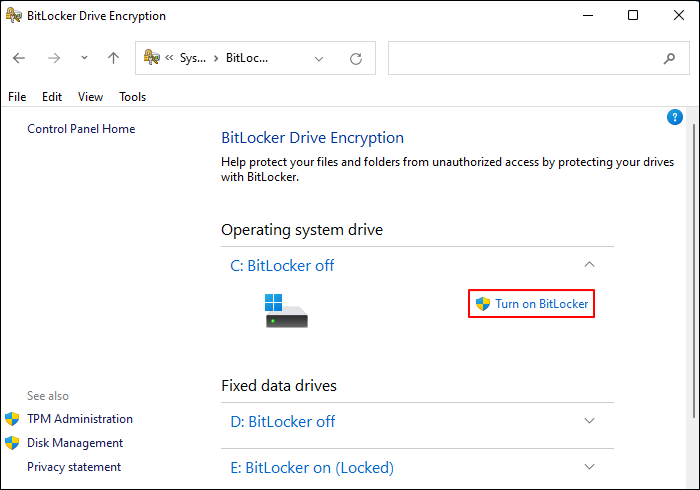
Fix 2. Enable BitLocker on the OS Drive
Auto-unlock depends on your system drive being protected. Windows uses the OS drive's encryption to securely store the unlock keys for other drives. If the OS drive isn't encrypted, Windows disables the feature. Once encryption starts (you don't need to wait for it to complete), the automatically unlock option should become available for other drives. Please refer to the following steps.
Step 1. Type Control Panel in the search bar > click it to open it.
Step 2. Go to System and Security > select BitLocker Drive Encryption > locate your system drive > click Turn on BitLocker.
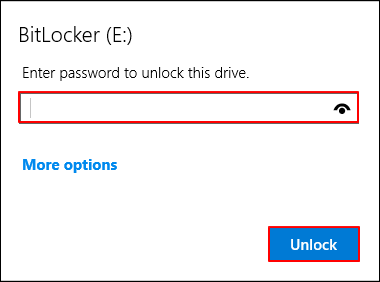
Fix 3. Make Sure the Drive Is Unlocked
You can't enable auto-unlock on a drive that's currently locked because Windows needs access to store its unlock credentials. Now, the greyed-out option should be clickable. Here are the steps.
Step 1. Press Win + E to open File Explorer > double-click your encrypted drive.
Step 2. Enter your BitLocker password > go back to the BitLocker settings after unlocking your targeted drive.
Fix 4. Enable Auto-Unlock using CMD
Sometimes the graphical interface fails or hides options due to minor glitches or permission issues. Using the command prompt with manage bde bypasses the UI and enables the feature directly. It forces Windows to enable the automatic unlock feature for your selected drive.
If it fails, double-check that the drive is unlocked or not, and that BitLocker is activated on both your system and data drives.
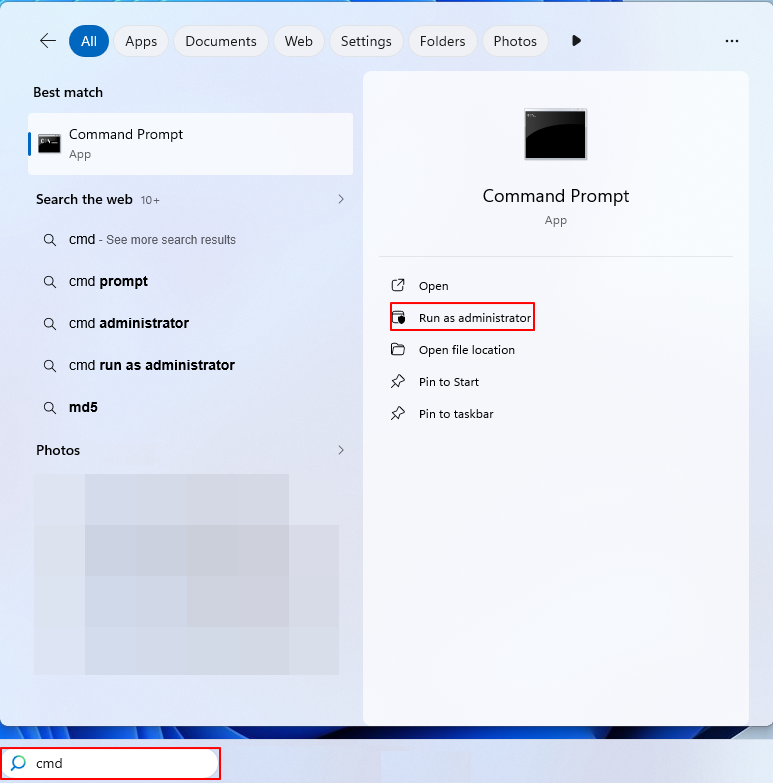
Step 1. Type cmd in the search bar > click Run as Administrator to open the Command Prompt window.
Step 2. Let's take the D drive as an example. Here, you can type the following command line in the window.
- manage-bde -autounlock -enable D:
Fix 5. Verify BitLocker Status
Before trying advanced solutions, it's important to check the current state of your drives with BitLocker. Verifying the BitLocker status helps you determine whether your OS drive and data drives are properly encrypted, unlocked, and configured for features such as automatic unlocking.
Using manage-bde in Command Prompt, you can quickly see which drives are protected, which are unlocked, and whether any encryption issues might be causing the "Automatically Unlock" greyed out problem.
Step 1. Type cmd in the search bar > click Run as Administrator to open the Command Prompt window.
Step 2. Type manage-bde -status in the window.
What to check:
- OS drive➡️Protection Status: On
- Data drive➡️Lock Status: Unlocked
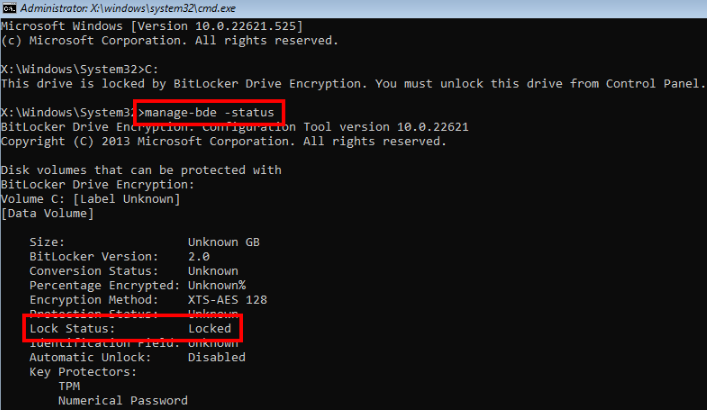
Step 3. If the OS drive isn't encrypted, go back to Fix 1.
Fix 6. Check Group Policy Restrictions
The "Automatically Unlock" option can be disabled by Windows policies, especially on work or school PCs. Checking Group Policy lets you verify and adjust these settings so your encrypted data drives can unlock automatically without entering a BitLocker password. Let's show how it works.
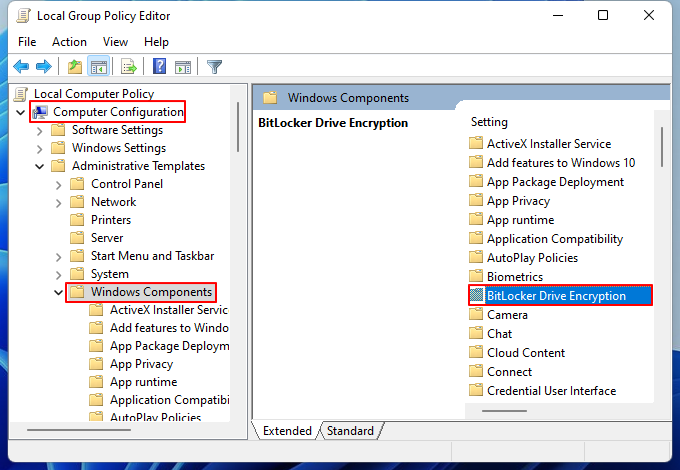
Step 1. Press Windows + R to open the Run window > type gpedit.msc > click OK or press Enter.
Step 2. In the new window, go to Computer Configuration > Administrative Templates > Windows Components > BitLocker Drive Encryption.
What to look for:
- Settings that disable auto-unlock
- Restrictions on authentication methods
Step 3. Set restrictive policies to Not Configured or Disabled > restart your PC.
Fix 7. Reconfigure BitLocker on the Drive
If BitLocker was set up incorrectly or became corrupted, the automatic unlock may stop working. Turning BitLocker off and back on re-applies encryption, clears errors, and restores the connection between the OS and data drives, allowing Windows to securely store the keys needed for auto-unlock.
Step 1. Type cmd in the search bar > click Run as Administrator to open the Command Prompt window.
Step 2. Type the following command line to turn off BitLocker. You can replace the letter D with a new drive letter.
- manage-bde -off D:
Step 3. Wait for decryption to finish > turn it back on > type the following command line.
- manage-bde -on D:
Step 4. After re-enabling, the automatically unlock option should work normally.
Conclusion
The "Automatically Unlock" issue in BitLocker is often caused by drive configuration problems. Let BitLocker automatically unlock my drive greyed out? EaseUS Partition Master makes fixing this easy and safe, letting you resize, move, or convert partitions without data loss. By ensuring your drives are compatible with BitLocker, you can restore auto-unlock, offering a more convenient and secure way to access your encrypted data.
How Can We Help You
About the Author
"I hope my articles can help solve your technical problems. If you are interested in other articles, you can check the articles at the bottom of this page. Similarly, you can also check my Twitter to get additional help."
Product Reviews
-
I love that the changes you make with EaseUS Partition Master Free aren't immediately applied to the disks. It makes it way easier to play out what will happen after you've made all the changes. I also think the overall look and feel of EaseUS Partition Master Free makes whatever you're doing with your computer's partitions easy.
Read More -
Partition Master Free can Resize, Move, Merge, Migrate, and Copy disks or partitions; convert to local, change label, defragment, check and explore partition; and much more. A premium upgrade adds free tech support and the ability to resize dynamic volumes.
Read More -
It won't hot image your drives or align them, but since it's coupled with a partition manager, it allows you do perform many tasks at once, instead of just cloning drives. You can move partitions around, resize them, defragment, and more, along with the other tools you'd expect from a cloning tool.
Read More
Related Articles
-
Blue Screen and Restart Windows 11 [Solutions HERE]
![author icon]() Oliver/2026/06/30
Oliver/2026/06/30 -
Master Boot Record of This Hard Drive Is Damaged | Fix MBR Windows 10/8/7/Vista/XP
![author icon]() Jean/2026/06/17
Jean/2026/06/17 -
The Boot Configuration Data Store Could Not Be Opened [6 Ways]
![author icon]() Cici/2026/06/30
Cici/2026/06/30 -
Solved: Black Screen After Installing Windows 10
![author icon]() Cici/2026/06/17
Cici/2026/06/17


