
Content
Page Table of Contents
About the Author
Hot Topics
- What Is BitLocker?
- Get Started With BitLocker
- BitLocker Management Tools
- Check the BitLocker Status
- Enable BitLocker
- Manage BitLocker Protectors
- Suspend and Resume BitLocker
- Reset and Back Up a Recovery Password
- Disable BitLocker
- Unlock a Drive
- Common BitLocker Issues
- BitLocker Management With EaseUS Partition Master
- FAQs About BitLocker
Windows provides several ways to manage BitLocker, including the BitLocker Control Panel, File Explorer, PowerShell, and the manage-bde.exe command-line tool. Each method provides a different level of control. This guide explains the most common BitLocker management and operations step by step, starting with the basics and moving to more advanced options.
What Is BitLocker?
BitLocker is Microsoft's built-in volume encryption technology for Windows. It encrypts the data stored on a drive so that the data cannot be read normally without the required authentication or recovery information. BitLocker can protect Windows system drives, internal data drives, and supported external or removable drives. When a drive is protected, BitLocker uses encryption to protect the data and one or more key protectors to control how the encryption key can be accessed.
For example, a Windows system drive may use the computer's TPM as its normal protector, while a recovery password provides an alternative way to regain access if the normal startup process cannot unlock the drive.
BitLocker is different from simply putting a password on a folder. Encryption protects the data at the drive level, so the files remain protected even if someone removes the physical drive and tries to access it from another computer. To learn more details about BitLocker, refer to the BitLocker troubleshooting center.
How BitLocker Protects Your Data
BitLocker's protection can be understood through three basic components:
- Encryption protects the data stored on the drive.
- Key protectors control how BitLocker obtains access to the encryption key. Depending on the configuration, a drive can have protectors such as a TPM, PIN, password, startup key, or recovery password.
- Authentication determines whether the person or system attempting to access the drive has the required credentials.
On supported Windows systems, the TPM can help protect the keys used to unlock the operating system drive during startup. If Windows detects a change that prevents the normal protector from being used, BitLocker may require a recovery password instead.
This is why BitLocker management involves more than simply turning encryption on or off. Users may need to manage the drive's encryption state, protection state, key protectors, and recovery information separately.
What Can You Use BitLocker For?
BitLocker can be useful in several common situations.
- Protect a Windows system drive: Encrypting the system drive helps protect the operating system, applications, and user data if the computer is lost or the physical drive is removed.
- Protect internal data drives: You can also encrypt a secondary internal drive used for documents, photos, work files, or other data.
- Protect external drives: BitLocker can protect supported external HDDs and SSDs, allowing you to encrypt data that you carry between computers.
- Protect removable storage: BitLocker To Go can be used to protect supported removable drives, such as USB flash drives.
- Protect data on lost or stolen devices: Without the appropriate authentication or recovery information, an encrypted drive cannot simply be read by connecting it to another computer.
BitLocker vs. Device Encryption
BitLocker and Windows Device Encryption are related technologies, but they are not exactly the same user experience.
BitLocker provides detailed controls for managing encrypted drives, protection methods, and recovery options. It is commonly associated with Windows Pro, Enterprise, and Education editions.
Device Encryption is a simplified Windows encryption feature designed to make encryption easier to use on supported devices. It can automatically encrypt the operating system drive and other fixed drives when the required hardware and account conditions are met.
The exact features available depend on your Windows edition, hardware, and device configuration. If you need detailed control over BitLocker settings and protectors, check whether the full BitLocker management interface is available on your system.
BitLocker Requirements and Limitations
Before configuring BitLocker, check the following:
- Your Windows edition supports the BitLocker features you need.
- You have administrator permissions when required.
- Your computer has the hardware needed for the selected protection method.
- A TPM is available if you plan to use TPM-based protection.
- You have a safe place to store your recovery information.
- You understand which drive you are about to encrypt or decrypt.
BitLocker is designed to protect data, which also means that losing all available authentication and recovery methods can prevent access to the encrypted data. There is no normal BitLocker operation that simply bypasses encryption without the required credentials or recovery information.
Get Started With BitLocker
Before performing a BitLocker operation, it is important to understand the current state of the drive. This prevents common mistakes such as encrypting the wrong drive, removing the only available protector, or starting a decryption process when you only intended to suspend protection.
1️⃣Check Your Current BitLocker Configuration
Start by identifying the drive you want to manage.
You should know:
- The drive letter, such as C: or D:
- Whether BitLocker is enabled
- Whether encryption is complete
- Whether protection is currently on or suspended
- Which key protectors are configured
- Whether recovery information is available
For a detailed status check, PowerShell and manage-bde.exe provide more information than File Explorer.
You can use: Get-BitLockerVolume or manage-bde -status
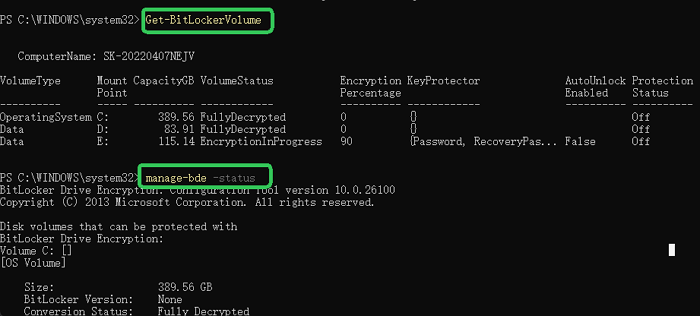
These commands can show the encryption and protection state of BitLocker-enabled volumes.
Decide What You Want to Protect: BitLocker can be used differently depending on the type of drive.
2️⃣Choose How the Drive Will Be Protected
BitLocker supports different types of key protectors.
Common examples include:
- TPM protector
- TPM + PIN
- Password protector
- Startup key
- Recovery password
The appropriate option depends on the drive and how it is used. A system drive commonly uses TPM-based protection, while a data drive may use a password.
A recovery password should normally be treated as a backup access method rather than your everyday authentication method.
3️⃣Prepare Your Recovery Information
Before enabling BitLocker, make sure you know where the recovery information will be stored. A recovery password should not be stored only on the drive it is supposed to recover. Depending on your environment, recovery information may be backed up to:
- A Microsoft account
- Microsoft Entra ID
- Active Directory
- A separate file
- A printed copy
- Another secure storage location
For organization-managed computers, recovery information may be controlled by an administrator or organizational policy.
BitLocker Management Tools
Windows provides several tools for BitLocker management. The best choice depends on how much control you need. For Windows beginners, an all-in-one BitLocker manager software like EaseUS Partition Master is highly recommended.
BitLocker PowerShell Module
The BitLocker PowerShell module provides cmdlets for managing encrypted volumes.
Common cmdlets include:
- Get-BitLockerVolume
- Enable-BitLocker
- Disable-BitLocker
- Add-BitLockerKeyProtector
- Remove-BitLockerKeyProtector
- Suspend-BitLocker
- Resume-BitLocker
- Unlock-BitLocker
- Lock-BitLocker
PowerShell is useful when you need precise control or want to automate BitLocker operations. For beginners, PowerShell commands should be entered carefully. A command that modifies a protector or starts decryption can change the security state of a drive.
manage-bde.exe
manage-bde.exe is the main command-line management tool. It can be used to check status, enable or disable BitLocker, manage protectors, suspend or resume protection, and unlock drives.
repair-bde.exe
repair-bde.exe is different from manage-bde.exe. It is intended for disaster-recovery situations where a BitLocker-protected drive cannot be accessed normally. It is not a normal daily management tool.
Do not use repair-bde simply because a drive is locked. First try the normal BitLocker authentication and recovery methods.
BitLocker Control Panel Applet
Windows includes a graphical BitLocker management interface in Control Panel. From this interface, supported operations can include turning BitLocker on or off, managing some protection settings, backing up recovery information, and suspending or resuming protection. The Control Panel provides a simpler interface for basic tasks, while PowerShell and manage-bde.exe provide more detailed controls.
File Explorer
File Explorer provides the simplest way to perform some basic operations on an unlocked or locked BitLocker data drive. File Explorer is convenient for basic access, but it does not provide the same level of configuration as PowerShell or manage-bde.exe.
Check the BitLocker Status
Before changing BitLocker settings, check the current status of the drive (Check if BitLocker is enabled or disabled). A BitLocker status check can tell you whether a volume is encrypted, whether encryption is complete, and whether protection is currently enabled.
Check BitLocker Status With PowerShell
PowerShell provides a detailed view of BitLocker volumes.
Step 1: Open PowerShell as Administrator
- Open Start.
- Search for PowerShell.
- Right-click Windows PowerShell or the available PowerShell application.
- Select Run as administrator.
- Select Yes when prompted.
Step 2: Get the BitLocker Status
- Enter: Get-BitLockerVolume
- Press Enter.
Step 3: Check One Specific Drive
If you only want to check one drive, use: Get-BitLockerVolume -MountPoint "C:"
Replace C: with the drive you want to check.
Step 4: Review the Important Fields
Pay particular attention to:
- VolumeStatus
- EncryptionPercentage
- ProtectionStatus
- LockStatus
- KeyProtector
These values help you determine whether the drive is encrypted, whether protection is active, and which protectors are available.
Check BitLocker Status With manage-bde
You can also use Command Prompt.
Step 1: Open Command Prompt as Administrator
- Open Start.
- Search for Command Prompt.
- Select Run as administrator.
- Confirm the User Account Control prompt.
Step 2: Check All Drives
- Enter: manage-bde -status
- Press Enter.
Step 3: Check One Drive
- To check only the C: drive: manage-bde -status C:
- Replace C: with the drive you want to check.
manage-bde -status provides information about the BitLocker state of the selected volume.
Check BitLocker Status in Control Panel
- Open Control Panel.
- Select System and Security.
- Open BitLocker Drive Encryption.
- Find the drive you want to check.
- Review the status shown next to the drive.
Check If a Drive Is BitLocker Encrypted in File Explorer
- Open File Explorer.
- Select This PC.
- Find the drive.
- Look for the lock icon or the available BitLocker options.
Enable BitLocker
Before enabling BitLocker, make sure you have selected the correct drive and prepared a recovery method. Do not begin encryption until you know where the recovery information will be stored.
Enable BitLocker From the Control Panel
Step 1: Open BitLocker Drive Encryption
- Open Control Panel.
- Select System and Security.
- Select BitLocker Drive Encryption.
Step 2: Select the Drive
- Find the drive you want to encrypt.
- For the Windows system drive, select Turn on BitLocker.
Step 3: Finish the Following Settings
- Choose an Unlock Method: Depending on the drive and Windows configuration, Windows may ask you to select an authentication method.
- Back Up the Recovery Information: Choose an available option and complete the backup. Do not skip this step unless you already have a reliable recovery arrangement.
- Choose the Encryption Scope: Windows may ask whether you want to encrypt: Used disk space only or the entire drive
🟡If the drive is new and has never contained sensitive data, encrypting used space may be sufficient for some scenarios. If the drive has previously contained data, full-drive encryption may provide more comprehensive protection.
- Choose the Encryption Mode: Depending on the Windows version and drive type, Windows may offer different encryption modes.
- Start Encryption: Confirm your settings and start BitLocker.
Enable BitLocker With PowerShell
Step 1: Open PowerShell as Administrator
- Open Start, search for PowerShell, right-click it, and select Run as administrator.
Step 2: Confirm the Drive Letter
- Check that the target drive is correct. For example: Get-BitLockerVolume
Step 3: Run the Enable Command
- For a TPM-protected system drive: Enable-BitLocker C: -EncryptionMethod XtsAes256 -UsedSpaceOnly -TpmProtector
For a TPM + PIN configuration, a secure PIN value is required. Microsoft documents -TPMandPinProtector for this scenario.
Manage BitLocker Protectors
A BitLocker key protector controls how the encryption key can be accessed. A single drive can have multiple protectors. For example, a drive may have a normal authentication method plus a recovery password.
1️⃣View BitLocker Protectors With PowerShell
Open PowerShell as administrator and run: (Get-BitLockerVolume -MountPoint "C:").KeyProtector
🟡Replace C: with the target drive.
2️⃣Add a Recovery Password Protector With PowerShell
To add a new recovery password protector: Add-BitLockerKeyProtector -MountPoint "C:" -RecoveryPasswordProtector
After the command completes, check the protectors again: (Get-BitLockerVolume -MountPoint "C:").KeyProtector
The output includes the new recovery password. Save the recovery password in a secure location.
3️⃣Add a Password Protector With PowerShell
For a data volume, you can add a password protector.
Run: Add-BitLockerKeyProtector -MountPoint "D:" -PasswordProtector
PowerShell prompts you for the password.
Follow the prompt to create the password and then verify the protector: (Get-BitLockerVolume -MountPoint "D:").KeyProtector
4️⃣Add a Protector From Control Panel
For supported drives:
- Open Control Panel.
- Select System and Security.
- Open BitLocker Drive Encryption.
- Find the encrypted drive.
- Expand the available BitLocker options.
- Select the option for adding or managing a protector.
- Follow the instructions shown by Windows.
The exact options available depend on the drive type and Windows configuration.
5️⃣Remove a Specific Protector With PowerShell
Do not remove a protector until you have confirmed that another valid way to unlock or recover the drive exists.
- First list the protectors: (Get-BitLockerVolume -MountPoint "C:").KeyProtector
- Find the protector ID you want to remove.
- Then run: Remove-BitLockerKeyProtector -MountPoint "C:" -KeyProtectorId "{GUID}"
- Replace {GUID} with the complete protector ID, including the braces.
Microsoft specifically notes that the protector GUID should be provided in quotation marks and that you should retain at least one valid unlock method.
Suspend and Resume BitLocker
Suspending BitLocker is useful when you need to make certain system or configuration changes.
Suspending protection does not decrypt the drive. The data remains encrypted; BitLocker protection is temporarily disabled so the system can complete the required change.
When Should You Suspend BitLocker?
You may need to suspend BitLocker before certain:
- BIOS or UEFI updates
- Firmware updates
- Hardware changes
- Boot configuration changes
- System maintenance operations
If you are not sure whether a specific operation requires suspension, check the instructions provided by the hardware or software manufacturer.
Suspend BitLocker With manage-bde
Open Command Prompt as administrator and run: manage-bde -protectors -disable C:
This disables the protectors temporarily without decrypting the drive.
Suspend BitLocker From Control Panel
For supported Windows system drives:
- Open Control Panel.
- Select System and Security.
- Select BitLocker Drive Encryption.
- Find the operating system drive.
- Select Suspend protection.
- Confirm the action if Windows asks.
Microsoft notes that the Control Panel method is available for suspending protection on the OS drive.
Resume BitLocker With manage-bde
Run: manage-bde -protectors -enable C:
This re-enables the BitLocker protectors.
Resume BitLocker From Control Panel
- Open Control Panel.
- Select System and Security.
- Open BitLocker Drive Encryption.
- Find the operating system drive.
- Select Resume protection.
- Confirm the operation.
After resuming protection, verify that the drive is protected again.
Reset and Back Up a Recovery Password
A BitLocker recovery password is a 48-digit numerical password that can be used to recover access to a protected drive when the normal protector cannot unlock it. If a recovery password has already been used to recover a device, it can also be appropriate to replace that recovery password with a new one, particularly in managed environments.
View the Existing Recovery Password
You can get the existing recovery key using PowerShell:
- Open PowerShell as administrator and run: (Get-BitLockerVolume -MountPoint "C:").KeyProtector
- Find the entry whose KeyProtectorType is RecoveryPassword. The corresponding RecoveryPassword value is the 48-digit recovery password.
Add a New Recovery Password
If you want to create an additional recovery password: Add-BitLockerKeyProtector -MountPoint "C:" -RecoveryPasswordProtector
Then run: (Get-BitLockerVolume -MountPoint "C:").KeyProtector
Locate the new RecoveryPassword entry and record it securely.
Back Up a Recovery Password
- Open Control Panel.
- Select System and Security.
- Open BitLocker Drive Encryption.
- Find the encrypted drive.
- Select Back up your recovery key.
- Choose an available backup location.
- Follow the instructions to complete the backup.
The exact backup destinations depend on the Windows version, account type, device configuration, and organizational policies.
Disable BitLocker
When Should You Disable BitLocker? You may decide to decrypt a drive when:
- You no longer need encryption.
- The drive will be repurposed.
- You need to use the drive in an environment that does not support your BitLocker configuration.
- You are preparing the drive for another use.
Do not disable BitLocker simply because you need to perform a temporary system change. Suspending protection may be sufficient.
| Disable BitLocker With PowerShell | Disable BitLocker From Control Panel |
|---|---|
|
1. Check the Drive Run: Get-BitLockerVolume Confirm the target drive. 2. Start Decryption For example: Disable-BitLocker -MountPoint "C:" |
|
Do not shut down or disconnect an external drive while it is actively being decrypted.
What Happens During Decryption?
Decryption does not normally delete the files stored on the drive. Instead, Windows processes the encrypted volume and removes BitLocker encryption.
The amount of time required depends on factors such as:
- Drive capacity
- Drive speed
- Amount of data
- System workload
- Storage health
After decryption is complete, check the BitLocker status to confirm that the drive is no longer encrypted.
Unlock a Drive
Unlocking a BitLocker drive allows you to access the encrypted data without removing BitLocker. This is different from disabling BitLocker.
- Unlock: Access the encrypted drive.
- Disable: Decrypt and remove BitLocker.
If you connect a BitLocker-protected data drive to another Windows computer, you may need to unlock it before accessing its files.
1️⃣Unlock a Drive With File Explorer
This is usually the easiest method for beginners.
- Connect the BitLocker-protected external drive, USB drive, or other data drive.
- Press Windows + E, and select This PC. Then, locate the BitLocker-protected drive.
- Double-click the drive or select the available unlock option.
- Enter the password configured for the drive.
If you do not have the normal password but have the recovery password, use a recovery option when Windows provides one.
2️⃣Unlock a Drive From Control Panel
- Open Control Panel.
- Select System and Security.
- Open BitLocker Drive Encryption.
- Find the locked drive.
- Select Unlock drive.
- Enter the requested authentication information.
- Complete the unlock process.
- Open File Explorer and access the drive.
Microsoft documents Control Panel and File Explorer as graphical methods for unlocking a BitLocker data drive.
3️⃣Unlock a Drive With PowerShell
If you have the 48-digit recovery password, you can use Unlock-BitLocker.
For example: Unlock-BitLocker -MountPoint "D:" -RecoveryPassword xxxxxx-xxxxxx-xxxxxx-xxxxxx-xxxxxx-xxxxxx-xxxxxx-xxxxxx
Replace:
- D: with the correct drive letter.
- The placeholder recovery password with the actual 48-digit recovery password.
4️⃣Lock the Drive Again After Use
If you have unlocked an external or removable BitLocker drive and no longer need to access it, you can lock it again.
With PowerShell: Lock-BitLocker -MountPoint "D:"
With manage-bde: manage-bde -lock D:
You can then safely disconnect the drive after Windows finishes any pending disk activity.
Common BitLocker Issues
| Issues | Solutions |
|---|---|
| BitLocker Is Not Available on My PC |
If you cannot find the expected BitLocker options:
The available BitLocker interface can vary by Windows edition and device configuration. |
| BitLocker Encryption Is Taking Too Long |
Encryption time varies depending on the drive and system. Before assuming that BitLocker has stopped working:
Use: Get-BitLockerVolume or manage-bde -status to check progress. |
| BitLocker Protection Is Suspended |
If BitLocker protection is suspended, the drive may remain encrypted but its normal protection mechanism is temporarily inactive. If you have finished the system maintenance that required suspension, resume protection: Resume-BitLocker -MountPoint "C:" or manage-bde -protectors -enable C: Then verify the protection status. |
| A BitLocker Drive Cannot Be Unlocked |
Start with the basics:
Do not repeatedly remove protectors or change TPM settings simply because the drive cannot be unlocked. These changes can make recovery more complicated. |
| BitLocker Asks for a Recovery Password Unexpectedly |
BitLocker can request recovery authentication when it cannot use the normal protection mechanism. Potential triggers include changes to the system's trusted boot environment, TPM state, firmware, hardware, or boot configuration. If this happens:
|
| A BitLocker Operation Fails |
If an operation fails:
|
For advanced recovery scenarios involving a severely damaged BitLocker volume, repair-bde.exe may be relevant. It is a recovery tool rather than a routine management utility.
BitLocker Management With EaseUS Partition Master
Windows provides several native ways to manage BitLocker, but they are spread across different interfaces. PowerShell provides extensive control but requires command-line knowledge. manage-bde.exe offers powerful command-line operations but can be difficult for users who are unfamiliar with Windows commands. Control Panel is easier to use but does not expose every BitLocker management option.
EaseUS Partition Master provides a graphical approach to supported BitLocker management operations, allowing users to manage protected partitions without having to remember command syntax.
| Feature | Advantage |
|---|---|
| All-in-One BitLocker Management | Unlock, lock, and disable BitLocker from one simple interface. |
| Back Up Recovery Key | Easily back up your BitLocker recovery key to prevent access issues. |
| Turn Off BitLocker on Windows Home | Manage and turn off BitLocker on Windows Home PCs. |
| Retrieve Recovery Key | Quickly retrieve available BitLocker recovery keys from your local PC or Microsoft account. |
| BitLocker Emergency Disk | Boot from USB to retrieve the recovery key and unlock BitLocker when Windows won't start or gets stuck in a recovery loop. |
When using any third-party disk management software with an encrypted drive, always confirm the operation and target volume before applying changes. Encryption-related operations can affect access to your data if performed incorrectly.
FAQs About BitLocker
1. What Happens If I Lose My BitLocker Recovery Password?
A BitLocker recovery password is an important backup method for accessing an encrypted drive when the normal authentication method cannot unlock it.
- If you can still access the drive normally, create and securely back up the recovery information before you lose access.
- If you cannot unlock the drive using its normal protector and you also do not have a valid recovery password, there is no standard BitLocker operation that simply bypasses the encryption.
For a personal device, check the locations where you previously saved the recovery information. For a work or school device, contact the organization's administrator because recovery information may have been backed up to Microsoft Entra ID or Active Directory.
The safest approach is to treat recovery information as part of normal BitLocker maintenance rather than something to look for only after a recovery problem occurs.
2. Does BitLocker Slow Down My Computer?
BitLocker can have some impact on disk performance because data needs to be encrypted and decrypted as it is read and written. However, on modern computers with hardware-supported encryption, the performance impact is generally small during normal use.
You may notice more activity when BitLocker is initially encrypting or decrypting a large drive. Once encryption is complete, BitLocker is designed to run in the background without significantly affecting everyday tasks on most modern systems.
3. Why Does BitLocker Ask for a Recovery Key?
BitLocker may ask for a recovery key when it cannot use the normal protection method to unlock the drive. This can happen after certain changes to the computer's trusted startup environment, such as:
- BIOS or UEFI changes
- Firmware updates
- TPM changes
- Hardware changes
- Boot configuration changes
If you see a BitLocker recovery screen, use the recovery key associated with that specific device or drive. After regaining access, check your BitLocker and system configuration to determine why recovery was triggered.
4. What Is the Difference Between Suspending and Turning Off BitLocker?
Suspending BitLocker temporarily disables the protection mechanism while keeping the drive encrypted. It is commonly used before certain BIOS, firmware, or system changes. Turning off BitLocker starts the decryption process and eventually removes BitLocker protection from the drive.
In simple terms:
- Suspend = Keep the encryption, temporarily pause protection.
- Turn off = Decrypt the drive and remove BitLocker.
If you only need to perform a temporary system or hardware change, suspending BitLocker is usually more appropriate than turning it off.
5. What Should I Do If Windows Won't Start Because of BitLocker?
If Windows cannot start and you are stuck at a BitLocker recovery screen, you first need the correct BitLocker recovery key to regain access to the encrypted drive. If you can access the Windows recovery environment, follow the available recovery options and enter the recovery key when prompted.
If Windows cannot start normally and you cannot use the usual BitLocker management tools, a bootable BitLocker Emergency Disk can provide another recovery option. With EaseUS Partition Master, you can create an emergency USB in advance and use it to boot the computer, retrieve available BitLocker recovery information, and help unlock the protected drive when Windows is inaccessible.
How Can We Help You
About the Author

Updated by Tracy King
Tracy became a member of the EaseUS content team in 2013. Being a technical writer for over 10 years, she is enthusiastic about sharing tips to assist readers in resolving complex issues in disk management, file transfer, PC & Mac performance optimization, etc., like an expert.

Sherly joined EaseUS in 2022 and she has always loved writing articles and enjoys the fun they bring. She receives professional training here, focusing on product performance and other relative knowledge. She has written over 200 articles to help people overcome computing issues.
Product Reviews
-
I love that the changes you make with EaseUS Partition Master Free aren't immediately applied to the disks. It makes it way easier to play out what will happen after you've made all the changes. I also think the overall look and feel of EaseUS Partition Master Free makes whatever you're doing with your computer's partitions easy.
Read More -
Partition Master Free can Resize, Move, Merge, Migrate, and Copy disks or partitions; convert to local, change label, defragment, check and explore partition; and much more. A premium upgrade adds free tech support and the ability to resize dynamic volumes.
Read More -
It won't hot image your drives or align them, but since it's coupled with a partition manager, it allows you do perform many tasks at once, instead of just cloning drives. You can move partitions around, resize them, defragment, and more, along with the other tools you'd expect from a cloning tool.
Read More
Related Articles
-
How to Boot Samsung Laptop From USB on Windows 10/11
![author icon]() Sherly/2026/08/14
Sherly/2026/08/14 -
BitLocker Automatic Device Encryption - Reasons & Solutions
![author icon]() Sherly/2026/08/14
Sherly/2026/08/14 -
How to Repair BitLocker Encrypted Drive in Windows 11/10
![author icon]() Cici/2026/08/14
Cici/2026/08/14 -
Windows 11 Password Reset USB Free Download - Unlock Now
![author icon]() Joey Albert/2026/08/14
Joey Albert/2026/08/14
 Cici/2026/08/14
  Joey Albert/2026/08/14