
Content
Page Table of Contents
About the Author
Hot Topics
Starting with Windows 11 version 24H2, Microsoft enables BitLocker by default during setup, even on Windows 11 Home. This happens if your device meets basic hardware requirements like TPM 2.0 and Secure Boot, and you sign in with a Microsoft account.
If you are stuck on the BitLocker recovery screen or can't find the recovery key, you might want to disable BitLocker on Windows 11 Home. This guide shows you how to disable BitLocker on Windows 11 Home through four ways.
| Workable Solutions | Apply For |
|---|---|
| Best when you can't disable BitLocker via other methods; click-based and works on all Windows editions. | |
| Simple one-click option, but only available on some OEM devices. | |
| Reliable fallback for advanced users who prefer built-in tools. | |
| Flexible for scripting and managing multiple drives at once. |
Can You Disable BitLocker on Windows 11 Home?
Microsoft does not include the full BitLocker feature set on Windows 11 Home. You will not find the classic "Manage BitLocker" option in Control Panel. Microsoft uses a version called Device Encryption that turns on automatically when your device meets three conditions:
- TPM 2.0 chip is present and enabled
- Secure Boot is turned on in UEFI/BIOS
- You sign in with a Microsoft account
You might not need this level of security. Some tutorials may suggest upgrading from Windows 11 Home to Windows 11 Pro to unlock advanced features of BitLocker. But can you turn off BitLocker on Windows 11 Home?
The answer is yes. You can disable BitLocker in several ways, including a BitLocker management tool, Windows settings, Command Prompt, or PowerShell. Let's move on to the next part to learn the detailed methods.
Method 1. Disable BitLocker on Windows 11 Home with EaseUS Partition Master
Windows 11 Home does not introduce the full BitLocker management panel. Some OEMs like Dell may hide PCs with the Device encryption toggle. Then, your go‑to option is EaseUS Partition Master.
EaseUS Partition Master is the enterprise-level tool for users who prefer a visual interface and do not want to deal with command lines. It's a professional disk manager that offers a dedicated BitLocker Manager for Windows users, including Windows 11 Home, Pro, and Enterprise.
Why choose EaseUS Partition Master? Besides disabling BitLocker, it's also a comprehensive BitLocker manager software to help Windows users to manage and control BitLocker:
- Disable BitLocker directly on Windows 11 Home
- No need to upgrade your OS just to manage encryption
- Retrieve BitLocker recovery keys (lost or forgotten)
- Support turning on, turning off, locking, and unlocking BitLocker
- Fix BitLocker blue screen and boot loop
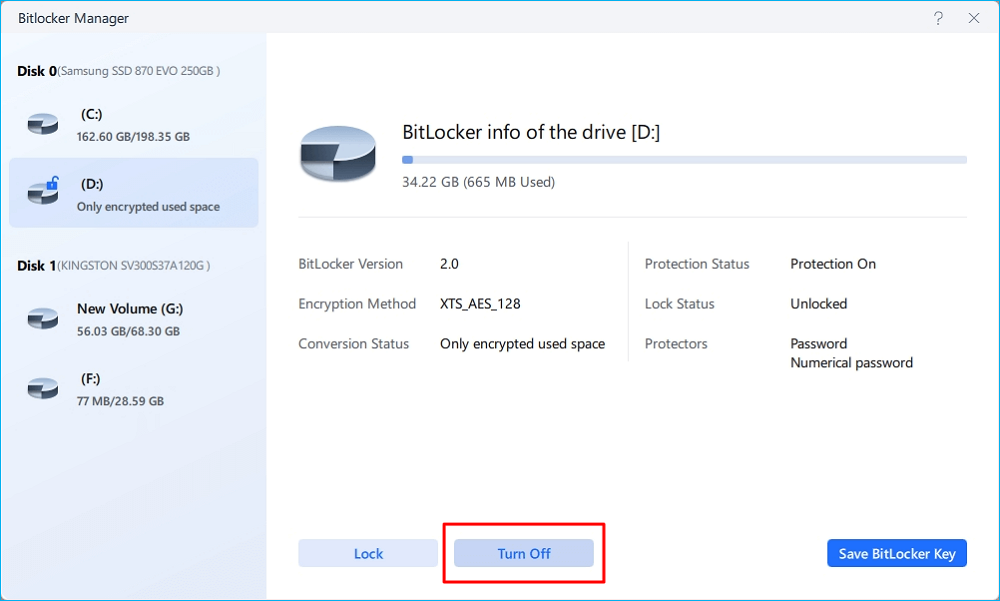
Step 1. Open EaseUS Partition Master and right-click on the BitLocker-encrypted drive.
Step 2. Select "BitLocker Manager," and you will see a new window that allows you to perform BitLocker-relevant ops.
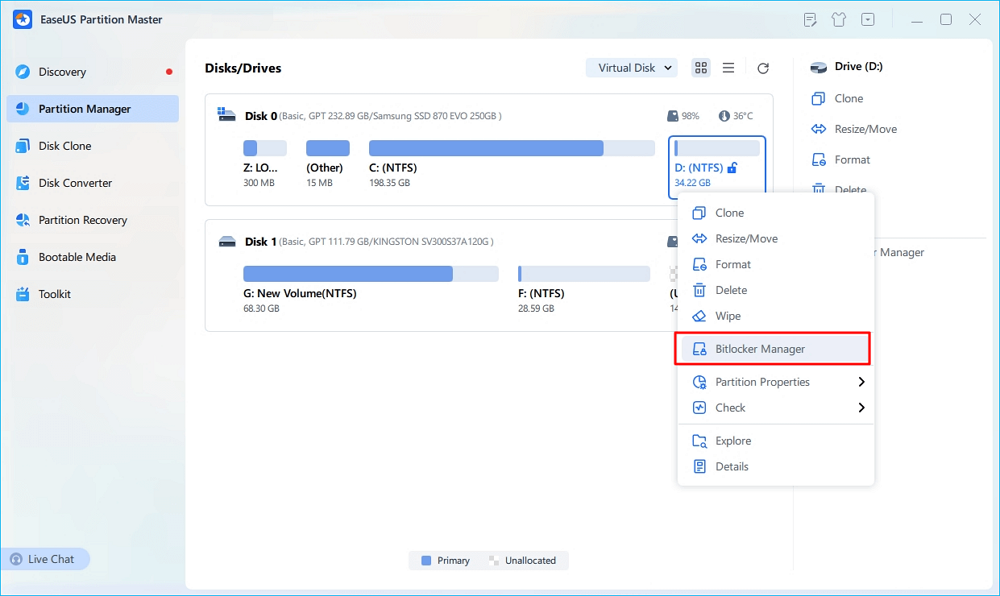
Step 3. Click "Turn Off" for your target drive, click "Yes" to confirm you want to turn off BitLocker on your partition, and wait patiently until it's done.
Method 2. Turn Off BitLocker on Windows 11 Home in Settings
If you are using Windows 11 Home, you can use Device encryption in Settings to disable BitLocker. Microsoft designed this for mainstream home users who want a one‑click solution. You do not need to install anything.
- Tip
- If you do not see "Device encryption" in Settings, your hardware may not support it, or your PC manufacturer has hidden the option. In that case, try Method 1
Here is how to disable BitLocker on Windows 11 Home:
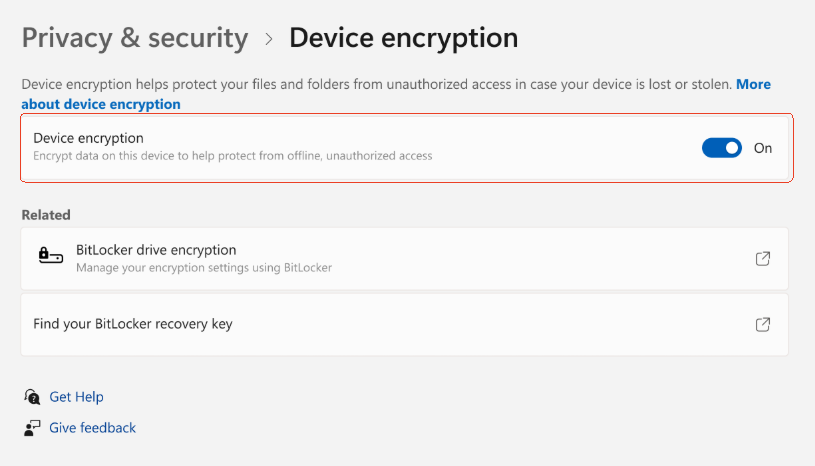
Step 1. Press Win + I to open Settings.
Step 2. Go to Privacy & security > Device encryption.
Step 3. If encryption is on, you will see a toggle switch. Turn it off.
Step 4. Windows will start decrypting your drive.
Step 5. Once complete, restart your computer.
For a complete overview of BitLocker management, see our [BitLocker Management and Operations Guide].
Method 3. Disable BitLocker on Windows 11 Home via Command Prompt
Another way to disable BitLocker on Windows 11 Home is using Command Prompt. Command Prompt works at the system level. This method is also useful if you manage multiple PCs and want to script the process.
Refer to the following steps.
Step 1. In the Search bar, type "Command Prompt."
Step 2. Select "Run as administrator."
Step 3. Enter the following command to check encryption status:
manage-bde -status
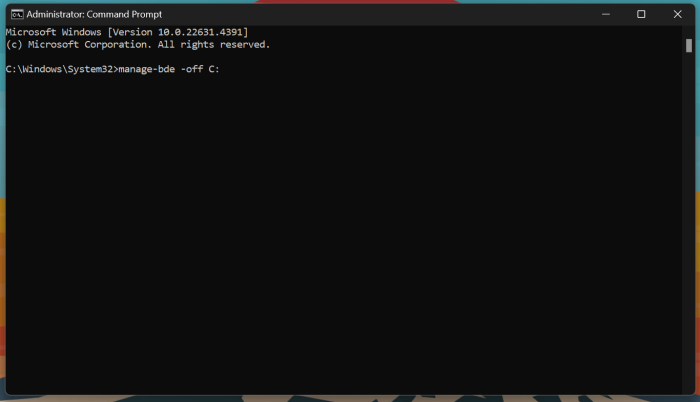
Step 4. If the drive is encrypted, run:
manage-bde -off C:
(Replace C: with your actual drive letter if different.)
Method 4. Disable BitLocker Using PowerShell on Windows 11 Home
You can also disable BitLocker using PowerShell. PowerShell gives you more detailed output. You can see the encryption percentage, protector types, and key IDs in a structured format. If you want more control or plan to automate decryption, PowerShell is better than Command Prompt.
Step 1. In the Search bar, type "PowerShell."
Step 2. Run it as administrator.
Step 3. To check encryption status, run:
Get-BitLockerVolume -MountPoint C:
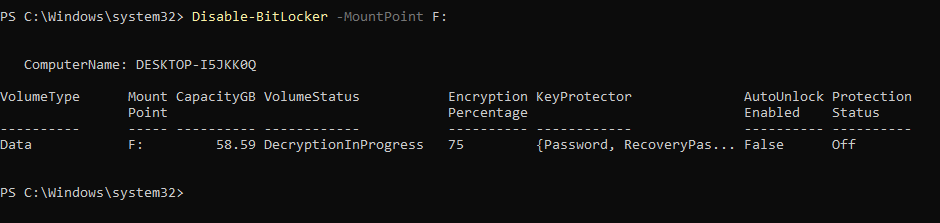
Step 4. To turn off BitLocker encryption, run:
Disable-BitLocker -MountPoint C:
(Replace C: with your drive letter)
Conclusion
Starting with Windows 11 24H2, encryption turns on by default for devices with TPM 2.0 and Secure Boot when you sign in with a Microsoft account. This may lead to frequent recovery key prompts and performance concerns. Disabling BitLocker on Windows 11 Home is possible, even though Microsoft hides the full feature set.
You have four options to disable BitLocker on Windows 11 Home:
- Use EaseUS Partition Master for a guided, click‑based experience
- Turn off Device encryption in Settings
- Run manage-bde -off in Command Prompt
- Use Disable-BitLocker in PowerShell
FAQs
1. What Happens After Disabling BitLocker?
Your files stay safe. Decryption removes only the encryption layer, not your data. Documents, photos, and apps remain untouched. You may see faster boot times and file access on older hardware. But without BitLocker, if your device is lost or stolen, others can access your drive.
2. Can You Turn BitLocker Back On After Disabling?
Yes, you can re‑enable encryption anytime. Toggle Device encryption back on in Settings. Encryption happens in the background. Your PC stays usable during the process. Save your recovery key to your Microsoft account. You will need it if hardware changes or tampering is detected.
3. What Is the Difference Between Windows Home and Pro BitLocker?
Windows Home uses Device encryption. It auto‑enables, lacks a Control Panel, and usually covers only the system drive. Pro offers a full page for BitLocker management. You get manual control, multi‑drive support, PIN or startup key options. Pro fits those who need external drive encryption or centralized management across multiple PCs.
How Can We Help You
About the Author

Updated by Tracy King
Tracy became a member of the EaseUS content team in 2013. Being a technical writer for over 10 years, she is enthusiastic about sharing tips to assist readers in resolving complex issues in disk management, file transfer, PC & Mac performance optimization, etc., like an expert.

Written by Joey Albert
Joey is an enthusiast of science and technology. With a passion for uncovering the latest tech innovations, she creates clear, engaging how-to guides that make technology accessible and enjoyable for all.
Product Reviews
-
I love that the changes you make with EaseUS Partition Master Free aren't immediately applied to the disks. It makes it way easier to play out what will happen after you've made all the changes. I also think the overall look and feel of EaseUS Partition Master Free makes whatever you're doing with your computer's partitions easy.
Read More -
Partition Master Free can Resize, Move, Merge, Migrate, and Copy disks or partitions; convert to local, change label, defragment, check and explore partition; and much more. A premium upgrade adds free tech support and the ability to resize dynamic volumes.
Read More -
It won't hot image your drives or align them, but since it's coupled with a partition manager, it allows you do perform many tasks at once, instead of just cloning drives. You can move partitions around, resize them, defragment, and more, along with the other tools you'd expect from a cloning tool.
Read More
Related Articles
-
How to Format a BitLocker Encrypted Drive Without Recovery Key
![author icon]() Sherly/2026/10/22
Sherly/2026/10/22 -
7 Easy Ways to Fix Windows 11 Stuck on Boot Screen
![author icon]() Sherly/2026/10/22
Sherly/2026/10/22 -
MBR or GPT Corruption No Boot | How to Fix
![author icon]() Cici/2026/10/22
Cici/2026/10/22 -
How to Open BitLocker-Encrypted USB on Mac, No Data Loss
![author icon]() Sherly/2026/10/22
Sherly/2026/10/22
 Sherly/2026/10/22
  Cici/2026/10/22