
Content
Page Table of Contents
About the Author
Hot Topics
BitLocker is a useful Windows feature that helps protect your data through disk encryption. It is widely used on laptops, workstations, and servers in both home and business environments. Sometimes, you may need to turn it off:
- Prepare a system image
- Change disk partitions
- Troubleshoot performance issues
Using PowerShell is one of the fastest ways to disable BitLocker. It lets you work from the command line, automate tasks, and even run scripts on multiple machines. In this guide, we will walk through how to disable BitLocker with PowerShell.
Before You Disable BitLocker
Before you turn off BitLocker using PowerShell, make sure a few basic requirements are met. This helps you avoid errors and reduces the risk of data loss.
1️⃣Access to the drive
The drive you want to modify must be accessible in Windows. If BitLocker asks for a recovery key at boot, unlock the drive first. It is also a good idea to keep the recovery key safe until all changes are complete.
2️⃣Back up important data
While decryption normally completes without problems, you should always keep recent backups of important files. If something goes wrong, you can restore your data.
3️⃣Administrator rights
Please run PowerShell as an administrator. Without elevated rights, BitLocker commands will fail or only show status information.
4️⃣Stable power and enough time
Disabling BitLocker decrypts the drive. This can take some time, especially on large or slow disks. Make sure the drive is plugged in and will not shut down unexpectedly during the process.
Disable BitLocker Using PowerShell (Step‑by‑Step)
When you want a direct, script‑based way to turn off BitLocker, PowerShell is one of the most efficient options. This step‑by‑step section shows how to disable BitLocker encryption using PowerShell commands, check drive status, decrypt specific volumes, and safely remove BitLocker protection.
Step 1. Open PowerShell as Administrator
First, open an elevated PowerShell session.
- Click the Search bar and type "PowerShell".
- Right‑click "Windows PowerShell" and choose "Run as administrator".
- If a prompt appears, click "Yes" to allow changes.
Step 2. Check BitLocker Status
Before you turn anything off, check which drives are protected by BitLocker. This prevents you from changing the wrong drive and gives you a clear view of the current state.
- In the PowerShell window, run a BitLocker status command to list all volumes: Get-BitLockerVolume.
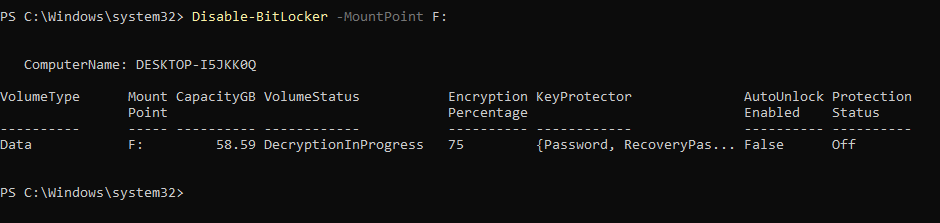
Step 3. Disable BitLocker on a Specific Drive
Most users want to disable BitLocker on one main drive, usually the system drive C: or a data drive.
- Run the following command, replacing C: with your target drive letter: Disable-BitLocker -MountPoint C:
For a complete overview of BitLocker management, see our [BitLocker Management and Operations Guide].
Step 4. Disable BitLocker on All Encrypted Drives (Optional)
If you need to remove BitLocker protection from all encrypted volumes, you can use PowerShell to apply the change in bulk.
- Execute these commands:
$BLV = Get-BitLockerVolume
Disable-BitLocker -MountPoint $BLV
Step 5. Monitor decryption progress
Decryption takes time depending on the drive size. If you want to know the process, you can run:
Get-BitLockerVolume -MountPoint C:
Wait for decryption to complete. After that, you can confirm that BitLocker is actually disabled.
📺Here is a short video that shows you the quick process to disable BitLocker using PowerShell:
All-in-one BitLocker Manager to Disable BitLocker Encryption
While PowerShell works well, it's not ideal for everyone. Some users feel more comfortable with a clear interface rather than typing commands. In that case, EaseUS Partition Master is an excellent choice for handling both BitLocker and everyday disk management tasks. This tool lets you manage partitions and BitLocker encryption in a more visual way. It offers a free BitLocker management feature to help you solve BitLocker-related issues, such as:
- Check the status of BitLocker
- Turn on BitLocker
- Turn off BitLocker
- Unlock BitLocker
- Find BitLocker keys
- Resize, extend, shrink unlocked BitLocker partition
Here is how to disable BitLocker with EaseUS Partition Master:
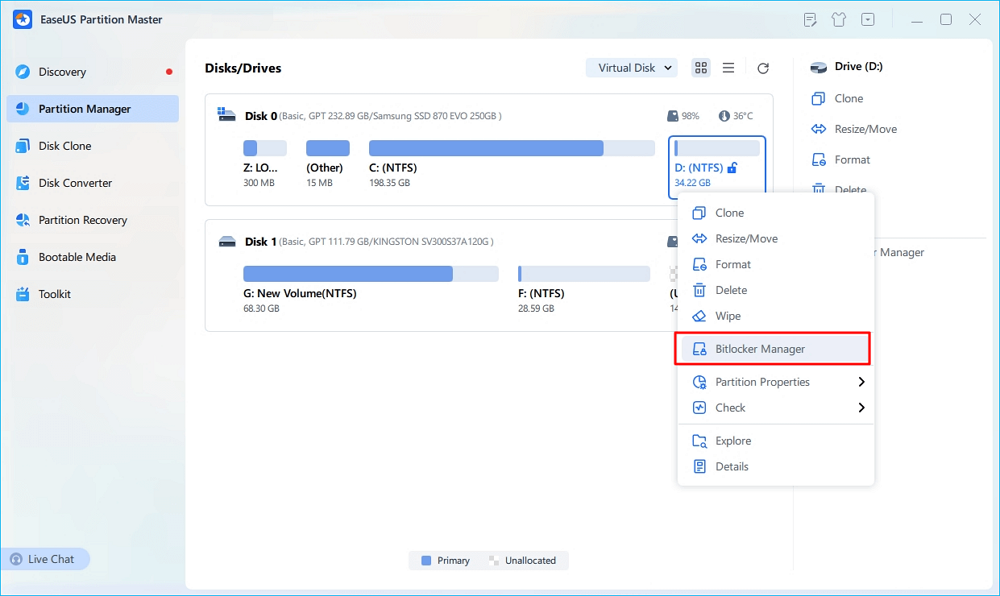
Step 1. Open EaseUS Partition Master and right-click on the BitLocker-encrypted drive.
Step 2. Select "BitLocker Manager," and you will see a new window that allows you to perform BitLocker-relevant ops.
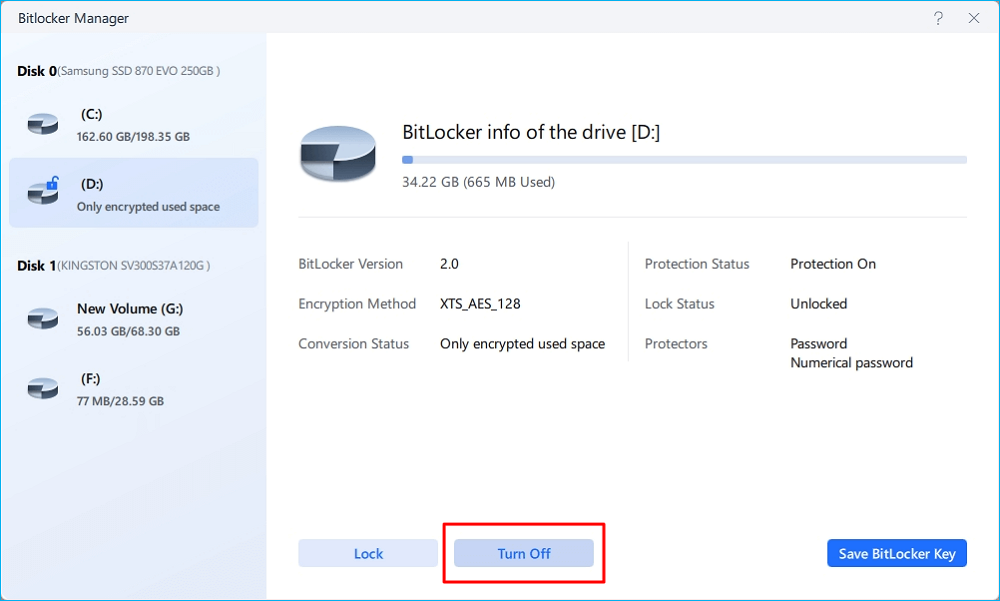
Step 3. Click "Turn Off" for your target drive, click "Yes" to confirm you want to turn off BitLocker on your partition, and wait patiently until it's done.
EaseUS Partition Master is not limited to encryption control. It also includes a wide set of disk features, such as resizing partitions, converting disk types, and preparing drives for system migration.
Conclusion
Now, you know how to disable BitLocker using PowerShell. It is a safe and practical method when you follow clear steps and meet the basic requirements. It gives you full control over how and when encryption is removed. For users who prefer a visual tool, EaseUS Partition Master offers an easier way to manage BitLocker and other disk tasks through a single interface.
💫Comparison: Disable BitLocker with PowerShell vs EaseUS Partition Master
| Method | PowerShell | EaseUS Partition Master |
| How It Works | Command‑line scripts and BitLocker cmdlets | Graphical interface with guided actions |
| Time | Depends on drive size and hardware | About 1 minute |
| Difficulty | Medium | Easy |
| Best For | IT admins, power users, scripted deployments | Everyday users, visual workflow, mixed disk tasks |
| Advantages | Precise control | Simple UI, all‑in‑one disk tools |
| Disadvantages | Needs command‑line skills, easy to mistype commands | Requires extra software |
FAQs
1. How to turn off BitLocker in Windows 11?
You can turn off BitLocker in Windows 11 by going to the Control Panel. Select "System and Security," then click "BitLocker Drive Encryption." Find the drive you want to decrypt and select "Turn off BitLocker." Follow the prompts to complete the decryption process. You can also use PowerShell commands to disable BitLocker.
2. How to disable BitLocker without recovery key?
Disabling BitLocker without a recovery key may require professional assistance. The key is necessary for unlocking encryption. However, you can try accessing files using a Microsoft account if it is associated with your BitLocker key. A professional data recovery service might help recover important files without the key.
3. How to disable BitLocker without logging in?
Disabling BitLocker without logging in is not straightforward. If you have an administrator's password, you can use a Recovery Environment or Bootable Media. Another option is using Command Prompt via Safe Mode or external drives to disable it.
How Can We Help You
About the Author

Sherly joined EaseUS in 2022 and she has always loved writing articles and enjoys the fun they bring. She receives professional training here, focusing on product performance and other relative knowledge. She has written over 200 articles to help people overcome computing issues.

Written by Joey Albert
Joey is an enthusiast of science and technology. With a passion for uncovering the latest tech innovations, she creates clear, engaging how-to guides that make technology accessible and enjoyable for all.
Product Reviews
-
I love that the changes you make with EaseUS Partition Master Free aren't immediately applied to the disks. It makes it way easier to play out what will happen after you've made all the changes. I also think the overall look and feel of EaseUS Partition Master Free makes whatever you're doing with your computer's partitions easy.
Read More -
Partition Master Free can Resize, Move, Merge, Migrate, and Copy disks or partitions; convert to local, change label, defragment, check and explore partition; and much more. A premium upgrade adds free tech support and the ability to resize dynamic volumes.
Read More -
It won't hot image your drives or align them, but since it's coupled with a partition manager, it allows you do perform many tasks at once, instead of just cloning drives. You can move partitions around, resize them, defragment, and more, along with the other tools you'd expect from a cloning tool.
Read More
Related Articles
-
[Fixed] BitLocker Backup Recovery Key Option Missing
![author icon]() Cici/2026/08/13
Cici/2026/08/13 -
How to Format Laptop or PC Windows 7 Without CD (Full Guides)
![author icon]() Cedric/2026/08/13
Cedric/2026/08/13 -
Windows 7 Password Reset Tools - Top 5 Checklist
![author icon]() Sherly/2026/06/17
Sherly/2026/06/17 -
How-to: Create USB Bootable Partition Manager to Manage Partitions Safely
![author icon]() Daisy/2026/08/13
Daisy/2026/08/13
 Cici/2026/08/13
  Cedric/2026/08/13
  Daisy/2026/08/13