
Content
Page Table of Contents
About the Author
Hot Topics
Looking for a way to bypass the BitLocker recovery screen without a recovery key? If your PC suddenly asks for a 48-digit BitLocker recovery key that you don't have, it can feel like you're completely locked out. Unfortunately, BitLocker encryption cannot be bypassed without the correct key. However, if the recovery screen was triggered by a Windows update, TPM issue, BIOS change, or another system event, you may still be able to regain access. This guide explains why the BitLocker recovery screen appears and walks you through every practical solution, from locating a forgotten recovery key to reinstalling Windows as a last resort.
Why BitLocker Recovery Screen Happens?
In most cases, the BitLocker recovery screen doesn't appear because something is wrong with your drive. Instead, Windows detects a security change that it can't verify and asks for the BitLocker recovery key before unlocking the encrypted drive.
Here are the most common reasons why BitLocker enters recovery mode:
Windows updates changed security settings
- Some Windows updates modify Secure Boot settings, TPM measurements, or startup files. When this happens, BitLocker may think the device has changed and require the recovery key before allowing Windows to start.
Your computer hardware changed
- Replacing components such as the motherboard, SSD, CPU, or TPM chip can trigger BitLocker Recovery because the hardware no longer matches the security information stored when encryption was enabled.
Temporary communication issues between BitLocker and TPM
- Sometimes the Trusted Platform Module (TPM) fails to correctly verify the device during startup. Even without any actual hardware changes, BitLocker may mistakenly display the recovery screen.
BIOS or UEFI settings were modified
- Changing Secure Boot, switching between Legacy and UEFI boot mode, updating the BIOS, or changing the boot order can all cause BitLocker to request the recovery key.
Boot files are damaged
- Corrupted boot configuration data (BCD) or startup files may prevent Windows from validating the trusted boot environment, causing BitLocker Recovery to appear.
To learn more about BitLocker, refer to this BitLocker troubleshooting guide. If this guide helps you solve the problem, consider sharing it with someone else who is stuck on the BitLocker recovery screen.

Stuck on the BitLocker Recovery Screen Without the Recovery Key? How to Fix
The right solution depends on why you're seeing the BitLocker recovery screen. Start with the least invasive method before moving on to options that may erase your data.
| Method | Best For | Data Loss |
|---|---|---|
| Find hidden or forgotten BitLocker recovery keys | You may have backed up the recovery key | ❌ No |
| Fix a motherboard or TPM glitch | Recovery screen appears after Windows Update, BIOS update, or hardware changes | ❌ Usually No |
| Disable BitLocker in Safe Mode | Windows is stuck in a startup loop | ❌ Usually No |
| Reset and reinstall Windows | Recovery key cannot be found anywhere | ✅ Yes, permanent data loss |
Fix 1. Find Hidden or Forgotten BitLocker Recovery Keys
Before trying advanced troubleshooting, check whether your BitLocker recovery key has already been backed up. Many users don't realize Windows automatically saves it when BitLocker is enabled.
- Microsoft Account: Sign in to the Microsoft account associated with your PC. If BitLocker automatically backed up the recovery key, you'll find it there.
- Work or School Account: If this is a work or school computer, your organization's IT administrator may have stored the recovery key in Microsoft Entra ID or Active Directory.
- USB Drive or Printed Copy: During BitLocker setup, Windows gives you the option to save the recovery key to a USB flash drive or print it. Check any USB drives or documents you may have kept.
- Other Backup Locations: Some users save the recovery key in a password manager, cloud storage, or another secure location. It's worth checking these places before moving on.
If you still can't locate the recovery key, EaseUS Partition Master provides a BitLocker Recovery key retrieval feature. By creating a bootable USB on another working computer, you can start the locked PC, and EaseUS Partition Master will search for BitLocker recovery keys and unlock BitLocker automatically.
You'll need:
- Another working Windows computer
- A USB flash drive
- EaseUS Partition Master
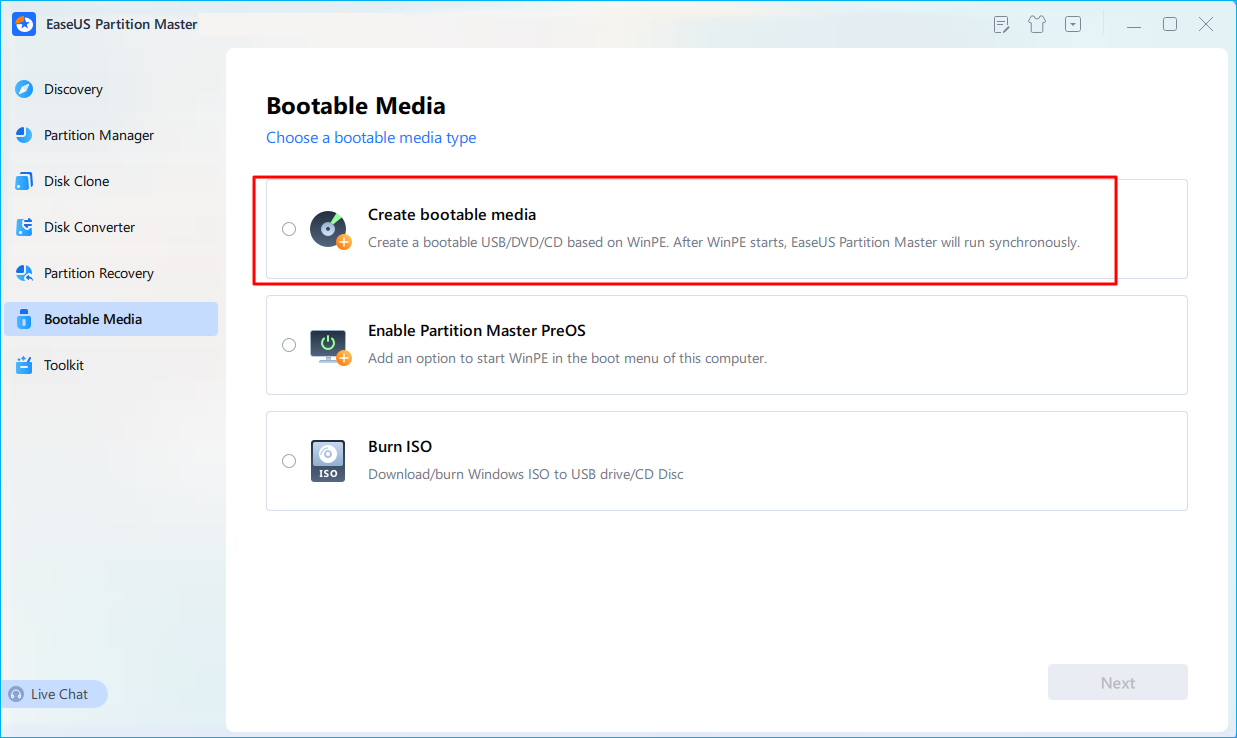
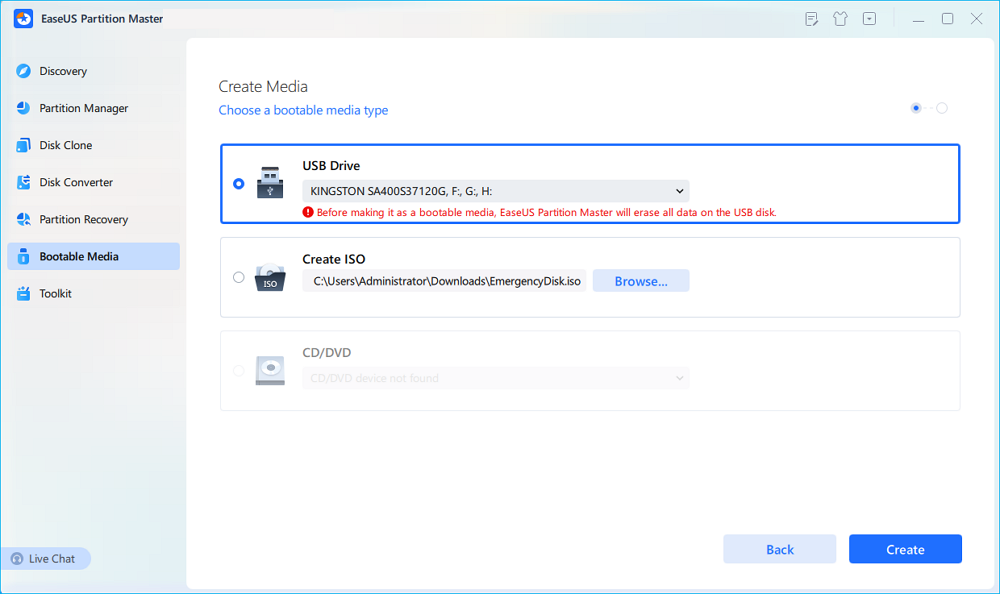
Step 1. First, connect a USB to the PC running properly. Launch EaseUS Partition Master, navigate to "Bootable Media" section, and click "Create bootable media" option. Click "Next" to continue.
Step 2. Select the target USB drive and click "Create" to continue. Please back up your data in advance since this will erase all data on the USB drive. Then, click "yes" to confirm when you see the warning. Do not exit EaseUS Partition Master until it's done.
Step 3. Connect the bootable USB to the BitLocker encrypted PC and restart PC. During the reboot, press the BIOS key (F2/F8/F12/DEL/ESC) to access BIOS and set the bootable USB as the boot drive. This PC will automatically boot from the USB disk.
Step 4. EaseUS Partition Master will automatically unlock the BitLocker encrypted drive and you can see a "unlock" icon.
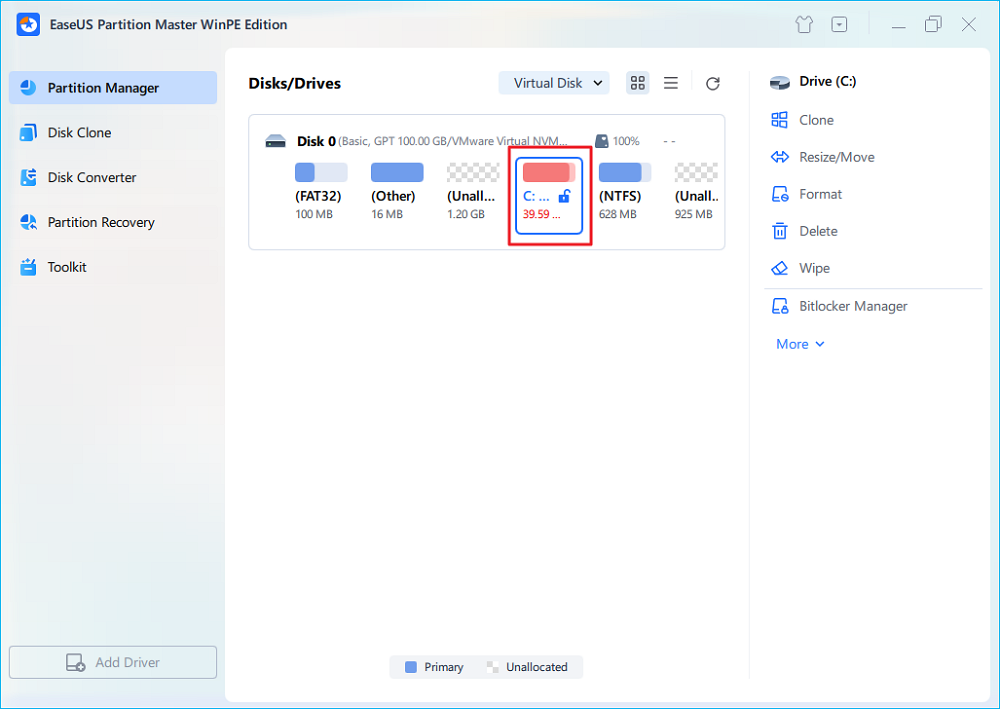
Step 5. Hover the mouse on the BitLocker partition; you can see more info of this partition and manage the BitLocker partition such as locking it or turning off BitLocker.
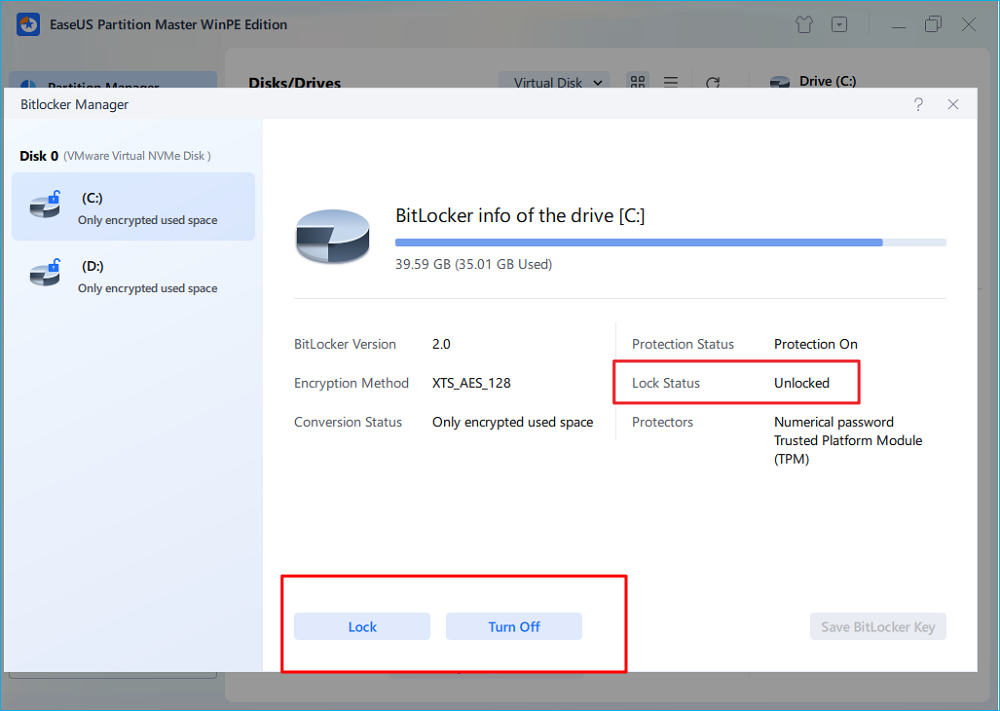
Alongside finding a missing or forgotten BitLocker recovery key, EaseUS Partition Master works more like a BitLocker management tool that supports resizing BitLocker partitions, unlocking BitLocker partitions, and even resolving BitLocker recovery screen issues. If you like this software, don't forget to share it online to help more Windows owners there:
Fix 2. Fix a Motherboard or TPM Glitch
If the BitLocker recovery screen started appearing after a Windows update, BIOS update, or hardware upgrade, the issue may be related to TPM measurements rather than the encrypted drive itself.
Follow these steps:
Step 1. Shut down your computer completely.
Turn off the PC and disconnect the power cable. If you're using a laptop with a removable battery, remove it as well.
Step 2. Wait for about 30 seconds.
Reconnect the power and turn the computer back on.
Step 3. Check whether Windows starts normally.
If the recovery screen still appears, continue with the next steps.
Step 4. Enter the BIOS or UEFI settings.
Restart your PC and press the appropriate key (usually Delete, F2, F10, or Esc) during startup.
Step 5. Verify the security settings.
Make sure:
- TPM is enabled.
- Secure Boot is configured correctly.
- The boot mode (UEFI or Legacy) hasn't changed.
- The system drive is still the primary boot device.
If you recently changed any of these settings, restore them to their previous values.
Step 6. Save the changes and restart your PC.
If a TPM mismatch caused the recovery prompt, correcting the firmware settings may allow Windows to boot normally again.
Fix 3. Boot into Safe Mode to Fix Startup Issues
If your PC keeps restarting after the BitLocker recovery screen, Safe Mode may help you troubleshoot the underlying startup problem.
Step 1. On the BitLocker recovery screen, press Esc to display more recovery options.
Step 2. Click Skip this drive.
Step 3. Go to: Troubleshoot > Advanced options > Command Prompt
Step 4. Type the following command and press Enter:
bcdedit /set {default} safeboot minimal
Step 5. Close Command Prompt and click Continue to restart your computer.
Step 6. If Windows successfully boots into Safe Mode, sign in to your account.
Step 7. Open Command Prompt as Administrator and run:
bcdedit /deletevalue {default} safeboot
Step 8. Restart the computer normally.
If the startup issue, not BitLocker itself, was preventing Windows from loading, this method may help your PC boot successfully.
Fix 4. Reset Your PC and Reinstall Windows
If none of the previous methods work and the BitLocker recovery key cannot be recovered, reinstalling Windows is the only remaining option.
🔴Important: Reinstalling Windows removes the BitLocker-protected partition. Without the recovery key, any files stored on that partition are permanently inaccessible.
You'll need:
- Another working Windows computer
- A USB flash drive (at least 8 GB)
- A stable Internet connection
Step 1. Create a Windows installation USB using Microsoft's Media Creation Tool on another computer.
Learn how to create a Windows installation USB from Microsoft Support.
Step 2. Insert the USB into the locked computer and boot from it.
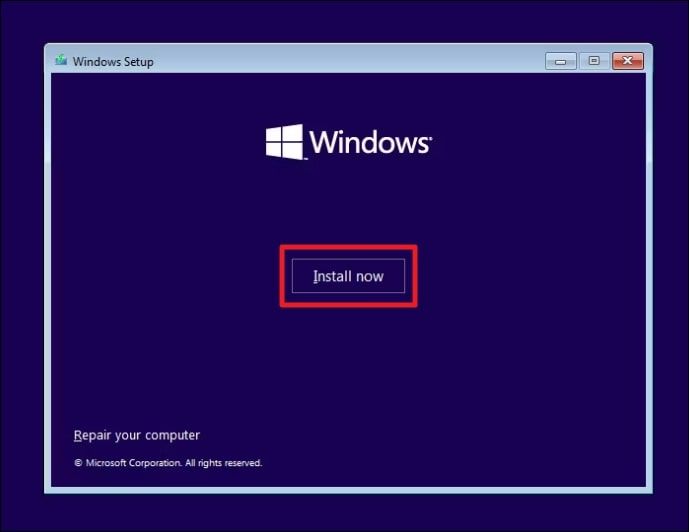
Step 3. Select your language and keyboard preferences, then click Install now.
Step 4. When prompted to choose where to install Windows, delete the BitLocker-encrypted partition.
Step 5. Create a new partition and continue the Windows installation.
Step 6. Complete the Windows setup and restore your files from a backup, if available.
For a complete overview of BitLocker management, see our [BitLocker Management and Operations Guide].
Conclusion
Getting stuck on the BitLocker recovery screen doesn't always mean your data is lost. In many cases, the recovery prompt is caused by a Windows update, BIOS change, or TPM issue rather than a damaged drive. Start by checking every possible location for your BitLocker recovery key, then work through the troubleshooting methods in this guide.
If the key cannot be recovered, reinstalling Windows is the only practical way to use the computer again, although the encrypted data cannot be restored without the recovery key.
FAQs About PC Locked By BitLocker Recovery Screen
1. Can I bypass the BitLocker recovery screen without the recovery key?
No. There is no legitimate way to bypass BitLocker encryption without the recovery key if the drive is locked. If the recovery screen was triggered by a TPM or firmware issue, however, fixing the underlying problem may allow Windows to start normally without entering recovery mode again.
2. Why is BitLocker suddenly asking for my recovery key?
BitLocker commonly requests the recovery key after Windows updates, BIOS or firmware updates, hardware replacements, TPM errors, Secure Boot changes, or modifications to the boot configuration.
3. Where else can I find my BitLocker recovery key?
Check your Microsoft account, your work or school account, a USB flash drive, a printed copy, a password manager, or any documentation created when BitLocker was enabled. Organizations may also store recovery keys in Microsoft Entra ID or Active Directory.
4. Can Windows Update trigger the BitLocker recovery screen?
Yes. Some Windows updates change TPM measurements or startup files. BitLocker treats these changes as potential security risks and requests the recovery key to verify that the device hasn't been tampered with.
5. Will reinstalling Windows remove BitLocker?
Yes. Reinstalling Windows removes the encrypted partition and installs a fresh copy of Windows. However, any files encrypted with BitLocker on the original partition cannot be recovered without the recovery key.
How Can We Help You
About the Author

Updated by Tracy King
Tracy became a member of the EaseUS content team in 2013. Being a technical writer for over 10 years, she is enthusiastic about sharing tips to assist readers in resolving complex issues in disk management, file transfer, PC & Mac performance optimization, etc., like an expert.

Sherly joined EaseUS in 2022 and she has always loved writing articles and enjoys the fun they bring. She receives professional training here, focusing on product performance and other relative knowledge. She has written over 200 articles to help people overcome computing issues.
Product Reviews
-
I love that the changes you make with EaseUS Partition Master Free aren't immediately applied to the disks. It makes it way easier to play out what will happen after you've made all the changes. I also think the overall look and feel of EaseUS Partition Master Free makes whatever you're doing with your computer's partitions easy.
Read More -
Partition Master Free can Resize, Move, Merge, Migrate, and Copy disks or partitions; convert to local, change label, defragment, check and explore partition; and much more. A premium upgrade adds free tech support and the ability to resize dynamic volumes.
Read More -
It won't hot image your drives or align them, but since it's coupled with a partition manager, it allows you do perform many tasks at once, instead of just cloning drives. You can move partitions around, resize them, defragment, and more, along with the other tools you'd expect from a cloning tool.
Read More
Related Articles
-
Windows 10 Won't Boot With Second Hard Drive - 8 Tips
![author icon]() Sherly/2026/08/13
Sherly/2026/08/13 -
How to Disable BitLocker on Windows 11 Home
![author icon]() Joey Albert/2026/08/17
Joey Albert/2026/08/17 -
How to Create EaseUS WinPE Bootable Disk in Windows 10/8/7
![author icon]() Daisy/2026/08/14
Daisy/2026/08/14 -
Windows 7 Password Reset USB Free Download | Safe
![author icon]() Sherly/2026/08/13
Sherly/2026/08/13
 Joey Albert/2026/08/17
  Daisy/2026/08/14