
Content
Page Table of Contents
About the Author
Hot Topics
If you need to disable BitLocker in BIOS Windows 11, such as before updating firmware or changing TPM/Secure Boot settings, it's important to prepare your system correctly. BitLocker encrypts your drives to protect data, but active encryption can trigger recovery key prompts or boot issues during BIOS changes. This guide from EaseUS Software provides safe, step-by-step methods to disable BitLocker in Windows 11 in BIOS and prevent unnecessary interruptions.
Why Disable BitLocker Before BIOS Changes
BitLocker is a full-disk encryption feature that secures your data. When you modify BIOS settings like TPM or Secure Boot with BitLocker enabled, Windows may detect a security change and ask for the recovery key on the next boot. Temporarily disabling or suspending BitLocker ensures smooth BIOS access and prevents accidental lockouts.
How to Disable BitLocker Before Entering BIOS | 3 Ways
When exploring solutions, this section introduces three effective methods to resolve the issue, starting with a reliable third-party partition manager for a simpler and more efficient approach.
Way 1. Use EaseUS Partition Master🔥
The simplest way to manage BitLocker before BIOS changes is with EaseUS Partition Master. This tool lets you quickly disable or suspend BitLocker without navigating multiple menus or using command-line tools. It also helps you check drive status and manage partitions safely.
Key features of EaseUS Partition Master:
- Easily suspend or disable BitLocker encryption
- Prepare your system for BIOS updates without risk
- User-friendly interface for both beginners and advanced users
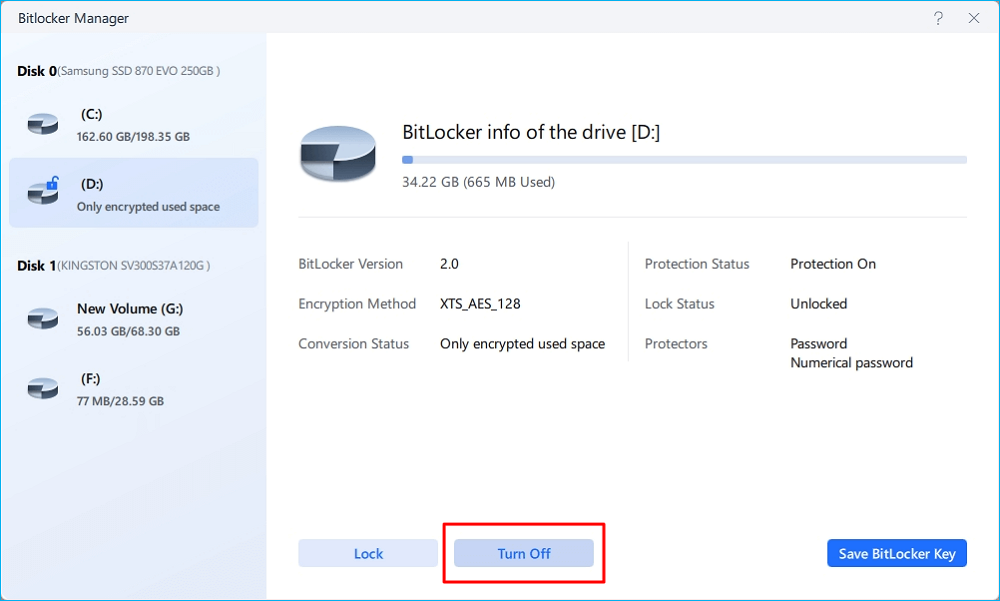
Step 1. Open EaseUS Partition Master and right-click on the BitLocker-encrypted drive.
Step 2. Select "BitLocker Manager," and you will see a new window that allows you to perform BitLocker-relevant ops.

Step 3. Click "Turn Off" for your target drive, click "Yes" to confirm you want to turn off BitLocker on your partition, and wait patiently until it's done.
Way 2. Disable BitLocker via Windows Settings
Windows Settings is the built-in, most reliable way to disable BitLocker in Windows 11, allowing users to either turn off encryption completely or temporarily suspend it before tasks such as BIOS updates or hardware changes. Using Windows Settings, you can safely manage encrypted drives, prevent recovery key prompts after reboot, and ensure system compatibility without risking data loss, making it the simplest and most secure way to control BitLocker.
Please refer to the following steps.
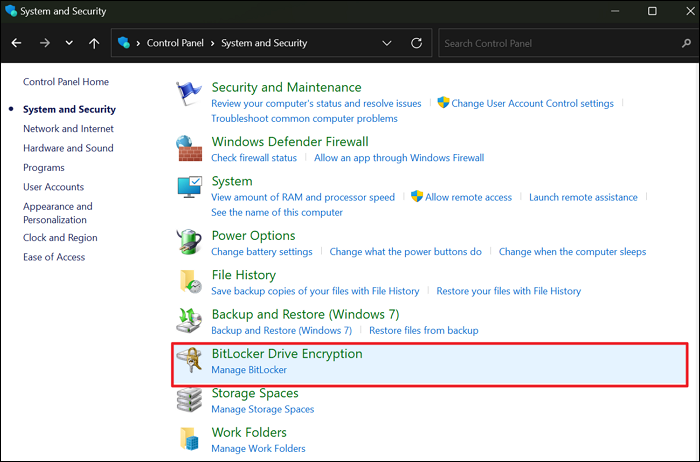
Step 1. Press the control panel in the search bar > click it to open > go to System and Security > click BitLocker Drive Encryption.
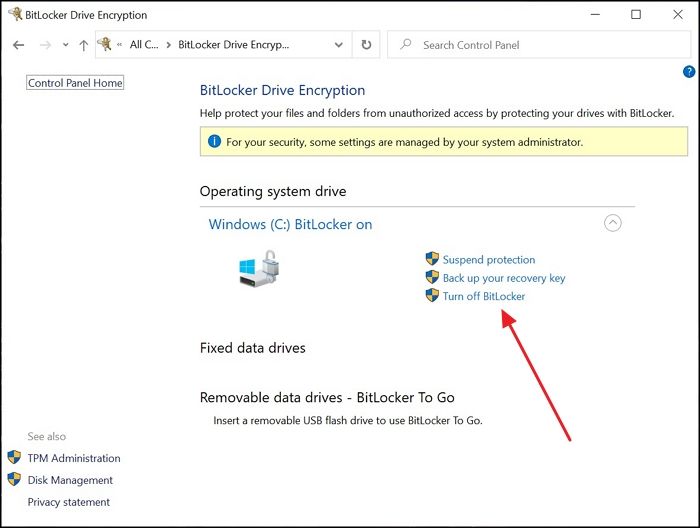
Step 2. In the new pop-up window, select your encrypted drive > click Turn off BitLocker > please wait patiently.
![]()
Way 3. Enter BIOS and Make Changes
Entering the BIOS in Windows 11 does not directly disable BitLocker. Rather, it is used to make hardware or firmware changes, such as modifying TPM or Secure Boot settings that can affect BitLocker encryption. To avoid recovery key prompts or boot issues after these changes, BitLocker must be disabled or suspended in Windows beforehand, making BIOS access a supporting step rather than the actual method for turning off BitLocker.
Step 1. Restart your PC > press F2, F10, Esc, or DEL as the startup screen appears.
Step 2. Figure out the manufacturer of your PC > keep pressing the following corresponding hotkey to enter BIOS.
- HP: F10 or Esc
- Dell: F2 or F12
- Acer: F2 or Del
- Lenovo: F2 or Fn + F2
- Asus: F2 or Esc
- Samsung: F2
- Sony: F1, F2, or F3
Step 3. In your BIOS menu, modify settings such as TPM, Secure Boot, or firmware.
Step 4. Remember to save these changes and exit the BIOS.
With BitLocker disabled or suspended, your system should boot normally without requesting a recovery key.
Conclusion
In short, understanding how to disable BitLocker in Windows 11: in BIOS is crucial before performing BIOS updates or making firmware changes. By temporarily disabling or suspending BitLocker, either through Windows settings or with a trusted tool like EaseUS Partition Master, you can avoid recovery key prompts, ensure a smooth system boot, and protect your data. Following these steps guarantees a seamless BIOS update experience while maintaining the security and performance of your Windows 11 system.
FAQs
Furthermore, this section also includes some related tips about BitLocker. Please check them out if you're intersted.
1. Do I have to disable BitLocker for BIOS update?
Before performing a BIOS update, it's essential to temporarily disable BitLocker on your Windows system. If BitLocker remains active, the system may fail to recognize the encryption key after reboot, prompting users to enter the BitLocker recovery key to continue.
2. How to deactivate BitLocker in Windows 11 CMD?
- For Command Prompt: Windows Command Prompt. Copy. manage-bde.exe -off C: Replace C: with the appropriate drive letter.
- For PowerShell: PowerShell. Copy. Disable-BitLocker -MountPoint "C:" Again, replace C: with the correct drive letter.
3. Will disabling BitLocker slow down my PC?
Disabling BitLocker will not slow down your PC. In fact, it can improve performance. Since BitLocker encryption adds computational overhead, turning it off can improve SSD performance, reduce CPU usage, and boost read/write speeds by up to 45% on some devices.
How Can We Help You
About the Author
"I hope my articles can help solve your technical problems. If you are interested in other articles, you can check the articles at the bottom of this page. Similarly, you can also check my Twitter to get additional help."
Product Reviews
-
I love that the changes you make with EaseUS Partition Master Free aren't immediately applied to the disks. It makes it way easier to play out what will happen after you've made all the changes. I also think the overall look and feel of EaseUS Partition Master Free makes whatever you're doing with your computer's partitions easy.
Read More -
Partition Master Free can Resize, Move, Merge, Migrate, and Copy disks or partitions; convert to local, change label, defragment, check and explore partition; and much more. A premium upgrade adds free tech support and the ability to resize dynamic volumes.
Read More -
It won't hot image your drives or align them, but since it's coupled with a partition manager, it allows you do perform many tasks at once, instead of just cloning drives. You can move partitions around, resize them, defragment, and more, along with the other tools you'd expect from a cloning tool.
Read More
Related Articles
-
How to Change Boot Drive Windows 11 [Beginner's Guide]
![author icon]() Oliver/2026/06/17
Oliver/2026/06/17 -
We Couldn't Create a New Partition or Locate an Existing One
![author icon]() Daisy/2026/06/17
Daisy/2026/06/17 -
Windows Won't Boot After Running CHKDSK: How to Fix?
![author icon]() Cici/2026/06/17
Cici/2026/06/17 -
Change Windows Password Using Command Prompt - 2 Ways
![author icon]() Sherly/2026/06/17
Sherly/2026/06/17


