Though the Mac detects the drive, reading fails due to a file system conflict. Such glitches - the disk you attached was not readable by this computer - still pop up on recent macOS Tahoe versions. Problems often appear with external drives formatted for Windows systems. Compatibility hiccups arise when encryption tools alter standard formatting. Older hardware sometimes triggers recognition errors, too:
- External hard drives
- USB flash drives
- SD cards from cameras or drones
So I recently bought a Kingston USB flash drive and have a bunch of files on there but suddenly, it's not working anymore. I tried "first aid" but it didn't change anything despite saying that the operation was "successful"。 Idk if its a problem but the disk is formatted in exFAT which i saw online could be the problem? Tho it worked just fine before so I'm just at a loss for what to do. - from Reddit
Thankfully, data often remains untouched - ready to be restored. Though problems arise, recovery is still possible in many situations.
Why Is the Attached Disk Not Readable on Mac
On macOS Tahoe or other older versions, this error appears when the system fails to mount a detected disk due to file system incompatibility or corruption.
You will typically see a pop-up with three options:
- Initialize
- Ignore
- Eject
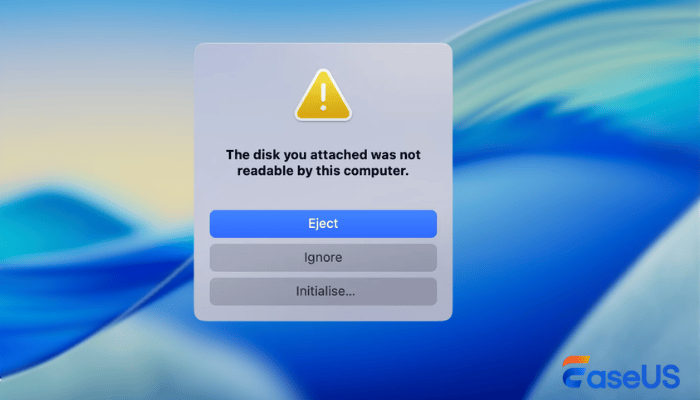
| ⚠️Important: Do NOT click "Initialize" immediately, as it may lead to permanent data loss if done before recovery. |
1️⃣File System Corruption
This is the most common cause. It usually happens when a disk is disconnected improperly or interrupted during read/write operations. Typical triggers include the following:
- Sudden unplugging
- Power failure
- System crash
2️⃣Unsupported or Damaged NTFS
macOS Tahoe still has limited native support for NTFS. While it can read NTFS, corrupted NTFS volumes often fail to mount.
3️⃣Partition Map Damage
If the partition table (GPT or MBR) is damaged, macOS cannot identify valid volumes.
4️⃣Hardware Issues
Physical problems such as damaged USB ports, cables, or failing drives can also trigger this error.
5️⃣macOS Tahoe Compatibility or Driver Issues
Although Tahoe improves disk handling, issues may still occur due to:
- USB-C hub incompatibility
- Outdated firmware on external drives
- Third-party driver conflicts
You can share these possible reasons on social media to let more readers know.

Quick Fix The Disk You Attached Was Not Readable by This Computer on Mac
Occasionally, spotting that message about an unreadable disk on a Mac does not always mean your drive is damaged. More often than not, the root lies in slight connectivity hiccups rather than hardware failure. File formats unrecognized by macOS may trigger the alert without warning. Sometimes, brief software stutters interfere with normal detection. A loose cable can be just as disruptive as corrupted data. Rarely does the problem point to irreversible damage right away.
Start by testing these basic checks before moving to complex solutions - simple issues often hide behind bigger symptoms
- Reconnect the disk to another USB port
- Replace the USB cable or adapter
- Restart your Mac
- Test the disk on another computer (Mac or Windows)
Should the drive function correctly when connected elsewhere, problems probably stem from configuration issues within macOS or underlying system glitches. When access fails across all systems, damage to the file structure or physical components becomes a stronger possibility. In that case, move on to the following methods.
How to Fix "Disk You Attached Not Readable" Error on Your Mac
It's not difficult to fix this disk unreadable problem on Mac by yourself, you can try the following methods one by one, and here's a video guide that can also help you fix this issue quickly:
- 00:23 Fix 1. Plug in Different Devices to Mac
- 00:32 Fix 2. Repair Unreadable Disk with Disk Utility
- 00:55 Fix3. Check the File System of Inserted Disk
Fix 1. Check Unreadable Disk in Disk Utility
Start by checking if macOS recognizes your drive in Disk Utility. Though it might not show up in Finder, you could spot it in Disk Utility - this often means the problem lies in software, not hardware.
Step 1. Begin by launching Disk Utility through the Applications folder, then select "Utilities". Inside that menu, find "Disk Utility" and open it.
Step 2. Next, choose "View" from the upper menu bar before picking "Show All Devices".
Step 3. Locate your external disk in the left sidebar.
Step 4. Check its status:
- When the disk shows up without mounting, a problem with its file structure likely exists.
- When nothing shows up, perhaps something's wrong with the device or how it's linked.
This process lets you see if a software fix might work. Whether the issue can be resolved without hardware changes becomes clear here.
Stop using the disk immediately if you notice:
- Clicking or grinding noise
- Disk not appearing in Disk Utility
- Overheating
In such cases, professional recovery services are required.
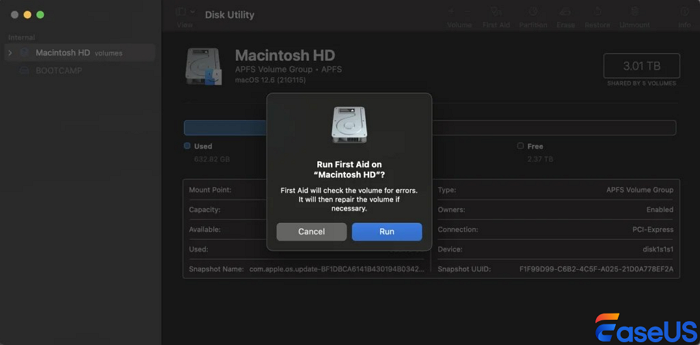
Fix 2. Run First Aid to Repair Disk Errors
The macOS operating system includes a built-in repair tool called First Aid, which can automatically detect and fix common disk errors such as directory corruption or invalid file structures. Check the following tutorial and fix corrupted hard drive on your Mac:
Step 1. Open Disk Utility in the Utilities folder or use Spotlight.
Step 2. Select the problematic disk from the sidebar, and click the "First Aid" button at the top.
Step 3. Click "Run" to begin the repair process.
Step 5. Wait for the process to complete and review the results.
⭐Note: First Aid is safe to use and does not delete data. However, if the corruption is severe, the repair may fail or only partially fix the issue.
Fix 3. Recover Data Before Formatting
If First Aid fails, do not format the disk immediately. Formatting will erase the file system and make recovery more difficult. Instead, your priority should be retrieving important data from the unreadable disk. Professional recovery tools like EaseUS Data Recovery Wizard for Mac can scan RAW or unreadable drives and recover files without relying on the damaged file system.
How Data Recovery Works on Unreadable Disks
Even if a disk is unreadable, the actual data is often still present on the storage sectors.
Advanced recovery tools like EaseUS use sector-level scanning to rebuild lost file structures.
This allows recovery of:
- Photos (JPG, CR2, NEF, ARW)
- Videos (MP4, MOV)
- Documents
- RAW camera files
This reliable data recovery software can help you recover an unreadable SD card on Mac, and other storage devices become RAW and unreadable on your Mac. The overall troubleshooting steps are as follows:
Step 1. Search for lost files
Correctly connect your external hard drive to your Mac. Launch EaseUS Data Recovery Wizard for Mac, and select the external hard drive. Then, click "Search for lost files" to find lost/deleted files on your external devices.

Step 2. Filter and find lost files
After the scan, all file types will be presented in the left panel. Select the file type to find wanted files on your external devices.

Step 3. Preview and recover
Click the file and preview it. Then, select the files you want to recover and click the "Recover" button. You can save your data to local and cloud drives.

⚠️Important Tip: Never save recovered files back to the same disk, as this may overwrite lost data and reduce recovery success.
If you find this information helpful, please share it with others on social media to help them overcome this common challenge.
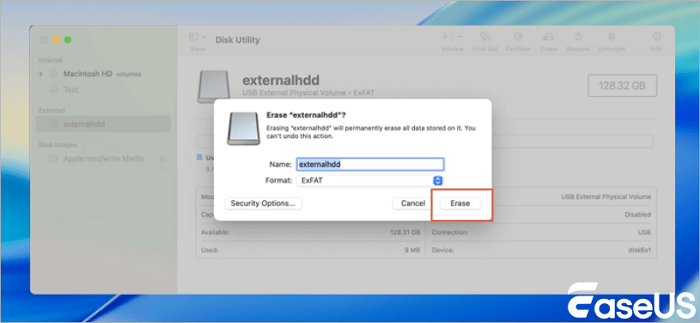
Fix 4. Reformat the Unreadable Disk
After securely retrieving your data, starting over by wiping the drive often works best to restore it to normal operation. With corruption cleared out, a clean file structure can be built - ready for macOS use. Sometimes beginning again fixes what repairs cannot.
Step 1. Begin by launching Disk Utility, and choose the drive showing issues next.
Step 2. Next, choose the "Erase" button located in the upper area.
Step 3. Choose a label for the storage unit next. Then type it into the field provided.
Step 4. Choose a file system format, and confirm by selecting the Erase option.
- APFS Works Well With Macs Only
- exFAT Works on Mac and Windows
Hold on until everything finishes running. Completion comes after some time has passed naturally. Once the process finishes, access to the disk usually returns.
Fix 5. Force Mount the Disk via Terminal
Should the disk appear in Disk Utility without mounting, attempt to manually mount the disk on the Mac in Terminal. When automatic detection stalls, this approach often helps. Yet even if invisible at first, some drives respond once called by command.
Step 1. Launch Terminal found within Applications, then navigate to Utilities. Begin by opening the app labeled Terminal located in the Utilities folder under Applications.
Step 2. Next, enter the diskutil list command, then hit the Enter key.
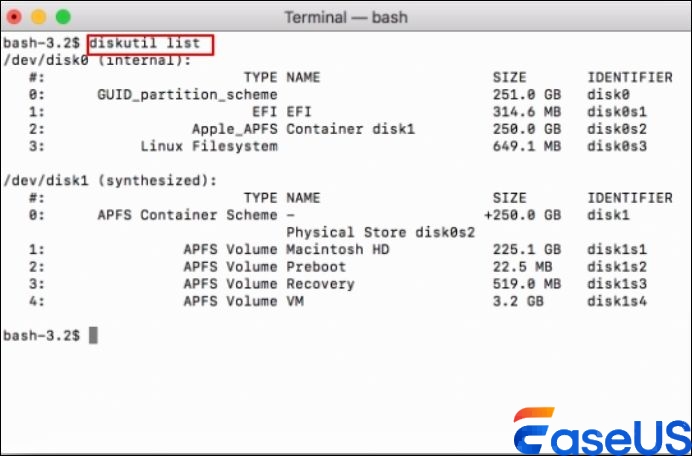
Step 3. Locate your disk identifier (e.g., /dev/disk2).
Step 4. Run the mount command diskutil mountDisk /dev/diskX. Replace diskX with your actual disk number.
Step 5. After pressing Enter, observe whether the disk attaches without issues.
Occasionally, this approach works around small installation issues tied to software hiccups.
How to Prevent Inserted Disk Unreadable Error on macOS
Most problems with unreadable disks on Macs start small - often ignored signs or careless handling. Instead of waiting for failure, staying ahead helps avoid trouble later. Here's how to prevent this mistake going forward:
- Always Eject Drives Properly. Hit "Eject" in Finder or Disk Utility before you unplug anything—this makes sure your files are fully saved and nothing gets corrupted.
- Use Compatible File Systems. If you use both Mac and Windows, go with exFAT. Sticking with just Macs? APFS is your best bet.
- Maintain Regular Backups. Whether it's an external hard drive, a NAS, or cloud storage, keeping extra copies of your data saves you from big headaches if something goes wrong.
- Avoid Low-Quality USB Hubs or Adapters. Always use high-quality, certified accessories for reliable performance.
- Monitor Disk Health Regularly. If you notice slow performance, frequent disconnections, or unusual noises (for HDDs), take action immediately to prevent complete failure.
By adopting these habits, you can not only prevent the "disk not readable" error but also extend the lifespan of your storage devices and ensure long-term data safety.
Final Thoughts
A drive failing to mount under macOS often points to damaged file structures, mismatched formatting, or faulty links between the device and the computer. Often, recovery becomes possible through native applications such as Disk Utility or command-line access via Terminal.
Still, getting your files back should come first, ahead of any formatting. After deletion, pulling data back grows much harder. Using the methods described lets you fix problems safely, reducing the risk of losing information forever.
The Disk You Inserted Was Not Readable by This Computer FAQs
1. Can I fix the disk without losing data?
Yes, as long as you recover your data first. Use a tool like EaseUS Data Recovery Wizard for Mac to save your files before you try to repair or format the disk.
2. Why did my external drive suddenly become unreadable?
It usually comes down to things like unplugging it without ejecting, corruption in the file system, or a transfer that got interrupted. This happens a lot with SD cards and portable drives.
3. Should I click "Initialize"?
Don't do it unless you've already recovered your data. Initializing can erase important info and make recovery harder.
4. Can Disk Utility fix everything?
No. Disk Utility is great for small issues, but if the drive is seriously corrupted or physically damaged, it can't fix that.
5. Is my disk permanently damaged?
Not always. Most of the time, it's just the file system that's messed up. Your data is still there, it just needs recovering.
Was This Page Helpful?
Dany is an editor of EaseUS who lives and works in Chengdu, China. She focuses on writing articles about data recovery on Mac devices and PCs. She is devoted to improving her writing skills and enriching her professional knowledge. Dany also enjoys reading detective novels in her spare time.
Written by Tracy King
Tracy became a member of the EaseUS content team in 2013. Being a technical writer for over 10 years, she is enthusiastic about sharing tips to assist readers in resolving complex issues in disk management, file transfer, PC & Mac performance optimization, etc., like an expert.
-
EaseUS Data Recovery Wizard is a powerful system recovery software, designed to enable you to recover files you’ve deleted accidentally, potentially lost to malware or an entire hard drive partition.
Read More -
EaseUS Data Recovery Wizard is the best we have seen. It's far from perfect, partly because today's advanced disk technology makes data-recovery more difficult than it was with the simpler technology of the past.
Read More -
EaseUS Data Recovery Wizard Pro has a reputation as one of the best data recovery software programs on the market. It comes with a selection of advanced features, including partition recovery, formatted drive restoration, and corrupted file repair.
Read More
Related Articles
-
How to Recover Deleted Files from USB Flash Drive on Mac in 3 Ways
![author icon]() Daisy/May 22, 2026
Daisy/May 22, 2026 -
Get USB No Media 0 Bytes Fix Here [2026 Guide]
![author icon]() Tracy King/Jun 16, 2026
Tracy King/Jun 16, 2026 -
Best USB Repair Tool: Fix Corrupted Flash Drives Without Data Loss
![author icon]() Tracy King/Jun 16, 2026
Tracy King/Jun 16, 2026 -
Possible to Recover Corrupted SD Card? YES, Here's How
![author icon]() Tracy King/Jun 21, 2026
Tracy King/Jun 21, 2026