- Recover Data from the Unmounting SanDisk Extreme Portable SSD🔥
- Fix 1. Verify the SanDisk Extreme Portable SSD and Mac Interfaces
- Fix 2. Force Mount the SanDisk Extreme Portable SSD via Disk Utility
- Fix 3. Fix the SanDisk Extreme Portable SSD Using First Aid
- Fix 4. Format the SanDisk Extreme Portable SSD on Your Mac
- Why Doesn't the SanDisk Extreme Portable SSD Mount on Your Mac
The SanDisk Extreme Pro is a leading SSD boasting remarkable reliability and speed. That's why it has become one of the most top-tier choices for professionals. However, Mac users often reported facing challenges that SanDisk Extreme Portable SSD is not mounted on a Mac while accessing it.
I just got an Extreme Portable SSD, and I put some files on it from my iMac and plugged it into my MacBook Pro. I was using a file on it, and the drive was unmounted, and I couldn't get it to remount. From SanDisk Forums
There are several ways to resolve SanDisk Extreme Portable SSD. But before proceeding with the fixes, you should know that the "SanDisk Extreme Portable SSD not mounting Mac" error leads to data loss, rendering data recovery important.
Recover Data from the Unmounting SanDisk Extreme Portable SSD
As we mentioned, the SanDisk SSD not mounting error will lead to data loss. Using professional data recovery software, such as EaseUS Data Recovery Wizard for Mac, to retrieve data before lowering the hassles of data loss is crucial.
This software boasts of restoring lost data in typical to most severe situations, including the common unmounting error "com.apple.DiskManagement.disenter" on an external SSD, such as:
- com.apple.DiskManagement.disenter error 0
- com.apple.DiskManagement.disenter error 49244
- com.apple.DiskManagement.disenter error 49218
- ......
Download this professional data retrieval software now! Follow the steps below:
Step 1. Search for lost files
Correctly connect your external hard drive to your Mac. Launch EaseUS Data Recovery Wizard for Mac, and select the external hard drive. Then, click "Search for lost files" to find lost/deleted files on your external devices.

Step 2. Filter and find lost files
After the scan, all file types will be presented in the left panel. Select the file type to find wanted files on your external devices.

Step 3. Preview and recover
Click the file and preview it. Then, select the files you want to recover and click the "Recover" button. You can save your data to local and cloud drives.

Fix 1. Verify the SanDisk Extreme Portable SSD and Mac Interfaces
Making sure the SSD has been attached to your Mac accurately is the fundamental and most significant step in resolving the "Sandisk extreme portable SSD not mounting Mac" problem. In that case, you must check that the original cable works properly by linking the SSD with another cable.
SanDisk Extreme Pro SSD utilizes SATA III; ensure that the dock, adapter, or case corresponds to your SSD. Now, you may try using another SATA to USB adapter and ensure it works by connecting a distinct drive. However, you may link the SSD to your MacBook instead of gaining access through a USB-C adapter.
Share this article on social media to help others learn how to fix the SanDisk Extreme Portable SSD not mounting on a Mac issue.
Fix 2. Force Mount the SanDisk Extreme Portable SSD via Disk Utility
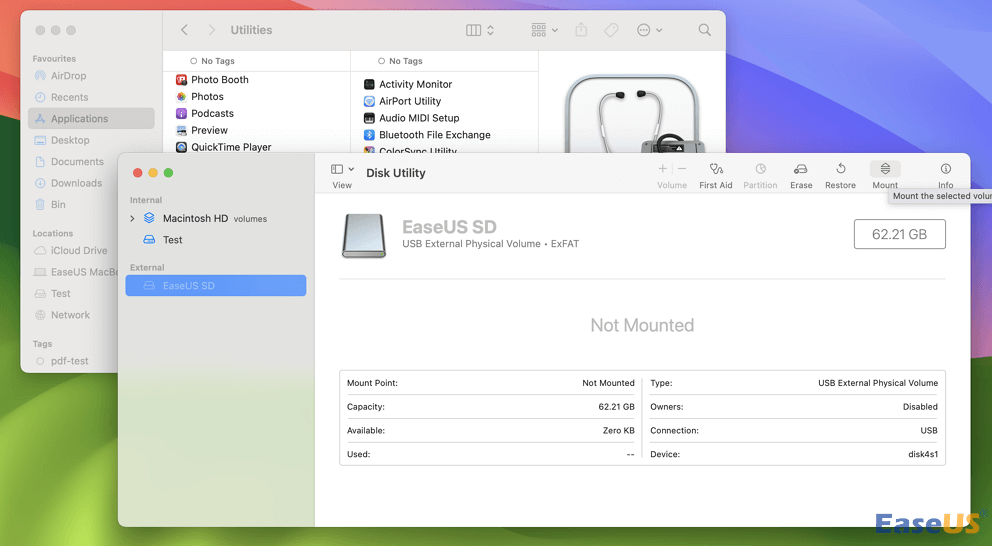
In case the "SanDisk extreme portable ssd not mounting Mac", you may force mount a disk with Disk Utility. Follow the steps below to force mount the SSD via Disk Utility:
Step 1. Open "Finder > Applications > Utilities > Disk Utility".

Step 2. Find the unmounted partition or SSD disk, and hit it.
Step 3. Opt for the "Mount" button at the top.
N.B: In case you obtain the unmounting error or the SanDisk SSD isn't detected on a Mac, try to recover stored data from the unmounting SSD with the EaseUS data recovery tool!
Fix 3. Fix the SanDisk Extreme Portable SSD Using First Aid
Are you unable to mount your SanDisk Extreme Pro SSD successfully, but it is visible in the Disk Utility? If that's the case, you could try to repair the SSD by using First Aid. It will help check and mend any disk issues on the SSD. Follow the steps below to run First Aid:
Step 1. To start the program, navigate to "Finder > Applications > Utilities > Disk Utility".
Step 2. Opt for SanDisk Extreme Pro SSD from the left side.
Step 3. Hit the "First Aid" button from the top-right corner of the window. Hit "Run" to confirm.

If the First Aid process fails, don't panic; we provide a guide on how to fix the First Aid process issue.

Disk Utility First Aid Process Has Failed [with 5 Proven Ways to Fix It]
Then follow this easy guide on how you can fix the error the First Aid process has failed in Disk Utility. Read more >>
Fix 4. Format the SanDisk Extreme Portable SSD on Your Mac
A loss of information may result from striving to fix the SanDisk Extreme Portable SSD not mounting properly on your Mac using the methods listed above. Backups of data are essential to avoiding the discomforts that come with info loss.
Back Up Your Mac and Never Lose Data
Back up and restore your MacBook/iMac without Time Machine, iCloud, or external hard drives.
If you don't know how to backup, a professional tool such as EaseUS Data Recovery Wizard for Mac can help you retrieve the erased data. This software aids in the recovery of data kinds from your Mac's unmounted SanDisk Extreme Portable SSD.
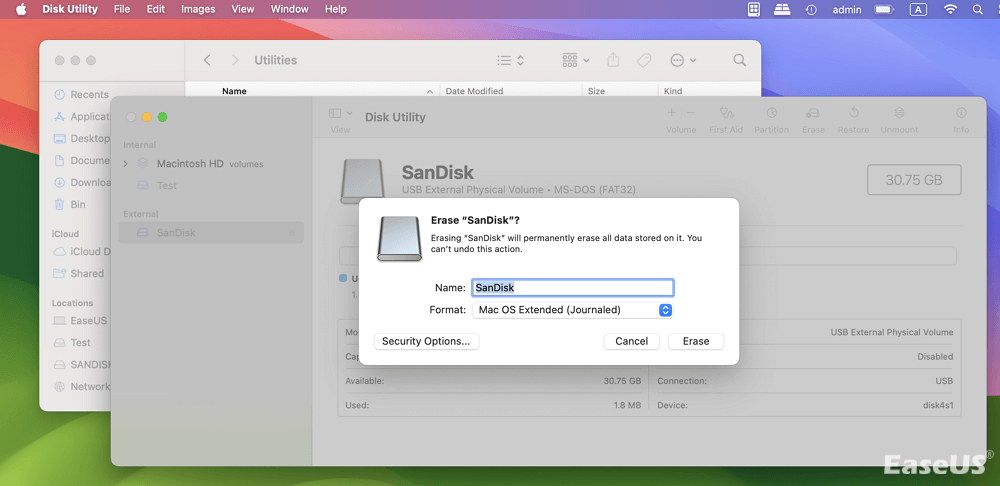
Are you wondering how to format an SSD using Disk Utility? Using Disk Utility is effortless, and you may format your SSD to a seamless format in an amiable interface. These are the steps to follow:
Step 1. Look for "Disk Utility" and hit the "Open" option.
Step 2. Find and opt for your SSD.
Step 3. Hit "Erase" on the top of the window.
Step 4. Provide a fresh name and the right format for your SSD.
In case the SSD's file system format is incompatible with macOS, the SSD might not mount on your Mac.
Why Doesn't the SanDisk Extreme Portable SSD Mount on Your Mac
There might be numerous reasons why your "Sandisk Extreme Portable SSD is not mounting Mac". However, the common reasons are the following:
❎SATA compatibility: This device employs a SATA interface, which is probable that the dock and adapter or case utilized with the drive don't correspond to the drive's SATA version.
⛔Temporary technical glitches: Your MacBook might have temporary pitfalls that impede the SanDisk Extreme Portable SSD from being identified.
😫Cable errors: The cable utilized to link the SanDisk Extreme Pro SSD to the MacBook might be erroneous. The cable might be corrupted or not compatible with the drive.
Conclusion
To sum up, you might consider a few solutions if your SanDisk Extreme Pro SSD won't be detected or authorized by Mac OS. You can try some fixes, including double-checking the connection and wiring, resetting the SSD, and applying Disk Utility's First Aid feature. In case you have lost data due to this "sandisk extreme portable ssd not mounting mac" error, installing EaseUS Data Recovery Wizard for Mac is recommended.
SanDisk Extreme Portable SSD Not Mounting Mac FAQs
In order to dig into the matter, proceed with the following FAQs:
1. What is 'com.apple.DiskManagement.disenter error 0' on my SanDisk Portable SSD?
This error indicates some underlying errors on macOS or the drive, rendering the disk unable to be recognized or mounted by the "Mount" feature in "Disk Utility". Here are effective ways to fix this mounting error:
- Fix 1. Check Connection Issues
- Fix 2. Restart Your Mac
- Fix 3. Run First Aid in Disk Utility
- Fix 4. Mount the Disk via the Terminal
- Fix 5. Reformat the Problematic Disk
2. Why is my Mac unable to identify my SanDisk Portable SSD?
The SanDisk Extreme Portable SSD won't be detected by the Mac if any external gadgets are set up so that the computer is unable to see them. In that case, you need to navigate to "Finder preferences" and check it out.
Was This Page Helpful?
Brithny is a technology enthusiast, aiming to make readers' tech lives easy and enjoyable. She loves exploring new technologies and writing technical how-to tips. In her spare time, she loves sharing things about her game experience on Facebook or Twitter.
-
EaseUS Data Recovery Wizard is a powerful system recovery software, designed to enable you to recover files you’ve deleted accidentally, potentially lost to malware or an entire hard drive partition.
Read More -
EaseUS Data Recovery Wizard is the best we have seen. It's far from perfect, partly because today's advanced disk technology makes data-recovery more difficult than it was with the simpler technology of the past.
Read More -
EaseUS Data Recovery Wizard Pro has a reputation as one of the best data recovery software programs on the market. It comes with a selection of advanced features, including partition recovery, formatted drive restoration, and corrupted file repair.
Read More
Related Articles
-
Where Is Trash Folder on Mac [Beginner's Guide]
![author icon]() Dany/Jun 30, 2026
Dany/Jun 30, 2026 -
How to Recover Data from M2 Chip Mac [2026]
![author icon]() Jaden/Jun 30, 2026
Jaden/Jun 30, 2026 -
SD Card Says Full But Nothing on It Mac [with 5 Proven Fixes]
![author icon]() Brithny/Jun 30, 2026
Brithny/Jun 30, 2026 -
Top 5 Best Mac Data Recovery Software in 2026
![author icon]() Brithny/Jun 30, 2026
Brithny/Jun 30, 2026