Although macOS lacks an official snipping tool like Windows, the built-in Screenshot app can do similar functions. If you are a novice to MacBook, you can keep reading this article to learn how to snip on Mac. What's more, for Mac-accustomed people, we also offer the answers to where do screenshots go and how to recover deleted screenshots on MacBook.
How to Snip on Mac [5 Ways]
The built-in Screenshot tool on Mac allows you to capture the full screen and specific screen areas, just like on Windows devices. This part shows you 5 proven and effective ways to snip on Mac.
- Fix 1. Shortcuts to Take a Full Screenshot on Mac
- Fix 2. Capture a Portion of the Screen
- Fix 3. Catch the Entire Window
- Fix 4. Access the Mac Screenshot Menu
- Fix 5. Cut an Image of the Touch Bar
Fix 1. Shortcuts to Take a Full Screenshot on Mac
To capture your entire screen on Mac, follow the steps:
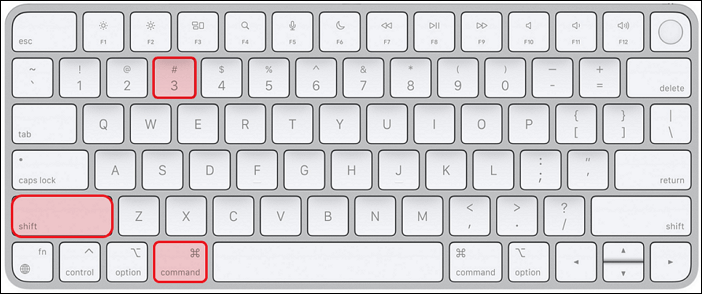
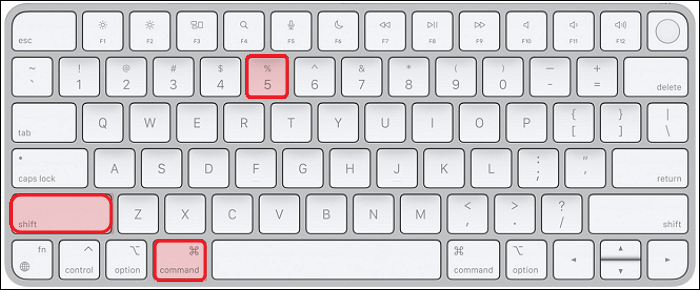
Step 1. Press and hold these three keys Shift + Command + 3 together.
Step 2. When you capture one, click on the tiny thumbnail preview that appears in the bottom-right corner of your screen to edit the screenshot.
Step 3. Alternatively, wait until the screenshot is saved to your desktop.
You can enable and disable this capability using the screenshot menu.
Fix 2. Capture a Part of the Screen
Before you are going to try the method to capture parts of a Mac's screen, watch this short video first. It provides you with more details about it.
- 00:00 - 00:29 Snip on Mac by shortcuts
- 00:30 - 00:38 Choose and edit
- 00:40 - 01:09 Find the screenshots on Mac
The following are the steps:
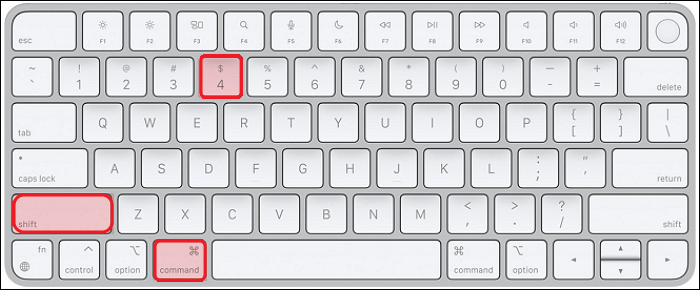
Step 1. Press the keys Shift + Command + 4 simultaneously.
Step 2. Launch the snipping tool on a Mac.
Step 3. A crosshair will show up on the screen.
Step 4. Cut a specific area of the screen by dragging your cursor.
Step 5. Press the Esc key to end using the snipping tool.
The captured portion of the screen will get darker. Holding down the Space bar while dragging with the snipping tool will allow you to shift the darkened region. The option to display your cursor in Mac screenshots is also available.
If there isn't a darkish area on the screen, you can also press the trackpad or right-click or Control-click if you're using a mouse.
Fix 3. Catch the Entire Window
The snipping tool for Mac also allows you to record a whole window. When Shift + Command + 4 + Space is pressed simultaneously, the cursor will change to a Camera icon.
Release the trackpad or mouse when you're ready to slice the screen. Then, a thumbnail will show up in the right corner. The thumbnail will be saved to the desktop if you use the trackpad to slide it to the right. After a short while, it will be saved automatically if you don't do anything.
To capture it, click the window or menu. If you click while holding down the Option key, the window's shadow will not be captured in the screenshot.
To cancel taking the screenshot, tap the Esc key.
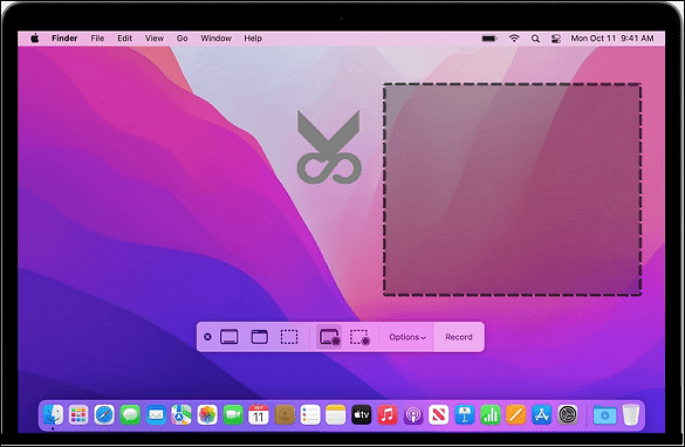
Fix 4. Access the Mac Screenshot Menu
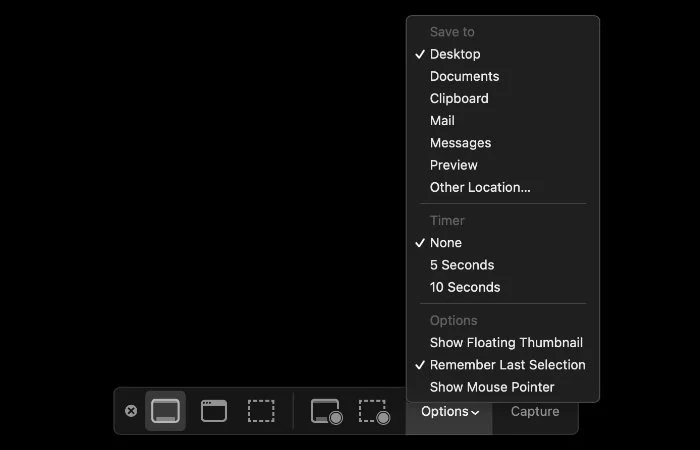
You can open the Mac Snipping tool control panel at the bottom of your screen by pressing Shift + Command + 5 on a MacBook running macOS Mojave or a later operating system version.
You can perform a number of screen capture tasks here, including taking screenshots, selecting a portion of your screen, and recording recordings of your screen for lessons and instructional films.
Apple has also offered a number of helpful settings that you can utilize to tailor your workflow further if necessary. You can also choose the new default location for the screenshots by selecting "Other Locations" from the selection menu.
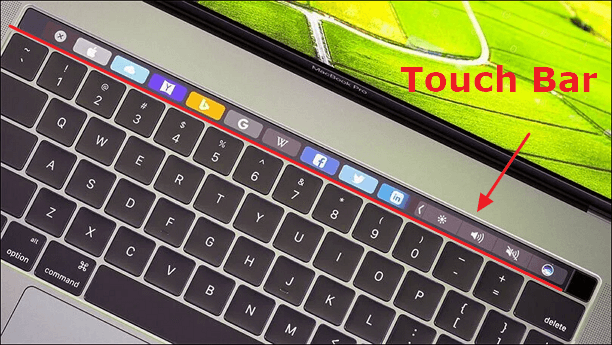
Fix 5. Cut an Image of the Touch Bar
You can screenshot anything you want to show someone else on your Touch Bar by hitting Shift + Command + 6. Immediately after doing so, your Touch Bar will be fully captured.
Although not all Mac computers have a Touch Bar, those that have can be screenshotted.
If you find this post helpful, share it on your Facebook, Twitter, and Instagram to let more people know.
The File Location of Mac Screenshots
Whenever you capture a screenshot on a Mac, it is automatically saved to the Desktop folder. This is done to make it simple to locate screenshots after you take them. Determine the "Desktop" section in the Finder program or look for thumbnails of your screenshots on your desktop to determine where they are stored.
If you can't find screenshots on Mac, you can try the 2 methods to locate them:
- Select File > Find from the Finder menu after clicking the desktop. Alternatively, use the keyboard shortcut Command + F. A Finder Search window will appear for you.
- You may open the Spotlight feature by clicking the Spotlight icon in the Mac menu bar or by pressing Command + Spacebar anywhere in macOS. The screenshots you've taken instantly appear in Spotlight!
How to snip on Mac and paste? Check the answers on Twitter.
Take screenshots without filling up your desktop. ?
— Apple Support (@AppleSupport) June 15, 2022
When taking a screenshot on your Mac, hold down the Control key to save it to the Clipboard temporarily, then you can paste it to the place you need it like in Mail or Keynote. Check out this time-saving tip from Cheryl at Apple. pic.twitter.com/YLTXfmatml
How to Recover Deleted Screenshots on MacBook
However, you can't find the wanted screenshots through the Finder, Spotlight, or even Terminal. Think about it - did I delete the screenshots? If the answer is yes, you dragged the pictures to the Trash, don't worry and restore them from the Trash Bin. If you empty your Trash, how to recover Trash on Mac?
Emptying the Trash means the screenshots are permanently deleted or lost. The easiest way for you is to use EaseUS Data Recovery Wizard for Mac.
EaseUS Data Recovery Wizard for Mac
- Recover deleted screenshots, documents, audio, music, and emails on Mac effectively.
- Recovery of screenshots from SD cards, memory cards, USB flash drives, external hard drives, etc., is supported, as is Mac hard disk recovery.
- Support Mac data recovery for deletion, formatting, external hard drive corruption, and system crash under different situations.
Follow the steps below to recover deleted or lost screenshots on Mac:
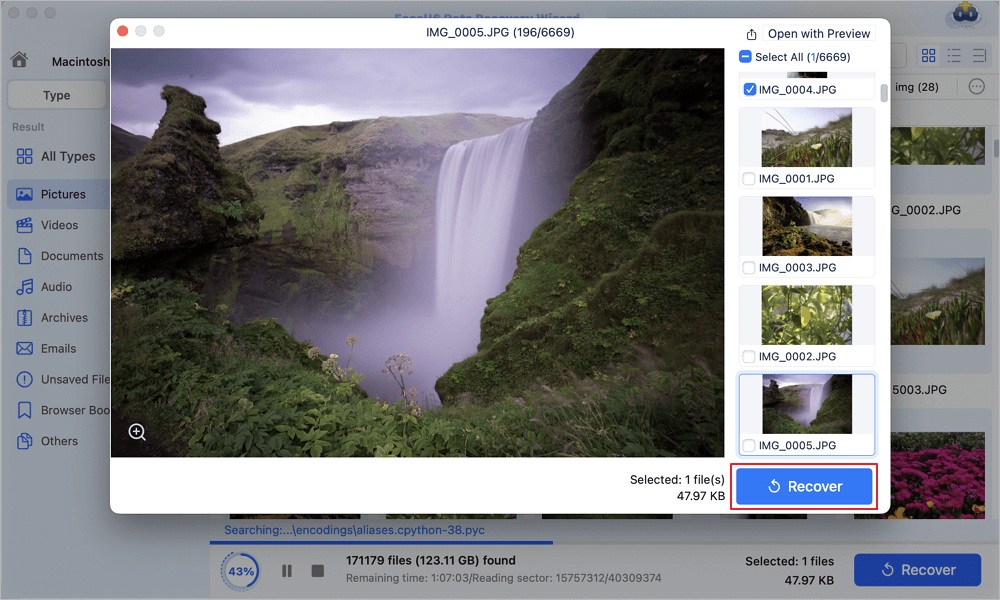
Step 1. Scan for lost photos
Select the location where your valuable photos were lost and click the "Search for lost files" button.

Step 2. Select wanted photos
EaseUS Data Recovery Wizard for Mac will immediately start a scan on your selected disk volume. Meanwhile, the scanning results will be presented in the left pane. By Path and Type, you can quickly filter the photos you've lost earlier.
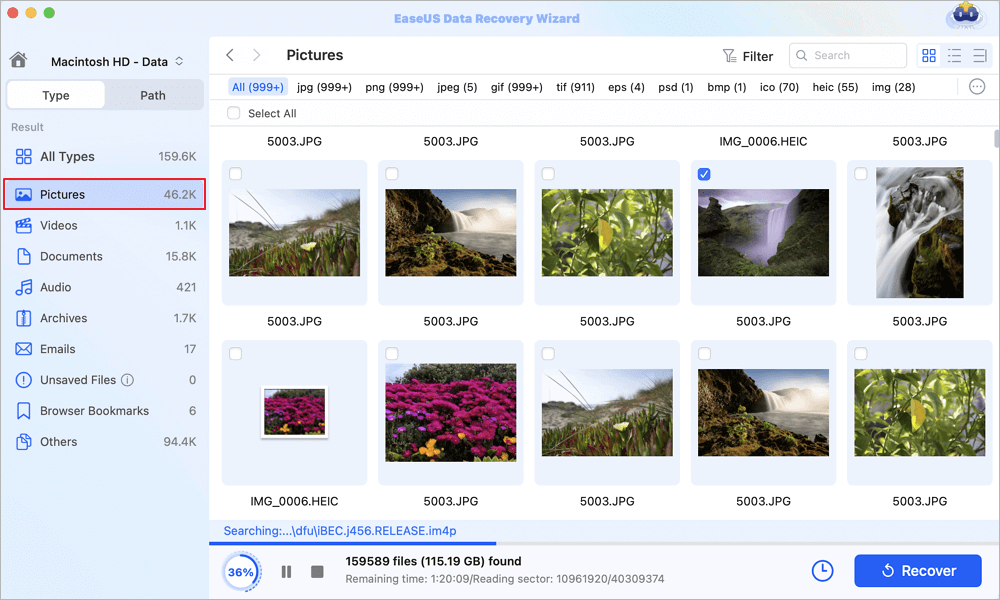
Step 3. Recover lost photos
Select the target photos and click the "Recover" button to get them back at once.
Mac Snipping Tool Configuration
The Mac snipping tool also offers extra Options, allowing you to select where you want to save any screenshots or videos you take using the tool on your Mac. The desktop is the default location for screenshots taken using the Mac snipping tool.
Still, you may also choose to send them to:
- The Documents folder
- The Clipboard
- The Mac Mail program
- The Message app
- The Preview app on macOS or a Custom Location of your choosing
Other options include showing floating thumbnails, remembering the last election, showing the mouse pointer, and setting a timer for 5 or 10 seconds.
If you have a MacBook that with a Touch Bar and don't like hitting so many keys at once, you can add the Screenshot app shortcut to the Touch Bar. This is how to do it:
- Select "System Preferences" > "Keyboard".
- To access the dropdown menu, hover your mouse over "Touch Bar shows" and select "App Controls."
- Press the Customize Control Strip button. The screen will show a collection of icons for program shortcuts.
- Drag the shortcut for the Screenshot app to the Touch Bar by clicking on it. It will be instantly included in it.
If your MacBook Touch Bar is not working, check the linked page to learn a few straightforward ways to fix it.
Final Words
You can reach the primary control panel of the Mac snipping tool by pressing Shift + Command + 5, but you can also screenshot your entire Mac screen quickly by pressing Shift + Command + 3, or you may screenshot only a portion of your Mac screen by pressing Shift + Command + 4.
You can choose the best method based on the discussion provided. Nearly all of these snipping tools are flexible and effective for your job. Comparing compatibility levels will be helpful in assisting you in selecting the best choice. You can also try EaseUS Data Recovery Wizard for Mac to recover any screenshots you unintentionally or knowingly erased.
How to Snip on Mac FAQs
After learning how to snip on Mac, you may have more questions about it. See if you can find your answers here:
1. How to snip on Mac and paste?
Press Command + Control + Shift + 4 to copy a section of the screen to the clipboard. You can click and drag to choose the area you want to capture using the cross-hair cursor that will display. After releasing the mouse button, you can paste the screen capture into another program.
2. How to snip on Windows?
Press the Windows key + Shift + and + S. While you choose a location for your screenshot, the desktop will become darker. By default, the rectangular mode is chosen. By selecting one of the following options from the toolbar, you can alter the shape of your snip: rectangular, window, full-screen, or free-form mode.
3. How to snip on MacBook Pro 2022?
- Press and hold Command + Control + Shift + 4 together.
- To capture a certain portion of the screen, drag the crosshair.
- Release the trackpad button or mouse to take a screenshot on Mac.
- Click the thumbnail to alter the screenshot if it appears in the corner of your screen.
4. Where do screenshots go on Mac?
By default, your Mac saves any screenshots you take with Shift + Command + 3, Shift + Command + 4, or Shift + Command + 5 to your Desktop as PNG files. Each one will be titled 'Screen Shot' and include a time and date (for example, 'Screen Shot 2022-06-03 at 10.58.12 AM').
Was This Page Helpful?
Jaden is one of the editors of EaseUS, who focuses on topics concerning PCs and Mac data recovery. Jaden is committed to enhancing professional IT knowledge and writing abilities. She is always keen on new and intelligent products.
-
EaseUS Data Recovery Wizard is a powerful system recovery software, designed to enable you to recover files you’ve deleted accidentally, potentially lost to malware or an entire hard drive partition.
Read More -
EaseUS Data Recovery Wizard is the best we have seen. It's far from perfect, partly because today's advanced disk technology makes data-recovery more difficult than it was with the simpler technology of the past.
Read More -
EaseUS Data Recovery Wizard Pro has a reputation as one of the best data recovery software programs on the market. It comes with a selection of advanced features, including partition recovery, formatted drive restoration, and corrupted file repair.
Read More
Related Articles
-
Where Are Screenshots Saved on Mac | Find Screenshots on macOS
![author icon]() Dany/Apr 08, 2026
Dany/Apr 08, 2026 -
Forgot MacBook Password No Question Mark
![author icon]() Jean/Apr 08, 2026
Jean/Apr 08, 2026 -
How to Undo Deleted Text in Notes on Mac | 3 Ways
![author icon]() Dany/Jan 19, 2026
Dany/Jan 19, 2026 -
Fixed: SD Card Not Showing Up Mac Sonoma/Ventura/Monterey
![author icon]() Tracy King/Jun 15, 2026
Tracy King/Jun 15, 2026