on this page, you'll find handy solutions to restore deleted files on Windows 10 and stop Windows 10 from deleting files without asking.
| Workable Solutions | Step-by-step Troubleshooting |
|---|---|
| Fix 1. Stop Windows Defender | Open Windows Defender > click Virus & Threat protection > click Exclusions...Full steps |
| Fix 2. Turn off Storage Sense | Go to Settings > System > Storage > toggle Storage Sense to "Off"...Full steps |
| Fix 3. Uninstall faulty updates | Open Control Panel > click Programs and Features > click View Installed Updates...Full steps |
Q: Windows Defender Keeps Deleting Files
"Hi, I'm having an issue with my computer automatically deleting files without asking me for confirmation. I use some programs with .exe extension. But Windows defender reads those as a virus and deletes them while I still want them! How do I stop Windows defender from deleting files I want to keep?"
Are you having the same issue that Windows defender keeps deleting files, such as downloaded videos, documents, or .exe programs? Or is your Windows 10 automatically deleting downloaded files and data without asking for confirmation? Although it sounds senseless, it is true. Windows 10 may keep deleting programs and documents after restart because of the defender or the new storage sense feature in Windows 10. But, you don't have to worry since you can quickly recover deleted files from Windows 10 using a professional EaseUS data recovery tool. After that, you can use the helpful methods demonstrated below to stop Windows from deleting files automatically.
- Notice:
- If you've got important files deleted by Windows 10, which you can restore from nowhere, go to Part 1 and recover those lost files first. And then, you can follow Part 2 with provided methods to stop Windows 10 from deleting your files without asking your permission or giving any notification.
Part 1. Restore Files Deleted by Windows 10
If your essential files got removed or deleted by Windows 10 and you can't get them back anyhow, don't worry. One of the best file recovery software - EaseUS Data Recovery Wizard can simply recover your lost files within three steps. It allows you to restore deleted files from Recycle Bin, HDD, SSD, USB flash drive, external hard drive, digital camera, and more.
Now, download and install this software on your PC and follow the next steps to restore the removed files deleted by Windows 10.
Step 1. Run EaseUS Data Recovery Wizard. Choose the drive where you lost files and start scanning by clicking "Search for Lost Data". This software allows you to recover lost data from all devices, including HDD, SSD, USB drive, SD card, pen drive, camera, etc.

Step 2. Browse the full scan results. You can choose the file type you need by clicking on the file type filter. EaseUS data recovery software supports 1000+ file types like photos, videos, documents, emails, audio files, and many more.

Step 3. Select the files you want to preview. Click "Recover" and set a storage location or Cloud drive to save the recovered data.

Part 2. Fix Windows 10 Automatically Delete Files Error
After removing all your lost files from the Windows system, you can now follow the solutions to fix Windows 10 from the problem of the deleting file.
Method 1. Stop Windows Defender from Deleting Files Automatically
1. Open "Windows Defender" > Click on "Virus & threat protection".
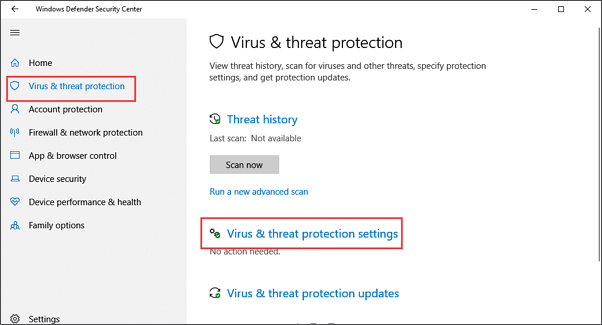
2. Scroll down and click "Virus & threat protection" settings.
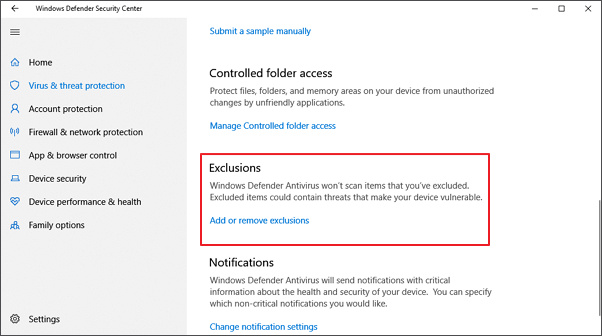
3. Scroll down to "Exclusions" and click "Add or remove exclusions".
4. Click + plus icon to add an exclusion and select File, Folder, File Type, or Process, then specify the exact files, folders, or even file types that you don't want to get them deleted or removed by Windows Defender.
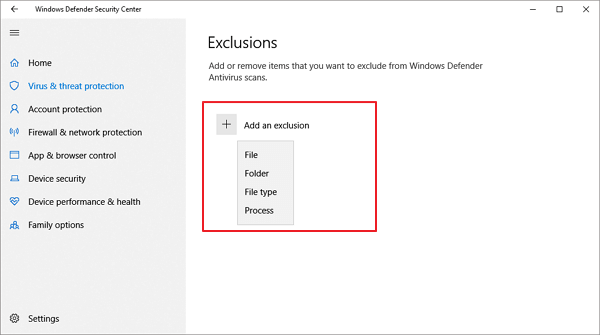
5. Save all changes. If you don't want Windows Defender to remove the .dll files, click "File Types" and type in the .dll and .exe file extension, click "Add". After this, those files that you’ve set to be excluded won’t be removed or deleted again.
Method 2. Turn off Storage Sense to Stop Windows 10 Deleting Files Automatically
Storage Sense in Windows 10 is a new feature. When you enable it, Windows will automatically delete unused files when the computer is low on disk space. For instance, it can automatically delete files older than 30 or 60 days from the Recycle Bin or delete temporary files to free up some space. It also can delete older files in the Downloads folder.
But If you don't want the Storage Sense to delete files by itself, you can change its default settings to prevent Windows 10 from automatically deleting files when you want to keep them
Step 1. Open the "Settings" app. Click the "System" > "Storage". You can flip the Storage Sense switch to "Off".
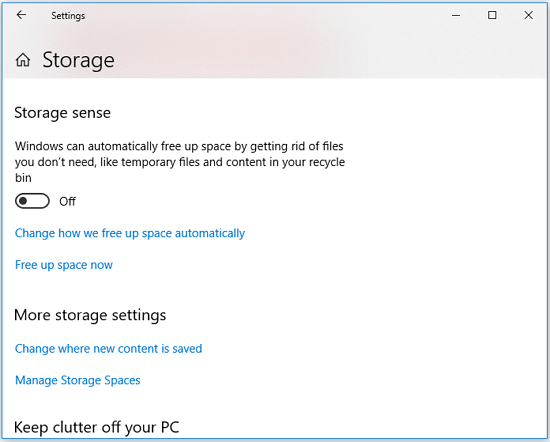
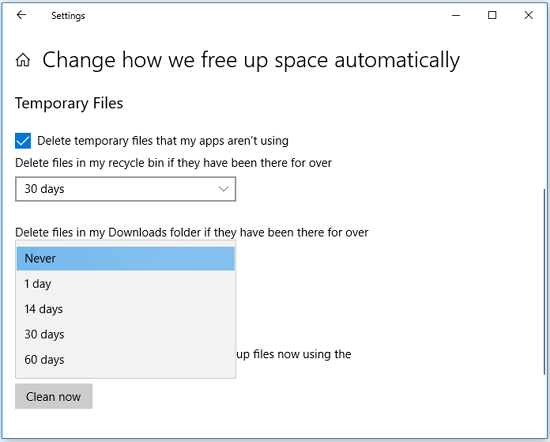
Step 2. If you don't want to disable this feature totally, you can re-configure Storage Sense by clicking "Change how we free up space automatically".
Step 3. Click the box under "Delete files in my recycle bin if they have been there for over" and select "Never". Also, click the box under "Delete files in my Downloads folder if they have been there for over" and choose "Never".
Method 3. Uninstall Faulty Updates that Delete Files on Windows 10
As we all know that sometimes the newly installed Windows system would remove or delete files on the computer without asking you for permission. It seems that if you’ve installed an incompatible or faulty Windows 10 update, it will remove or delete your files on PC. So the most straightforward way is to uninstall the faulty updates that remove files on your Windows 10 computer.
Here are the detailed steps about how to uninstall faulty updates:
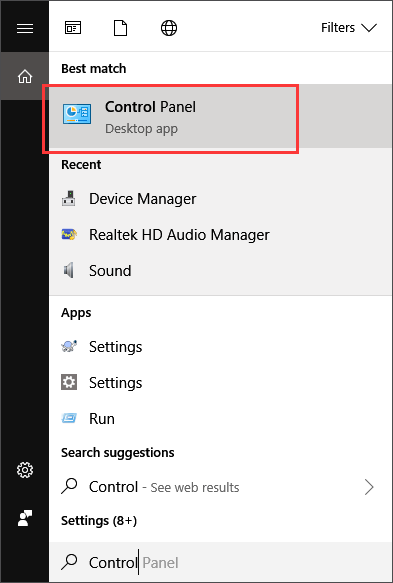
Step 1. Press Windows + X keys and select "Control Panel".
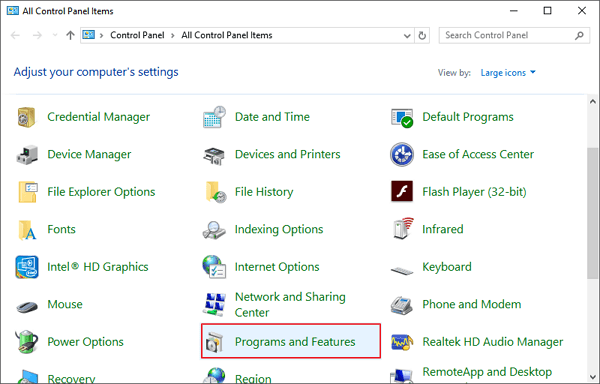
Step 2. Click "Programs and Features" and select "View Installed Updates".
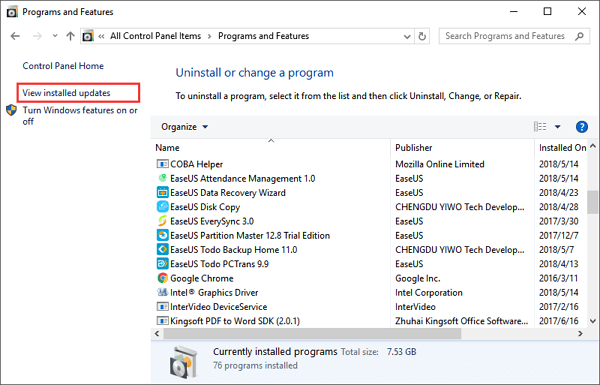
Step 3. Click the "Installed On" column header to sort the updates by dates.
Step 4. Locate and right-click on the large-sized, significant updates you've recently downloaded, and select "Uninstall".
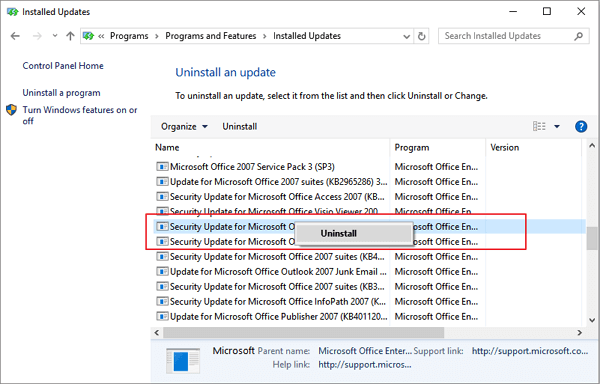
Step 5. When the uninstall process completes, reboot your PC.
PS: If you want to install the latest Windows 10 update, you can refer to Microsoft Windows 10 update official website to download Windows 10 ISO and install it on your PC.
Was This Page Helpful?
Finley is interested in reading and writing articles about technical knowledge. Her articles mainly focus on file repair and data recovery.
Written by Tracy King
Tracy became a member of the EaseUS content team in 2013. Being a technical writer for over 10 years, she is enthusiastic about sharing tips to assist readers in resolving complex issues in disk management, file transfer, PC & Mac performance optimization, etc., like an expert.
Related Articles
-
The Disk Macintosh HD Can't Be Unlocked? Here Are Solutions
![author icon]() Jaden/2026-06-17
Jaden/2026-06-17 -
How to Clean Computer Using Command Prompt - Tutorial
![author icon]() Sherly/2026-06-30
Sherly/2026-06-30 -
Steam Deck SD Card Format | What's It & How to Format [Ultimate Solution]
![author icon]() Cici/2026-06-17
Cici/2026-06-17 -
What's The Best SSD Allocation Unit Size in Windows 11/10
![author icon]() Cici/2025-07-04
Cici/2025-07-04
EaseUS Data Recovery Services
EaseUS data recovery experts have uneaqualed expertise to repair disks/systems and salvage data from all devices like RAID, HDD, SSD, USB, etc.