Featured Articles
- 01 Accidentally Closed Word Without Saving
- 02 I Saved a Word Document and Can't Find It
- 03 How to Recover Unsaved Google Docs
- 04 How to Find Hidden Images in Word Document
- 05 Word Document Is Blank When Opened
- 06 Word Cannot Open the Document: User Does Not Have Access Privileges
- 07 Open ASD File
- 08 Run Time Error 53
- 09 Word Experienced an Error Trying to Open the File 2022
| Workable Solutions | Step-by-step Troubleshooting |
|---|---|
| Fix 1. Show hidden images in a Word | Click "File" > "Options" in Word. Click "Advanced" on the left pane, uncheck "Show picture placeholders"...Full steps |
| Fix 2. View hidden texts in Word | Click "File" > "Options" in Word 2013/2010 (for Word 2007, click Office button > "Word Options")...Full steps |
| Fix 3. Recover hidden Word/photos | Unhide a Word Document in File Explorer. Or recover hidden Word with data recovery software...Full steps |
Q: Pictures not showing in Word, how to find hidden images in Word document?
"I have a four-page Word document with several images inserted. When I opened it this morning to see only white rectangles instead of pictures in the Word. Why are my pictures not showing up in the Word document? Are they hidden? How to show hidden images in a Word?"
Images or texts not showing in a Word document happens from time to time because they are hidden intentionally or unintentionally. This article shows you a detailed guide on how to show hidden images and texts in a Word document. What’s more, If you want to recover hidden Word documents and photos on Windows PC and laptop, you can use an ultimate EaseUS Data Recovery Wizard tool to help you make it effortlessly.
How to Find Hidden Images/Pictures in Word
When you can't see a picture or image in a Word document, you can try the tips below to find hidden pictures or images.
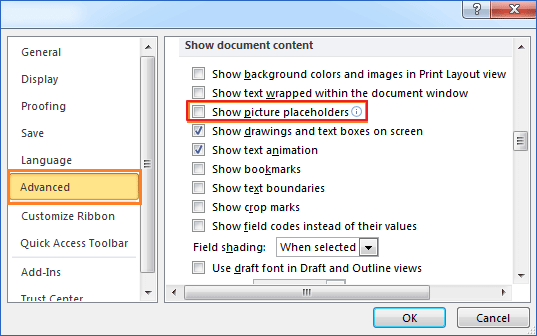
Step 1: Open your Microsoft Office Word > "Word Options" in Word 2007. (Click "File" > "Options" in Word 2016/2013/2010.)
Step 2: Click "Advanced" on the left pane, uncheck "Show picture placeholders" under Show document content. Then you should be able to see your hidden images or pictures in Word document again.
How to hide images in a Word document?
Sometimes you need to insert pictures in Word to supplement the text message. On the contrary, sometimes, when you just want to scroll and read text quickly, they can become an additional obstacle. In this case, you can hide pictures in your Word document with the "Show picture placeholders" feature. using the same steps above.
How to View Hidden Text in Word Document
If you've hidden some text lines in a Word document, or some content was set to hide in Word, is it possible to show the hidden text content? How? You'll find two options for showing hidden text in Word 2016/2013/2010/2007. (If you are using an older version of Word, please find more solutions from Microsoft Office support team or Google.)
Method 1. Show Hidden Text in Word 2016
The first way is to view the hidden text from Print settings.
Step 1. Open the Word document in Word 2016 in which you have hidden text.
Step 2. Go to "Print" settings and select "Page Setup".
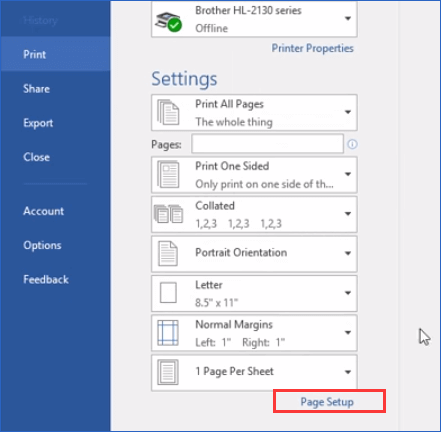
Step 3. Go to "Paper" settings, click "Print Options...".
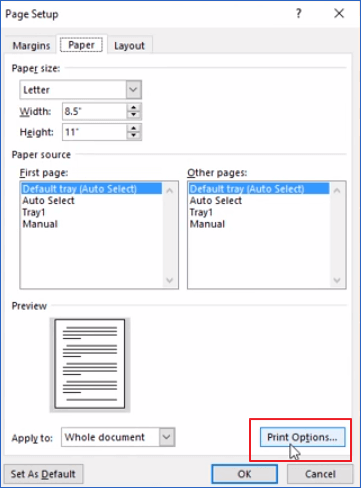
Step 4. In Display, check "Print hidden text" and click "OK" to save changes.
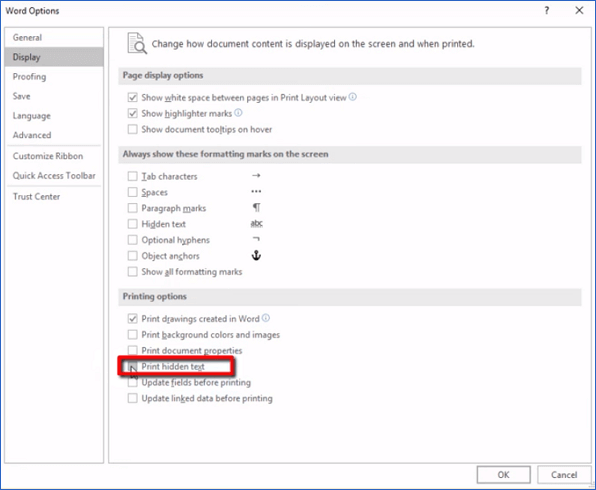
By doing so, those hidden texts will only show up in the Print preview window. But still hidden in Word document. If you want to unhide text in Word 2016, follow the below tips.
Step 1. Press Ctrl + A to select all content in Word document.
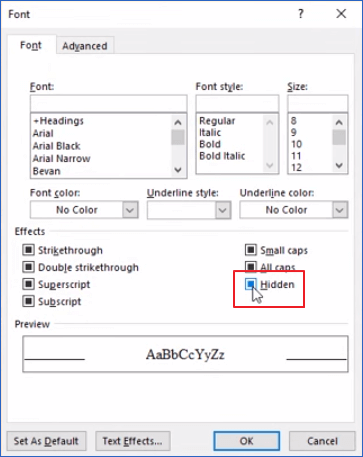
Step 2. Right-click on content and select "Font...".
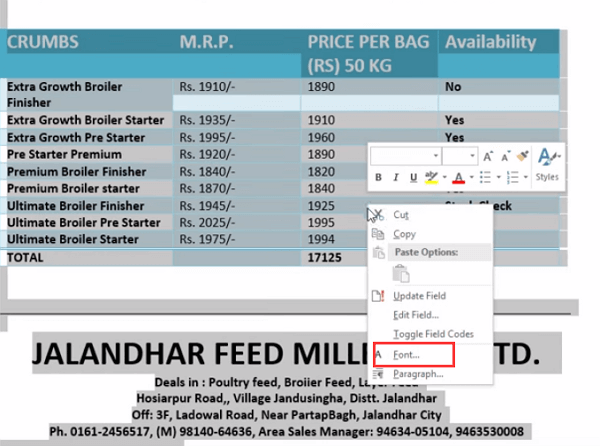
Step 3. Click the "Hidden" box twice, uncheck it and click "OK" to save changes.
Now you can see all hidden content displaying in your Word document again.
Method 2. Display Hidden Text in Word 2013/2010/2007
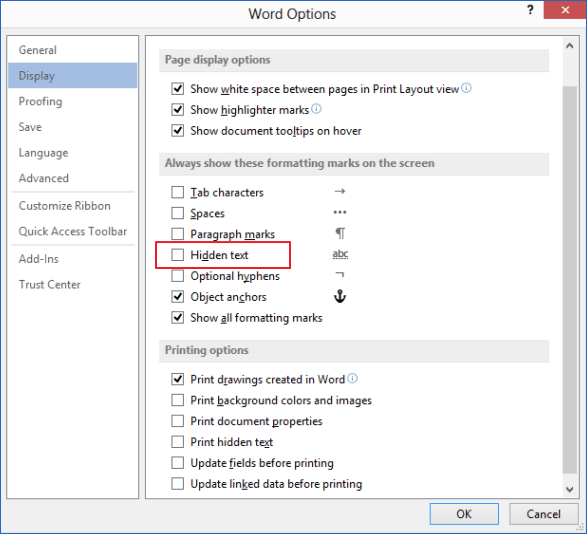
Step 1. Click "File" > "Options" in Word 2013/2010. For Word 2007, click Office button > "Word Options".
Step 2. Click "Display" at the left pane. Check and uncheck the Hidden text box, leaving it empty.
Step 3. Click "OK" to save all changes.
How to Recover Hidden Word Document/Photos in Windows 10/8/7
In this part, we'll provide you with two reliable methods for recover hidden Word documents in Windows computer or external storage devices. Let's see how to do it now.
Method 1. Unhide a Word Document in File Explorer
For Windows 10/8/8.1 users:
Step 1. Type file explorer in the Search box and select "File Explorer".
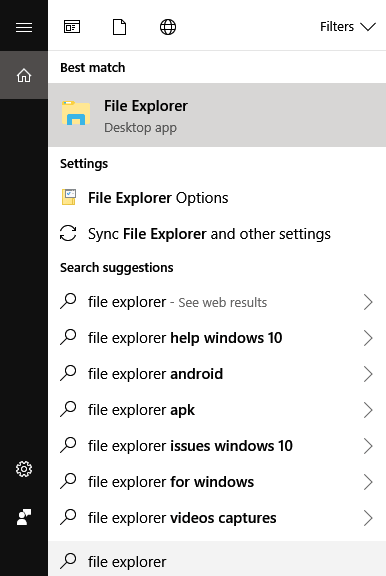
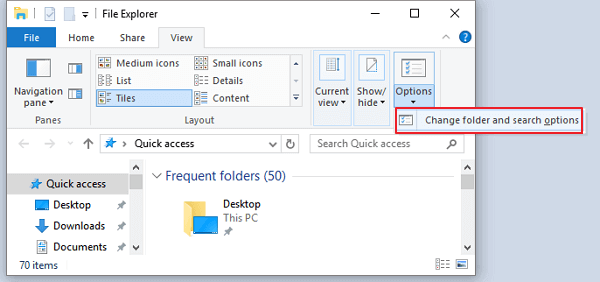
Step 2. Select "View" > "Options" > "Change folder and search options".
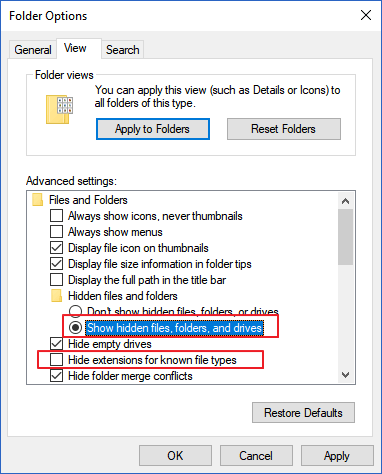
Step 3. In "Folder Options", select "Show hidden files, folders, and drives" under Hidden files and folders. Also, uncheck Hide extensions for known file types. Click "Apply" to save all changes.
For Windows 7 users:
Step 1. Open Windows Explorer by clicking "Start" > "Computer".
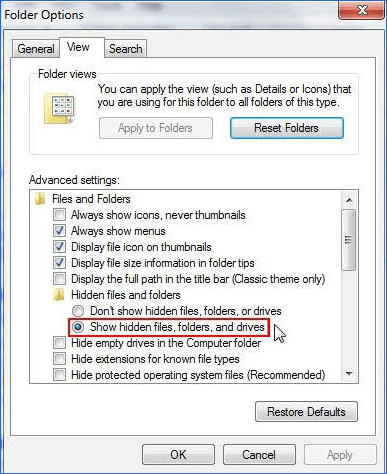
Step 2. Click "Tools" > "Folder Options" > "View".
Step 3. Under the View tab, select "Show hidden files, folders, and drives" below Hidden Files and Folders. Uncheck Hidden extensions for known file types and apply the changes. By doing so, you see all file extensions, and it will help you quickly locate the hidden Word documents or pictures.
Method 2. Recover Hidden Word Documents and Photos with Data Recovery Software
If you can't view hidden Word documents, pictures, audios, videos, or other files in File Explorer, there is still a great chance to restore hidden files by using professional file recovery software - EaseUS Data Recovery Wizard. This competent and user-friendly data recovery program allows you to fully scan computer or storage devices, finding all existing, lost, formatted, and hidden files with two scanning modes - Quick Scan and Deep Scan.
In addition to restoring normally deleted files, EaseUS file recovery software also enables you to Undelete files Windows 10 in HDD, SSD, USB flash drive, SD card, pen drive, external hard drive, etc. Download and install it on your PC, then follow the guidelines below to restore your hidden Word document or pictures within three steps.
Step 1. Select the virus infected drive to scan
Run EaseUS virus file recovery software on your Windows PC. Select the disk attacked by the virus to scan for lost or hidden files. Note that:
- If it's an HDD where files were hidden or deleted by virus, it's better to install the software on a different volume or an external USB drive to avoid data overwriting.
- If the infected device is an external hard drive, flash drive or memory card, it doesn't matter to install the software on the local drive of the computer.

Step 2. Check all scanned results
EaseUS Data Recovery Wizard will immediately start a scan process to find your deleted or hidden files on the virus infected hard drive. To quickly locate the wanted files, you can use the Filter or search box feature to display only the pictures, videos, documents, emails, etc.

Step 3. Preview and recover deleted/hidden files
When the process finishes, you can preview the scanned files. Select the files you want and click the "Recover" button. You should save restored files to another secure location or Cloud drive, not where they were lost.

Was This Page Helpful?
Daisy is the Senior editor of the writing team for EaseUS. She has been working at EaseUS for over ten years, starting as a technical writer and moving on to being a team leader of the content group. As a professional author for over ten years, she writes a lot to help people overcome their tech troubles.
Written by Tracy King
Tracy became a member of the EaseUS content team in 2013. Being a technical writer for over 10 years, she is enthusiastic about sharing tips to assist readers in resolving complex issues in disk management, file transfer, PC & Mac performance optimization, etc., like an expert.
Related Articles
-
How to Fix Folders Turned into Shortcuts
![author icon]() Tracy King/Jul 23, 2026
Tracy King/Jul 23, 2026 -
How to Open 0KB PDF Files on Windows 11/10 | 4 Safe Methods
![author icon]() Dany/Jul 23, 2026
Dany/Jul 23, 2026 -
How to Restore Previous Versions of File or Folder Windows
![author icon]() Jean/Jul 23, 2026
Jean/Jul 23, 2026 -
How to Recover Corrupted Excel Files in Windows 10 | AI-Powered
![author icon]() Tracy King/Jul 23, 2026
Tracy King/Jul 23, 2026