Do you need a tutorial on how to use PowerShell to format a disk? It might be tricky! But don't worry. You can learn a detailed guide on PowerShell format disk. First, we have to figure out what PowerShell is.
What Is PowerShell?
Have you ever wanted to format your disk when you check disk space? You may like to know PowerShell. However, what is PowerShell?
PowerShell is a Microsoft task automation and configuration management program, consisting of a command-line shell and the associated scripting language. - By Wikipedia
![]()
Windows operating system comes with a very useful built-in tool named PowerShell. It is an advanced version of the "Command Prompt," and users can use it to customize the Windows system through commands. Its main functions are as follows:
- Enabling task automation
- Driving data accessibility
- Facilitating remote commands
- Managing "infrastructure as code"
Besides these basic features. PowerShell still gets many other functions, such as formatting a disk. This article focuses on how to format a disk drive with PowerShell. You can get detailed steps in the following content.
Tutorial for PowerShell Format Disk - Using Commands
How do I format a disk drive with PowerShell on Windows? How do I format my disk and create new partitions? There are many ways you can format a disk drive on Windows, such as Disk Management and the DiskPart command-line tool.
This tutorial focuses on how to use PowerShell to format disks and how to create new partitions after formatting disks. First, let's learn how to format disks with PowerShell.
Guide 1. How to Format Disks with PowerShell
As mentioned above, you can use commands to use PowerShell. But what commands should you use to format a disk with PowerShell? Let's continue and see it.
Step 1. Run PowerShell as administrator.
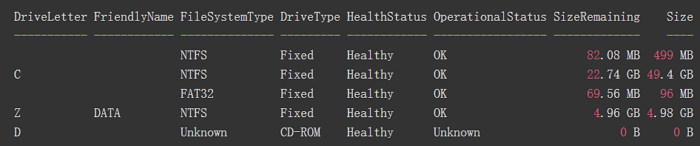
Step 2. List all volumes available by typing the following command:
Get-Volume | Format-Table -Autosize
Step 3. Choose the disk to format and determine its file format. Then type the following command:
Format-Volume -DriveLetter Z -FileSystem NTFS -Full
Note: You need to change Z with the correct disk letter and change NTFS with any format you want.
In this way, you can format your disk with PowerShell commands. However, what if you want to create a new partition after formatting and wiping the whole disk? Continue to read. There is a full guide in the next paragraph.
Guide 2. How to Format Disk and Create New Partitions with PowerShell
Step 1. Open "Start".
Step 2. Find PowerShell, right-click it, and select the "Run as administrator" option.
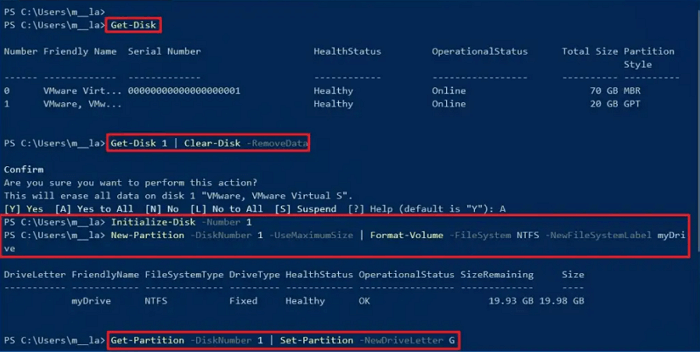
Step 3. Type the following command and find the drive to format:
Get-Disk
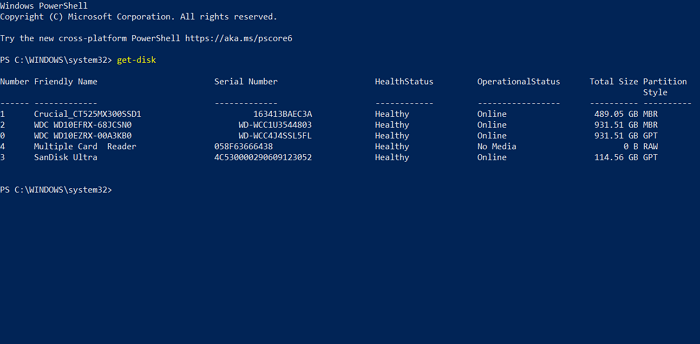
After that, press "Enter", and then you can see all the disks available.
Step 4. Before pressing "Enter", type the following command to wipe out the disk drive:
Get-Disk 1 | Clear-Disk -RemoveData
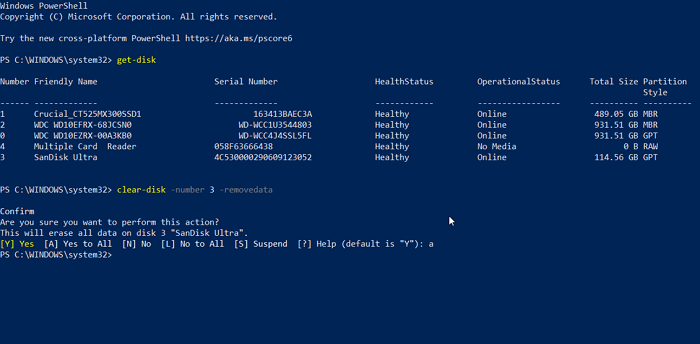
Note: Change 1 with the specific number of the drive that you want to format. Make sure you give the correct number, or you may suffer data loss.
Step 5. Type Y to confirm it is the right drive you want to format. Then press "Enter".
Step 6. Type the command below to initialize the targeted disk:
Initialize-Disk -Number 1
Note: 1 refers to the number of the disk you want to format. You need to change 1 with the correct number.
Step 7. Format and create a new partition by typing the following command:
New-Partition -DiskNumber 1 -UseMaximumSize | Format-Volume -FileSystem NTFS -NewFileSystemLabel myDrive
Note: Change 1 with the right disk number, NTFS with the right file system format you want, and change myDrive with a new name you like.
Step 8. Type a command to give a drive letter to the targeted disk drive and press Enter: The command is as follows:
Get-Partition -DiskNumber 1 | Set-Partition -NewDriveLetter G
Note: Change 1 with the correct disk number and G with the letter you want to assign to the storage.
After this process, you can format your disk with PowerShell. It is a little tricky, isn't it? Do you want to find an easier and faster way to format your disks on Windows? There is a tool to help!
A Professional Alternative to PowerShell on Windows - EaseUS Partition Master
As a free format tool, EaseUS Partition Master Free can finish a format process in a shorter time with simple clicks. This software is widely compatible with Windows 11/10/ 8.1/8 and Windows 7. Equipped with stunning features, this partition manager is easy to use. If you are confused by a tricky format process, you will like it.
Now, let's see how to use it to format disks on Windows.
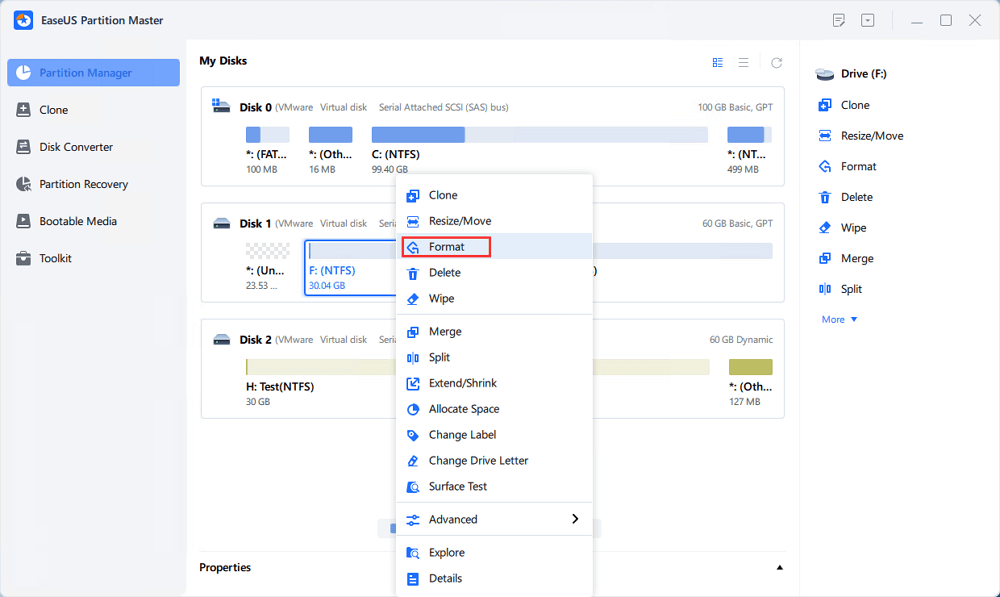
Step 1. Run EaseUS Partition Master, right-click the hard drive partition you intend to format and choose "Format".
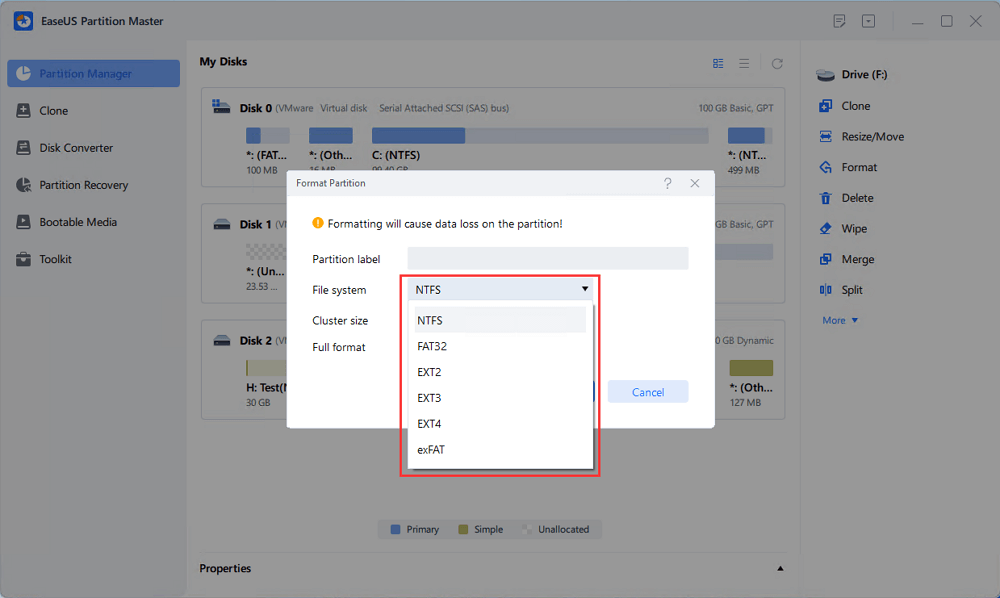
Step 2. In the new window, set the Partition label, File system (NTFS/FAT32/EXT2/EXT3/EXT4/exFAT), and Cluster size for the partition to be formatted, then click "OK".
Step 3. Then you will see a warning window, click "Yes" in it to continue.

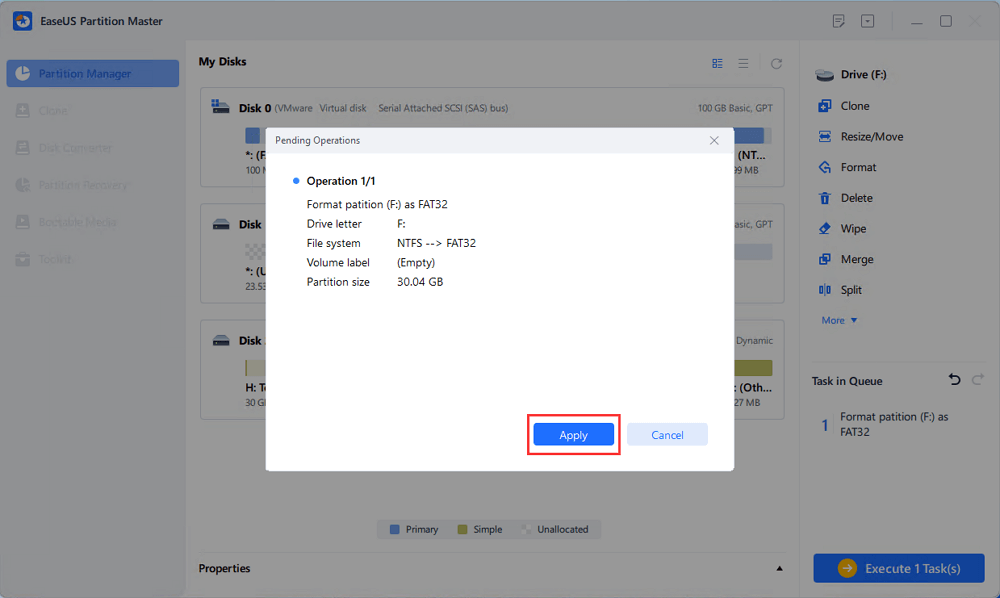
Step 4. Click the "Execute 1 Task(s)" button to review the changes, then click "Apply" to start formatting the partition on your hard drive.
Besides formatting, does EaseUS Partition Master have any other features? Sure.
What Else Can EaseUS Partition Master Help with?
EaseUS Partition Master is far more than a formatter. Its specific features are as follows:
- Format USB to boot
- Convert FAT32 to NTFS
- Clone systems and partitions
- Convert MBR to GPT without data loss
- Extend, shrink, move or resize partitions
- Convert Data Disk to MBR/GPT, NTFS/FAT32
You see! It is multifunctional. If you need to manage your partitions and disks, don't hesitate to download this tool to help.
Conclusion
Do you know how to use the PowerShell commands to format your disks on Windows? We have learned the detailed tutorial. You can also use EaseUS Partition Master to help format disks if you consider these commands difficult. This format software can be a nice helper.
FAQs About PowerShell Format Disk
Do you have any questions about using PowerShell to format disks? In this part, I list three questions related to today's topic. Hope it can help.
1. How do I list a disk in PowerShell?
It is easy. You just run PowerShell as administrator and type the following command: Get-Disk
Then you can see all the disks available to your device.
2. How do I format a USB drive in PowerShell?
Step 1. Open PowerShell, and select the "Run as administrator" option.
Step 2. Type the following command to format the USB and press Enter:
Format-Volume -DriveLetter DRIVE-LETTER -FileSystem FILE-SYSTEM -NewFileSystemLabel DRIVE-NAME
Make sure you replace DRIVE-LETTER with the correct disk letter, replace FILE-SYSTEM with the targeted file format, and change DRIVE-NAME with a new name you like.
3. How do I completely format a disk?
Step 1. Right-click on the drive to format and select "Format".
Step 2. Enter a name for the drive in the "Volume label" and determine the format type.
Step 3. Click "OK".
Note: It takes a while to delete all the files and change the format of your disk.
Was This Page Helpful?
Sherly joined EaseUS in 2022 and she has always loved writing articles and enjoys the fun they bring. She receives professional training here, focusing on product performance and other relative knowledge. She has written over 200 articles to help people overcome computing issues.
Related Articles
-
[5 Ways] How to Change Product Key in Windows 11/10
![author icon]() Daisy/2025-07-04
Daisy/2025-07-04 -
Which Is the Best NTFS Allocation Unit Size, How to Set?
![author icon]() Sherly/2025-07-04
Sherly/2025-07-04 -
9 Best Solutions to Fix Windows Stop Code 0xC000021A
![author icon]() Brithny/2025-07-04
Brithny/2025-07-04 -
Don't Pass: Is It Safe to Update BIOS?🔥
![author icon]() Jerry/2025-07-04
Jerry/2025-07-04
EaseUS Data Recovery Services
EaseUS data recovery experts have uneaqualed expertise to repair disks/systems and salvage data from all devices like RAID, HDD, SSD, USB, etc.