Have you heard the word PowerShell to get disk space and felt confused about the same? If yes, this guide will introduce you to the different options to check disk space PowerShell and the alternatives for showing disk usage conveniently.
PowerShell is one of Windows's most powerful built-in command-line shell and scripting environment tools that offer seamless convenience over handling various tasks. Whether it's about installing Windows update or about PowerShell SSH, about PowerShell getting folder size, or it's about PowerShell unzip/zip, or PowerShell runs exe, PowerShell gets disk space and handles all things conveniently.
Read Also:
7 Ways to Fix 99% Disk Usage on Windows
Discover effective solutions to resolve 99% disk usage issues on Windows. Follow seven methods to optimize your system's performance efficiently.
PowerShell Get Disk Space - Step-by-Step Tutorial
PowerShell is a cross-platform task automation solution that offers many functionalities, including easy automation, consistent API, comprehensive type system, built-in data formats, cross-product composability, and much more. PowerShell is designed with different factors, including a command line shell, configuration management framework, and scripting language. However, how to use PowerShell to get disk space?
PowerShell gets disk space and can be used in different types. If you are eager to know these, here we are with the four guides on the other commands for you.
PowerShell Get Disk Space via Get-Volume Command
This option offers the list of all volumes available on the system. It is the very most straightforward method for PowerShell to get free disk space operation where all you can do is:
Show all the drives and space allocation on the computer:
Step 1: Tap the Win + R button together to run the Run command on your device.
Step 2: Type PowerShell in the given space and hit Enter.
Step 3: Type the command Get-Volume and press Enter.
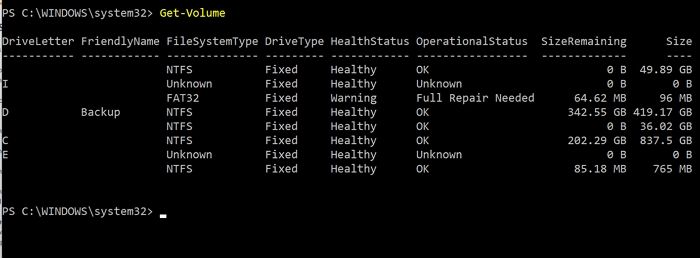
Step 4: Once done, you can find the list of drives and their information on the local computer.
- Notice:
- Run the command saying Get-Volume -DriveLetter C in PowerShell. (Replace C with the actual drive letter can be replaced here with the preferable drives)
PowerShell Get Disk Space via Get-PSDrive Command
You can use PowerShell's Get-PSDrive cmdlet command to find out all drives' available disk space in GB. Once you run the command, you may view each device's provider, root, and used/free disk space. To know the free or used disk space of a specific drive, you only need to run the Get-PSDrive + drive letter command.
Now, let's learn how to use these commands in PowerShell.
Show the free disk space for all drives on the target computer:
Step 1: Run the Get-PSDrive cmdlet in PowerShell.
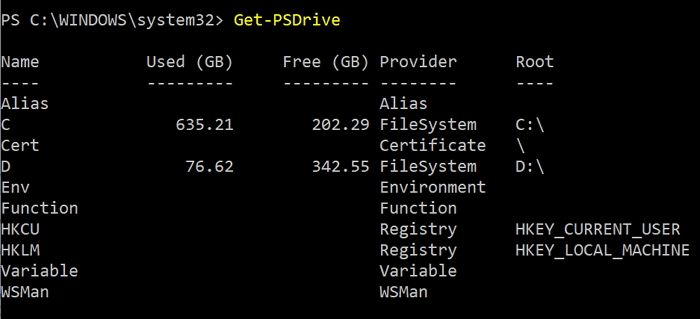
Step 2: Once done, you can view the used disks, free disk space, provider, and root for all drives.
- Notice:
- Run the Get-PSDrive C command to find a particular drive. Replace C with any other drive name.
PowerShell Get Disk Space via Get-WmiObject Command
This cmdlet and the win32_logicaldisk PowerShell script help display the logical drives' total size, allocated, and free space.
Show free space for all drives on your computer:
Step 1: Type the command:
Get-WmiObject -Class win32_logicaldisk | Format-Table DeviceId, MediaType, @{n="Size";e={[math]::Round($_.Size/1GB,2)}},@{n="FreeSpace";e={[math]::Round($_.FreeSpace/1GB,2)}}
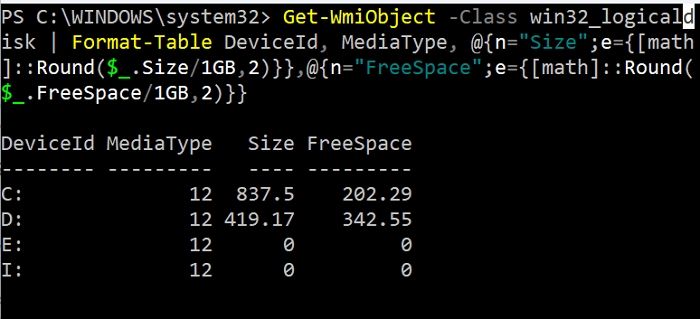
Step 2: Once done, then hit the Enter button. It will offer free space for all drives in GB.
Step 3: If you are willing to acquire total disk space and free percentage on each drive, the commands you must run here are:
Get-WmiObject -Class Win32_LogicalDisk | Select-Object -Property DeviceID, VolumeName, @{Label='FreeSpace (Gb)'; expression={($_.FreeSpace/1GB).ToString('F2')}}, @{Label='Total (Gb)'; expression={($_.Size/1GB).ToString('F2')}}, @{label='FreePercent'; expression={[Math]::Round(($_.freespace / $_.size) * 100, 2)}}|ft
By the way, you can also use the command to check the free space on a remote computer. Here is how to do so.
- Notice:
-
One can easily enable total free disk space on the remote computers by replacing the computer's name in the above command, such as: Get-WmiObject -Class Win32_logicalDisk -ComputerName srv01,srv02,srv03
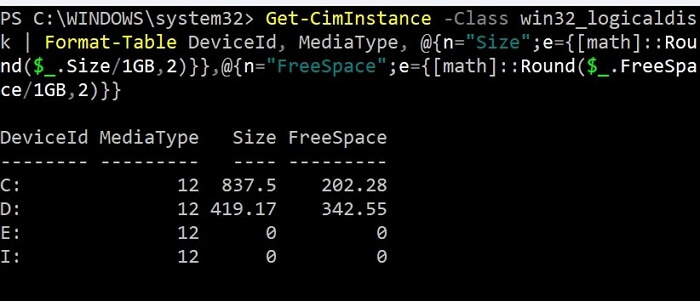
PowerShell Get Disk Space via Get-CimInstance Command
This command helps get total and free disk space on the local and remote computers.
Show free disk space of each drive on the local computer:
Step 1: Run the following command in the PowerShell Prompt:
Get-CimInstance -Class win32_logicaldisk | Format-Table DeviceId, MediaType, @{n="Size";e={[math]::Round($_.Size/1GB,2)}},@{n="FreeSpace";e={[math]::Round($_.FreeSpace/1GB,2)}}
Step 2: Once done, run the following command to get complete information about the drives.
Get-CimInstance -Class Win32_LogicalDisk |Select-Object -Property DeviceID, VolumeName, @{Label='FreeSpace (Gb)'; expression={($_.FreeSpace/1GB).ToString('F2')}},@{Label='Total (Gb)'; expression={($_.Size/1GB).ToString('F2')}},@{label='FreePercent'; expression={[Math]::Round(($_.freespace / $_.size) * 100, 2)}}|ft
- Notice:
-
Replace the computer name and drive letter in the given command per your preferences:
Get-CimInstance -ComputerName computername win32_logicaldisk | where caption -eq "C:" | foreach-object {write " $($_.caption) $('{0:N2}' -f ($_.Size/1gb)) GB total, $('{0:N2}' -f ($_.FreeSpace/1gb)) GB free "}
Although the PowerShell commands are tricky, they are needed to type very carefully; otherwise, it can result in data loss. If you are unwilling to indulge in much computing experience, conveniently pick up a reliable third-party tool.
Professional Alternative to PowerShell Get Disk Space [Free & Easy]
If you don't want to indulge in complicated commands, EaseUS Partition Master is a beautiful alternative; we suggest you have one. It allows you to check all the basic information of the disk without any tricky commands, including free disk space.
The tool comes up with an "extend partition" feature making it easier for users to get disk space conveniently. It is one of the finest all-in-one Windows partition manager options, making it easier to perform different tasks perfectly.
In this way, you can remove the low disk space error efficiently. During the process, you can see clearly how much space you get on your disk.
Whether it's about adjusting disk space, creating a new partition, merging a section, or setting up a hard drive on Windows, EaseUS Partition Master can perform the different tasks efficiently. It is a straightforward and free partition software that suits the requirements of beginners well.
Features of EaseUS Partition Master:
- All in one free partition manager
- Move unallocated space to C drive
- Can copy OS and data to another HDD/SSD
- Move partition to end of disk on WIndows 10/11
- Can convert MBR to GPT for Windows 11 upgrade
- Merge partitions on SSD/USB to get more usable space
- Works well on the different Windows operating systems
The introduction of the EaseUS Partition Master has relieved users from the headache of getting trapped in complicated commands. You can quickly get disk space on your drive with a few clicks.
Conclusion
So, guys! Hopefully, you have learned how to use PowerShell to get disk space in 2023. There are four different ways one can use PowerShell for disk space. The related commands are complicated and can create issues anytime. The best thing you could do in the league is to use a third-party option, i.e., EaseUS Partition Master. It is a simple and easy-to-use tool that only requires a few clicks to get space on the disk drive.
Besides checking the disk space, many users are also concerned about the status of the disk, or they may want to use PowerShell to perform other actions. Hence, herein I give some others links. Click them if you have similar questions.
PowerShell Get Disk Space FAQs
Although we have tried to cover most of the information in this article, some queries can create confusion for you. Here we are with some of the most asked questions that will make things more straightforward.
1. How do I check disk space in PowerShell?
You can quickly check the disk space in PowerShell using the Get-Volume PowerShell Command. You can use the -DriveLetter parameter to specify a specific drive to check.
The command is also capable of giving information about file system volumes on a computer, including the drive letter, file system, capacity, free space, and other details.
You can also use the fsutil and wmic to find the same details.
2. How do I see disk space in CMD?
Command Prompt is less powerful than Terminal or PowerShell, but you can use the "dir" command with the "/S" option to check the disk space. The "/S" option displays the total size of all files and subdirectories in the specified directory.
3. How do I check disk space on multiple servers using PowerShell?
You can check the disk space on multiple servers using PowerShell by combining the Get-WmiObject and the Foreach-Object cmdlets. You will need to write a script using both and then execute it.
Was This Page Helpful?
Daisy is the Senior editor of the writing team for EaseUS. She has been working at EaseUS for over ten years, starting as a technical writer and moving on to being a team leader of the content group. As a professional author for over ten years, she writes a lot to help people overcome their tech troubles.
Sherly joined EaseUS in 2022 and she has always loved writing articles and enjoys the fun they bring. She receives professional training here, focusing on product performance and other relative knowledge. She has written over 200 articles to help people overcome computing issues.
Related Articles
-
What Is Allocation Unit Size For SD Card? Everything You Should Know
![author icon]() Cici/2026-05-21
Cici/2026-05-21 -
(Solved!) Windows Update Stuck on Restarting🔥
![author icon]() Jerry/2026-06-18
Jerry/2026-06-18 -
How to Recover Unsaved/Lost/Corrupted Adobe Acrobat Files on Windows PC
![author icon]() Cedric/2026-02-06
Cedric/2026-02-06 -
Game Stuttering on High-End PC [Why & How to Fix]
![author icon]() Larissa/2026-05-21
Larissa/2026-05-21
EaseUS Data Recovery Services
EaseUS data recovery experts have uneaqualed expertise to repair disks/systems and salvage data from all devices like RAID, HDD, SSD, USB, etc.