
What is a Windows Boot Drive?
A Windows boot drive is one of the prime devices that can be helpful in letting you boot into Windows. The computer or laptop requires a boot drive or device to boot into the primary operating system.
Generally, all system files are stored in a drive of your computer's internal disk, and it is usually called the C drive. And every time you turn on the computer, you are actually using these files to perform a boot process. You can also create a bootable USB drive in case you have met serious issues when starting the computer. Or, this bootable drive can be applied to another computer to let you use your own system on other computers.
Then how to create a bootable USB drive and how large the Windows boot drive size is? In the following part, we will tell you all the answers.
How to Create a Windows 10/11 Boot Drive?
There are different methods to create a Windows boot drive, and each of these methods comes with its own advantages. Here we will introduce three common methods, including making a fresh new bootable drive and making a portable system drive of your setup computer.
Method 1. Creating Windows 10/11 Boot Drive with Windows Media Creation Tool
The Windows Media Creation Tool has been rated as one of the easy ways for creating your Windows boot drive. It allows you to download the Windows 10/11 install file onto a flash drive or CD/DVD so that you can use it to reinstall the Windows system. With this method, you should prepare a USB drive with a size of at least 8GB.
Here are the steps that you can follow to use the Windows Media Creation Tool:
Step 1. Download the creation tool from Microsoft's official download page. Click "Download tool now" to start.

Step 2. Wait till the download is complete. Click on the downloaded file to begin running it.
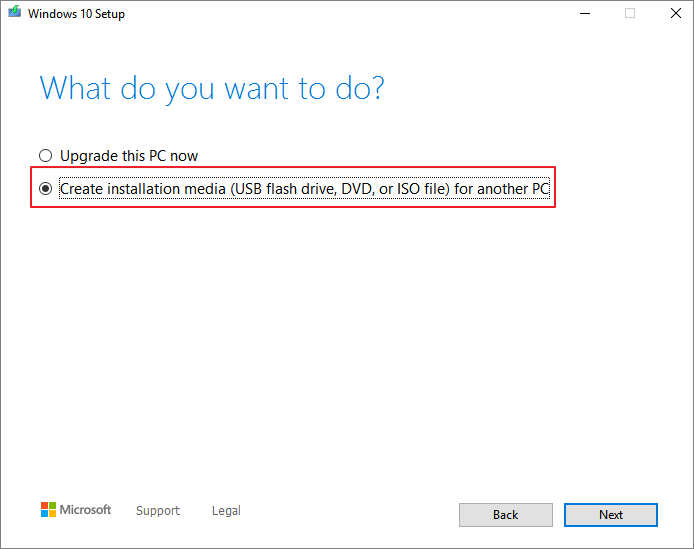
Step 3. Accept the Terms and Conditions and select the Create installation media (USB flash drive, DVD, or ISO file) for another PC.
Step 4. Click on Next, and select the language, architecture, and edition details. The tool will select the best options automatically.

Step 5. On the next page, keep the option USB flash drive selected and click on Next.

Step 6. Then follow the on-screen instructions to create the USB boot drive. Once it has been done, you can use the created USB drive to reinstall a Windows system.
Method 2. Create a Portable Windows USB Drive Using Windows To Go
Windows To Go is a feature available only on Windows Education and Enterprise editions. It is designed for users to create a portable Windows system drive. Once created a portable system USB drive, you can carry it anywhere and use your system on any computer. You can even run Windows OS on a Mac computer without using BootCamp, which means you don't have to spend 128GB of disk space to install a Windows OS.
To apply this method, you will need to satisfy the following requirements:
- A computer running Windows 8/8.1/10
- A Windows To Go certified USB drive
Below are the steps you need to follow:
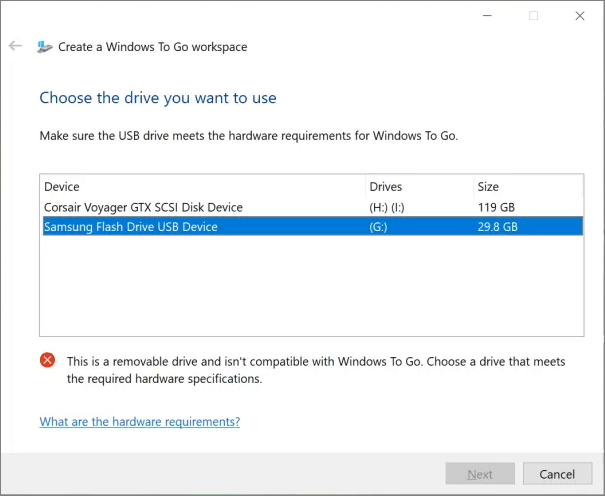
Step 1. On your Windows 10 computer, launch Windows to Go, and choose the USB drive you are going to use.
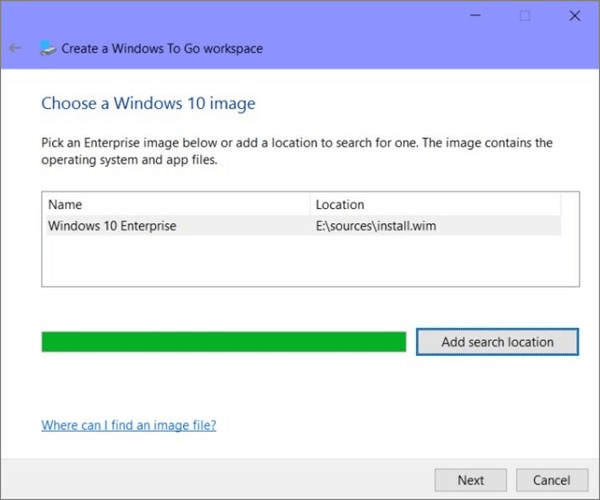
Step 2. Then choose a valid Windows image file. It will automatically list an available one, or you can search for it manually.
Step 3. In the next step, you can choose to set a Bitlocker password or not. It's an optional choice.
Step 4. In the last step, Windows To Go will format the target USB drive, and transfer the Windows image to the USB drive. Wait until the process is finished.
If you want to boot from the created Windows To Go USB drive, launch Windows To Go again. In the Windows To Go Startup Options, there will be a question asked: Do you want to automatically boot your PC from a Windows To Go workspace? Select Yes and click Save changes. Restart your computer, your computer will boot from the portable Windows USB drive.
Method 3. Create a Portable Windows USB Drive Using EaseUS OS2Go
As mentioned before, only Windows Education and Enterprise editions have the Windows To Go feature. Moreover, in the latest Windows 10 version, the Windows To Go feature has been removed. What if you are using a normal Windows system but still want to create a portable USB drive? Here comes the best alternative of Windows To Go - EaseUS OS2Go.
EaseUS OS2Go is a unique Windows to Go creator for both novice and advanced users. It works across all the Windows versions, right from Windows 7 to the latest Windows 11. Some of the benefits offered by EaseUS OS2Go can include:
- Migrates Windows 11 to a portable drive along with all programs, files, and whatever in your system drive.
- Easy-to-use. Even if you have zero knowledge about Windows To Go, you can use this tool.
- Once created, you can even run Windows 11 on unsupported old computers.
- The created USB drive can be used on Mac computers, great news for game lovers.
Now, download EaseUS OS2Go from the button below, and see how to use this easy tool.
Step 1. Install EaseUS OS2Go on your Windows computer, it will display your system drive's used space. Plug in a USB drive that is larger than the system drive used space. Choose the target USB drive and click Next to continue.

Step 2. EaseUS OS2Go will notify you that the following operation would delete all data on your drive. Make sure that you have backed up all the important data. Click the Continue button to proceed.

Step 3. Adjust disk layout. The default disk layout on the target drive will be exactly the same as the resource drive. You could also edit the layout according to your needs. Tick the option there if you're using a Solid State Drive as the Windows bootable drive. Next, click Proceed.

Step 4. Then EaseUS OS2Go will start to create the portable USB drive. It usually takes a while depending on your OS and Network condition. When the progress reaches 100%, the USB drive should be bootable now.

Step 5. Insert the portable Windows USB and start your computer. Press the required key (F2, DEL, F10...) to access BIOS. Choose to boot from the USB disk.
Note: Please make sure that the boot mode (UEFI or Legacy) of the portable USB and your target computer are the same, otherwise you may not be able to boot.
Conclusion
Creating a bootable drive can be quite useful and simple. If you don't have enough computer knowledge, the EaseUS OS2Go can be one of the best tools for the purpose. Check out the tool and achieve the most promising experience ever in creating a Windows boot drive.
Was This Page Helpful?
Related Articles
-
How to Create Bootable USB from ISO Windows 11 in 3 Different Ways
![]() Jerry/2024-02-22
Jerry/2024-02-22 -
How to Play League of Legends (LOL) on Mac with 3 Solutions
![]() Jean/2023-12-12
Jean/2023-12-12 -
Without Boot Camp | How to Play Valorant on Mac
![]() Jean/2023-11-17
Jean/2023-11-17 -
Top 3 Best Windows To Go Creator Software for Windows 11/10/8/7
![]() Jean/2023-07-20
Jean/2023-07-20
EaseUS OS2Go
- Create portable Windows to USB
- Copy installed Windows OS to USB
- Clone Winodws OS drive to USB
- Run Windows 11 on any PC
- Run Windows 11 on unsupported PC
- Run Windows 11/10 on a Mac