-
![]() EaseUS Data Recovery Wizard 20.1 Review: Major Updates
EaseUS Data Recovery Wizard 20.1 Review: Major Updates June 16,2026
 6 min read
 -
![]()
-
![]() EaseUS Data Recovery Wizard for Mac Review [Update in 2026]June 30,20266 min read
EaseUS Data Recovery Wizard for Mac Review [Update in 2026]June 30,20266 min read -
![]() PhotoRec vs EaseUS Data Recovery: Full Comparison & 2026 ReviewJune 30,20266 min read
PhotoRec vs EaseUS Data Recovery: Full Comparison & 2026 ReviewJune 30,20266 min read -
![]()
-
![]()
-
![]() How to Get EaseUS Data Recovery License Code | Safe & Full VersionJune 16,20266 min read
How to Get EaseUS Data Recovery License Code | Safe & Full VersionJune 16,20266 min read -
![]() How to Use TestDisk to Recover Data on Windows/MacJune 30,20266 min read
How to Use TestDisk to Recover Data on Windows/MacJune 30,20266 min read -
![]() How to Use PhotoRec to Recover Files [Detailed Guide]June 16,20266 min read
How to Use PhotoRec to Recover Files [Detailed Guide]June 16,20266 min read -
![]()
Page Table of Contents
| Workable Solutions | Step-by-step Troubleshooting |
|---|---|
| Main Features of TestDisk | TestDisk is a free data recovery tool and is compatible with multiple operating systems...Full steps |
| TestDisk Pros and Cons | Various distinct partition schemes and file systems are fully recoverable with TestDisk...Full steps |
| A Step-by-Step TestDisk Tutorial | Install TestDisk on your PC and follow the instructions to recover data using the TestDisk...Full steps |
| EaseUS Data Recovery Wizard | EaseUS Data Recovery Wizard is the best data retrieval solution for businesses and service providers...Full steps |
Main Features of TestDisk
Losing confidential data from your Windows or Mac hurts a lot! Have you been facing troubles due to data loss? The impact could be severe! Data loss sets back your productivity timelines and leads to losing your valuable customers if security infringements accompany it.
Whenever your company's confidential data is stolen, it begets losing your customer's trust and respect. Here comes the importance of having a powerful data recovery solution! Top-notch data recovery or backup solutions will help you identify the unrecognized format, unforeseen deletions, virus attacks, corrupt documents, etc.
TestDisk is the leading data recovery solution when you face the inaccessibility of your files and folders. So, are you willing to know more about what is TestDisk? In today's article on TestDisk review, we will discuss its features, pros & cons, and so on. Let's get started!
The prime features of TestDisk are shown below:
- Price: TestDisk is a free data recovery tool. You can download TestDisk free version now!
- Data Recovery: In case you've faced a corrupt partition on the partition table, the data preserved on the segment will be unreadable by your OS. However, with TestDisk, anybody can retrieve ext2, HFS, exFAT, JFS, NTFS, ext3, ext4, and FAT32. But if you lost a media file to a damaged partition, TestDisk's satellite software, PhotoRec, specializes in reading and retrieving media files from storage devices.
- Compatibility: TestDisk is compatible with multiple operating systems and supports Microsoft Windows 7, 8.1, 10, Vista, XP, 2000, Server 2003, 2008, NT 4.0, FreeBSD, OpenBSD, Linux, and more.
- Multiple Operating System Support: TestDisk provides multi-language OS support, such as macOS, Windows, and different Linux and UNIX distributions.
- Multiple Language Support: No data recovery tool is flawless! If you face issues while recovering files with TestDisk, contacting its customer care executive is the only way out. TestDisk has a support forum facility available in the languages, including English, French, and German.
TestDisk Pros and Cons
After introducing the main features of TestDisk, we will share the advantages and disadvantages of this product, so that you can better know this product. Now let's take a closer look at its pros and cons.
Pros:
- File system and partition support: Various distinct partition schemes and file systems are fully recoverable with TestDisk.
- Charges: Unlike other data recovery tools, TestDisk is 100% free as it's open-source freeware. Therefore, it can be used and modified for free. The developer of this tool accepts contributions to guide its maintenance and support endeavors.
- OS support: TestDisk supports not only Windows OS but also Linux and UNIX distributions.
Cons:
- Poor UI: Both the PhotoRec and TestDisk are highly command-line software, which isn't mainly suited to the users who crave a more graphical UX. However, the individuals mostly use this tool with different degrees of PC proficiencies and knowledge. On the other hand, the novices might be limited to using TestDisk to accumulate data for tech support to assess.
A Step-by-Step Guide to Recover Lost Data with TestDisk
In this TestDisk review, we will share the detailed steps to install TestDisk on your PC. Although different download methods are available for different OS, installing this software must be straightforward in terms of the OS you are using.
Are you using MacBook Air? Today, we will show you how to install TestDisk on your MacBook Air operating macOS Mojave 10.14.5.
Step1. You need to download TestDisk free version from here.
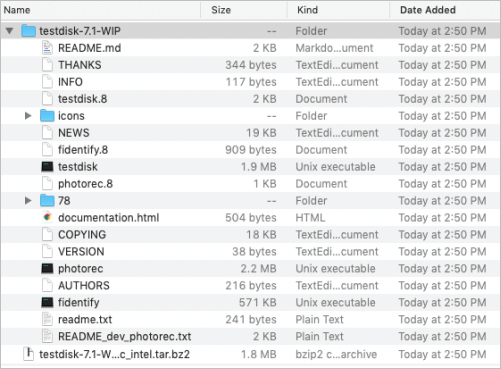
Step2. However, for Mac, you need to click on the big green button showing TestDisk 7.1, resulting in a file: testdisk-7.1-WIP.mac_intel.tar.bz2, which is being saved to your Mac's download folder.
Step3. Select the file to uncompress it that built a folder named testdisk-7.1-WIP. Therefore, expanding that folder unbolted many executable files for PhotoRec and TestDisk.
In this step-by-step TestDisk review tutorial, you can take any MacBook or Windows PC to launch TestDisk. However, the detailed steps used in this significant data retrieving exercise are the following:
Step1. Start TestDisk.
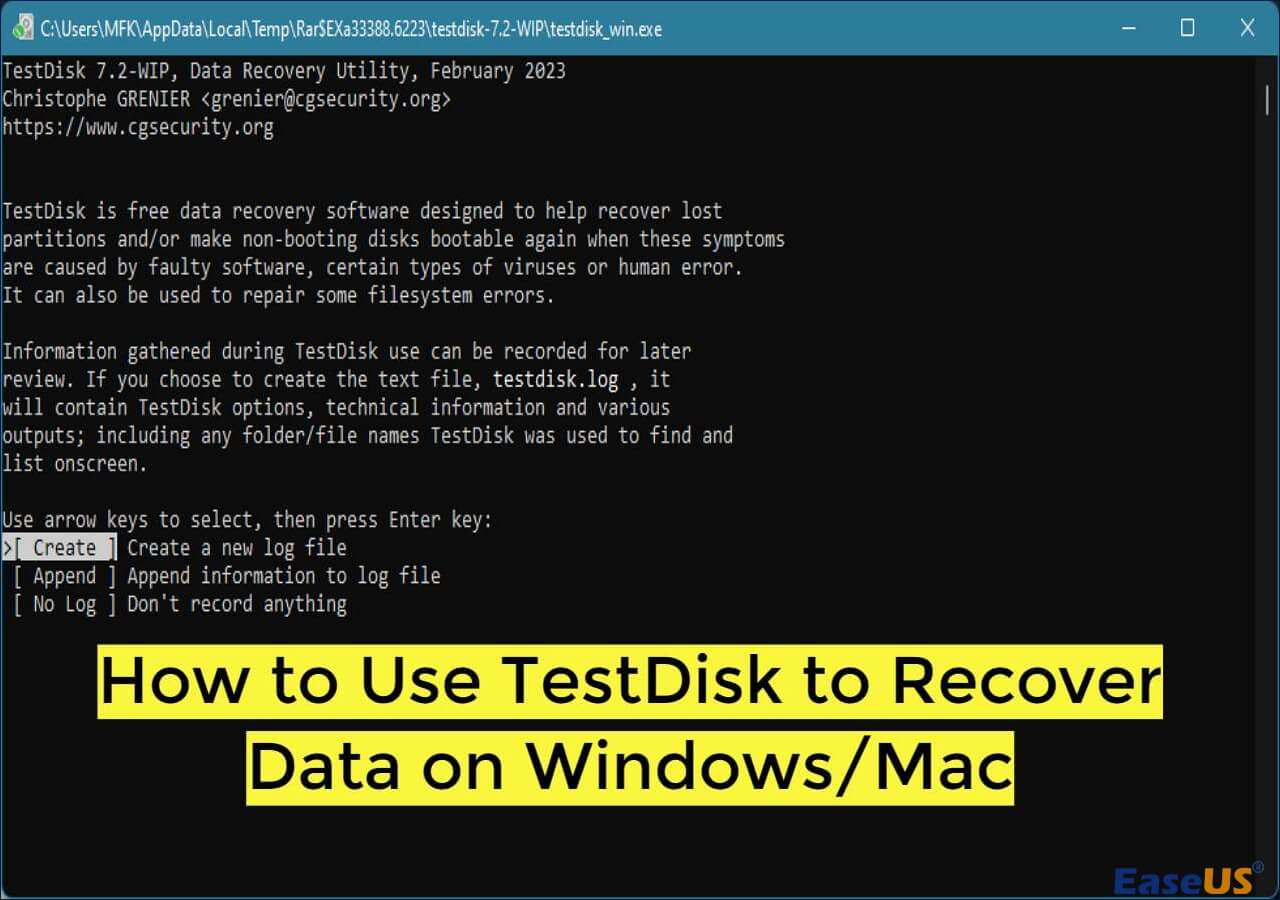
Step2. Choose "Create" to make a brand-new log file.

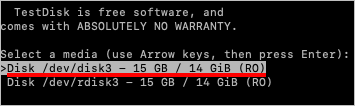
Step3. Provide your admin's password when instigated. Once you return to the program, you will see a text showcasing that this freeware has no warranty.
Step4. Opt for the disk to be retrieved quickly. In this stage, no partition on this disk can be ascended. You might go into the Disk Utility and unmounts the compartments.
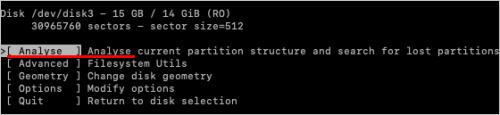
Step5. Choose the table type of the partition. You must pre-select the EFI GPT as TestDisk had witnessed that partition type.

Step6. Choose "analyze" to have a look at the disk structure.
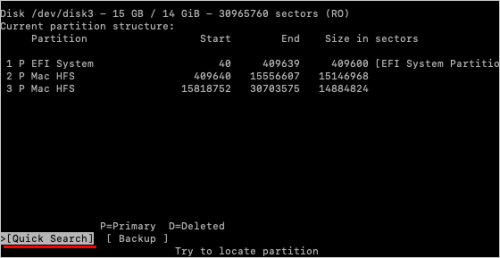
Step7. Once the disk analysis is over, your disk structure is ready to evaluate.
Step8. Carry out a "quick search" for the misplaced partition, which was unsuccessful.
Step9. Perform or follow up with a "Deeper Search" to find the mislaid partition.
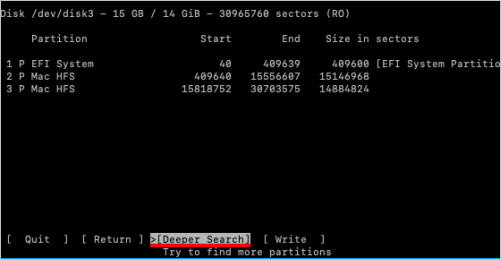
Step10. Opt for the partition, which will be retrieved, and hit the "write" button.
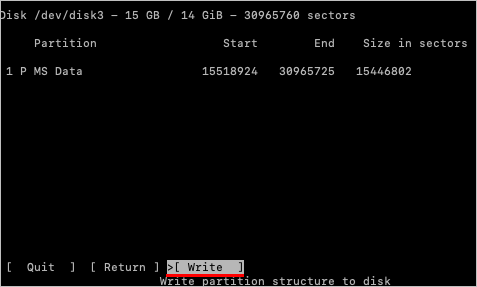
Step11. By following the prompts, you have to proceed with the retrieval.
EaseUS Data Recovery Wizard - TestDisk Alternative
TestDisk, being a command-line interface software, it's cumbersome for everyday users to understand, and they often can't operate it. Do you need all-in-one data retrieval software? According to the data recovery software review, EaseUS Data Recovery Wizard is that powerful data recovery tool alternative, aiding you in retrieving accidentally deleted files and data from formatted or damaged hard drives.
When you couldn't retrieve data by TestDisk, EaseUS is a miraculous solution that can instantly recover your lost files after emptying the recycle bin. With EaseUS, you can:
- Recover NAS Data: It's the globe's first extraordinary data retrieval for NAS servers. EaseUS has made NAS data recuperation effortless and can retrieve every type of NAS content.
- RAW recovery: When your PC's hard drive becomes RAW, it will never be infuriating and pesky anymore. EaseUS data recovery wizard pro lets you scan all the retrieval files from any inaccessible storage device. Also, it helps finish the file recovery efficiently and safely.
How to Use EaseUS Data Recovery Wizard to Recover Data
EaseUS Data Recovery Wizard is the best data retrieval solution for businesses and service providers. It mixes up a classic and user-friendly approach with a convenient suite of elements to help you regain files, which you accidentally eliminated from your PC. Are you bothered about using the EaseUS Data Recovery Wizard for the fastest data retrieval? Don't worry, as we have got your back!
Step 1. Run EaseUS Data Recovery Wizard on your computer. Choose the drive where you lost files and click "Search for Lost Data". If your lost files were on an external storage device, connect it to your computer firstly.

Step 2. The software will quickly scan the deleted files immediately, and then automatically perform a deep scan to find more lost files. After the scan is completed, you can use "Filter" or "Search box" to quickly locate specific file types.

Step 3. Click the "Preview" button or double-click on a file for a full preview. Finally, select the desired files, click "Recover" and choose another safe location or Cloud drive to save all the files at once.

Conclusion
Those who're wondering what is TestDisk, hopefully, this article mitigated all your concerns and gave you the nitty-gritty information about this data recovery tool. As you want to retrieve files from the primary storage devices, such as SSD, HDD, flash drive, and SD card, it's recommended to check out TestDisk.
This software is safe and free; hence, you can download TestDisk free version by following the steps mentioned above. But if you're looking for the best alternative to TestDisk, EaseUS Data Recovery Wizard is the best solution!
TestDisk Recovery FAQs
As you've gained information about TestDisk, its features, price, installation process, and pros & cons, now it's time to look at some common FAQs to grasp the usage of the TestDisk better.
Is TestDisk Safe to Use?
TestDisk is a steadfast and credible tool that doesn't operate behind any curtains. Being open-source software, with TestDisk, you can quickly download the source code and crosscheck its integrity.
How to Use TestDisk to Recover a Partition?
To retrieve a partition using TestDisk, you should choose a storage drive first to scan. Afterward, opt for a partition table type and choose "advanced" to check more utility options. You can select the eliminated file source drive partition and check out its directory here.
At this moment, you need to copy the lost file by choosing them and pressing C. Once over, you must paste them into the desired folder by hitting C again.
How to Use TestDisk to Repair a Raw Partition?
You can use TestDisk to fix a RAW partition by scanning your PC's drives and the available partitions. When TestDisk gives you a long list of available partitions for assessment, you can perform a Deeper Search or Quick Search for a thorough scan of your drive.
All those damaged partitions will be shown in green. In this stage, select a partition you want to fix, choose to write, and hit enter. Confirm your selection by hitting Y, and your impaired RAW partition will be retrieved within a few minutes.
Was this page helpful?
-
![]()
Approved by
Evan Galasso is a digital forensics and data recovery engineer with over 10 years of experience in the field. He presents opinions on the current state of storage media, reverse engineering of storage systems and firmware, and electro-mechanical systems of SSDs and HDDs.…


20+
Years of experience

160+
Countries and regions

72 Million+
Downloads

4.9 +
Trustpilot Score


