
Content
Page Table of Contents
About the Author
Hot Topics
| Workable Solutions | Step-by-step Troubleshooting |
|---|---|
| #1. EaseUS Partition Master | Step 1: Locate the drive/partition; Step 2: Resize or move the partition; Step 3: Apply changes...Full steps |
| #2. Disk Management | Step 1. Click on "Manage"; Step 2. You have to navigate the sidebar until you reach "Storage" right below...Full steps |
Creating a partition in Windows Operating System isn't difficult. But how do you go about doing it?
A lot of people today struggle with storage space. That's why they add additional devices to their computers to create a spacious storage system. The common devices used on computers include:
- Hard Disk Drives
- Solid State Drives
- NVME SSDs
- Portable HDDs, SSDs & NVMEs
- USB Pen Drives, SD Cards, and other forms of flash drives
All these physical storage can be very convenient. However, using them to their full effect can be challenging for some. Mainly because it's not easy to employ hundreds of gigabytes of storage.
So, if you're one of the people who just bought one of this hardware, then you must be wondering how do I create a new partition? The process isn't difficult, but it is a little complicated. Moreover, there is more than one way of doing it.
Therefore, let's dive in and analyze each one of them accordingly.
Why Create Partition on Windows 11?
Suppose you wish to learn how to create a partition in Windows 11 without formatting. In that case, you know that separate partitions have many benefits to it. It can help you manage your storage accordingly and ensure that you keep your data separate, allowing you to access necessary information at any time.
Here's what our computer's partition looks like:

As you can see here, there are five partitions. The Local Disk, with the drive letter "C:" is the primary partition where our operating system is installed. In a creative twist, we keep our personal files and important data in Sanctuary II.
While The Migration drive is where data from previous drives are kept. The other two are for gaming and entertainment-related files. It's essential to notice the "F:" partition, as you can see it's near its total space.
While you can notice other drives are evenly balanced. It allows us to keep the data separate and secure while providing easy access to them efficiently. But, to lay it out for you, here are a few reasons to create a partition on Windows 11 or any other OS:
- Keep The Performance Optimal - Speed Up PC Performance
When you are keeping the critical files and programs in a separate drive, it will improve their performance. On the other hand, keeping your bulk files in a separate partition will ensure it doesn't affect your computer's performance.
- Easily Install Multiple Operating Systems
If you wish to use various operating systems, such as one for work and the other for personal space, you can create two primary partitions to install two operating systems. Or, you can use two different operating systems, i.e., Windows & Linux OS.
- Manage Your Data Easily
As seen in the screenshot above, you might have separate interests, so you can create various partitions for various purposes. You can keep your games, entertainment, and other leisure separate from your work without sacrificing efficiency.
#1. Use Free Partition Creator on Windows 11
If you want to know how to create a partition in Windows 11, you need a viable program. The first step to getting you all the aforementioned benefits is to create partitions using a tool like EaseUS Partition Master.
It's a free disk manager, which can help if you want to know how I can partition my C Drive in Windows 11 without formatting or any other Microsoft operating system.
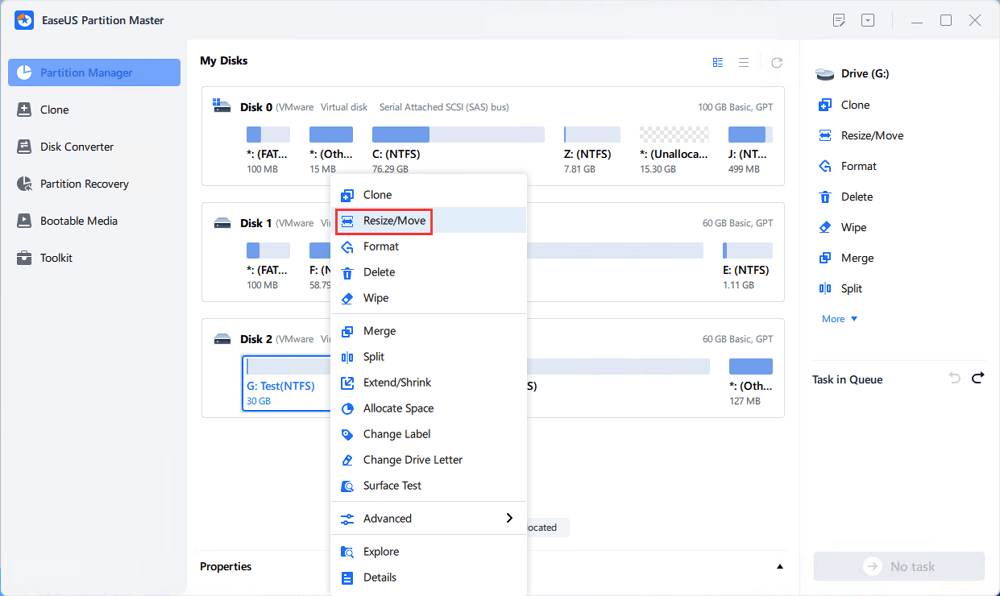
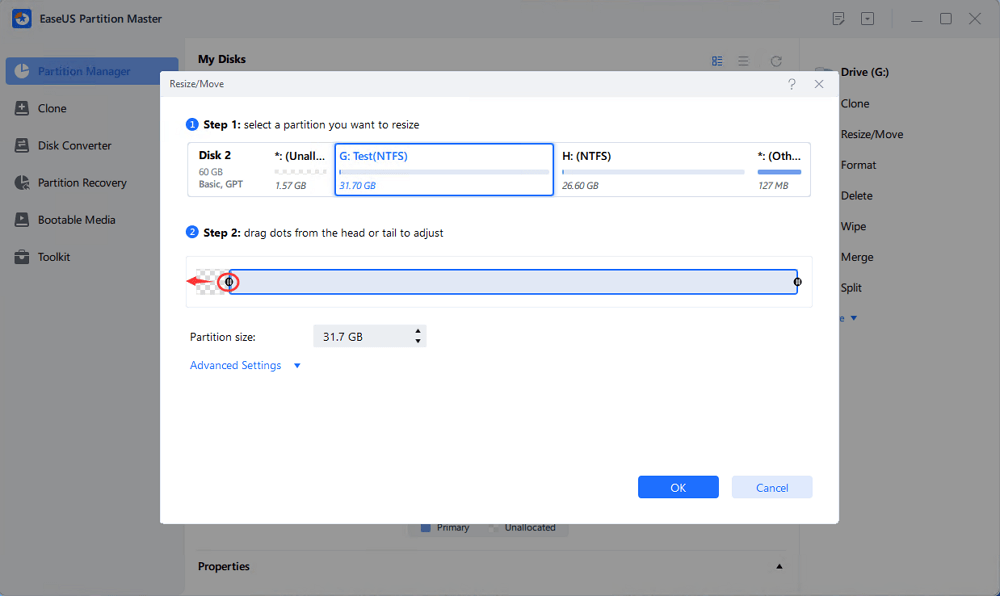
Step 1: Locate and select the target drive/partition
Launch EaseUS Partition Master and go to Partition Manager, select the target drive/partition to adjust its size, right-click on it and choose "Resize/Move".
Step 2: Resize or move the partition
1.To shrink the partition, simply drag one of its ends to free up unallocated space. Once done, click "OK".
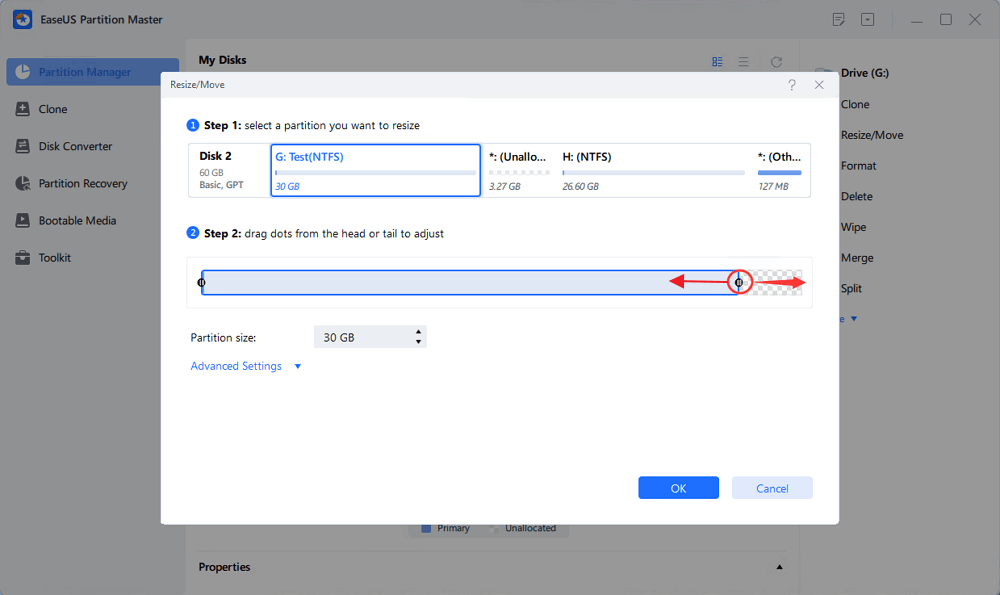
2. To extend the partition, make sure that there is unallocated space aside (if there isn't, follow the above steps to create some). In the same way, drag your mouse into the unallocated space. Click "OK".
3. To move a partition position, you need to leave unallocated space next to the target partition. If no, free up some unallocated space first.
Right-click the target partition, select "Reize/Move". Then drag the whole partition leftward or rightward to adjust its position. Click "OK" to confirm.
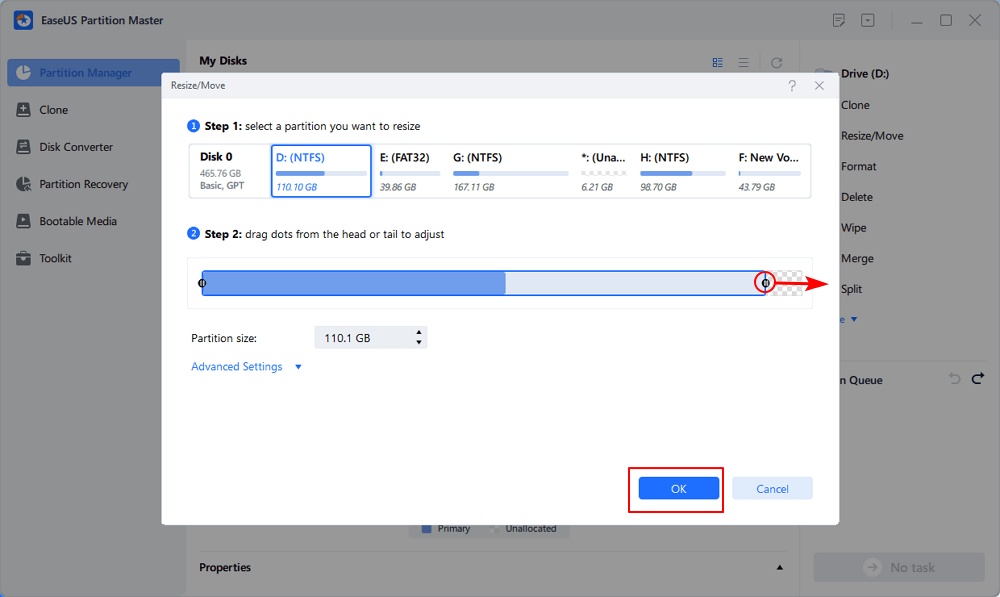
Step 3: Confirm the result and apply changes
At this step, you will see the new disk partition information & diagram.
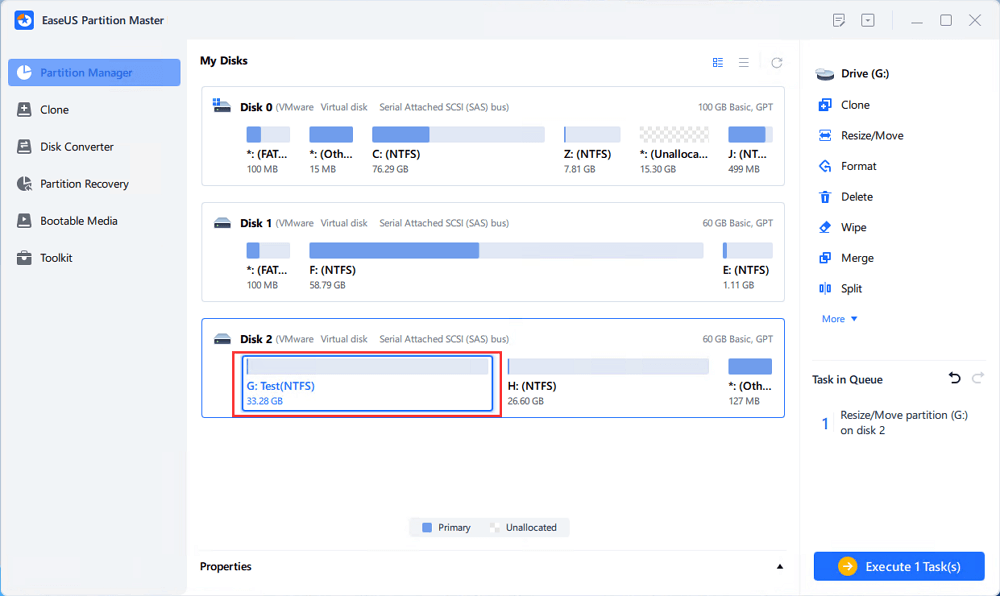
To save changes, click the "Execute Task" button and then "Apply".

#2. Create Partition in Windows 11 with Disk Management
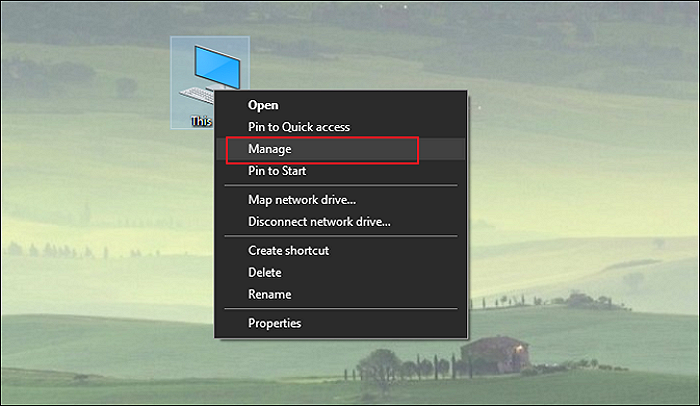
The second option in understanding how to create a partition in Windows 11 is to create one with the help of Disk Management. Here's how you get there.
Step 1. Click on "Manage".
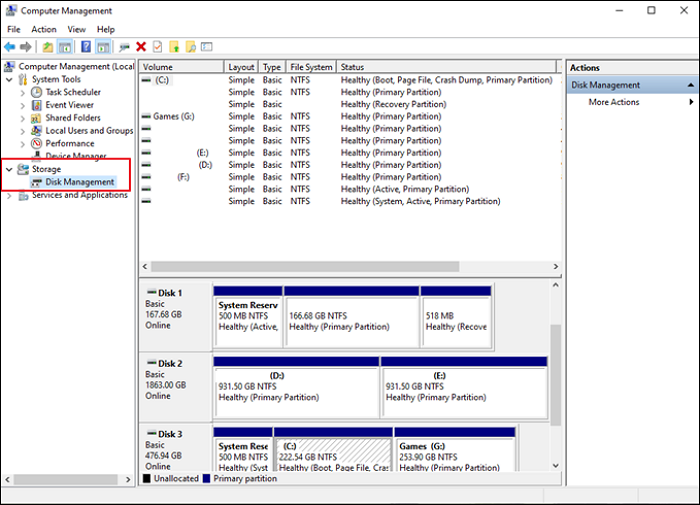
Step 2. You have to navigate the sidebar until you reach "Storage" right below "System Tools". Then click on Disk Management, and you will see the window.
Option 1. Create Partition without Unallocated Space
In the image above, all of the partitions are either taken or have their drive letters. However, some cases will show you Unallocated Space, which is space on a physical drive not yet formatted or partitioned.
If you don't have unallocated space, then click on any of the partitions you wish to shrink.
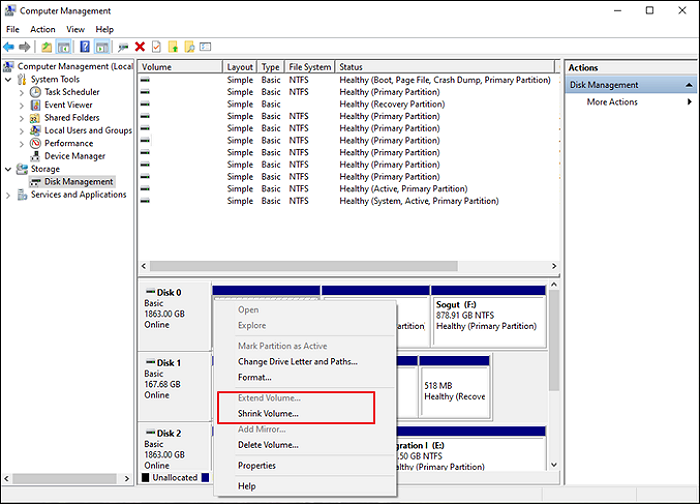
Click on "Shrink Volume Option" in the drop-down menu.
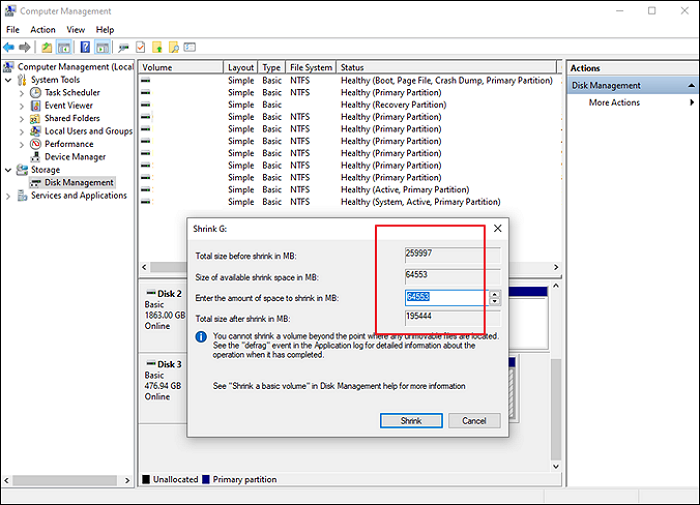
You can pick the amount of space that you wish to shrink from here. This will prompt the windows to remove allocated space from this particular partition.
Option 2. Use Unallocated Space
Once you follow the steps mentioned above, you will see this:

Then, you can right-click on this and create "New Simple Volume".
Option 3. Delete Volume to Get Unallocated Space
The third option you have is to delete one of the partitions you don't need. This will help you empty up space on your computer. Now, remember that you should delete only the volume you don't have any essential data inside - or data that you have backed up already.
Final Thought
There's your process of getting unallocated space through The Disk Management or using EaseUS Partition Master. It's recommended that you use the latter tool to save you from all the hassle of Disk Management.
Plus, using disk management puts you at risk of losing important data. So, to avoid such risks, use the tool and create a partition in Windows 11 easily.
How Can We Help You
About the Author
Oliver is an EaseUS professional writer who dares explore new areas. With a passion for solving tech issues with straightforward guides for common users, Oliver keeps honing his writing craft by developing in-depth solutions for disk and partition management, computer boot-up issues, file transfer, etc.
Written by Tracy King
Tracy became a member of the EaseUS content team in 2013. Being a technical writer for over 10 years, she is enthusiastic about sharing tips to assist readers in resolving complex issues in disk management, file transfer, PC & Mac performance optimization, etc., like an expert.
Product Reviews
-
I love that the changes you make with EaseUS Partition Master Free aren't immediately applied to the disks. It makes it way easier to play out what will happen after you've made all the changes. I also think the overall look and feel of EaseUS Partition Master Free makes whatever you're doing with your computer's partitions easy.
Read More -
Partition Master Free can Resize, Move, Merge, Migrate, and Copy disks or partitions; convert to local, change label, defragment, check and explore partition; and much more. A premium upgrade adds free tech support and the ability to resize dynamic volumes.
Read More -
It won't hot image your drives or align them, but since it's coupled with a partition manager, it allows you do perform many tasks at once, instead of just cloning drives. You can move partitions around, resize them, defragment, and more, along with the other tools you'd expect from a cloning tool.
Read More
Related Articles
-
How to Move Unallocated Space to C Drive in Windows 10/11
![author icon]() Sherly/2024/04/22
Sherly/2024/04/22 -
How to Run CHKDSK Without Admin Rights
![author icon]() Jean/2024/04/22
Jean/2024/04/22 -
Top 5 SD Card Formatter Free Download | Format SD Card on Windows 11/10/8/7
![author icon]() Daisy/2024/04/22
Daisy/2024/04/22 -
Mark Partition as Active in 4 Ways [Step-by-Step Guide]🔥
![author icon]() Tracy King/2024/04/22
Tracy King/2024/04/22
Hot Topics in 2024


EaseUS Partition Master

Manage partitions and optimize disks efficiently