A Mac that fails to start owing to a system problem might be concerning. However, there is no reason to worry. This article will lead you through how to transfer files in Recovery Mode on a Mac, ensuring your important data is secure and accessible.
Whether you're having problems with your Mac's hardware or software, understanding how to use recovery mode properly might help you transfer Mac files in Recovery Mode to protect your data before seeking repair services.
If you haven't created a Time Machine backup before, don't worry! EaseUS Data Recovery Wizard for Mac is a powerful data recovery solution for effectively recovering data from a MacBook that won't turn on normally without creating a USB installer drive. Download this trusted recovery tool and read on to learn detailed steps.
Run Mac Data Recovery Software in Recovery Mode [Without Create USB Installer]
EaseUS data recovery software can perform Mac data recovery in Recovery Mode. This adaptable application provides a smooth recovery procedure that can be started immediately from the source page using a simple command line, avoiding needing a USB installation. Users can quickly and easily recover their data without creating extra bootable disks.
Install the EaseUS Mac data recovery tool, and follow three steps to transfer Mac files from macOS Recovery Mode:
Step 1. Boot Your Mac into macOS Recovery Mode
Step 2. Launch EaseUS Software with Terminal in Recovery Mode
- Select "Utilities" from the top menu, and click "Terminal" in the drop-down options.
- Enter the command sh <(curl https://d3.easeus.com/mac/boot.sh) and hit "Return" to open the professional Mac data recovery software.

Step 3. Recover Mac Data in Recovery Mode with the EaseUS Tool
- #1. Select the disk where your Mac data is stored, and click "Search for lost files". The EaseUS software will quickly locate all the recoverable data on the selected disk volume.

- #2. EaseUS software categorizes the scanned recoverable data by file type and storage path, and you can find the data you want by clicking "Type" or "Path" in the left panel. Check the boxes in front of the data you want to recover.
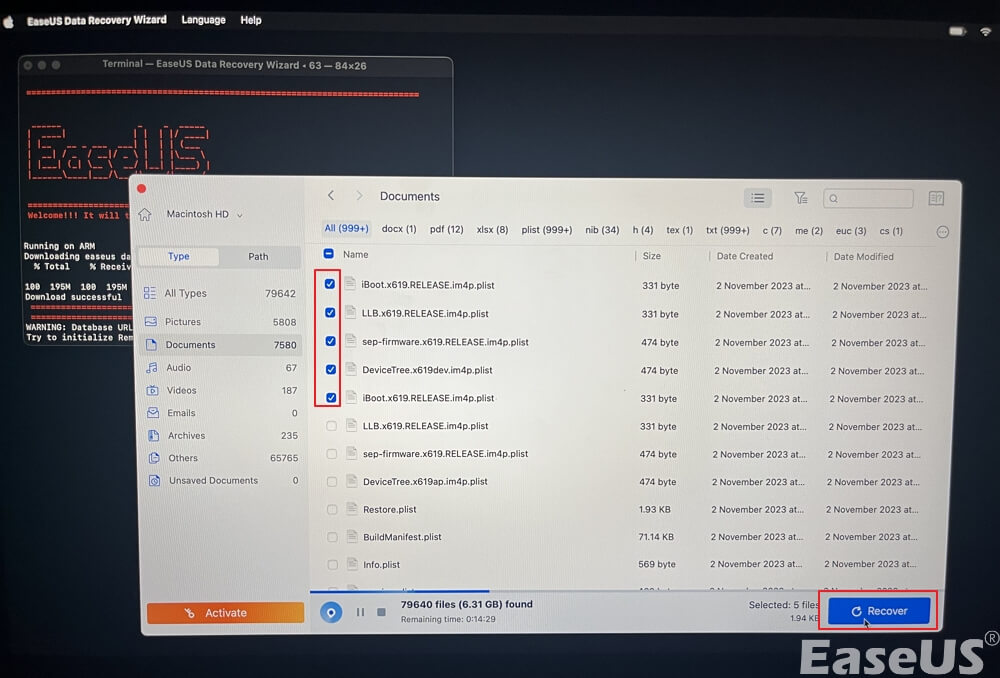
- #3. Click the "Recover" button, and a pop-up window will show up saying, "Please select a target location to save". Choose the external disk as the new storage location of your recovered data.
One of the most notable characteristics of EaseUS Data Recovery Wizard for Mac is its user-friendly design, which makes it suitable for users of all skill levels. Whether you're a newbie or an intermediate user, this program offers a simple method for retrieving data when in recovery mode.
If you think this post is informative, share it on SNS to help others learn how to transfer Mac files in Recovery Mode.
Quick Solutions: Restore Your Mac from a Recent Time Machine Backup
Restoring your Mac from a Time Machine backup is simple using Apple's built-in backup tool. Here are a few easy steps:
Step 1. Connect your Mac to the Time Machine backup external disk. Verify connectivity and activation.
Step 2. After restarting your Mac, use the Command and R keys to reach Recovery Mode, which is necessary for system recovery.
Step 3. Proceed with restoration in macOS Utilities by selecting "Restore From Time Machine Backup".

Step 4. Select the most recent backup before the troubles.
Step 5. Launch the restore procedure on the destination disk, generally your Mac's internal drive. Select disks accurately to avoid data loss or overwrites.
Transfer Files in Recovery Mode [2 Different Ways for Intel/Apple Silicon Mac]
When confronted with a Mac that won't boot up owing to a system fault, moving files in recovery mode is critical for protecting sensitive data. Below, we provide two separate approaches for Intel and Apple Silicon Macs; let's have a look:
#1. Use Target Disk Mode to Transfer Files on an Intel Mac
Target Disk Mode is a dependable option for transferring data from Mac to Mac, mainly developed for Intel-based Macs. Follow the steps below:
Step 1. Connect the two Macs using a Firewire or Thunderbolt connection (not a conventional USB cable).
Step 2. Ensure that the source Mac (the one that won't boot) is off.
Step 3. To boot into Target Disk Mode, press the power button on the source Mac and hold down the 'T' key.

Step 4. Once Target Disk Mode is enabled on the second Mac, the drive from the source Mac should display on the desktop or in the Finder sidebar under "Locations."
Step 5. To access the drive, double-click on it. If the disk is protected using FileVault, you will be requested for the password to unlock it.
Step 6. Transfer the required files, remove the disk, and turn off the source Mac when finished.
#2. Use Mac Sharing Mode to Transfer Files on an Apple Silicon Mac
This alternative to Target Disk Mode for Apple Silicon-equipped Macs allows users to transfer files from one Apple Silicon Mac to another, assuring flawless data retrieval even when in recovery mode. Follow these instructions to use Mac Sharing Mode efficiently.
Step 1. Connect the two computers with a USB, USB-C, or Thunderbolt connection.
Step 2. Turn off the Apple Silicon Mac (source) and press and hold the power button until the message "Loading startup options" shows on the screen.
Step 3. To boot into Recovery Mode, choose "Options" then "Continue" and input the password when requested.

Step 4. In Recovery Mode, go to Utilities > Share disk, select the disk for share, then click "Start Sharing".
Step 5. To see the source Mac, open Finder on the recipient Mac and choose "Network" from the "Locations" column.
Step 6. To access and transfer files, double-click on it, choose "Guest", and then click "Connect".
Step 7. Once the file transfer is complete, eject the disk and shut off the Apple Silicon source Mac.
Transfer Files in Recovery Mode by Copying
When the Mac won't start, enabling Recovery Mode is critical for moving data to another external hard drive. This approach allows users to skip the standard boot procedure and use Recovery Mode's capabilities, such as a Terminal window, to transfer data efficiently. Follow the steps below:
Step 1. You can enter Recovery Mode on older Intel Macs by holding down the Command and R keys during startup.
Step 2. For recent Apple Silicon Macs, turn off the machine, press the power button until "Loading startup options" displays, then choose Options > Continue.
Follow the steps below to Copy Files using the Command Line:
Step 1. In the Terminal window, use the necessary commands to go to the directory containing the files you want to copy. For example ls /Volumes/Macintosh\ HD/
Step 2. To begin copying, use the 'cp' command followed by the source file path and destination directory. For example cp -R /Volumes/Macintosh\ HD/Users/htg/ /Volumes/Rescue\ Disk/

Step 3. Monitor the copy procedure in the Terminal window to ensure all files are copied.
Step 4. Once you're done copying, remove the external hard disk and turn off the Mac.
Conclusion
This article contains complete methods for transferring files in Recovery Mode on Mac, guaranteeing that users can recover their essential data even while experiencing booting troubles. Whether using Target Disk Mode, Mac Sharing Mode, or copying files from the command line, users have various choices customized to their unique Mac models and settings.
However, for a smooth and easy data recovery experience, we suggest installing EaseUS Data Recovery Wizard for Mac. Its comprehensive capabilities and user-friendly interface provide a dependable solution for recovering lost or inaccessible information. Please do not hesitate to download our program for quick data recovery.
Frequently Asked Questions
The FAQs below are some queries asked by Mac users related to how to transfer files in recovery mode:
1. Can I access files in recovery mode?
Yes, you can access files when in recovery mode on your Mac. Recovery mode grants access to critical applications such as Terminal and Disk Utility, enabling you to explore your system and retrieve files for recovery or troubleshooting.
2. Can I copy files in Mac recovery mode?
Yes, you can copy files in Mac Recovery Mode. Using Terminal commands or built-in applications like Disk Utility, you can transfer files from your Mac's internal storage to an external disk or another place, guaranteeing data protection and recovery even under challenging circumstances.
Was This Page Helpful?
Brithny is a technology enthusiast, aiming to make readers' tech lives easy and enjoyable. She loves exploring new technologies and writing technical how-to tips. In her spare time, she loves sharing things about her game experience on Facebook or Twitter.
-
EaseUS Data Recovery Wizard is a powerful system recovery software, designed to enable you to recover files you’ve deleted accidentally, potentially lost to malware or an entire hard drive partition.
Read More -
EaseUS Data Recovery Wizard is the best we have seen. It's far from perfect, partly because today's advanced disk technology makes data-recovery more difficult than it was with the simpler technology of the past.
Read More -
EaseUS Data Recovery Wizard Pro has a reputation as one of the best data recovery software programs on the market. It comes with a selection of advanced features, including partition recovery, formatted drive restoration, and corrupted file repair.
Read More
Related Articles
-
Where Are Photos Stored on Mac? How to Find Photos in Finder
![author icon]() Dany/Jun 17, 2026
Dany/Jun 17, 2026 -
Recover Screen Recordings on Mac in 4 Ways
![author icon]() Dany/Jun 28, 2026
Dany/Jun 28, 2026 -
Apple Support 2002F - Fix It with 4 Solutions [No Data Loss]
![author icon]() Brithny/Jun 17, 2026
Brithny/Jun 17, 2026 -
How to Fix Time Machine Backup Error 19 With Nas
![author icon]() Jaden/Jun 30, 2026
Jaden/Jun 30, 2026