Suppose your Mac suddenly stops working, and you can not boot it up; don't worry about losing data! We will introduce an effective method to run Mac data recovery in Recovery Mode!
EaseUS Data Recovery Wizard for Mac can be launched in macOS Recovery Mode on a Mac without creating a bootable USB drive and downloading the installer on it. So you can run Mac data recovery in Recovery Mode when your Mac suddenly dies due to hardware issues, malware, operating system corruption, etc.
You Can Trust EaseUS Data Recovery Software
EaseUS Data Recovery Wizard has acquired an extensive technical base in data recovery and trusted by billions of users since 2005. Check out reviews on G2.
Before recovering data from a Mac that won't turn on, you should prepare 2 things in advance:
- Link the Mac power supply to avoid data loss caused by power failure during the data recovery process.
- Prepare a large-capacity external disk to ensure that it can store the data stored on the unbootable Mac.
Then, follow the steps below to recover the stored data on your Mac in macOS Recovery Mode!
Step 1. Boot Your Mac into macOS Recovery Mode
Macs with different chipsets have different ways to enter Recovery Mode, and you can refer to the steps below to find the detailed steps for your Mac model:
- For Apple Silicon Macs (M1/M2/M3):
Shut down your Mac, press and hold the power button (Touch ID) until you see "Loading startup options". Select "Options" and click the "Continue" button to enter the macOS Recovery Mode.

- For Intel-based Macs:
Completely turn off your Mac and turn it on when pressing down "Command + Option + R" together. Hold these keys until you see a spinning globe on your Mac's screen.
- For T2-secured Macs:
Turn your Mac on and immediately press down the "Command + Option + Shift + R" keys together. Hold them until you see the spinning globe on Mac's screen.
- Note
- Before running Mac data recovery software in recovery mode, you should check the internet connection. Launching EaseUS software in macOS Recovery Mode requires a network to install the software from its server.
Step 2. Launch EaseUS Data Recovery Software with Terminal
After checking the internet connection, you can launch EaseUS Data Recovery Wizard for Mac in macOS Recovery Mode using Terminal. Here's how to launch the EaseUS software with Terminal:
Step 1. Select "Utilities" from the top menu, and click "Terminal" in the drop-down options.

Step 2. Enter the command below and hit "Return".
sh <(curl https://d3.easeus.com/mac/boot.sh)

This command line will open the professional Mac data recovery software. Wait for the application to open, and it will take several minutes.

- Tip
- If the Terminal says "No such file or directory" or "Could not resolve host", you should check that the command line you typed is spelled correctly (it is recommended that you copy and paste this command line directly), that your Mac's internet connection is stable, or that your macOS version is not lower than macOS 10.12.
If your Mac is completely dead or the Mac Recovery Mode is not working, you need to create a USB installer to access its data. We also provide an article about recovering data from a dead Mac; take a look if needed.

How to Recover Data from the Dead Mac in 2024 [Pro/Air]🍎
This article discusses 5 effective methods to recover data from a dead Mac. Read more >>
Step 3. Recover Mac Data in Recovery Mode with the EaseUS Tool
Wait for the EaseUS software window to appear on your Mac screen, and you can see the different storage locations in the left sidebar. Follow the steps below to recover Mac data:
Step 1. Select the location
Select the disk where your Mac data is stored, and click "Search for lost files". The EaseUS software will quickly locate all the recoverable data on the selected disk volume.

Step 2. Find the data you want
EaseUS software categorizes the scanned recoverable data by file type and storage path, and you can find the data you want by clicking "Type" or "Path" in the left panel. Check the boxes in front of the data you want to recover.
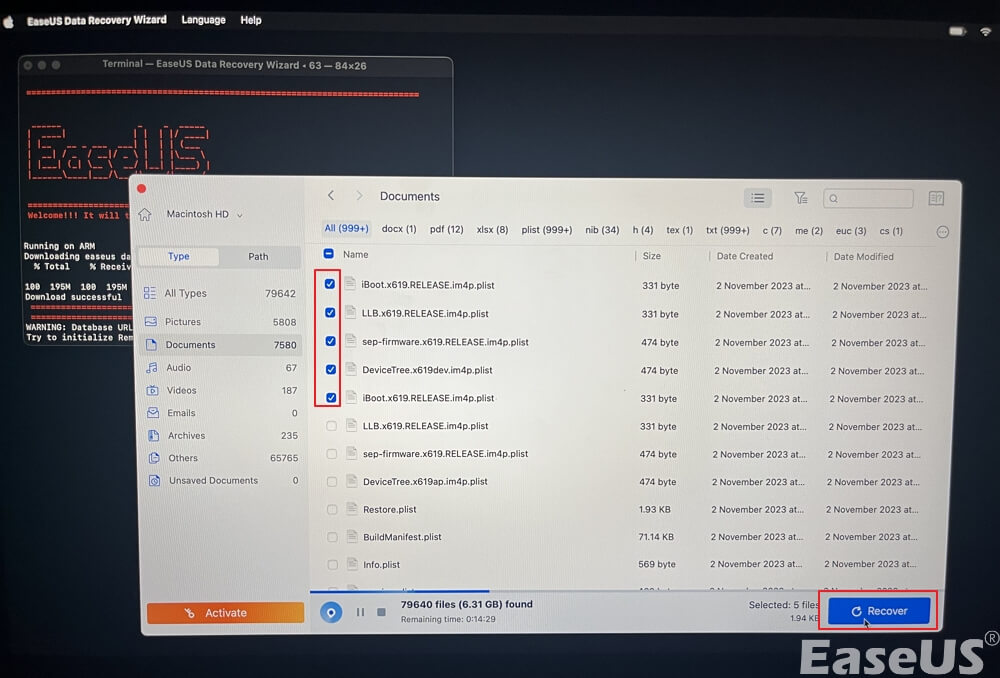
Step 3. Recover and save your data
Click the "Recover" button, and a pop-up window will show up saying, "Please select a target location to save". Choose the external disk as the new storage location of your recovered data.
Extra Tips: How to Recover Unbootable Mac with a USB Drive
If your Mac can't boot or can't connect to the internet in macOS Recovery mode, don't worry! Here are the steps to recover your Mac data by creating a USB installer:
Step 1. Install and run EaseUS Data Recovery Wizard for Mac on another Mac computer, and select "Unbootable Mac > Start".
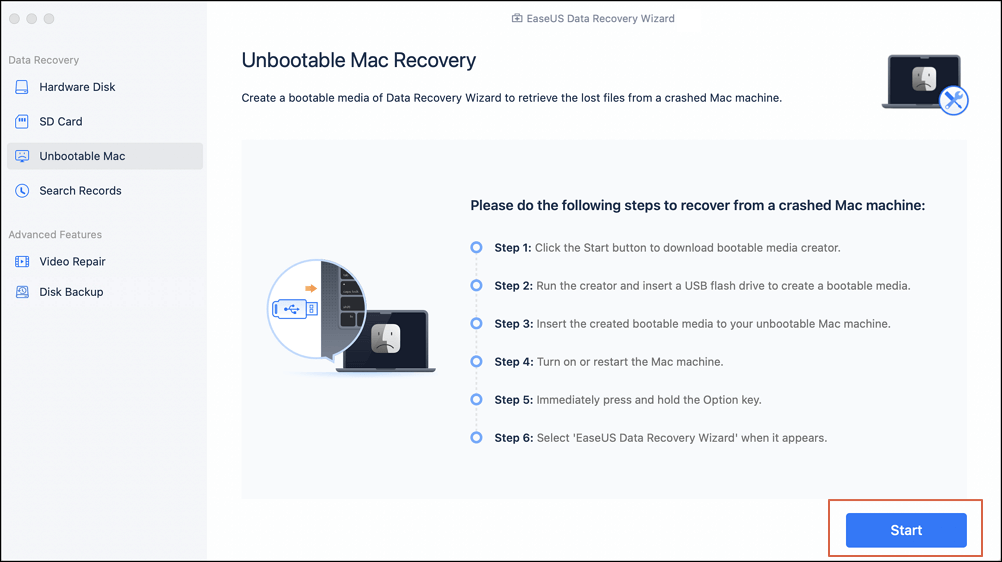
Step 2. Then, choose a prepared USB drive to create the bootable disc. Select "Next" to start creating the bootable disk.

- Warning
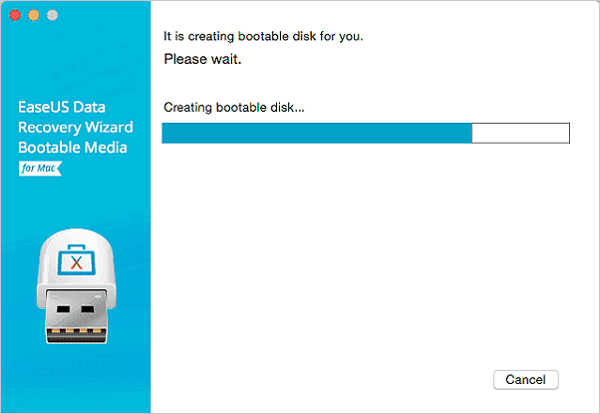
- The creator will prompt to erase the drive to reallocate the space; then it can write the bootable files to this drive. Please back up all USB files before processing "Eraser".
Step 3. The program starts to create a 2GB space and save the boot files. The rest space on the USB can be still used for storage.
Step 4. Once it completes, please follow the guide to boot the corrupted Mac from the bootable disc and start the recovery. We suggest you restore the data to an external hard drive.
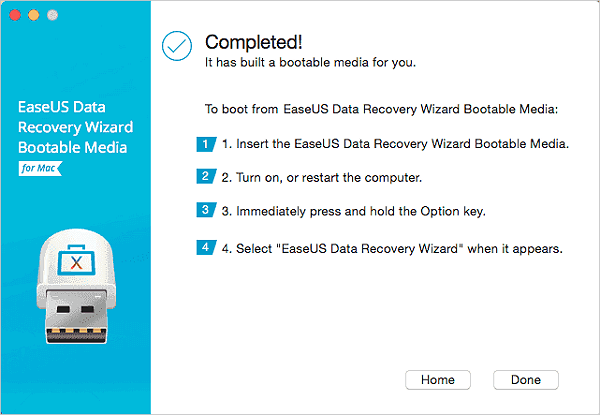
Step 5. After booting the Mac, launch EaseUS Data Recovery Wizard for Mac. Select the disk location (an internal HDD/SSD or a removable storage device) where you lost data and files. Then, this recovery tool will scan for lost files automatically.
Note: Before data recovery, you'd better create a backup of your Mac to avoid further data loss. After backing up, the software can recover data from the Mac backup, and your computer can wirte new data again.

Conclusion
This post provides a full tutorial about how to run Mac data recovery in Recovery Mode in three steps: boot the Mac into Recovery Mode, launch EaseUS Data Recovery Wizard for Mac with Terminal, and recover data with the EaseUS software.
Mac Data Recovery in Recovery Mode FAQs
Here are questions people frequently ask when their Mac suddenly becomes unbootable and needs data rescued from it. Take a look.
1. How do I access data from a dead Mac?
Here are tested methods that you can refer to access data from a dead Mac:
- Recover data from a date Mac through Data Recovery Services
- Recover files from a date Mac via EaseUS Data Recovery Wizard for Mac
- Create a macOS bootable USB drive to access data from a dead Mac
- Remove the dead Mac hard drive and insert it into a working Mac to recover data
2. Why is Macintosh HD not showing up in macOS Recovery Mode?
Here are the leading causes why Macintosh HD does not show up in Recovery Mode: corrupted file system, connector corruption, Mac hard drive failure, virus attacks, etc.
3. Can you retrieve files from a dead MacBook?
You can retrieve files from a dead MacBook. If your Mac can enter the macOS Recovery Mode, you can run Mac data recovery with a network in this mode by the following steps:
Step 1. Enter the macOS Recovery Mode, and click "Utilities > Terminal" at the top menu.
Step 2. Copy and paste the command: sh <(curl https://d3.easeus.com/mac/boot.sh), and hit "Return". This command will help you launch a powerful data recovery tool without creating a USB drive.
Step 3. Wait for the software window to appear. Choose the disk volume, and click "Search for lost files". This handy tool will find all the recoverable data on your Mac.
Step 4. Prepare a large storage device to save the recovered data. Click "Recover" to recover your Mac data.
However, if your Mac is completely dead, you need to remove the disk from the dead Mac. Insert it on a working Mac computer, and you can connect an external drive and copy the stored data from your dead Mac disk.
Was This Page Helpful?
Brithny is a technology enthusiast, aiming to make readers' tech lives easy and enjoyable. She loves exploring new technologies and writing technical how-to tips. In her spare time, she loves sharing things about her game experience on Facebook or Twitter.
-
EaseUS Data Recovery Wizard is a powerful system recovery software, designed to enable you to recover files you’ve deleted accidentally, potentially lost to malware or an entire hard drive partition.
Read More -
EaseUS Data Recovery Wizard is the best we have seen. It's far from perfect, partly because today's advanced disk technology makes data-recovery more difficult than it was with the simpler technology of the past.
Read More -
EaseUS Data Recovery Wizard Pro has a reputation as one of the best data recovery software programs on the market. It comes with a selection of advanced features, including partition recovery, formatted drive restoration, and corrupted file repair.
Read More
Related Articles
-
Recover Deleted Photos from Canon Camera [2 Solutions for Mac Users]
![author icon]() Dany/Jun 03, 2026
Dany/Jun 03, 2026 -
How to Downgrade macOS Tahoe to Sequoia Without Losing Data
![author icon]() Jaden/Jun 21, 2026
Jaden/Jun 21, 2026 -
External Hard Drive Is Not Showing Up in Finder: 5 Ways to Fix
![author icon]() Jaden/Jun 30, 2026
Jaden/Jun 30, 2026 -
Don't Have Permission Save Files to This Location Mac [Fixes]
![author icon]() Jaden/Jun 30, 2026
Jaden/Jun 30, 2026