Did you recently buy a new Mac? Are you anxious about data transfer from the old Mac to the new one? Multiple reasons might lead to you wanting to transfer data from Mac to Mac.
For instance, if your old Mac is beyond repair and can shut down anytime, transferring the data to the new Mac as soon as possible is better. Another reason could be a malware attack and the old Mac's inability to function. You may also want to sell your old Mac or loan it to a friend. You will need to transfer data from dead Mac to new Mac seamlessly.
You can apply multiple solutions to transfer data from one Mac to another. In this guide, we will discuss six proven methods to help you!
| Workable Solutions | Step-by-step Troubleshooting |
|---|---|
| Fix 1. Use Migration Assistant | Open Migration Assistant via the path Applications > Utilities, and click on Continue...Full steps |
| Fix 2. Use Mac AirDrop | Turn on Bluetooth on both Macs, ensure they share the same Wi-Fi, and go to System Settings...Full steps |
| Fix 3. Use File Sharing | Select System Settings, click General from the sidebar, and choose Sharing...Full steps |
| Fix 4. Use USB Cable | Connect the USB cable between the old Mac and the hard drive, and copy and paste files...Full steps |
| Other Practical Fixes | Transfer data from Mac to Mac with iCloud or using Time Machine backup ...Full steps |
Fix 1. Transfer Data from Mac to Mac Using Migration Assistant
The Migration Assistant is one of the most popular ways to transfer data from Mac to Mac. However, before that, you need to follow some pointers. These are:
- Make sure both systems are updated and have the latest software.
- If there is an antivirus, VPN, or firewall software, turn it off.
- Turn the Wi-Fi on both systems and make sure they are close to each other.
Here's a video you can refer to help you transfer to a new Mac with Migration Assistant:
- 00:28 - Prepare the system before using Migration Assistant.
- 01:31 - Set up Migration Assistant.
- 03:41 - Wait for the transfer to complete and log into the new system.
You need to follow the steps on your new Mac:
Step 1. Open "Migration Assistant" via the path "Applications > Utilities > Migration Assistant".

Step 2. Migration Assistant will ask permission to make changes and quit the other apps. Click on "Continue" to move further.
Step 3. Enter the administrator password. Click "OK".
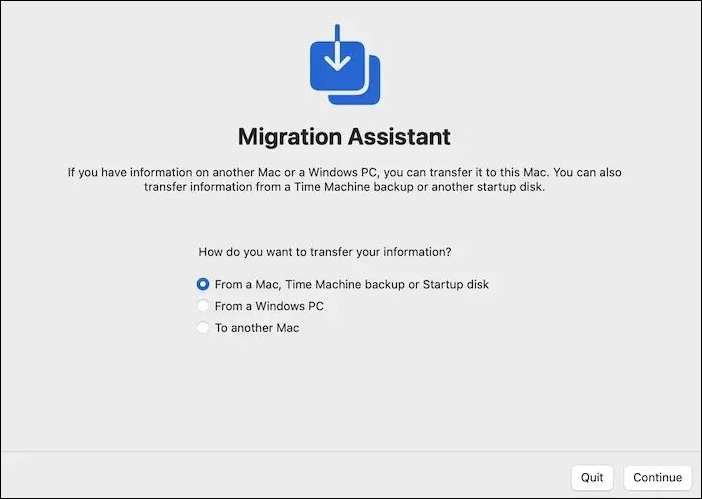
Step 4. Another window will appear, "How do you want to transfer your information".
Step 5. You should choose the "From a Mac, Time Machine backup, or Startup disk" option. Click "Continue".
You need to follow the steps on your old Mac simultaneously:
Step 6. Open "Migration Assistant", and a window will appear.
Step 7. Choose the option "To another Mac". Click "Continue".
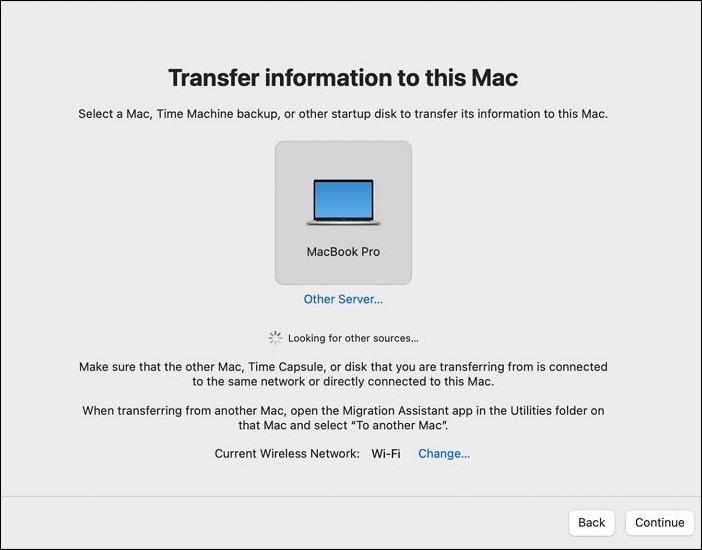
Step 8. On the new Mac: select "The other Mac". Press "Continue".
Step 9. A security code will appear on the old Mac. Ensure it's the same for both systems and click "Continue".
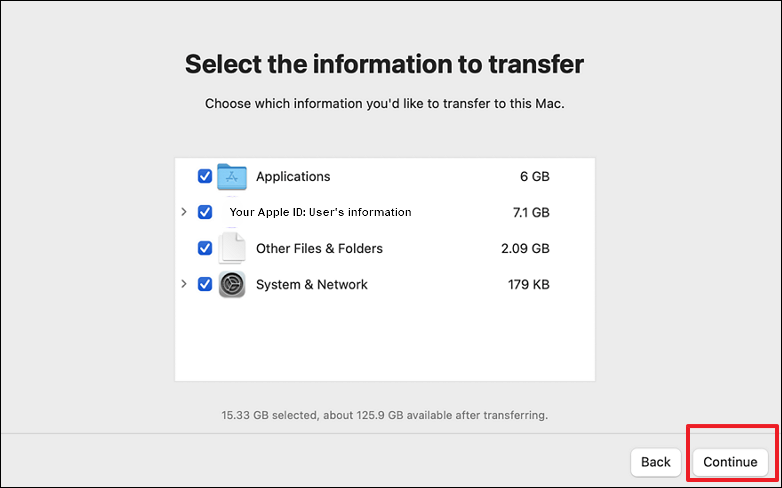
Step 10. On the new Mac: a window will appear, and you should select the information to transfer.
Step 11. Tick-mark the options you want and click "Continue".
Step 12. Quit "Migration Assistant". Now, go to the new Mac and log into the account to see if all the data has been transferred.
Suppose the Migration Assistant is not working on your Mac, don't worry; this article can help you solve this issue.

8 Ways to Fix Migration Assistant Not Working on Mac
This article discusses 8 effective methods to fix the issue of Migration Assistant not working on Mac. Read more >>
Fix 2. Use AirDrop to Transfer Data from Mac to Mac
Another effective way to transfer data from the old Mac to the new one is to use AirDrop. With AirDrop, you can transfer some files. However, it will need both Bluetooth and Wi-Fi.
Take a look at the steps you need to follow:
Step 1. Turn on the Bluetooth on both Macs.
Step 2. Make sure both systems share the same Wi-Fi.
Step 3. Go to "System Settings" or "System Preferences".
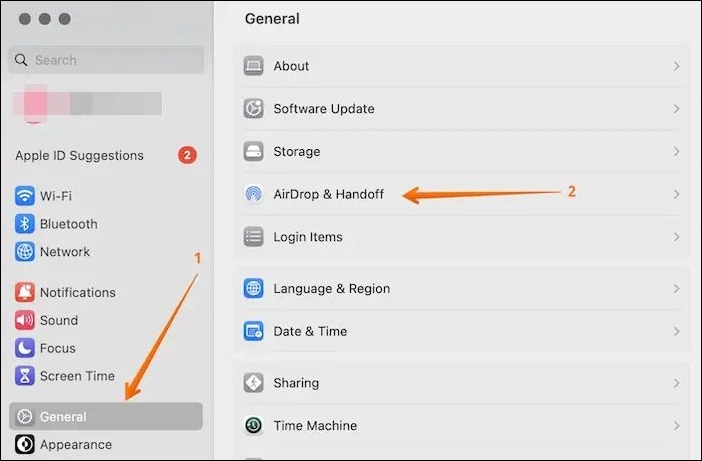
Step 4. Choose "General" from the left side.
Step 5. Select "AirDrop & Handoff" on the right-hand side settings pane.
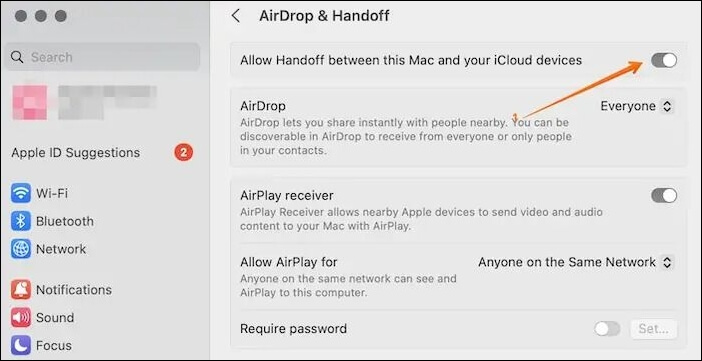
Step 6. Turn the toggle on for "Allow Handoff between this Mac and your iCloud devices". Now, you can share files between Mac to another Mac.
Step 7. On the old Mac, select the files for transfer.
Step 8. Control-click the files.
Step 9. Select "Share". It would be best to opt for the Mac you want the files to go to here.
Share this article on social media to help others learn how to transfer data from Mac to Mac in 6 proven ways.
Fix 3. Use File Sharing to Transfer Files from Mac to Mac
You can also use File Sharing to transfer files from one system to another. For that, you need to check out these steps:
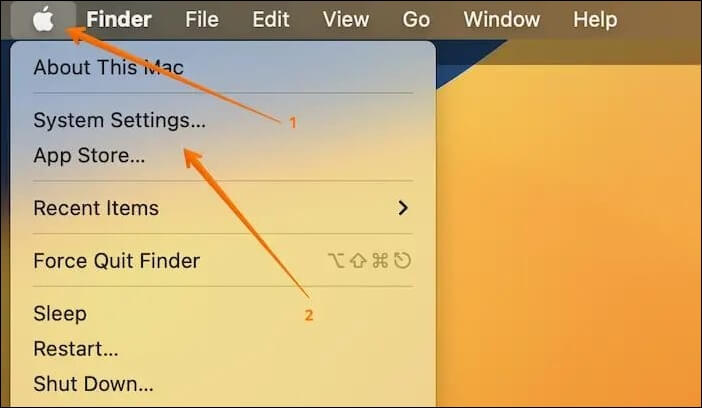
Step 1. Go to the Apple menu.
Step 2. Select "System Settings".
Step 3. Click "General" from the sidebar, and choose "Sharing".

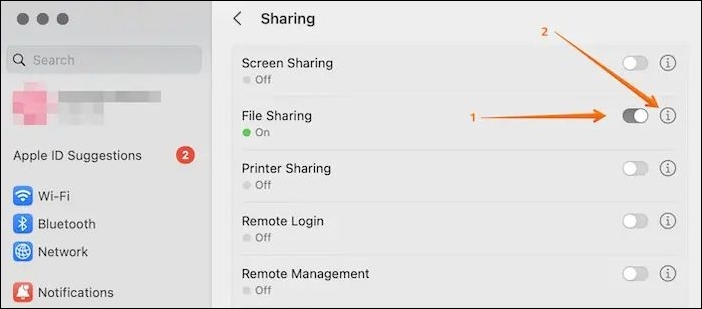
Step 4. Turn "File Sharing" on. Choose the Info button.
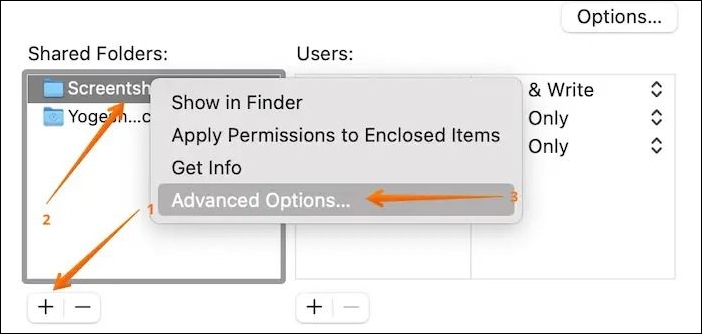
Step 5. Click the "Add" button at the end of the Shared Folders list to choose the folders you want to share.
Step 6. On the name of the folder, control-click on it.
Step 7. Go to "Advanced Options".
Step 8. Follow the on-screen instructions, and click "Done".
Fix 4. Transfer Data from Mac to Mac with USB Cable
Did you know you can transfer data from one Mac to another via a USB cable? Yes! That's right, and it's straightforward. You must purchase an external hard drive or a USB flash drive to store data. After that, you must connect the USB cable between the old Mac and the hard drive.
Copy and paste the files you want to transfer to the new Mac. After it's done, make sure to eject it safely. Now, repeat the same thing with the new Mac. You must copy and paste the files from the drive to the Mac.

USB Flash Drive Not Showing Up on Mac, Why and How to Fix
Is the USB flash drive not showing up on Mac after inserting it into the USB port? Here we find 10 solutions to help. Read more >>
Fix 5. Transfer Data from Mac with iCloud
Another excellent way to transfer data from one Mac to another is to use iCloud. For that, you need to follow the steps outlined below:
Step 1. Go to the Apple icon, and choose "System Preferences/Settings".
Step 2. Select Apple ID and choose the "iCloud" option. Enter credentials if asked.
Step 3. Tickmark the "iCloud Drive" option. Now, iCloud is turned on.
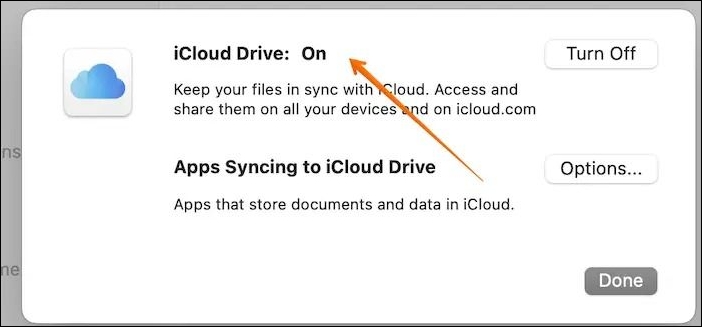
Step 4. Click on the desktop. On the Finder menu, click on "Go" and choose "iCloud" from the drop-down menu. Here, you will find the files you need.
Note: It is vital to remember that the files will be synced to iCloud only if the old system uses the same Apple ID.
Fix 6. Transfer Data from Mac to Mac via Time Machine Backup
If you want to migrate or shift all data from the old Mac to the new one, using Mac Time Machine backup is a better idea. With this method, you can transfer data such as applications, preferences, user accounts, and more.
Firstly, you need to use Time Machine to back up data on the old Mac. Here are the steps you need to follow:
Step 1. Connect the hard drive of your choice to the system.
Step 2. Go to the Apple logo.
Step 3. Click on "System Preferences".
Step 4. Choose the Time Machine application.
Step 5. Click on "Select Disk". Here, you need to select the disk for Time Machine backups.
Step 6. A window will appear. You need to checkmark the boxes "back up automatically" and "show Time Machine in the menu bar".
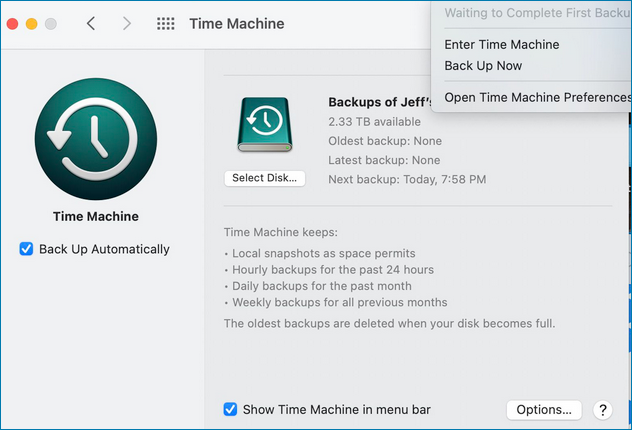
Step 7. You need to wait as the Time Machine backs up data.
If the Time Machine is stuck or can't complete the backup, this article can help you solve the problem with Time Machine backup.

2023 Fixed: Time Machine Won't Complete First Backup
This article will show how to fix Time Machine stuck waiting to complete the first backup issue. Read more >>
After that, you need to follow the steps given below on the new Mac to restore from Time Machine:
Step 1. Connect the drive containing the Time Machine backup to the new Mac.
Step 2. Start Mac in Recovery Mode, and choose the option "Restore from Time Machine".
Step 3. Click "Continue" and select the backup disk. Click "Continue" again.
Step 4. Opt for the recent backup.
Step 5. Follow the instructions on the screen. Restart the system.
Bonus Tip: How to Recover Data from Mac
How to get files off Mac with broken screen? Do you have a broken screen Mac and are worried about data transfer to the new system? Worry not! You can use professional software to restore data from the dead system seamlessly. For that, you can check out EaseUS Data Recovery Wizard for Mac. It is an efficient yet user-friendly recovery tool that aids in the easy restoration of data.
Apart from the powerful recovery features, the tool is easy to use. The user-friendly interface makes it easy even for beginners to use it. Moreover, it offers retrieval data from various data loss situations, such as recovering files from Mac that won't boot, virus attack, macOS update, system crash, human errors, etc. Here are the steps you need to follow:
Step 1. Select the drive to be scanned
In the main EaseUS Data Recovery Wizard window, there will be a list of the drives connected to your Mac. Select the drive you need to recover lost/deleted files from, and click the "Search for lost files" button.

Step 2. Select your lost data/files
EaseUS Data Recovery Wizard for Mac will immediately scan your selected disk volume and display the scanning results on the left pane. You can sort the results to find the wanted files if you are looking for certain files.

Step 3. Recover lost/deleted data
Once you have found the desired files, preview the files and then click "Recover" to begin the recovery of your deleted/lost Mac files.

Conclusion
Are you eager to transfer data from the old Mac to the new one? Various reasons can lead you to make this decision. Fortunately, there are multiple ways to go ahead with the data transfer. For instance, you can use the USB cable, Migration Assistant, Time Machine backup, etc.
If you are ready to transfer data from one dead Mac to another, you can choose EaseUS Data Recovery Wizard for Mac. It is a highly powerful yet easy-to-use recovery tool. With this software, you can recover different types of data with ease.
Transfer Data from Mac to Mac FAQs
Do you want to know more about Transfer Data from Mac to Mac? In that case, check out the questions and answers listed here:
1. How do I transfer data from my old Mac to my new Mac?
You can transfer data from an old Mac to a new Mac in multiple ways. For starters, you can use the USB cable. You can also opt for the Migration Assistant or choose Time Machine Backups. You can also use File Sharing or iCloud.
2. Does Migration Assistant erase old Mac?
No, Migration Assistant doesn't erase the old Mac. It only copies the files and aids in efficiently transferring data from one system to another. You don't have to worry about files overwriting.
3. How long does it take to transfer from Mac to Mac using Migration Assistant?
There is no fixed period for data transfer from Mac to Mac using Migration Assistant. It depends on the size of the data that is being transferred. It could take anywhere between a few minutes to a couple of hours.
4. How do I transfer files from Mac to Mac without iCloud?
You can choose multiple solutions to transfer files from Mac to Mac without iCloud. For instance, you can opt for "File Sharing" or go ahead with Time Machine backups.
Was This Page Helpful?
Brithny is a technology enthusiast, aiming to make readers' tech lives easy and enjoyable. She loves exploring new technologies and writing technical how-to tips. In her spare time, she loves sharing things about her game experience on Facebook or Twitter.
Related Articles
-
Can't Install macOS Ventura? Here Are the 9 Best Solutions
![author icon]() Brithny/2026-06-17
Brithny/2026-06-17 -
What to Do If Windows Updates Are Stuck on Pending Install/Download
![author icon]() Jerry/2025-07-04
Jerry/2025-07-04 -
FIXED: Windows Update Error 80072EFE [Windows 7 Tips]
![author icon]() Cedric/2026-02-12
Cedric/2026-02-12 -
How to Recover Unsaved/Lost/Corrupted Adobe Acrobat Files on Windows PC
![author icon]() Cedric/2026-02-06
Cedric/2026-02-06
EaseUS Data Recovery Services
EaseUS data recovery experts have uneaqualed expertise to repair disks/systems and salvage data from all devices like RAID, HDD, SSD, USB, etc.