Many users are facing the PC must support TPM 2.0 error while upgrading to Windows 11 and wondering how to resolve this error. Do not worry. If you are one of those, this article is for you. We will discuss all the details regarding the TPM and the solutions to overcome this issue.
Microsoft is allowing some Windows users to get their hands on the Insider bets program of Windows 11. It is in its pipeline and is set to roll out later this year or early next year. This Windows 11 upgrade is free for users with a genuine license for the current Windows 10 OS.
For Windows 11 to run on your PC, your PC should meet some minimum requirements along with the RAM and storage space. One such mandatory requirement is TPM 2.0, which your PC should support to run Windows 11.
You are facing this error for two reasons: if the PC does not support the TPM at all or if it supports TPM 1.2. In some cases, it may not be enabled at all. To know what TPM is, what it does, and how to fix the PC must support the TPM 2.0 error while upgrading to Windows 11. Follow the article.
What Is TPM 2.0
TPM stands for Trusted Platform Module and is a small chip in the motherboard. The function of this module is to provide security features to the PC at the hardware level. Now coming to, TPM 2.0 generates an integrated cryptographic key to protecting data used for the authentication of the PC.
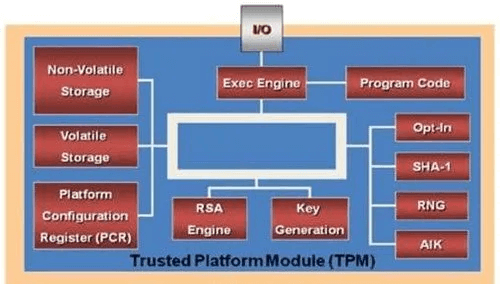
To give you a general idea of how TPM works on your PC, every time your press the power button, the TPM generates a unique code to communicate with other security features to boot the system. All the PCs released after 2016 have TPM inbuilt into them. If you bought your PC after 2016 and faced the PC must support TPM 2.0 error while upgrading to Windows 11, then we can fix the issue; otherwise, for PCs before 2016, it is unsure.
Fix the PC Must Support TPM 2.0 Error
To fix the issue, we need to follow some steps:
Step 1. Check if your PC has TPM 2.0.
Step 2. Enable the TPM using BIOS.
Step 3. Upgrade to Windows 11 bypass TPM.
Step 4. Get chipsets and motherboards with TPM support.
Check If Your PC Has TPM 2.0
The first thing you need to do is to check if your PC has TPM support. If the issue is with the installer, we can experience this error and update the drivers.
Method 1: Trusted Platform Module (TPM) Management
In Method 1, there are some steps for you to check if your PC has TPM support as follows:
Step 1. Press Windows + R and enter the tpm.msc in the dialogue box.
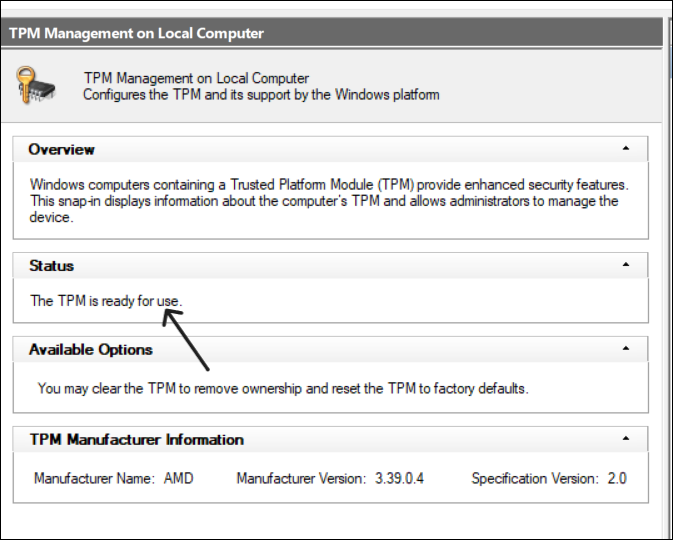
Step 2. A window appears if the status is "The TPM is ready for use" you have the TPM support, or else it says "a Compatible TPM cannot be found message."
Method 2: Device Manager
In Method 2, there are also some steps for you to check if your PC has TPM support, as follows:
Step 1. Press Windows + X to open the Device Manager.
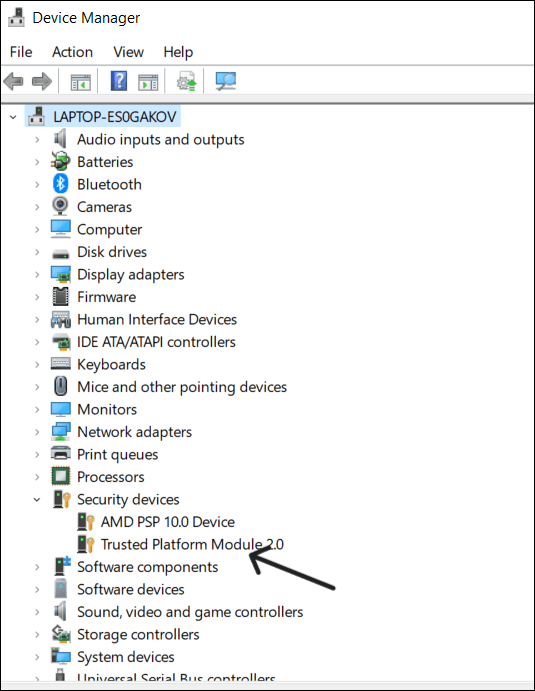
Step 2. Expand the security devices menu and check for TPM 2.0 in it. If yes, your PC supports it; if not, you cannot run Windows 11 on your PC.
Enable the TPM Using BIOS
Now that you know the status of TPM on your device, and if you have TPM and still facing the error. Then it could be due to Secure Boot and TPM being disabled in the BIOS. We have to enable them to fix the issue.
So there are some steps to enable the TPM and Secure Boot:
Step 1. Shut down your PC.
Step 2. Now power it on with the designated key to enter the BIOS settings on your PC. Designated keys are different for different manufacturers; google them before starting the process.
Step 3. Navigate to Boot options in the BIOS. Find the Secure Boot and enable it.
Step 4. Now, find the Security setting and enable every setting with "TPM" or "Security Chip."
Step 5. Save the changes and exit BIOS settings.
Bypass TPM Requirement
The best way to get Windows 11 on your computer is by bypassing the TPM requirement. Recently, Microsoft relaxed a few requirements for the Windows 11 installation on unsupported computers.
Steps to Bypass the TPM requirements:
Step 1. Go to the Microsoft Website and download the Windows Media creation tool. Use it to download the Windows 10 ISO file.
Step 2. Right-click on the Windows 10 ISO file and Choose "Mount."
Step 3. Open File Explorer and Select "This PC" to see the mounted ISO file.
Step 4. Locate the Sources folder and copy all the files except install.esd.
Step 5. Paste the files in the Sources folder in the Windows 11 ISO file.
You can also do this by editing the Registry; head to this article by the windows club to see the process.
Get Chipsets and Motherboard with TPM Support
The last thing you can try to install and use Windows 11 on your PC is to get chipsets and motherboards with TPM 2.0 support. Ensure the chipsets and motherboards are properly configured for Windows to recognize them. Refer to this article to know more about this process.
Conclusion
Well, who's not excited to see what Microsoft is bringing onto our PCs with Windows 11? If you are someone like that and facing the PC must support TPM 2.0 error while upgrading to Windows 11, then follow the article.
The guide discusses the steps one needs to follow to check, enable, escape, and attach the requirements to get Windows 11 running on your PC. Follow it to get this done easily.
If you find this article helpful, share it with your friends and leave a comment about it. If you have any queries regarding the topic, feel free to ask them in the comment box, and do let me know of the future issues you wish to see articles from us.
The PC Must Support TPM 2.0 Error While Upgrading to Windows 11 FAQs
With the above fantastic methods and steps offered in the article, the problem that the PC must support TPM 2.0 errors while upgrading to Windows 11 has become simple and easier than ever before.
Hopefully, you may know how to resolve this error properly using the methods offered. Check the FAQs below if you still have questions about the TPM 2.0 error while upgrading to Windows 11.
1. Can I install TPM 2.0 on my PC?
If you built your desktop PC in the last few years and are comfortable tinkering with hardware and software security settings in the system's BIOS, you can probably add a discrete TPM 2.0 chip to your motherboard.
2. How do I fix TPM 2.0 problem?
If the TPM is a TPM 2.0 and isn't detected by Windows, verify that your computer hardware contains a Unified Extensible Firmware Interface (UEFI) that is Trusted Computing Group-compliant. Also, ensure that in the UEFI settings, the TPM hasn't been disabled or hidden from the operating system.
3. Can I install TPM 2.0 manually?
Most motherboards have a TPM header, and you can install a TPM module manually. If you are unsure about it, you can check on your motherboard manufacturer's site. You have to google your motherboard model number and check the technical specs on the 'manufacturer's site.
Was This Page Helpful?
Sherly joined EaseUS in 2022 and she has always loved writing articles and enjoys the fun they bring. She receives professional training here, focusing on product performance and other relative knowledge. She has written over 200 articles to help people overcome computing issues.
Daisy is the Senior editor of the writing team for EaseUS. She has been working at EaseUS for over ten years, starting as a technical writer and moving on to being a team leader of the content group. As a professional author for over ten years, she writes a lot to help people overcome their tech troubles.
Related Articles
-
How to Fix Encrypt Contents to Secure Data Greyed Out [2025 Tutorial]
![author icon]() Tracy King/2026-06-29
Tracy King/2026-06-29 -
System Preferences Not Responding on Mac: Possible Causes and Solutions
![author icon]() Brithny/2026-06-17
Brithny/2026-06-17 -
How to Get BitLocker Recovery Key Using CMD ✨
![author icon]() Sherly/2026-04-16
Sherly/2026-04-16 -
How to Fix No Bootable Device Acer in Windows 11/10/7
![author icon]() Cici/2026-06-30
Cici/2026-06-30
EaseUS Data Recovery Services
EaseUS data recovery experts have uneaqualed expertise to repair disks/systems and salvage data from all devices like RAID, HDD, SSD, USB, etc.