Updating BIOS can help provide the latest support to your motherboard and chipset. In addition, it allows you to access previously unlocked options, give stability to your hardware, add newer RAM compatibility, etc. Therefore, updating BIOS can be a solution to hardware issues. But sometimes, your PC won't boot after BIOS update. This article from EaseUS will tell you how to fix the PC not booting after BIOS update error. Let's get started.
Why Is the Computer Not Booting After BIOS Update
PC not booting after BIOS update is very frustrating. During this error, the system fails to load startup files. All you see is an idle black screen or an infinite loop with no progress. The issue has been mostly found in Dell and MSI computers and laptops. And the most possible reasons for this are that your BIOS is not updated correctly or the BIOS update process was interrupted.

There are plenty of reasons for a system not booting after a BIOS update:
- An unsuccessful/interrupted boot update
- Incorrect BIOS configuration
- Unsupported BIOS version
- Corrupted Windows operating system
- Motherboard issues
All these problems can cause boot issues. In severe cases, it can result in data loss and bricking of your motherboard, which is beyond any repair. That's why whenever this fault appears, you should look for solutions immediately.
Some computer users also reported that their computer is on a black screen after the BIOS update. If you are in such a dilemma, you can refer to the following article for help.

(Solved!) Black Screen After BIOS Update - EaseUS
This article discusses 8 free and simple ways to help you solve the black screen after a BIOS update. When you experience this problem, you can refer to this article. Read more >>
How to Fix Windows Won't Boot After BIOS Update
After knowing the specific reasons why your computer won't start after a BIOS update, it is time to learn how to fix it. If your Windows doesn't boot after a BIOS update, you can try the following fixes:
- Fix 1. Perform Boot Repair
- Fix 2. Reset CMOS
- Fix 3. Reflash BIOS Update
- Fix 4. Boot into Safe Mode
- Fix 5. Perform Startup/Automatic Repair
- Fix 6. Reset BIOS to Default
- Fix 7. Rebuild MBR or BCD
Fix 1. Perform Boot Repair - Most Effective
If you encounter any Windows startup issues, EaseUS WinRescuer will solve the boot problem using its professional "Boot Repair" tool. This easy-to-use software will refresh you with high efficiency and comprehensive UEFI and BCD management. As the most straightforward solution, EaseUS Partition Master can assure you an enhanced experience.
Here are the steps:
Step 1. Connect the USB drive/external drive to a working computer, open EaseUS WinRescuer, and click "Create Bootable Media."
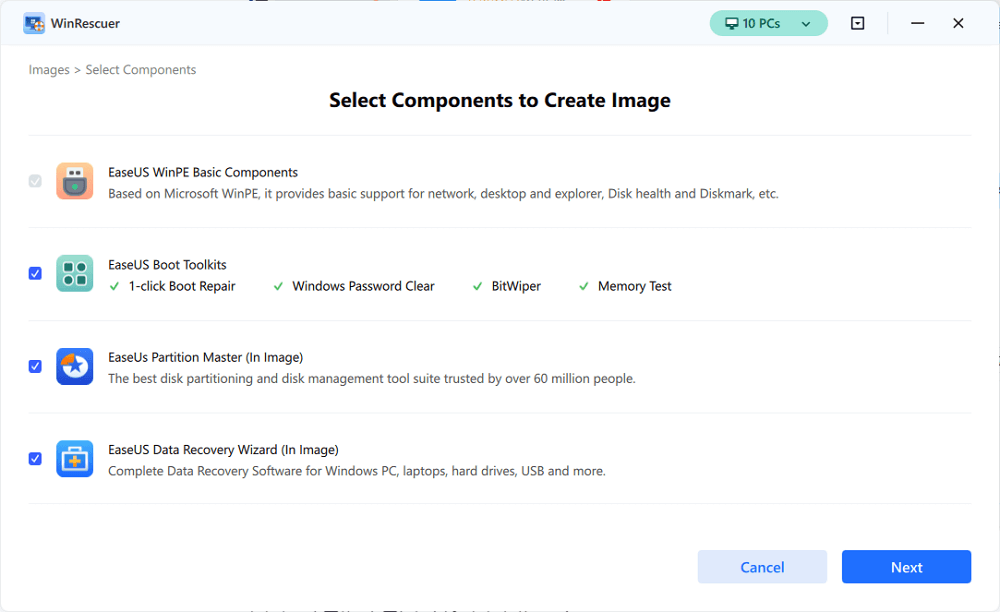
Step 2. Select EaseUS Boot Toolkits and other components you need. Then, click "Next."
Step 3. Select your movable device and click "Go" to create an image on your USB drive/external drive. You can also burn the Windows ISO file to the storage media.
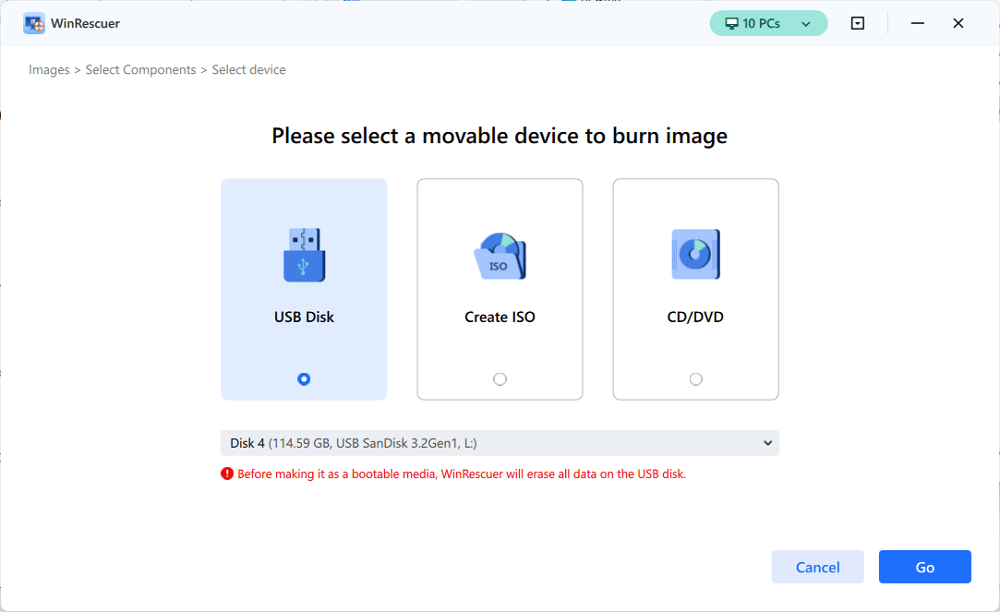
Step 4. Confirm the warning message and then wait for the creation process to complete.
Step 5. Connect the created bootable drive to the faulty computer and reboot it by pressing and holding "F2"/"Del" to enter the BIOS. Then, set the WinPE bootable drive as the boot disk and press "F10" to exit.

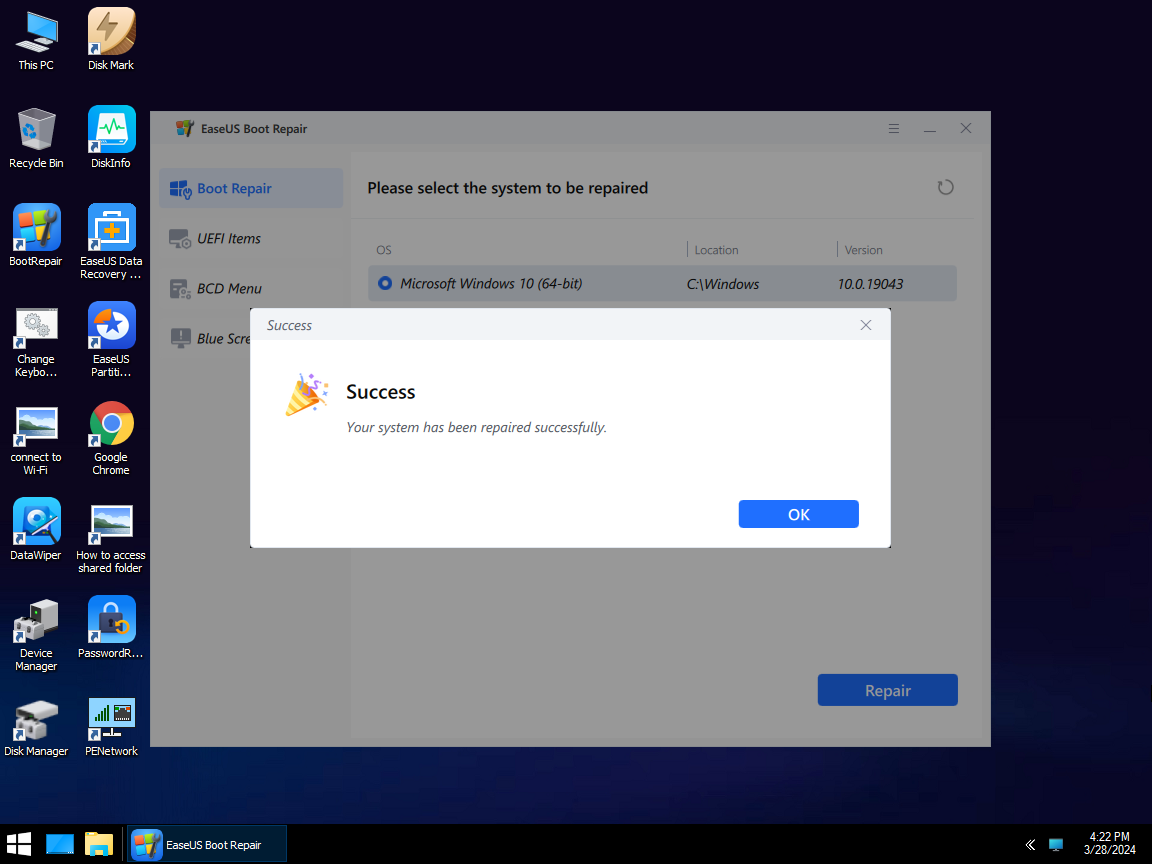
Step 6. Then, the computer will enter WinPE desktop. Open BootRepair, select the system you want to repair, and click "Repair."

Step 7. Wait a moment, and you will receive an alert that the system has been successfully repaired. Click "OK" to complete the boot repair process.
Fix 2. Reset CMOS
The boot configuration is stored using the CMOS Battery. The CMOS keeps hard disk configurations intact after each boot. Any malfunction or changes in CMOS directly affect Windows startup. Therefore, whenever you face booting issues, the first remedy is to reset the CMOS battery. This is the procedure to reset CMOS.
Step 1. Shut down your PC and unplug the power cable.
Step 2. Press and hold the power button for 60 seconds to discharge your PC.
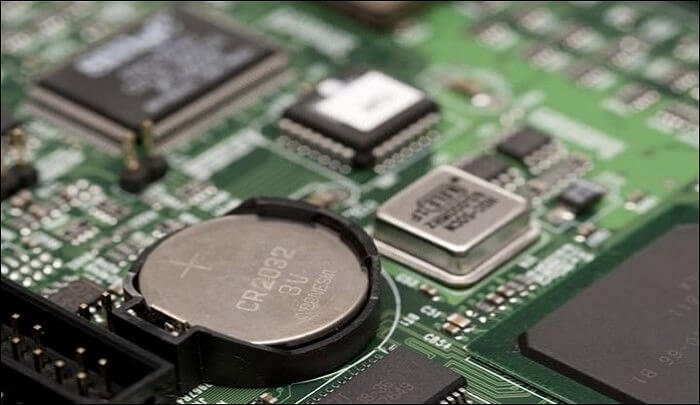
Step 3. Open the PC Casing and remove the CMOS battery. It is generally of 3V.
Step 4. Wait for minutes and reinstall it. The battery would reset.
Step 5. Turn on your system and see the results. If the system boots normally, the problem has been solved.
Fix 3. Reflash BIOS Update
The flashing of BIOS means replacing an existing BIOS with a new one. If the updated BIOS is corrupted or damaged, you can always replace it with a more compatible version. This time you should make sure the BIOS version is correct and the flashing doesn't get interrupted.
There are 2 articles about how to update BIOS, which can help you flash BIOS easily and quickly.
Fix 4. Boot into Safe Mode
Windows safe mode enables the system to operate with basic drivers. Since the booting problems occur due to changes in BIOS or motherboard, you can bypass it by booting into Safe Mode. In this way, the BIOS can repair itself as well. Follow these steps to boot into Safe Mode.
Step 1. Insert a bootable flash and restart your PC.
Step 2. Press F8 during restart to access the boot menu.
Step 3. In the boot menu, change the boot order to start with the inserted flash.
Step 4. The loading for installation will start. Select your preference and press the Next button.
Step 5. Now choose the Repair your computer option.
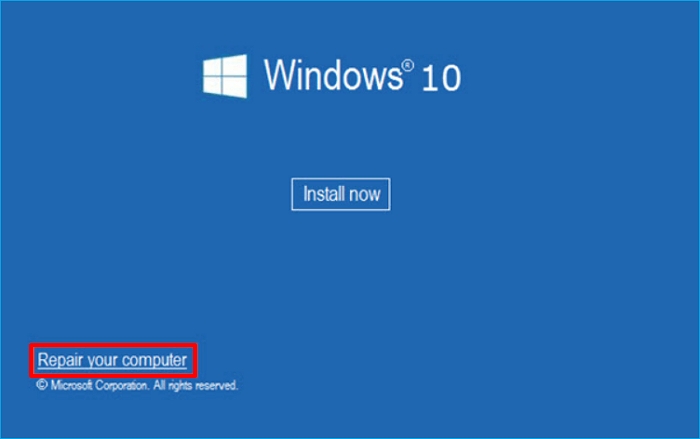
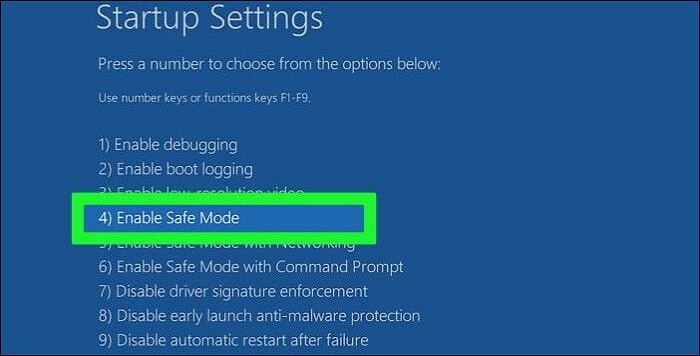
Step 6. Select Troubleshoot> Advanced Options > Startup settings.

Step 7. Press F4 to restart in safe mode. The system will boot into Safe mode.
Read Also:
Fix 5. Perform Startup/Automatic Repair
Windows has a built-in startup repair mechanism to resolve boot issues. It can detect and repair damaged or broken files. You can use this feature to resolve all booting problems after the BIOS update. You may need to create Windows 10 installation media and then perform Startup Repair. This is the stepwise method for it.
Step 1. Insert a bootable flash and restart the system.
Step 2. Press F8 to access the boot menu and change the boot order.
Step 3. Start the installation, choose your preferences, and press the Next Button.
Step 4. Select Repair your computer > Troubleshoot > Advanced options.

Step 5. In the advanced options, select automatic/startup repair.

Step 6. Follow the instructions, and the repair will start. Once it is completed, restart the system.
You May Also Like: Computer Won't Boot? Causes and Fixes
Fix 6. Reset BIOS to Default
If the BIOS update is from an unauthentic source, it is likely to contain malware or viruses. In such cases, the easiest way is to reset BIOS to default settings. It takes care of all changes causing start-up problems. Follow the guidelines below to reset BIOS to default.
Step 1. Turn off your PC, wait for a few seconds, and then restart it.
Step 2. Press F10 numerous times during startup to access the BIOS startup menu.
Step 3. In the menu, press F9 to select and load default BIOS Settings.

Step 4. Again, Press F10 to save these changes.
Step 5. Choose Yes when the system asks to save these changes.
Step 6. Restart the system to see if the error has been resolved.
Fix 7. Rebuild MBR or BCD
Master Boot Record is the information stored in the first half of a hard disk. It identifies where the operating system is located for booting. Any damage to MBR doesn't allow the operating system to load. So, it is essential to rebuild MBR or BCD for a normal boot. This is how you can rebuild MBR.
Step 1. Boot the system and press F8 to access the Windows Recovery menu.
Step 2. Then choose advanced> command prompt and type the following:
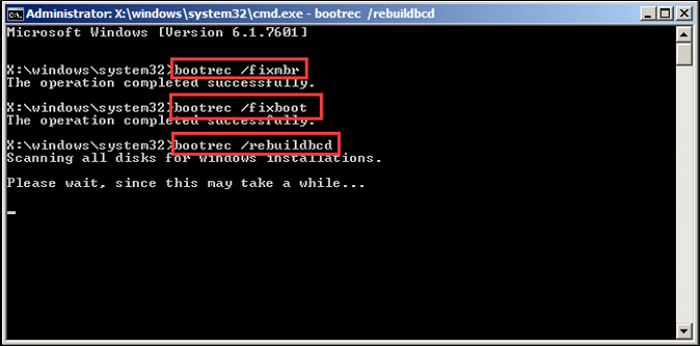
- bootrec/RebuildBCD
- bootrec/fixMbr
- bootrec/fixboot
Step 4. After that, the system will start working.
Step 4. Now reboot the system and check the status of the error.
Step 5. If the above steps don't fix the issue, write bootsect/nt60 SYS or bootsect/nt60 All. It will remove all remaining MBR errors.
If you like this post and find it useful, you can share it on your social platforms.
Bonus Tip: Always Backup Computer to Avoid Data Loss
Errors like "computer won't boot after BIOS update" are a constant occurrence in the tech world. They pose a serious threat to the functionality and data security of your personal computers.
Since the modern world is all about data, you should always back up your computer to avoid any personal, professional, and educational data loss. For this purpose, we recommend you use professional backup software - EaseUS Todo Backup, an award-winning data security tool.
EaseUS Todo Backup Home offers one-click backup with instant recovery options. You can back up your systems, files, computer apps, etc., and back up multiple hard drives. In case of an unwanted system failure, it offers system image recovery, bootable recovery, and disaster recovery options. All the data can be accessed via a USB drive or a Cloud backup. There are some key features of this backup software.
EaseUS Todo Backup Home
- Clone a hard drive for backup and recovery
- Create full, incremental, and differential backups
- Install Windows on a hard drive for another PC
- Compress backups to save storage space
- 250G free Cloud storage to back up your computer to Cloud
Secure Download
EaseUS Todo Backup can meet all your needs for protecting your computer or data. Feel safe and free to download and use it. Here is how to back up your computer using EaseUS Todo Backup.
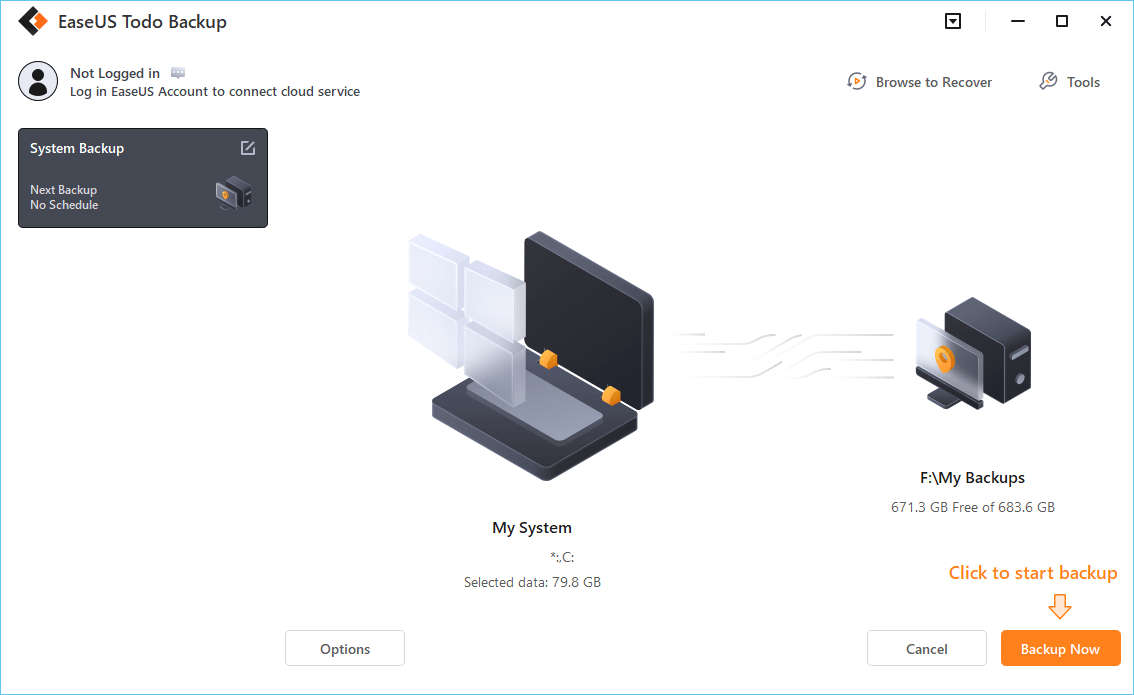
Step 1. Launch EaseUS Todo Backup on your computer, and click Create Backup on the home screen and then hit the big question mark to select backup contents.

Step 2. To back up your Windows operating system, click "OS" to begin the backup task.

Step 3. Your Windows operating system information and all system related files and partitions will be automatically selected so you don't need to do any manual selection at this step. Next, you'll need to choose a location to save the system image backup by clicking the illustrated area.

Step 4. The backup location can be another local drive on your computer, an external hard drive, network, cloud or NAS. Generally, we recommend you use an external physical drive or cloud to preserve the system backup files.

Step 5. Customiztion settings like enabling an automatic backup schedule in daily, weekly, monthly, or upon an event, and making a differential and incremental backup are available in the Options button if you're interested. Click "Backup Now", and the Windows system backup process will begin. The completed backup task will display on the left side in a card style.
The Final Thought
"PC won't boot after BIOS update" is a common problem in modern computers. During the error, the startup fails to load, and the system shows an idle black screen with no progress. It happens due to unsuccessful boot updates, incorrect BIOS configuration, corrupted operating system, and motherboard issues.
This article presents 6 fixes to resolve the PC won't boot after the BIOS update problem. The description, steps, and pictorial images of each method have been given for your understanding. To avoid any data loss during this problem, we recommend you use EaseUS Todo Backup. Download it now and make your data 100% secure.
Secure Download
FAQs on PC Won't Boot After BIOS Update
These are the most frequently asked questions on the "PC Won't boot after BIOS update”
1. Why is my laptop stuck on a black screen after a BIOS update?
That means your PC isn't booting after the BIOS update. There is an issue with start-up files. It can be due to unsuccessful BIOS updates, corrupted windows, and motherboard issues.
2. Why does my computer keep booting to BIOS after BIOS update?
It is because the BIOS update hasn't been successful. The primary reason for it is the incorrect boot order, which you should immediately rectify. It can also occur due to plug-in drives, CMOS batteries, and corrupted BIOS software.
3. Do I need to restart after BIOS update?
Yes, you should restart your system after completing the BIOS update. After the restart, you should confirm if the changes have been made.
4. What happens if a BIOS update goes wrong?
When a BIOS update goes wrong, the system fails to load startup files. The display shows a black screen or an infinite loop with no end. You can neither access any file nor do any operation.
Was This Page Helpful?
Sherly joined EaseUS in 2022 and she has always loved writing articles and enjoys the fun they bring. She receives professional training here, focusing on product performance and other relative knowledge. She has written over 200 articles to help people overcome computing issues.
Written by Jerry
"I hope my articles can help solve your technical problems. If you are interested in other articles, you can check the articles at the bottom of this page, and you can also check my Facebook to get additional help."
Related Articles
-
Black Myth: Wukong Save File Location & Config File Location
![author icon]() Jerry/2025-07-04
Jerry/2025-07-04 -
How to Recover Deleted Chrome Bookmarks on Mac
![author icon]() Jean/2025-07-04
Jean/2025-07-04 -
How to Fix the Requested System Device Cannot Be Found in Windows 11/10
![author icon]() Cici/2025-07-04
Cici/2025-07-04 -
Games Keep Crashing on Windows 10/11 - 13 Quick Fixes
![author icon]() Sherly/2025-07-04
Sherly/2025-07-04
EaseUS Data Recovery Services
EaseUS data recovery experts have uneaqualed expertise to repair disks/systems and salvage data from all devices like RAID, HDD, SSD, USB, etc.