- 🔥Recover Stored Data on the Iomega External Hard Drive
- Fix 1. Change Another USB Ports
- Fix 2. Check the Display Settings in the Finder
- Fix 3. Turn on Show All Devices in Disk Utility
- Fix 4. Run First Aid to Repair the Unrecognized Iomega External Hard Drive
- Fix 5. Fix the Unrecognized Iomega External Hard Drive by Reformatting
- Why Iomega External Hard Drive Not Showing Up on a Mac
If you are a Mac owner, you may find yourself trying to connect your Iomega external hard drive, but the Iomega external hard drive is not showing up on your Mac. Also, this can cause your external hard drive to lose data. If you're facing this problem, you're in the right place!
You'll find five ways to fix the Iomega external hard drive not showing up on Mac issue in this post. Read on!
🔥Recover Stored Data on the Iomega External Hard Drive
If you find yourself in a situation where your Iomega external hard drive is not recognizable on your Mac, and you need to recover your stored data, consider getting external hard drive data recovery software like EaseUS Data Recovery Wizard for Mac.
Download the trusted and professional software to recover data from unmounted external hard drives on a Mac. Besides, it can recover data that are lost due to recognition issues, accidental deletion, or formatting.
Below are steps to follow to restore your data from an external hard drive not showing up on a Mac using EaseUS Data Recovery Wizard for Mac:
Step 1. Search for lost files
Correctly connect your external hard drive to your Mac. Launch EaseUS Data Recovery Wizard for Mac, and select the external hard drive. Then, click "Search for lost files" to find lost/deleted files on your external devices.

Step 2. Filter and find lost files
After the scan, all file types will be presented in the left panel. Select the file type to find wanted files on your external devices.

Step 3. Preview and recover
Click the file and preview it. Then, select the files you want to recover and click the "Recover" button. You can save your data to local and cloud drives.

After recovering your stored data on the Iomega external hard drive that is not showing up on your Mac, you can try the following 5 methods we provide to fix the error.
Fix 1. Change Another USB Ports
The first fix you need to try is changing the USB port. Because the damaged port will deter your eternal hard drive from reading on Mac
Step 1. Unplug the Iomega External Hard Drive from its current USB port.
Step 2. Connect it to another USB port.
How to find an external hard drive on a Mac? The external hard drive connected to your Mac will appear on your Mac desktop; if not, check if the drive shows up in "Finder" or "Disk Utility".
Share this article on social media to help people with the same question about the Iomega external hard drive not showing up on Mac.
Fix 2. Check the Display Settings in the Finder
Your Mac may not display an external hard drive due to its setup. Use Finder to make it visible. Here is how you can use the Finder window to make your Iomega external HDD appear on your Mac
Step 1. Open the "Finder" menu and navigate to "Preferences > General".
Step 2. In the "General" tab, choose "External disks" to display external hard drives on your Mac.

Step 3. Go to the "Sidebar" section, navigate under "Location", and check the box next to "External disks". Your external hard drive will appear on the "Finder" window.
Fix 3. Turn on Show All Devices in Disk Utility
Disk Utility has a "Show All Devices" option that lets you see and control entire physical drives instead of just individual volumes or partitions. By default, Disk Utility shows only the separate volumes or partitions on a disk, keeping the actual physical disk hidden.
Turning on "Show All Devices" unveils the full list of physical disks, including their respective partitions.
Step 1. Open Disk Utility", and click "Applications > Utilities > Disk Utility".
Step 2. Click "View" in the toolbar.
Step 3. Select "Show All Devices" and find your external hard drive in the list.

Step 4. Click "Mount" in the top menu bar to mount an external hard drive on the Mac.
Fix 4. Run First Aid to Repair the Unrecognized Iomega External Hard Drive
File system issues can cause your external hard drive to be recognized. So, You can resolve this by using the First Aid tool.
This tool is helpful for verifying and fixing various problems associated with external drives.
Step 1. Open "Disk Utility" either through "Spotlight" (search for it) or go to "Finder > Go > Utilities".

Step 2. In "Disk Utility", find and select your Iomega external hard drive from the list.
Step 3. Select the "First Aid" tab, then click on the "Run" button.

If the First Aid process fails, don't worry! This article provides effective ways to solve the error.

Disk Utility First Aid Process Has Failed [with 5 Proven Ways to Fix It]
This article is an easy guide on how to fix the First Aid process's error in Disk Utility and what you can do in case you need to recover data. Read more >>
Fix 5. Fix the Unrecognized Iomega External Hard Drive by Reformatting
Not all external drives are designed to work seamlessly with Macs. It's common for a Mac not to read or write to an external hard drive formatted with NTFS.
If you're dealing with an unsupported drive format, consider changing its format. Remember that this process will require erasing all data on the drive. So, use EaseUS Data Recovery Wizard for Mac to recover the data.
Step 1. Plug in your external drive.
Step 2. Open "Disk Utility", pick the drive, and click the "Erase" button".
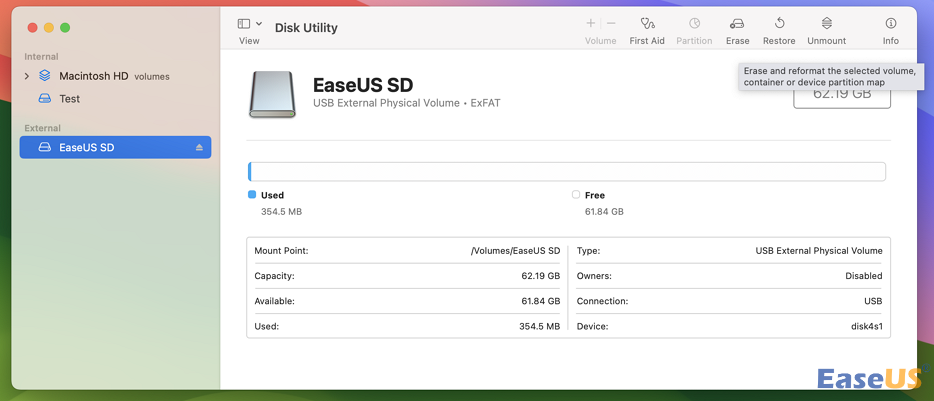
Step 3. Select the appropriate format in the Format section (APFS vs. Mac OS Extended) and click "Erase".

Why Iomega External Hard Drive Not Showing Up on a Mac
Nothing is frustrating like having your Iomega external hard drive fail to appear on your Mac, especially when it's storing important data.
Before you even think of fixing the issues, It's important to understand the factors that cause this problem. Here are some possible causes:
- ❎Connection Issues: If the USB cable connecting the Iomega drive to your Mac is faultily plugged into the port, you'll experience the problem.
- ⚠️Power Supply Problems: External hard drives often require their power source. If your Iomega drive is not getting sufficient power, it might not show up on your Mac.
- 😫Drive Formatting: If the Iomega drive is formatted in a file system that macOS doesn't support, it won't be recognized.
- ❌Cable or Adapter Issues: If the cable is damaged or faulty, it can prevent proper communication between the two devices.
- 🚫Outdated or Incompatible Drivers: If the drivers for the Iomega external hard drive need to be updated or compatible with your Mac's operating system, the drive may not be recognized.
Conclusion
From the article, you can simply learn that fixing your Iomega external hard drive not showing up on your Mac is quite simple. You need to run First Aid, change the USB, reformat the drive, or enable the "Show all Device" option.
If you lose the data while fixing the hard drive, just download the EaseUS Data Recovery Wizard for Mac. This recovery software will help you restore your data.
Iomega external hard drive Not Showing Up in Disk Utility FAQs
In this section, you’ll find some of the questions and answers on how to fix Iomega HDD displayed in the disk utility.
1. Why is my Mac not detecting my external hard drive?
Your Mac may be failing to detect the external hard drive due to several reasons. It could be a faulty USB connection, a damaged cable, or issues with the external drive's power supply. Check and secure the connections, try an alternate USB cable or port, and ensure the external drive is receiving power. Additionally, restart your Mac and check Disk Utility for any issues.
2. Is Iomega external hard drive compatible with Mac?
Generally, Iomega external hard drives are compatible with Mac systems. However, it's crucial to verify compatibility by checking the specific model's specifications or consulting Iomega's official website for any Mac-related requirements. Always ensure that the specifications of the external hard drive match your Mac's requirements for a smooth and trouble-free experience.
3. How to restore data from an Iomega external hard drive that is not showing up on my Mac?
To restore data from an Iomega external hard drive not appearing on your Mac, first check connections, use a different cable or port, and ensure the drive has power. If the issue persists, try connecting it to another computer. If unsuccessful, employ data recovery software.
Was This Page Helpful?
Brithny is a technology enthusiast, aiming to make readers' tech lives easy and enjoyable. She loves exploring new technologies and writing technical how-to tips. In her spare time, she loves sharing things about her game experience on Facebook or Twitter.
-
EaseUS Data Recovery Wizard is a powerful system recovery software, designed to enable you to recover files you’ve deleted accidentally, potentially lost to malware or an entire hard drive partition.
Read More -
EaseUS Data Recovery Wizard is the best we have seen. It's far from perfect, partly because today's advanced disk technology makes data-recovery more difficult than it was with the simpler technology of the past.
Read More -
EaseUS Data Recovery Wizard Pro has a reputation as one of the best data recovery software programs on the market. It comes with a selection of advanced features, including partition recovery, formatted drive restoration, and corrupted file repair.
Read More
Related Articles
-
How to Delete Photos on Mac with 6 Methods | NEW
![author icon]() Dany/Jun 30, 2026
Dany/Jun 30, 2026 -
How to Recover Deleted DNG Files on Mac and How to Open Them
![author icon]() Jaden/Jun 30, 2026
Jaden/Jun 30, 2026 -
Undo Replaced File on Mac - Full Guide in 2026
![author icon]() Tracy King/Jul 05, 2026
Tracy King/Jul 05, 2026 -
How to Delete Photos from Mac but Not iCloud [New]
![author icon]() Jaden/Jun 12, 2026
Jaden/Jun 12, 2026