Suppose you're logged into your Apple ID on a Mac laptop or desktop and an iPhone. You can conveniently control texting, sharing links, and sending films and photographs to contacts on your phone from your Mac. You might desire to know how to delete messages on Mac if you need to avoid continually switching your focus between the two devices.
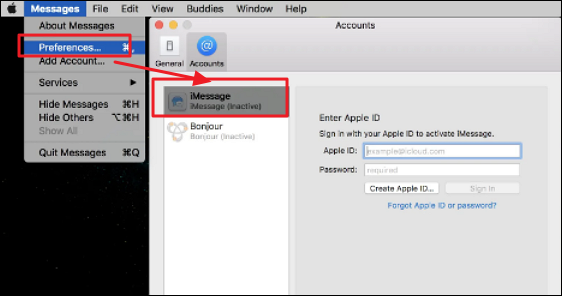
As you know, your iPhone's Messages app stores both conventional text messages and iMessages. One of the beneficial abilities is to utilize iMessage on several devices, like your Mac, in addition to receiving safe end-to-end encryption. To enable iMessage on Mac:
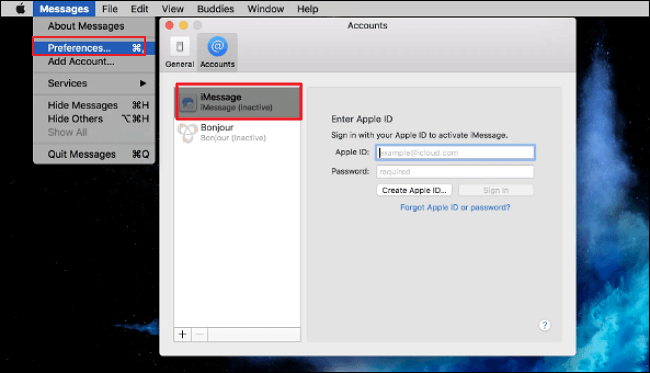
- Launch the Messages application after opening the Applications folder (Command + Shift + A).
- Select the iMessage tab in System Preferences to access the feature.
- "Enable this account" and "Enable Messages in iCloud" should be checked.
- Notice:
- Don't forget to uncheck the "Enable Messages in iCloud" option if you're unsure of how to switch off iMessage on Mac at any moment.
How to Delete Messages on Mac/MacBook
There are numerous methods you can employ if you want to organize your Messages app. Here is a guide for deleting texts on a Mac. You can delete messages after ensuring the Messages app is set up properly. You will need a different technique depending on whether you want to remove a single message, a conversation, or all of your messages.
| 4 Ways | Apply to |
| ✉️Delete the Single Message on Mac | Keep the message private |
| 📮Delete the Multiple Message on Mac | Keep the whole discussion private |
| 🕊️Delete All iMessages on Mac Forever | No record of the messages is left |
| 🤖Automatically Delete Messages on Mac | Periodically conceal vital information |
You should disable Messages in iCloud if you want to permanently delete messages from your Mac while keeping them on your other devices. In other words, you should turn off Messages in iCloud if you wish to remove them from your Mac but keep them on the other Apple devices.
- Start the "Messages" application.
- Then select Messages from the navigation bar.
- Choosing "Preferences".
- Choosing the iMessage tab.
- Disable Messages in iCloud.
1. Delete the Single Message on Mac
To keep the messages private on your Mac, the application - iMessage has a straightforward way to remove single messages on your Mac. Select the conversation you want to delete from the list on the left-hand panel. The message can then be deleted by doing one of the following.
- Make right-click on the message and select "Delete".
- Select the message you want to remove by pressing the Command + Click combination.
- Swipe from right to left, then tap the trash can-shaped Delete icon.
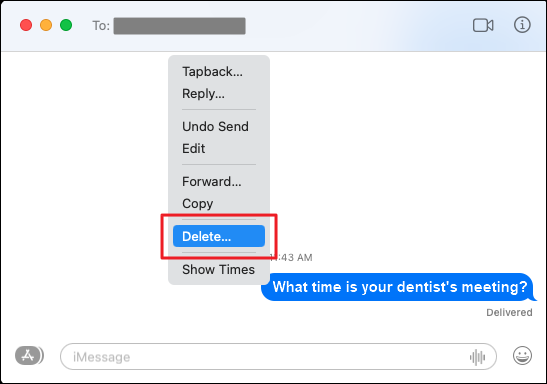
The next step is to ask you to confirm. To delete the message thread, choose "Delete". To be more cautious, you can empty the Trash after completing one of the tips above.
However, there are situations when you can't empty the Trash on a Mac owing to hardware or system issues. What is the precise cause of this problem, and how may it be resolved? Continue reading the linked article to find the solution.
Help! Mac Trash Bin Won't Let Me Empty it, How to Fix?
On some occasions, when Mac users want to empty the Trash to save storage space, they may find they can't empty the Trash on Mac when they click empty.
2. Delete the Multiple Message on Mac
It's important to know how to delete text messages on a Mac so that you may conceal vital items. Still, there may be instances when you'd prefer to learn how to delete multiple messages on Messenger so that you leave little to no record of whole discussions.
Here is how to remove every iMessage from your Mac:
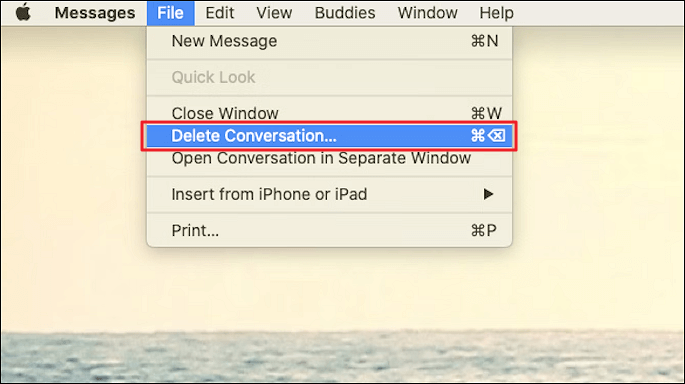
Step 1. Click on the discussion you want to remove in Messages.
Step 2. Delete the Conversation by selecting File from the Apple Menu bar.
An alternative way is:
Step 1. Right-click on the chat on the left side.
Step 2. Choose "Delete conversation" from the menu that appears.
Step 3. Hit Command + Delete after selecting the discussion.
If the tutorial is helpful, share it on your social platform and let more Mac users know!
3. Delete All iMessages on Mac Forever
Any of the aforementioned choices ought to be more than adequate for assisting you in maintaining your privacy. However, you might be curious about where iMessages are saved on a Mac if you absolutely must ensure that no record of your messages is left behind.
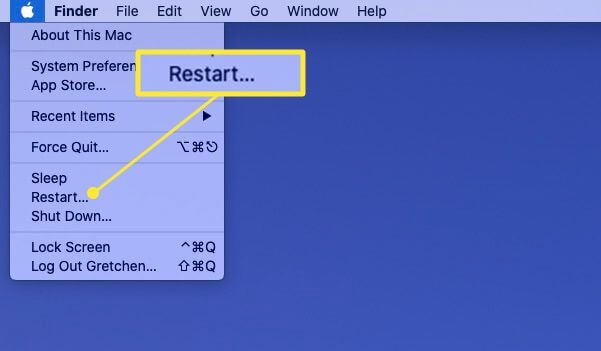
Fortunately, your Mac makes it simple to enter your Library folder and manually remove the Messages files:
Step 1. Find and click "Messages" > "Preferences" > "iMessage".
Step 2. Sign Out the iMessage and Quit the Messages app. You can also force quit apps on Mac by shortcuts.
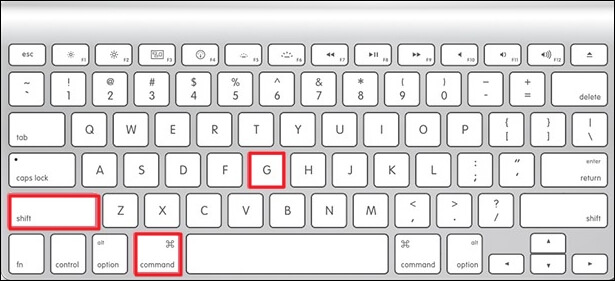
Step 3. Choose "Go" from the Menu Bar > Folder, or you can press these keywords: Command + Shift + G.
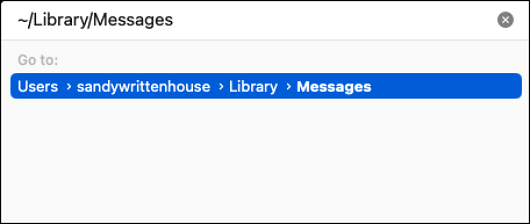
Step 4. Enter in ~/Library/Messages and then click "Go".
Step 5. Then, you can delete the "Archive and Attachments" folders and files of chat.db, chat.db-shm, and chat.db-wal.
Step 6. Restart the MacBook to check if the messages are deleted.
The files and discussions should now all be gone, though Messages might take some time to adjust themselves the next time you use them.
4. Automatically Delete Messages on Mac
You may set Messages on Mac to erase chats automatically after a predetermined period of time if you don't want to manually clean them up.
To have Mac messages deleted automatically:
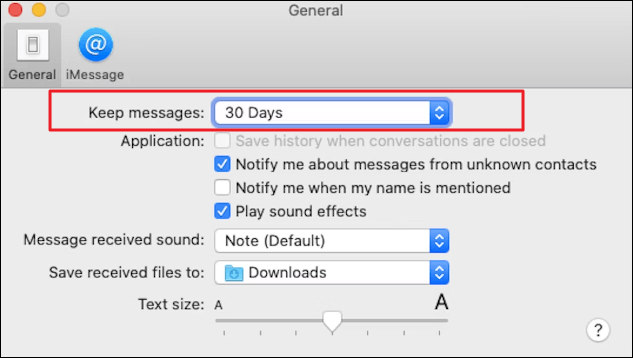
Step 1. Launch the messaging app.
Step 2. Then select "Messages" from the navigation bar.
Step 3. Choosing "Preferences."
Step 4. Click the "Keep Messages" drop-down box under the General tab.
Step 5. Choose from "30 days", "one year", or "forever".
Now, your communications will be deleted after the specified length of time. Any messages that lingered longer than necessary are no longer a concern.
How to Recover Deleted Messages on Mac/MacBook
You may quickly restore the deleted messages from Time Machine backup, including the deleted iMessages, as long as you have Time Machine backup turned on. On the other hand, iCloud backup's other data sync feature is also quite useful for recovering lost data across platforms.
However, can a deleted iMessage be recovered when there is no backup?
Before you are going to recover deleted iMessages on Mac, watch this video first. It provides you with more details on Mac data recovery.
- 00:50 Method 1. EaseUS Data Recovery Wizard for Mac
- 02:02 Method 2. Recover from iCloud
- 02:22 Method 3. Recover from Time Machine Backup
The content of the chat.db file is altered when you remove a conversation from iMessage on your Mac, but the file itself is still present. For this reason, you can recover deleted files using data recovery software. The solution for recovering deleted files on macOS is EaseUS Data Recovery Wizard for Mac.
EaseUS Data Recovery Wizard
- Apply messages, documents, emails, pictures, and another data recovery from the Mac device.
- Mac hard drive recovery: It can recover data and files from a Mac hard disk to a PC or internal hard drive.
- Recover data for sudden deletion, formatting, virus attack, and system crash under different situations.
Download this Mac data recovery software and recover deleted messages on Mac by these steps.
Step 1. Search for lost files
Select the disk location to search for lost files (it can be an internal HDD/SSD or an external hard drive) where you lost data and files. Click the "Search for lost files" button.

Step 2. Go through the scanning results
This software will immediately scan your selected disk volume and display pictures, documents, audio, videos, and emails on the left pane.

Step 3. Select the file(s) and recover
Click the data to preview, and click the "Recover" button to have them back.

About Deleting Messages on Mac
You should know a few things before repeatedly pressing the delete button. First, any messages you delete on your Mac are likewise deleted from your other Apple devices if you have activated Messages for iCloud.
- You can turn off the syncing option in Messages > Settings > iCloud to prevent losing your data completely.
- Remember that future Mac messages won't sync with other devices if you disable iCloud messaging.
- You could also find the task of removing conversations and messages to be a little laborious.
You can configure Messages to automatically delete previous texts after a time period you choose, which will lessen that load in the future.
Apple Mail Recovery | Recover Deleted Emails Messaged on Mac
When it comes to how to recover deleted emails and messages on your Mac, you have three ways to go. You can either use trustworthy third-party software. Read more >>
Conclusion
As a result of its ability to sync messages and attachments across all of your devices, Apple's Messages is a fantastic tool for staying in touch with friends and family. However, this can suggest that your Mac has a lot of messages and files that take up storage. All four ways detailed above can help you delete the messages on your Mac but are suitable for different situations. Please carry out the method best suited to your demands.
Moreover, you won't panic about losing any vital texts on your Mac, iPhone, or iPad. Try the previously mentioned fix - EaseUS Data Recovery Wizard for Mac to recover them.
How to Delete Messages on Mac FAQs
Here are 4 additional questions about how to delete Messages on Mac. Check here for the answers.
1. Why is Messages not an option in iCloud on Mac?
Ensure you have iCloud set up and are logged in with the same Apple ID on all your devices before turning on Message in iCloud. Additionally, you must have enabled iCloud Keychain and be using two-factor authentication with your Apple ID.
2. Can I enable Messages in iCloud on my Mac?
Using the same Apple ID across all of your Apple devices, enabling Messages in iCloud will sync all of your iMessage and SMS text, including images and attachments. You will have a distinct texting experience because you will see the same thing across all devices.
3. How do I get my iPhone Messages on my Mac?
- Navigate to "Setting"s > "Messages" on your iPhone.
- Click on "Text Message Forwarding".
- In the list of devices, turn on your Mac.
- A six-digit activation code displays on your Mac if two-factor authentication is inactive.
- Enter the code on your iPhone, then press "Allow".
4. How do I update Messages from iCloud on Mac?
Your communications keep current automatically after you enable iCloud communications. Make sure to select "Messages" > "Settings", click "iMessage", click "Settings", and then click Sync Now to ensure that a new modification is applied promptly.
Was This Page Helpful?
Jaden is one of the editors of EaseUS, who focuses on topics concerning PCs and Mac data recovery. Jaden is committed to enhancing professional IT knowledge and writing abilities. She is always keen on new and intelligent products.
-
EaseUS Data Recovery Wizard is a powerful system recovery software, designed to enable you to recover files you’ve deleted accidentally, potentially lost to malware or an entire hard drive partition.
Read More -
EaseUS Data Recovery Wizard is the best we have seen. It's far from perfect, partly because today's advanced disk technology makes data-recovery more difficult than it was with the simpler technology of the past.
Read More -
EaseUS Data Recovery Wizard Pro has a reputation as one of the best data recovery software programs on the market. It comes with a selection of advanced features, including partition recovery, formatted drive restoration, and corrupted file repair.
Read More
Related Articles
-
[macOS 10.15 Download] How to Download macOS 10.15 Update Today
![author icon]() Brithny/May 10, 2026
Brithny/May 10, 2026 -
com.apple.DiskManagement.disenter error -119930872 Occurs When Mount a Disk on Mac
![author icon]() Brithny/May 19, 2026
Brithny/May 19, 2026 -
How to Restore Mac from Backup on External HDD
![author icon]() Jaden/Jun 17, 2026
Jaden/Jun 17, 2026 -
How to Recover Deleted Pages Document on Mac [with 5 Proven Ways]
![author icon]() Brithny/Jan 19, 2026
Brithny/Jan 19, 2026