-
![]()
-
![]()
-
![]()
-
![]()
-
![]() What Is the Best SSD Data Recovery Software? 6 Top Solutions
What Is the Best SSD Data Recovery Software? 6 Top Solutions February 08,2026
 6 min read
 -
![]()
-
![]() Cerber Ransomware Decrption Tool: Decrypt/Restore .cerber Encrypted Files
Cerber Ransomware Decrption Tool: Decrypt/Restore .cerber Encrypted Files January 19,2026
 6 min read
 -
![]()
-
![]() Recover Lost Christmas Photos & Videos (2026 Complete Guide)
Recover Lost Christmas Photos & Videos (2026 Complete Guide) February 12,2026
 6 min read
 -
![]() EaseUS Data Recovery Wizard 19.2 Crack with License Code 2026
EaseUS Data Recovery Wizard 19.2 Crack with License Code 2026 January 19,2026
 6 min read
Page Table of Contents
PAGE CONTENT:
What Is a Memory Leak on Windows 11/10
A memory leak occurs when a process or program consumes increasing memory over time without releasing it. The constant and excess use results in systems slowing down or completely crashing. Memory leaks can result from poor software design, outdated drivers, or OS conflicts. As RAM overloads, programs may lag, freeze, or fail to launch.
Maintaining PC performance requires finding and fixing memory leaks. This article defines a memory leak, how to check for it, and nine practical ways to fix it on your Windows PC. We'll also discuss memory leaks and introduce a reliable data recovery tool to recover lost and deleted files during the memory leak. Read this article to learn how to fix memory leak issues and keep your system running smoothly.
How to Check for Memory Leaks
A memory leak can slow the computer because RAM is overloaded with processes that don't have free memory, such as Chrome's high memory usage. This can make simple tasks difficult and crash the system, requiring a restart. Early memory leak detection can prevent system issues. Windows 11/10 memory leak detection:
Step 1. Press the "Ctrl + Shift + Esc" keys to launch the task manager.
Step 2. Click the "Performance" tab to track your system's memory usage.
Step 3. Check the memory usage graph. An increase in memory usage without an increase in active applications may indicate a memory leak.
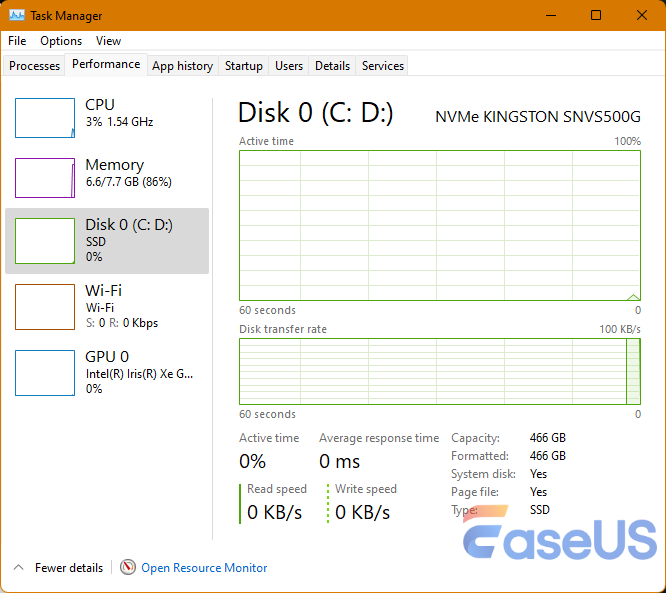
Step 4. Sort the "Processes" tab by "Memory" to see which programs use the most RAM.
Task Manager can detect memory leaks before they affect computer performance. In this post, we will tell you how to clear the RAM cache in Windows 10/11 without data loss.
9 Solutions to Fix Memory Leaks on Windows PC
After learning how to check your PC memory leak, we will introduce 9 solutions to fix memory leaks on a Windows PC. However, before fixing this error, it's suggested that you install the professional and trusted EaseUS Data Recovery Wizard to save your essential files to an external hard drive to avoid losing data.
After saving important files, refer to the effective solutions below to fix the memory leak issue:
Method 1. Close All Processes and Restart Your Computer
Closing unnecessary processes and restarting your computer is a simple memory leak fix. This refreshes system memory and frees up resources. Follow the steps below to fix the memory leak:
Step 1. Type task manager in the search bar to launch Windows Task Manager.
Step 2. Remove any unnecessary processes by selecting them and clicking "End Task".
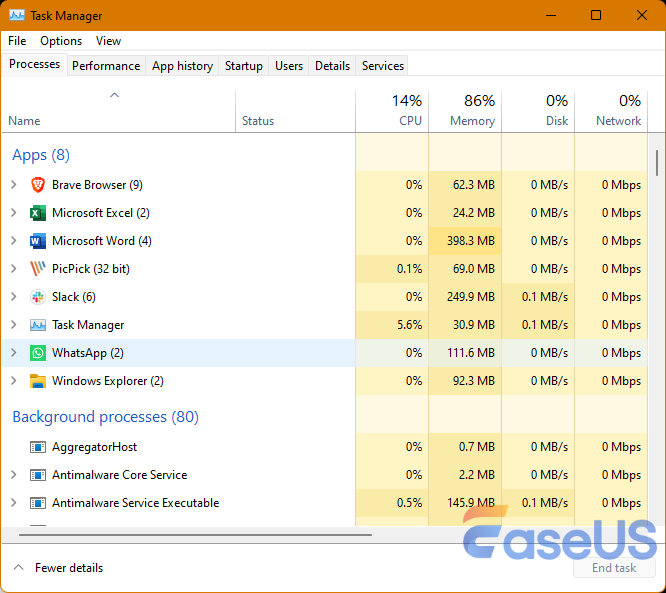
Step 3. Once all applications have been closed, restart your computer.
A fresh restart often clears the memory used by leaked processes.
Method 2. Update Your Device Drivers
Out-of-date or corrupt drivers often cause memory leaks. Updating your device drivers can help reduce memory consumption and improve system performance.
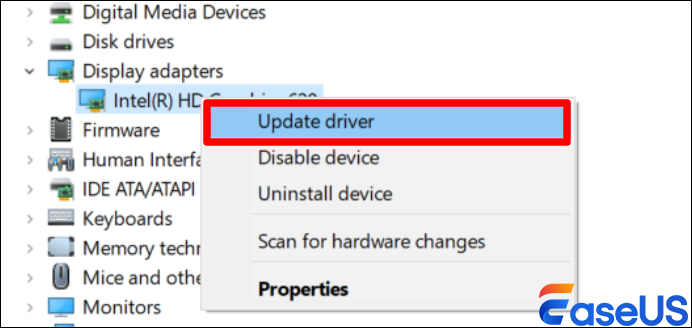
Step 1. Right-click "Start" and type "Device Manager".
Step 2. Right-click the driver to update and select "Update Driver".
If you think this article is informative, share it on social media to help others learn how to fix memory leaks with 9 solutions.
Method 3. Disable Startup Programs
Too many boot-up programs can overload memory. Disabling unnecessary startup programs frees up memory, improving PC performance.
Step 1. Open "Task Manager" by pressing "Ctrl + Shift + Esc" on your keyboard.
Step 2. Select the "Startup" tab to see all startup programs.
Step 3. Right-click unnecessary programs and choose "Disable".
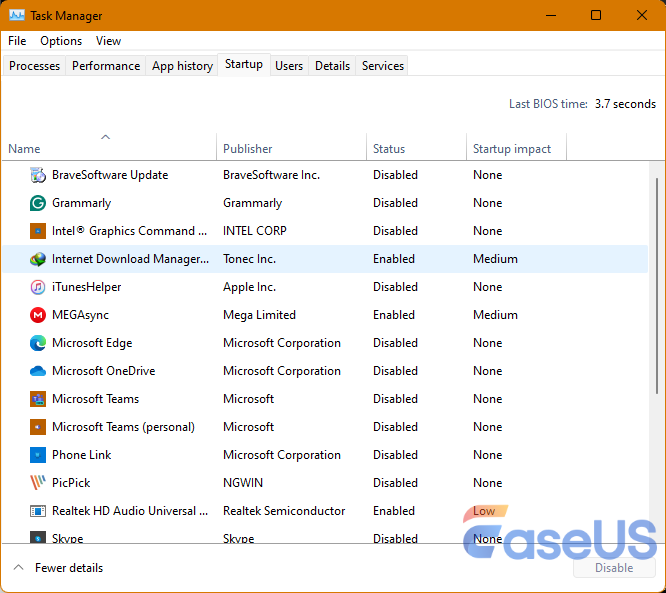
This frees up memory during startup, lowering the likelihood of memory leaks.
Method 4. Adjust for Best Performance
Setting your system to prioritize performance over visual effects can reduce memory leaks. Windows will allocate memory more efficiently with these settings.
Step 1. Navigate to the "Settings" on your PC. Search for Advanced System Settings.
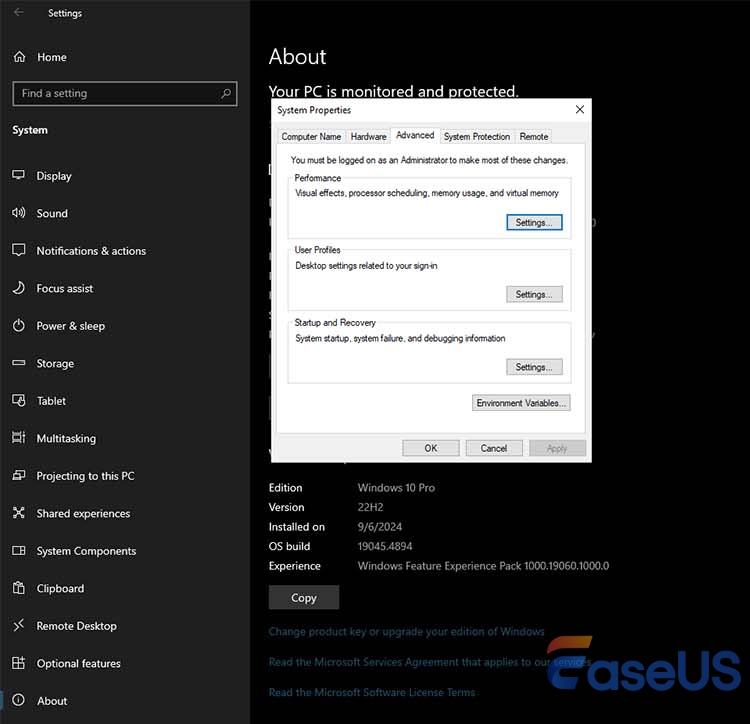
Step 2. Select "Advanced system settings" and navigate to the "Performance" section.
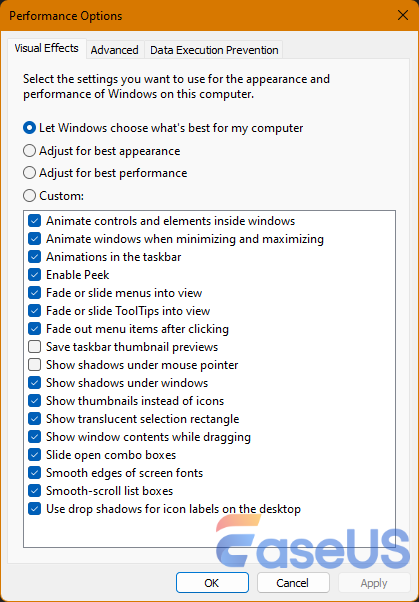
Step 3. Select "Adjust for Best Performance". This setting reduces visual effects, freeing up memory for more important tasks.
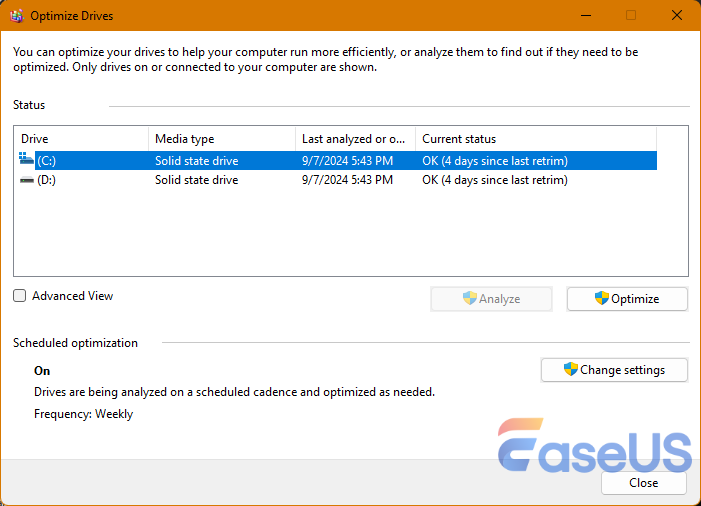
Method 5. Defrag Hard Drives on Your Computer
A fragmented hard drive can lead to performance issues and memory leaks. Regular defragmentation improves storage performance and helps your system manage memory more effectively.
Step 1. In the Windows search bar, type "defragment and optimize drives" and click on it.
Step 2. Choose which drive you want to optimize and click "Optimize".
Method 6. Run Windows Memory Diagnostic
The Windows Memory Diagnostic tool can identify hardware memory issues. Running this tool helps identify problems that may be causing memory leaks.
Step 1. Press "Windows + R", type mdsched.exe, and press "Enter".
Step 2. Choose "Restart now and check for problems". This will check for memory issues and recommend how to fix them.

Method 7. Run an Antivirus Scan
Memory leaks from malware can be significant. Detecting and removing these threats with an antivirus scan improves system performance. This task is best done with Windows Defender, Avast, and Bitdefender. These tools efficiently scan for malware and fix memory leaks from harmful programs.
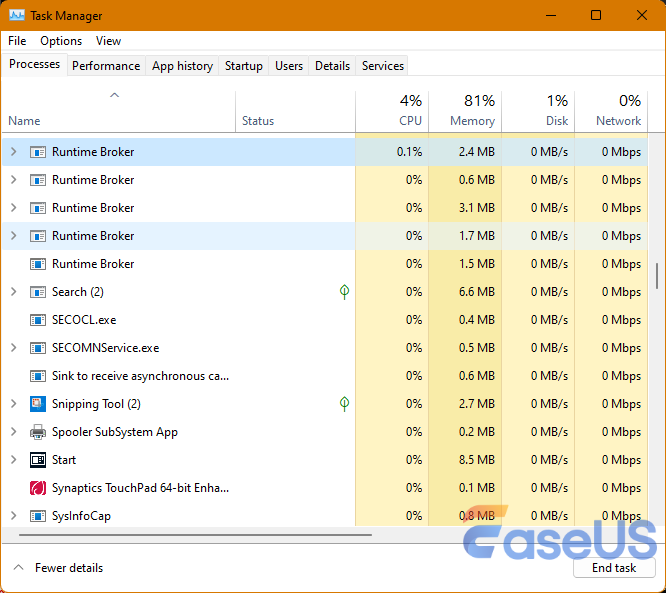
Method 8. Disable Runtime Broker
Runtime Broker can consume a lot of memory. Disabling or limiting its activity can help you resolve memory leaks, especially if you notice it using too much RAM.
Step 1. Open Task Manager and search for "Runtime Broker".
Step 2. Right-click on it and choose "End Task". This temporarily disables Runtime Broker and frees up memory.
Method 9. Disable Sysmain Feature in Windows 11/10
Sysmain (previously Superfetch) is a system feature that loads frequently used apps into memory. However, it can sometimes cause memory leaks. Disabling this feature can free up system memory and prevent performance problems.
Step 1. Press "Windows + R", type services.msc, and press "Enter".
Step 2. Scroll down to "Sysmain" in the list of services.
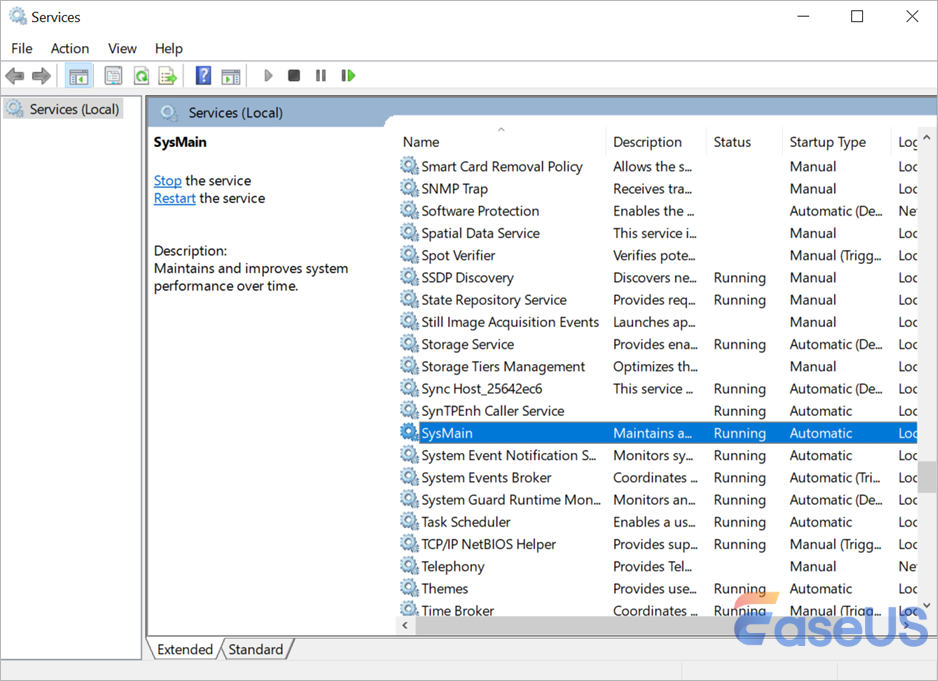
Step 3. Go to the "Properties" menu, right-click Sysmain, and then choose "Disabled" for the Startup type.
Extra Tip: Restore Lost Data During a Memory Leak
Memory leaks from programming errors or poor system resource management cause poor performance over time. During a memory leak, your system may slow down, freeze, or crash, resulting in unexpected data loss. System instability can corrupt or impair important files. Immediately recover data from a memory leak before the issue worsens.
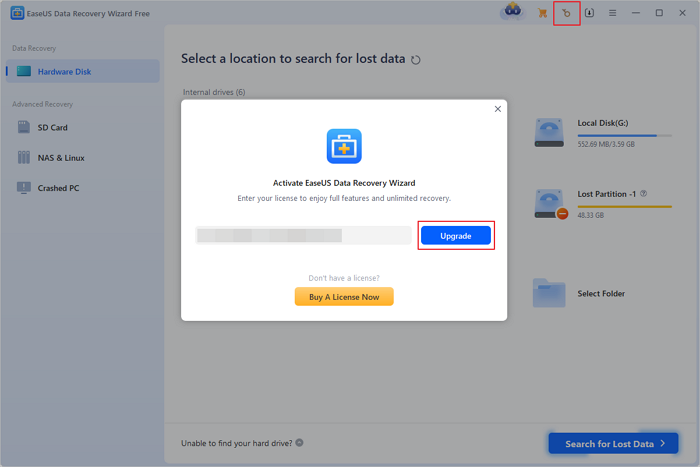
Here's the EaseUS Data Recovery Wizard. This powerful software can recover lost, deleted, or inaccessible Windows PC data despite system crashes or memory leaks. For documents, photos, videos, and other files, It scans your drive and safely restores them.
A user-friendly interface and a reliable reputation make EaseUS the go-to solution for memory leak data loss. Now, let's follow EaseUS's full data recovery process:
Note: To guarantee a high data recovery chance, install EaseUS data recovery software on another disk instead of the original disk where you lost files.
Step 1. Launch EaseUS Data Recovery Wizard on your Windows 11, Windows 10, Windows 8, or Windows 7 computer. Select the disk partition or storage location where you lost data and click "Search for Lost Data".

Step 2. This recovery software will start scanning the disk to find all lost and deleted files. When the scan process completes, click "Filter" > "Type" to specify lost file types. If you remember the file name, you can also search in the search box, which is the fastest way to find the target file.

Step 3. Preview and restore lost Windows files. You can double-click to preview the scanned files. Then, select the target data and click the "Recover" button to save them to another safe spot in the PC or Cloud drive.

Conclusion
Repairing a Windows 11/10 memory leak is relatively easy. The methods mentioned in this article can help you detect and fix memory leakage in your device. If you regularly update your system and drivers and monitor resource usage, memory leakage problems could be avoided.
Moreover, if your device faces a memory leak issue, it can cause data loss. EaseUS Data Recovery Wizard helps in such cases. This advanced and reliable software lets you easily restore images, files, and documents. Download EaseUS Data Recovery Wizard to recover lost files quickly.
How to Fix Memory Leak FAQs
Following are some common questions that people ask regarding memory leaks and how to fix memory them:
1. What causes memory leaks?
Memory leaks occur when a computer application or process keeps using memory. Incorrect software coding, system updates, and too many background processes are common causes. If the leak persists, your system may run out of RAM, slow down, or crash.
2. Is memory leak bad for PC?
A memory leak can significantly impact PC performance. Your system slows down, lags, or becomes unresponsive as RAM decreases. A severe memory leak can cause crashes, data loss, and hardware stress. Fixing memory leaks quickly improves performance and reduces system strain.
Was this page helpful?
-
Brithny is a technology enthusiast, aiming to make readers' tech lives easy and enjoyable. She loves exploring new technologies and writing technical how-to tips. In her spare time, she loves sharing things about her game experience on Facebook or Twitter.…

20+
Years of experience

160+
Countries and regions

72 Million+
Downloads

4.9 +
Trustpilot Score


Free Data
Recovery Software
Recover data up to 2GB for free!

