Digitization has led global users to compete in the data storage race. While the big companies are banking on effective storage solutions, many users rely on the optimized use of their existing storage capabilities. Windows 10/11 users don't need to worry about their storage optimization when they have the fantastic "Disk Management" utility. It offers end-to-end management of different advanced storage tasks. Do you know what does shrink volume do?
The shrink volume is the reliable option in the "Disk Management" utility. It decreases the partition space to create unallocated space on the disk. Let us go through shrink volume in detail in this article. By the end of this write-up, our readers will be able to use different ways to safely shrink volume on their Windows 10/11 systems. Are you looking for what it means to shrink volume in disk management? Here, you can click the link below to learn information about shrinking the C drive:
How to Fix Unable to Shrink C Drive on Windows 11/10/8/7
In this article, you can get the reasons why Windows is unable to shrink C drive and 4 efficient solutions based on these reasons.
What Does Shrink Volume Do in Disk Management
The first step towards understanding the process and detailed steps for what does shrink volume do is to get into its quick details.
First things first, what does shrink volume do in disk management? Shrink volume is the dedicated function of Disk Management. All ordinary files will be automatically relocated on the partition to decrease the partition space when shrink volume is activated on the Windows 10/11 system.
The next thing that comes to the mind of the readers is when is the right time to shrink volume. For this, it is important to go through the top reasons for selecting shrink volume on Windows 10/11 system. These include:
- Using the unallocated space to create a new volume for storing important files
- Using the unallocated space to set up SD over-provisioning.
- Extending the size of the adjacent volume using Disk Management.
The shrink volume function is found in the Disk Management utility. It is the dedicated Windows utility used for advanced storage tasks. It can shrink a basic volume, extend a basic volume, change a drive letter, initialize a new drive, etc.
Some crucial points to consider before moving ahead with the shrink volume in Windows 10/11 system are:
- The primary partitions and logical drives on raw petitions or the partitions using the NTFS file system format can be operated for shrink volume.
- It is recommended not to select block-level copy for data transfer as it copies the bad sectors to the new disk.
- It becomes necessary to identify the unmovable file as certain files can't get automatically relocated using shrink volume. The Application Log for Event 259 helps identify the unmovable file.
- There is no need to reformat the disk to shrink the partition.
It is easy for the readers to go through this link if facing any issues of shrink volume in Windows.
How Long Does It Take to Shrink Volume
After knowing what does shrink volume do, you may search the total time required to complete the shrink volume on Windows 10 or 11 devices.
The key factors affecting the total time in completing the shrink volume include:
- The size of the partition is reduced
- The space being freed
With the increased size of the partition, the shrink volume will take more time. It is due to the increased data and the corresponding space allocation. Hence, if the partition size is reduced, the shrink volume will be completed quickly.
Coming to the amount of space being freed, shrink volume may take more or less time. If the space being freed is less, shrink volume will operate quickly, while you may have to wait for a few minutes while looking to free large space.
Hence, on average, shrink volume may take anywhere between 15-20 minutes to 1-2 hours based on the above two factors. It is recommended to prevent any system from turning down or hard resetting during this process.
How to Safely Shrink Volume in Windows 10/11 - 3 Ways
After going through the time taken to shrink volume, the next in what does shrink volume do is the different ways to achieve it. Here, we'll consider three different ways to shrink volume in Windows 10 or 11 devices. These are:
- Way 1. Shrink Volume via EaseUS Partition Master
- Way 2. Shrink Volume via Disk Management
- Way 3. Shrink Volume via Diskpart
Before jumping to the details of these ways, it is easy to have a quick comparison between them based on different options. So, below is a quick comparison table:
| Feature | EaseUS Partition Master | Disk Management | Diskpart |
|---|---|---|---|
| Operation difficulty | Easy | Lengthy process | Lengthy process |
| Suitable users | Professional and individuals | Individuals | Individuals |
| Additional features | Multiple and advanced features | Limited features | Limited features |
Way 1. Shrink Volume via EaseUS Partition Master
When looking for a safe, quick, and easy way to shrink volume in Windows 10/11, EaseUS Partition Master is the perfect solution. It offers simple steps to shrink volume in Windows devices. It is easy for Windows 10/11 users to quickly download EaseUS Partition Master from its official website.
EaseUS Partition Master is the best disk manager offering quick disk space adjustment, creating a new partition, merging a partition, etc. It is compatible with not only Windows 10/11 but with Windows XP/ Vista, Windows 7/ 8/ 8.1, etc.
Features of EaseUS Partition Master:
Some of the key features of EaseUS Partition Master, making it an all-in-one partition manager, are:
- 1. It can quickly resize encrypted partition.
- 2. It creates partitions on USB drive.
- 3. Its Smart Windows 11 Upgrade Assist offers additional performance benefits to Windows 11 users.
- 4. It has additional disk management features like converting MBR to GPT, formatting partitions, merging partitions, etc.
EaseUS Partition Master is professional partition management software that can be used by beginners or professionals to shrink or extend Windows 10/11 partitions. The best part about this tool is the elimination of any data loss. It is a much easier solution when asked for the different methods for the users looking for what shrink volume does.
You may shrink volume via EaseUS Partition Master within these steps:
Step 1: Locate and select target partition to shrink
Go to the Partition Manager section, right-click on the partition that you want to shrink and select "Resize/Move".
Step 2: Adjust to shrink partition
Use your mouse to drag the end of the target partition to shrink partition space.
You can also adjust the partition size box to shrink the target partition. Once done, click "OK" to continue.
Step 3: Execute operation
Click the "Execute Task" button and "Apply" to keep all changes.
Way 2. Shrink Volume via Disk Management
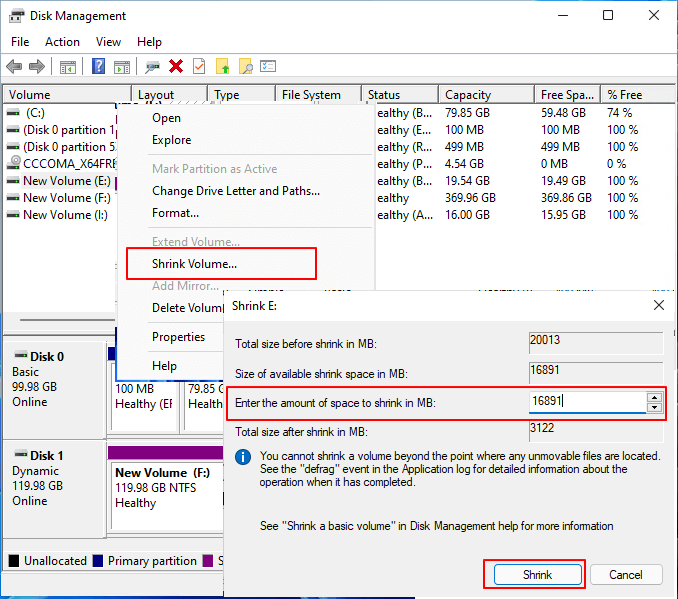
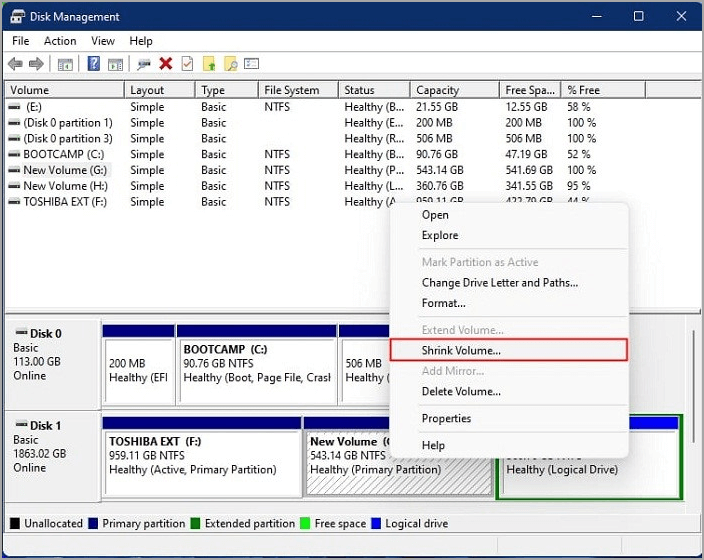
The next method is to shrink volume via disk management. It is a dedicated Windows utility offering different storage tasks. It is easy for the users to initialize a new drive, extend a basic volume, shrink a basic volume, and change the drive letter using disk management only. It is easy for beginners or professionals to go for the dedicated Troubleshooting Disk Management tool.
The quick steps to use shrink volume via disk management are:
Step 1. Open the "Disk Management" option in Windows 10/11 system.
Step 2. Select the "Shrink Volume" option in the disk management menu.
Step 3. Wait for the disk management to query available space to shrink.
Step 4. A pop-up window will appear. Here, enter the size you want to decrease.
Step 5. Click on the "Shrink" button to complete the shrink volume using disk management.
Way 3. Shrink Volume via Diskpart
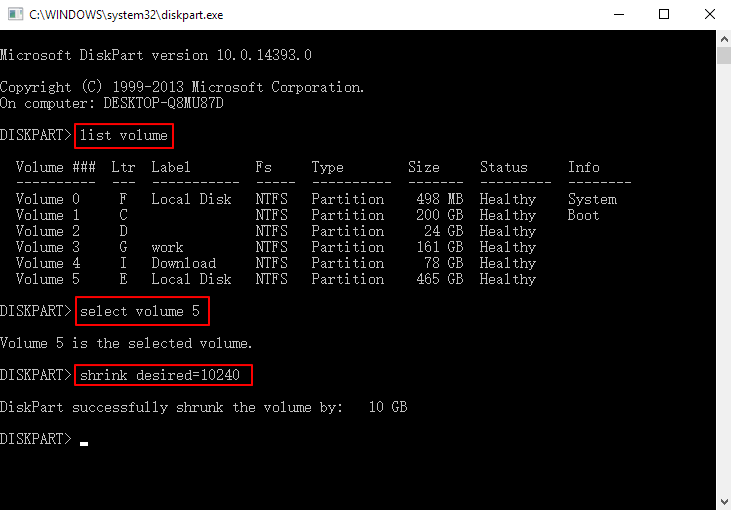
Last but not least is the method of shrinking volume via Diskpart commands. It is the dedicated command interpreter which helps manage the different computer drives. Diskpart can manage virtual hard disks, volumes, partitions, disks, etc. It is easy to use Diskpart by first going for the list, selecting the object, and giving it focus, followed by specific Diskpart commands.
The steps to shrink volume via Diskpart are:
Step 1. Go to "Windows + R" to open the run window.
Step 2. Enter "diskpart" into the run window and press "Enter".
Step 3. Input the following commands and press "Enter" after every command
list volume
select volume # (here # is the volume number)
shrink desired = * (here * is the amount of space required to shrink)
Step 4. You'll receive "DiskPart successfully shrunk the volume by: …" on the successful volume shrink.
Step 5. Input "Exit" and press "Enter" to close DiskPart.
Conclusion
Hope everything is clear to our readers about what shrink volume does and how to safely shrink volume on their devices. It is easy to go through the details of shrink volume in disk management and understand its safety. The shrink or extend volume never takes a toll on the system data. Further, the time taken in shrink volume is highly dependent on the amount of space.
After going through all these details, it is easy for the users to understand the three methods to safely shrink volume in Windows 10/11. The detailed steps for completing shrink volume using diskpart and disk management make it easy for beginners and professionals to understand. EaseUS Partition Master remains the best option when users want safe, quick, and reliable shrinking of volume on their devices.
FAQs Related to What Does Shrink Volume Do
After going through a detailed review of what does shrink volume does in this section, it is common for the readers to have some questions in mind. So, below is a quick list of the top and frequently asked questions related to the same:
1. Is it safe to shrink volume?
It is highly secure to shrink volume. Data is not affected by the "Shrink Volume" or "Extend Volume" options. Further, the unchanged information is irrespective of the location of the unallocated space or user space.
2. What is the difference between shrink volume and extend volume?
The shrinking volume features help create unallocated space on the right side of the partition as required to shrink. Users are not allowed to move it. The extended volume, on the other hand, is available only if there is a contiguous unallocated space on the right side of the partition needed to be enlarged.
3. What happens if I shrink the D drive?
When you shrink the D drive, all the unallocated space will locate after the D partition but not the C drive. Hence, even if there is unallocated space, it can't be used to extend the C drive.
Was This Page Helpful?
Cici is the junior editor of the writing team of EaseUS. She accepted the systematic training on computers at EaseUS for over one year. Now, she wrote a lot of professional articles to help people resolve the issues of hard drive corruption, computer boot errors, and disk partition problems.
Sherly joined EaseUS in 2022 and she has always loved writing articles and enjoys the fun they bring. She receives professional training here, focusing on product performance and other relative knowledge. She has written over 200 articles to help people overcome computing issues.
Related Articles
-
How to Fix SSD Slow Write Speed on Windows 10/11 [Full Guide]
![author icon]() Sherly/2024-11-27
Sherly/2024-11-27 -
[SOLVED] DMG File No Mountable File Systems on macOS Ventura/Monterery/Big Sur
![author icon]() Jaden/2024-10-25
Jaden/2024-10-25 -
Samsung T7 vs. T9: Which SSD to Choose?
![author icon]() Larissa/2024-11-25
Larissa/2024-11-25 -
[Full Guide] How to Factory Reset PC Without Turning It On
![author icon]() Jerry/2024-07-01
Jerry/2024-07-01

EaseUS Data Recovery Services
EaseUS data recovery experts have uneaqualed expertise to repair disks/systems and salvage data from all devices like RAID, HDD, SSD, USB, etc.