Secure Boot is a feature introduced by Microsoft in Windows 8 for the first time to keep its users secure. This feature ensures that the OS of a computer is safe and that no unauthorized apps are making trouble while turning your device on.
- Update August 2025:
- With the release of Battlefield 6, many PC players have encountered the error "Secure Boot is not enabled" when trying to launch the game. This guide now includes specific tips for Battlefield 6 players, helping you fix the issue and play Battlefield 6 smoothly. (Refer to - r/Battlefield)
In simple words, this option made it possible to create an extra security layer for the user's safety. But it has been reported by many users that "Secure Boot Enabled but not Active" in their devices. The problem becomes more common when someone is installing windows.
If you also face such an issue with the secure boot feature, you should read this blog until the end. This post from EaseUS will share effective ways to overcome this problem and run your system smoothly.
Why Is Secure Boot Enabled But Not Active
- Notice:
- Before moving to the solution to such problems in your computer, you should understand a few common reasons behind it. Doing so will enable you to understand the solutions properly and move ahead without trouble. So, we are here with some common causes behind this error.
The most common reason that can be at the back of this issue is "Secure Boot Disabled" in UEFI firmware settings. It might be possible that this option is disabled in that setting but showing enabled in your Windows. Be mindful that this feature won't work even if you have enabled it technically.
Another common reason is an activation of your system's CSM (Compatibility Support Module). It means that this option is enabled in UEFI settings, which is causing this error. You need to change the settings using some steps that we will discuss later in this blog.
Last but not least, if your BIOS isn't up-to-date, you will face many problems like "secure boot enabled but not active." Due to these reasons, you may be facing such problems and looking for a solution. Remember, whether you have a Dell device or the ASUS device, you may face the same error for these reasons.
Don't forget to share this post if you find it helpful.
How to Fix Secure Boot is Enabled But Not Active
Secure Boot ensures that your system only runs trusted software during startup. This is a requirement for certain modern games, including Battlefield 6, which will not run if Secure Boot is disabled or misconfigured.
The above-mentioned reasons are considered the most common behind this error related to secure boot. So, we have enlisted a few fixtures that can help you in a specific situation regarding them.
Way 1. Enable Secure Boot
The first method we recommend you go with is "Enable Secure Boot." It means that you have to restart your computer and enable this feature manually. Here are the steps that you have to follow in this regard.
Step 1: Go to "Settings" & look for the "System" option.
Step 2: In the "System" tab, click on the "Recovery" option.
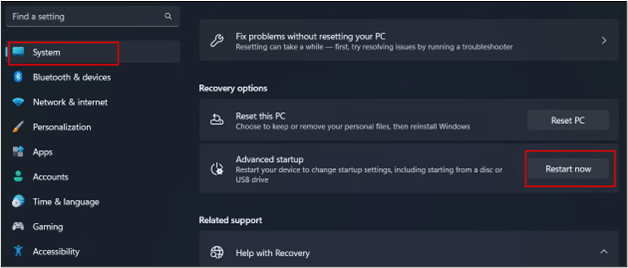
Step 3: Now, choose the "Restart Now" option given beside the "Advanced Startup."
Step 4: In this mode, look for the "Troubleshoot" option and click on it.
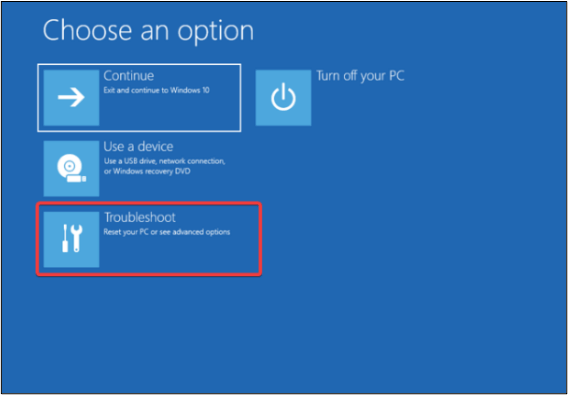
Step 5: Tap on "Advanced Options" and click "Restart" after selecting "UEFI Firmware Settings."
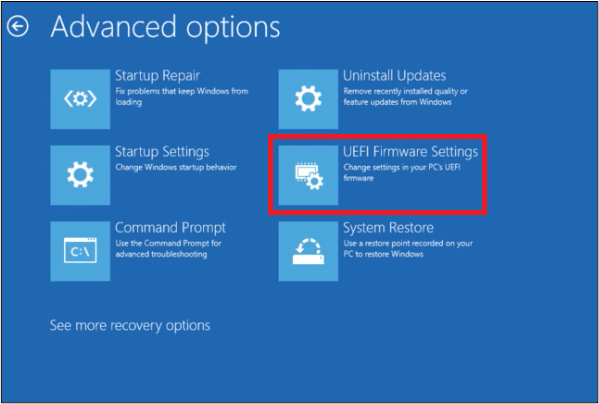
Step 6: The system will boot in UEFI BIOS.
Step 7: Look for "BIOS Setup" and click on it.
Step 8: Now, choose the "Secure Boot" option.
Step 9: Check in the box given beside "Enable Secure Boot."
These are simple steps that you can follow to enable secure boot in your system easily. It will be a simple task if you follow our guide step by step.
Additional Tips for Battlefield 6 Users: Prerequisites for Enabling Secure Boot
Before enabling Secure Boot to play Battlefield 6 smoothly, make sure your PC meets the following requirements:
- UEFI Boot Mode Enabled: Your BIOS/UEFI firmware must be set to UEFI mode, not Legacy/CSM. This is essential for Secure Boot to function.
- TPM 2.0 Enabled: Trusted Platform Module (TPM) version 2.0 must be active on your device. You can check this by typing tpm.msc in the Windows Run dialog.
- System Disk Uses GPT: Secure Boot requires your system disk to be formatted as GPT, not MBR.
If your disk is not MBR, you need to convert MBR to GPT using EaseUS Partition Master. Download it and follow the link to learn how to do that.
If these conditions are not met, Secure Boot cannot be enabled, and Battlefield 6 will continue to display errors. Always double-check these prerequisites in your BIOS and Windows system settings before attempting to enable Secure Boot.
Way 2. Disable Compatibility Support Module
CSM (Compatibility Support Module) is a specific feature that enables a computer system to perform functions seamlessly in case your device doesn't support UEFI settings. But it can be a reason to secure boot enabled but not active in your system.
Here are the steps that you need to follow to disable this setting in your system.
Step 1: Open "Settings" of your system.
Step 2: Look for the "System" option and then "Recovery" under that new tab.
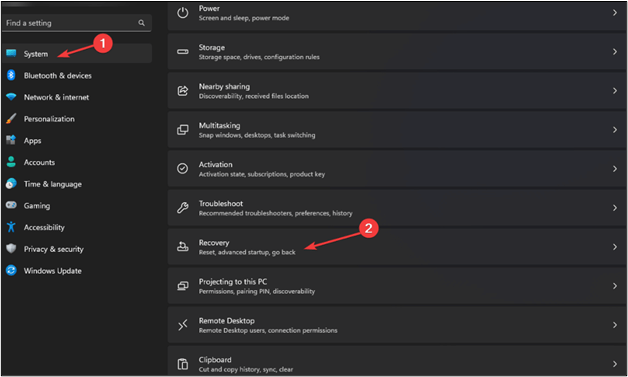
Step 3: Choose the "Restart Now" option given in front of "Advanced Startup."
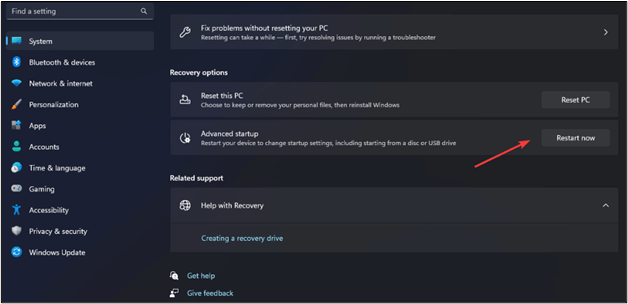
Step 4: Choose "Troubleshoot" from the new screen.
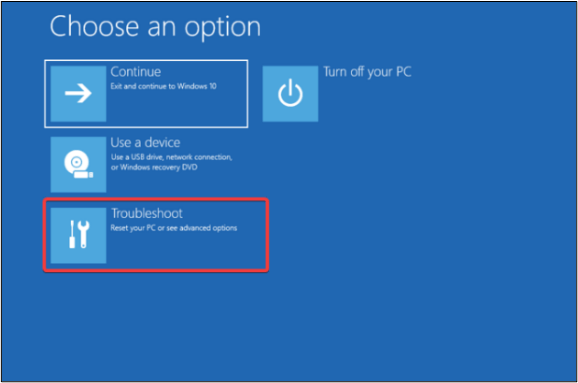
Step 5: Tap on "Advanced Options."
Step 6: Select "UEFI Firmware Settings."
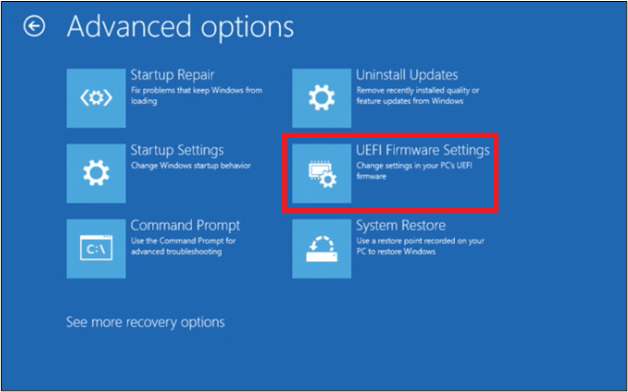
Step 7: Go to "Boot" in BIOS & then open "CSM" settings.
Step 8: Choose the "Disable" option from the list.
Step 9: Click on "Save Changes & Reset".
Restart your computer to check if the issue has been solved or not. It might be possible that you have done with the problem and can use your system seamlessly.
See also:
Way 3. Change Platform
Another effective method to resolve secure boot-related issues is changing the platform. With this, a great chance is that you can fix the secure boot issue. Let's have a look at how you can perform this change in your system.
Step 1: Enter the "BIOS" in your system.
Step 2: Look for "System Mode."
Step 3: If it is set to "Setup", change it to "User."
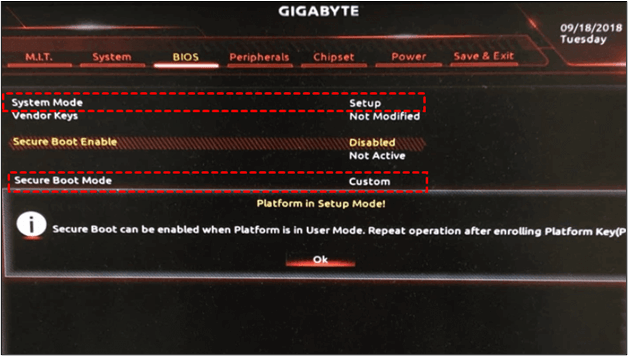
Step 4: Open "Secure Boot Mode" & switch it to "Custom" from "Standard."

Step 5: Again change it to the "Standard" option and accept the "Factory Defaults" option.
Your system will restart, and it will change the platform to resolve this issue. Many users have reported that they have resolved secure boot-related issues just by following this simple method.
Pro Tip: Backup Computer to Avoid Data Loss
The most common result from a secure boot-enabled but not active problem is data loss. It has been seen that users have lost their important data while resetting their devices or changing the platform. You should keep yourself by keeping your data safe in some cloud storage.
For this, you can use EaseUS Todo Backup, which has been designed to keep your data safe in such situations. Using this program, you can easily back up your data regularly. In turn, you will not be worried about your data loss if your system shows any problems.
Secure Download
No doubt, multiple tools are available for this purpose. But we have enlisted some of its features that make it better than other ones.
- Users can easily back up their data regularly with its scheduled backup option
- It keeps your data safe in a cloud-storage to secure it from any unexpected error in your system
- You can back up data or restore it using a few simple options instead of following a complex process
Multiple other features are also available in EaseUS Todo Backup, which makes it better to choose from the others. You can explore those features and back up your files timely by downloading it. It is simple to download and install this toolkit in your system to keep yourself safe.
To Wrap Things Up
In the above guide, we have told you how to resolve the problem of secure boot enabled but not active. You can try all those methods one by one to check which works to solve the issue. But we recommend you use EaseUS Todo Backup to keep your data safe.
It will enable you to backup and restore every file and save it in storage outside of your system. So, you can easily start the procedure from the above list without fear of losing data.
Secure Download
FAQs on Secure Boot Enabled But Not Active
1. How to fix Secure Boot enabled in BIOS but not Windows 11?
If you are unable to enter Windows 11, you can still fix the secure boot-enabled problem through BIOS. Here are the steps that you have to follow in this regard.
- Enter "BIOS" settings using specific keys (check your system's manual to learn about keys)
- Disable "Fast Boot" settings through this option
- Save "Factory Defaults" to change the settings to the previous ones when the system was released by the manufacturer
2. Why is Secure Boot not showing in BIOS?
Your system might be using outdated UEFI firmware that doesn't support a secure boot option. Also, it might be possible that this option isn't enabled in UEFI firmware settings. If any of these issues are there in your system, you will not be able to see the secure boot option in BIOS.
3. How do I enable Secure Boot without BIOS?
You can enable the secure boot option without BIOS through Windows. Here are the steps that you have to follow in this regard.
- Press "ctrl" + "R" to open the "Run" dialogue box
- Enter "msinfo32" in that box
- If it reads "off", enable the secure boot option from BIOS
4. What happens if I enable Secure Boot in BIOS?
It will keep your system safe from any unauthorized application installation. Every time you download and run a file, it will verify the digital signature before allowing you to go ahead. In turn, you can easily learn which program is safe and which can be corrupted.
Was This Page Helpful?
Sherly joined EaseUS in 2022 and she has always loved writing articles and enjoys the fun they bring. She receives professional training here, focusing on product performance and other relative knowledge. She has written over 200 articles to help people overcome computing issues.
Written by Jerry
"I hope my articles can help solve your technical problems. If you are interested in other articles, you can check the articles at the bottom of this page, and you can also check my Facebook to get additional help."
Related Articles
-
PS4 Internal Hard Drive Format: What Is the Best & How to Format [Full Guide]
![author icon]() Cici/2025-08-03
Cici/2025-08-03 -
How to Enable and Disable Airplane Mode on Windows
![author icon]() Daisy/2025-07-04
Daisy/2025-07-04 -
How to Mirror a Hard Drive in Windows 10 [step by step]
![author icon]() Tracy King/2025-07-04
Tracy King/2025-07-04 -
[Quickly & Easily] How to Update BIOS with USB in 2025
![author icon]() Jerry/2025-07-04
Jerry/2025-07-04
EaseUS Data Recovery Services
EaseUS data recovery experts have uneaqualed expertise to repair disks/systems and salvage data from all devices like RAID, HDD, SSD, USB, etc.