What Is Secure Boot & How It Works
Secure Boot is a safety feature developed by PC manufacturers to boot computers only with trusted software. It was initially introduced in Windows 8, followed by all the latest versions.
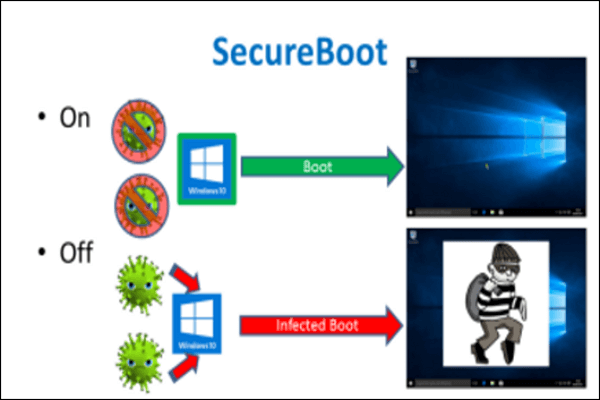
The fundamental purpose of a secure boot is to protect your computer from all types of malware. During secure boot, when a system restarts, the firmware examines the signatures of each part of the boot software (firmware drivers, operating system, EFI Application, etc.). If the signatures are satisfactory, the firmware controls the operating system, and the computer reboots.
What Happens If I Enable/Disable Secure Boot
Since the Secure Boot is a protection mechanism, enabling a Secure Boot keeps your PC safe from all malware attacks. Some malware packs load as soon as you start your PC. They are called Rootkits. Rootkits can save passwords, login details, and keystrokes, transfer sensitive files, and capture cryptographic data. For data security, optimal speed, and smooth operation, it is vital to enable the secure boot.
However, if you want to use previous Windows, certain graphic cards, and unauthorized software, the secure boot should be disabled. After disabling secure boot, the PC doesn't check the digital signature of the operating system. So, you can perform the following actions:
- Booting Windows with an external hard drive or USB.
- Dual Booting like Windows with Linux or Fedora.
- Booting with Windows password recovery tools.
- Operating previous Windows Versions.
In short, enabling and disabling secure boot depends upon your requirement. If you want maximum security, you should allow it to. If you wish to use extravagant third-party apps, you can disable Secure Boot.
How to Enable/Disable Secure Boot on your Computer
So far, we have explained what Secure Boot is and what happens when you enable/disable it. This section presents a step-by-step guide to enable/disable secure boot on your computer.
How to Enable Secure Boot
Before enabling Secure Boot, ensure your system has a Windows 8 or above operating system, the latest UFI, and necessary firmware options.
After that, follow these steps to enable Secure Boot on your PC.
Step 1. Remove operating systems, software, and graphic cards incompatible with Secure Boot.
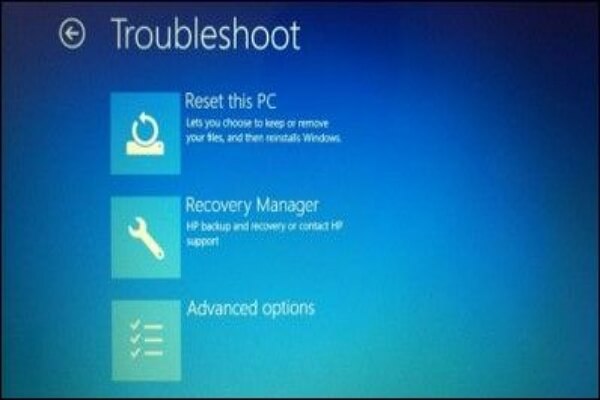
Step 2. Go to the PC BIOS Menu. For that, Press and hold the shift key and select "Restart." After that, go to Troubleshoot > Advanced Options.
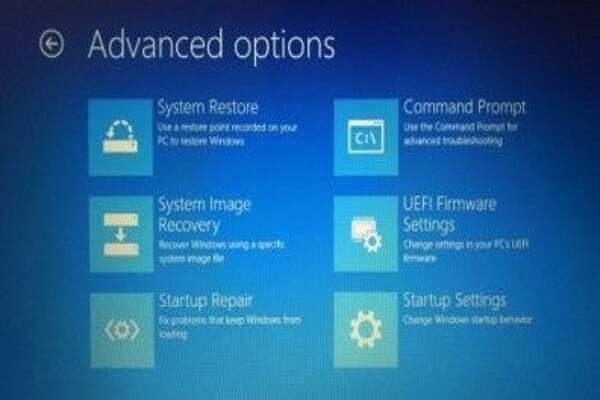
Step 3. In the advanced options menu, select "UEFI Firmware Settings."
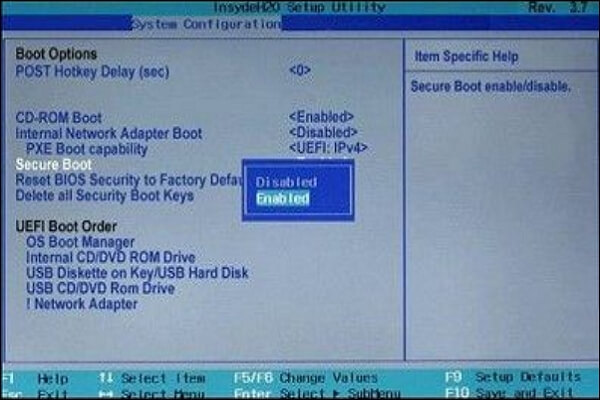
Step 4. Go to the "Secure Boot Settings" option and set it to "Enabled." The choice is usually available in either the Boot Tab or the Security tab.
Step 5. Exit the menu after saving these changes. You can now boot to any media supporting secure boot. You can also install a new operating system. However, the Windows partition storage type will be GPT Partitions instead of mbr.
Step 6. After installing the operating system, you can cross-check the enabling of Secure Boot. To do that, type "msinfo32.exe" in the open box and check the status of the Secure Boot state. It says "On," which means the Secure Boot is enabled.
How to Disable Secure Boot
If your PC doesn't allow third-party software, that means Secure Boot mode is functional. You can follow these steps to disable it.
Step 1. Before disabling, check the latest updates of the Secure Boot system. It will show an updated list of software, graphic cards, etc., compatible with your computer. This will let you know whether disabling is required or not.
Step 2. Once again, open the BIOS Menu. From Windows, hold the Shift key while selecting Restart. Go to Troubleshoot > Advanced Options.
Step 3. From the advanced options, go to "UEFI Firmware Settings."
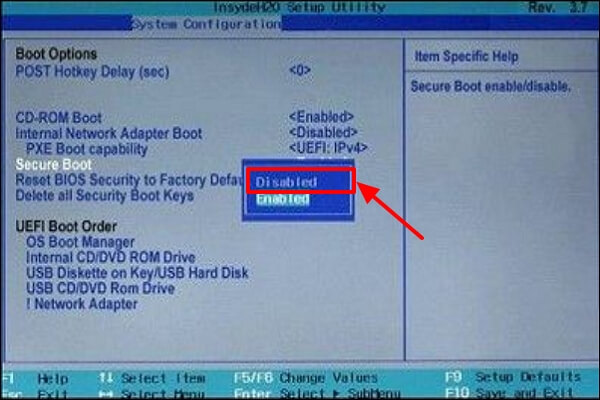
Step 4. Locate the "Secure Boot" option in the available menu. After that, set it to "Disabled." In some systems, it is available in the Boot or Security tab.
Step 5. Save changes and reboot your PC.
Step 6. Install any unauthorized operating system or graphic card in your system. If it runs successfully, the disabling is successful.
Using Professional Backup Software to Protect Computer Data
Secure Boot is an important security feature that keeps malicious software from loading when your PC starts up (boots). Most computers are capable of Secure Boot, but in some cases, settings may cause the computer to appear incapable of Secure Boot.
At this time, to protect your data on the computer from malicious software, you can turn to professional backup software, such as EaseUS Todo Backup, for help. It can provide a safe and reliable backup of your data.
Secure Download
EaseUS Todo Backup Home is a practical backup utility for Windows 11/10/8/7. It lets you automatically back up systems, disks, partitions, files, etc., and create various types of backups. Besides you can also use it to create an iso image from your operating system or hard drive. The award-winning software preserves your data from all malicious attacks. With this protection in place, you don't have to worry about losing your data during any system startup.
You can perform the following steps to create a system backup of your computer.
Step 1. Launch EaseUS Todo Backup on your computer, and click Create Backup on the home screen and then hit the big question mark to select backup contents.

Step 2. To back up your Windows operating system, click "OS" to begin the backup task.

Step 3. Your Windows operating system information and all system related files and partitions will be automatically selected so you don't need to do any manual selection at this step. Next, you'll need to choose a location to save the system image backup by clicking the illustrated area.

Step 4. The backup location can be another local drive on your computer, an external hard drive, network, cloud or NAS. Generally, we recommend you use an external physical drive or cloud to preserve the system backup files.

Step 5. Customiztion settings like enabling an automatic backup schedule in daily, weekly, monthly, or upon an event, and making a differential and incremental backup are available in the Options button if you're interested. Click "Backup Now", and the Windows system backup process will begin. The completed backup task will display on the left side in a card style.

The Bottom Line
SecureBoot is an advanced security feature that works as a wall against malware. It helps improve the speed, performance, and efficiency of your PC. The system works for Windows 8 or above. However, when you need to run previous Windows or unauthorized apps and graphic cards, you must disable them.
This article provides a step-by-step guide on how to enable and disable Secure Boot. So that you can use the feature as per your requirement, give it a read and let us know your views about this software.
Secure Download
FAQs
1. What is the disadvantage of Secure Boot?
Since Secure Boot is only compatible with Windows 8 or above, you can't use previous Windows versions with this. Plus, it blocks unlicensed software, which sometimes is required to get the job done. It also stops the system from accepting certain graphic cards, which can hinder running professional software and games.
2. Is Secure Boot UEFI or legacy?
Secure boot only supports the operating system with the latest UFI native boot. The legacy boot is a fundamental input/output system (BIOS) firmware. It doesn't support a Secure Boot.
3. Does Windows 10 require UEFI Secure Boot?
Microsoft wants PC Manufacturers to enable Secure Boot in the latest systems if they want an official Windows sticker and certification. However, old systems can upgrade to Windows 10 without UEFI Secure Boot.
4. Is Secure Boot mandatory?
Nope, it's a choice. You can enable or disable it as per your requirement. The operating system will work fine without it.
Was This Page Helpful?
Daisy is the Senior editor of the writing team for EaseUS. She has been working at EaseUS for over ten years, starting as a technical writer and moving on to being a team leader of the content group. As a professional author for over ten years, she writes a lot to help people overcome their tech troubles.
Written by Jerry
"I hope my articles can help solve your technical problems. If you are interested in other articles, you can check the articles at the bottom of this page, and you can also check my Facebook to get additional help."
Related Articles
-
[Solved!] Can't Sign into iMessage on Mac? 8 Solutions Here
![author icon]() Brithny/2024-10-30
Brithny/2024-10-30 -
How to Get BitLocker Recovery Key with Key ID [Full Guide]
![author icon]() Finley/2024-11-27
Finley/2024-11-27 -
How to Resolve "Outlook Cannot Connect to Server" Error
![author icon]() Daisy/2024-01-11
Daisy/2024-01-11 -
Access Denied When Copying Files Windows 10/8/7
![author icon]() Brithny/2024-08-23
Brithny/2024-08-23

EaseUS Data Recovery Services
EaseUS data recovery experts have uneaqualed expertise to repair disks/systems and salvage data from all devices like RAID, HDD, SSD, USB, etc.