| Workable Solutions | Step-by-step Troubleshooting |
|---|---|
| Fix 1. Encrypt Hard Drive on Mac with FileVault | Go to the Apple Menu. Select "System Settings".Move to the sidebar and press the Privacy...Full steps |
| Fix 2. Use Disk Utility to Format and Encrypt Hard Drive on Mac | Go to the Disk Utility app on the Mac or boot Mac into Disk Utility. From the sidebar, choose...Full steps |
| Fix 3. Recover Data from an Encrypted Hard Drive with Software | One of the most professional and reliable recovery programs you can choose is...Full steps |
Why Need to Encrypt Hard Drive on Mac
Are you worried about valuable data being stolen from your hard drive on your Mac? It is especially applicable for professionals storing sensitive information on the system. It would help if you had it to protect these files from being copied or viewed. For instance, if you have your company's financial data on your Mac, anyone else accessing this sensitive information can cause damage to the company.
In that case, Encrypting and protecting a storage device is the only solution ahead. That way, the data present on the hard drive cannot be read by unauthorized people. Anyone viewing the data must access the given password or key. The best part is that you can encrypt a hard drive on Mac without formatting as a necessary security measure to combat cyber-attacks.
This post will delve deep into hard drive encryption on Mac.
Fix 1. How to Encrypt Hard Drive on Mac with FileVault
Are you looking for ways to encrypt your hard drive on the Mac? One of the best solutions to enforce privacy and security on your hard drive is via the FileVault feature. With the FileVault full-disk encryption feature, one can utilize the XTS-AES-128 encryption with a 256-bit key. That way, you can combat unauthorized access to the data present on the disk.
Take a look at these steps to implement FileVault hard drive encryption.
For macOS Ventura and later versions:
Step 1. Go to the Apple Menu. Select "System Settings".

Step 2. Move to the sidebar and press the Privacy & Security option.
Step 3. Scroll down till you find the FileVault section.
Step 4. You need to click the "Turn On" button.
For macOS versions earlier than Ventura:
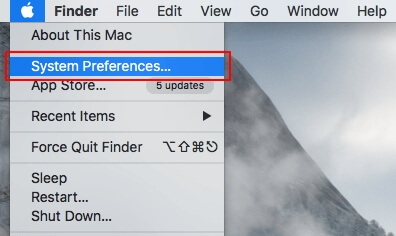
Step 1. Go to the Apple Menu.
Step 2. Click on "System Preferences".
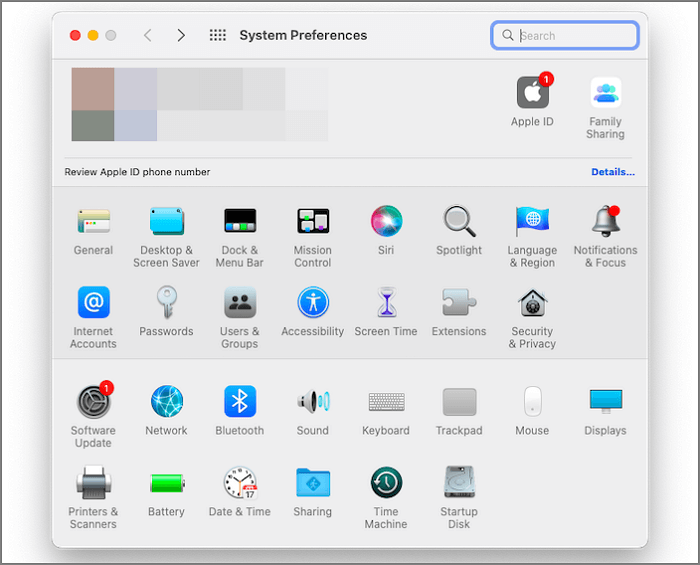
Step 3. Select "Security & Privacy".
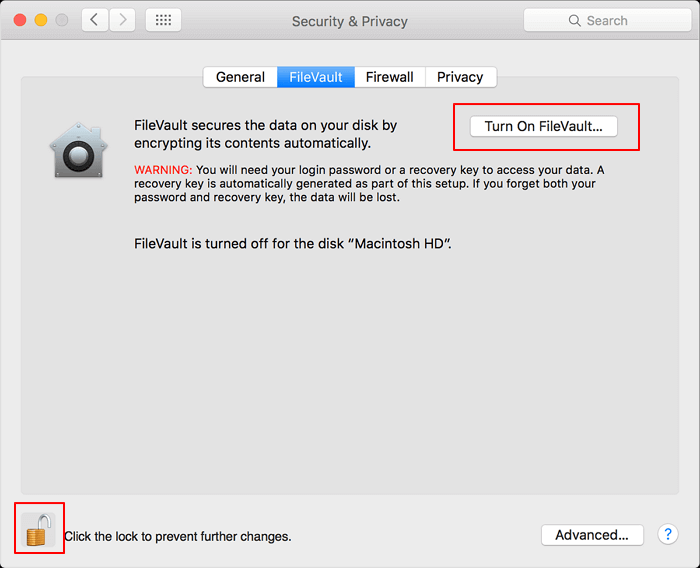
Step 4. Go to the FileVault tab. Now, select the "lock" icon.
Step 5. You need to enter the administrator's name and password.
Step 6. After that, you can select the "Turn on FileVault" option.
Fix 2. Use Disk Utility to Format and Encrypt Hard Drive on Mac
Another solution you can opt to encrypt the hard drive on your Mac is Mac Disk Utility. Using this tool, users can password-protect a particular storage device. If the storage device is internal, you must type the password to access the information. External devices need to be connected to the system, and a password must be entered for data access.
It is vital to know that if you want to use Disk Utility to encrypt the device, you will need to erase it. For that, copying the crucial information to another device is the ideal solution. Now, you can move ahead with the encryption.
Another thing one needs to know is that Disk Utility supports three distinct file system formats. These are:
- ExFAT and MS-DOS (FAT) for file systems that are Windows-compatible.
- Mac OS Extended for file systems with macOS 10.12 or earlier.
- Apple File System (APFS) for file systems with macOS 10.13 or later.
Here are the steps you need to follow:
Step 1. Go to the Disk Utility app on the Mac or boot Mac into Disk Utility.
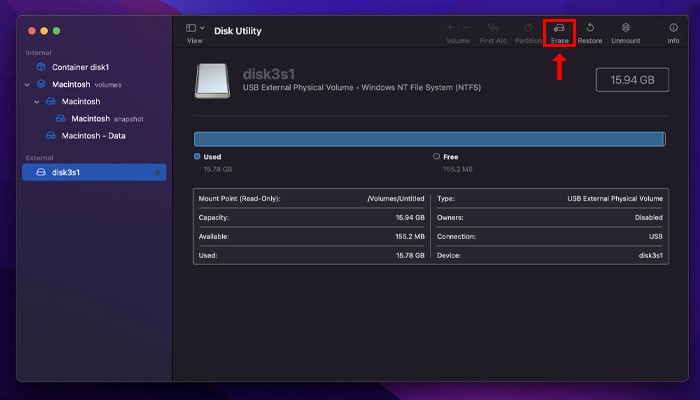
Step 2. From the sidebar, choose the storage device you wish to encrypt from the sidebar.
Step 3. Now, select the "Erase" button present in the toolbar.
Step 4. Type the name you want for the volume. Go to the Scheme pop-up menu. Now, select "GUID Partition Map".
Step 5. Go to the Format pop-up menu.
Step 6. You will need to choose the type of system format you want. Please enter the password and verify it. Click "Choose".
Step 7. Select Erase button. Click "Done."
Note: Sometimes, you can encounter the Security Options after the password step. Here, you can determine the number of times one can write over the data erased. To confirm the action, select "OK." Remember that the Secure erase options are unavailable for all storage devices. If the Security Options button is not present, you cannot use the Disk Utility to implement secure erase on the device.
Recover Data from an Encrypted Hard Drive on Mac with Software
Has the decryption of the hard drive caused a loss of critical data? Or have you lost essential data after formatting the hard drive? That is a valid cause for panic! Losing precious information is never easy. However, instead of having a nervous breakdown, take a deep breath.
There are software solutions available that can help you recover formatted hard drives on Mac. One of the most professional and reliable recovery programs you can choose is the EaseUS Data Recovery Wizard for Mac. The tool is an efficient recovery software capable of restoring lost information, irrespective of the scenario.
- For instance, you can recover deleted files Mac after decryption. Moreover, you can also recover files after format. Other situations include virus attacks, partition loss, damage to the hard drive, operation error, repartition, system crash, and more!
- You can use the EaseUS Data Recovery Wizard for Mac to restore from various devices. These include MacBooks, hard drives, cameras, USB Flash drives, memory cards, etc. You can also restore different data types, such as photos, documents, videos, audio, etc.
- Apart from that, the tool offers a wide array of advanced recovery features. You can restore the data retrieved to cloud storage such as Google Drive, Dropbox, and more!
Besides, EaseUS Data Recovery Wizard for Mac is easy to use and aids in recovering lost files quickly. In case you encounter problems, you can always get in touch with the IT support team. They are ready to offer assistance whenever you want.
Do you want to know how to use EaseUS Data Recovery Wizard for Mac? Follow these easy steps and start using the tool right away!
Step 1. Search for lost files
Select the disk location to search for lost files (it can be an internal HDD/SSD or a removable storage device) on macOS Sierra, High Sierra, Mojave, Catalina, Big Sur, Monterey, Ventura, and the latest Sonoma. Click the "Search for lost files" button.

Step 2. Go through the scanning results
EaseUS Data Recovery Wizard for Mac will immediately scan your selected disk volume and display the scanning results.

Step 3. Select the file(s) and recover
In the scan results, select the file(s) to preview and click the "Recover" button to have them back.

Summary
Losing valuable information from your hard drive is a frightening scenario. That is why encrypting the hard drive is a must. You need to take active steps to protect and safeguard the data. For this, you can opt for two solutions– FileVault and Disk Utility.
However, if you still face data loss after decrypting or hard drive formatting, don't worry! It would be best if you opted for a reliable data recovery tool. For that, you can choose EaseUS Data Recovery Wizard for Mac. It is a professional, reliable, easy-to-use recovery software solution for Mac users.
You can use the software solution to recover different types of data. Moreover, it is not limited to recovering data from the hard drive. So, what are you waiting for? Download EaseUS Data Recovery Wizard for Mac and start using it today!
Encrypt Hard Drive on Mac FAQs
Encrypting the hard drive on Mac is an excellent solution to protecting the privacy of the data. Take a look at these questions and answers listed below:
1. How do I unlock my encrypted hard drive on a Mac?
To unlock the encrypted hard drive on a Mac, you need to enter the macOS Recovery mode. After that, go to the Disk Utility and select the "Continue" button. Now, choose the desired startup disk and click on "Mount". You need to enter the recovery password and select the "Unlock" option.
2. Can I recover data from a formatted hard drive on Mac?
Yes, you can recover data from formatted Mac hard drive with data recovery software. However, you need to understand that if the new data overwrite the lost files, the data cannot be restored. You can use professional data recovery software to restore data from the formatted hard drive. For this, you can choose EaseUS Data Recovery Wizard for Mac.
- 1. Scan the target hard drive that you have formatted.
- 2. Filter and select the lost files that you want to recover.
- 3. Retrieve the target files by clicking the "Recover" icon.
3. How to encrypt a hard drive on Mac without FileVault?
To encrypt a hard drive on Mac without FileVault, go to Finder. Now, right-click the drive you want to encrypt from the sidebar on Finder. Click on the Encrypt button and enter the password. Finally, select the "Encrypt Disk" button. And you can also encrypt the Mac hard drive with Disk Utility.
4. Does encrypting a hard drive on Mac delete everything?
No, encrypting a hard drive on Mac doesn't need to delete everything. You can save data from being erased by going to FileVault and turning it on.
Was This Page Helpful?
Dany is an editor of EaseUS who lives and works in Chengdu, China. She focuses on writing articles about data recovery on Mac devices and PCs. She is devoted to improving her writing skills and enriching her professional knowledge. Dany also enjoys reading detective novels in her spare time.
Related Articles
-
How to Check RAM Health with Windows Memory Diagnostic Tool [Full Guide in 2024]
![author icon]() Daisy/2024-01-11
Daisy/2024-01-11 -
Can't Read From the Source File or Disk? Find Your Solutions Here
![author icon]() Tracy King/2024-01-11
Tracy King/2024-01-11 -
External Hard Drive Heating Up: Everything You Should Know
![author icon]() Cici/2024-10-25
Cici/2024-10-25 -
Bypass “Administrator Blocked You From Running This App” in Windows 10 [Full Information]
![author icon]() Daisy/2024-01-11
Daisy/2024-01-11

EaseUS Data Recovery Services
EaseUS data recovery experts have uneaqualed expertise to repair disks/systems and salvage data from all devices like RAID, HDD, SSD, USB, etc.