Adding new software can greatly enhance your experience when it comes to Mac computing. When it comes to Python programming, Pip plays a crucial role by offering access to a vast array of additional features. The Python Software Foundation recommends using this tool to install Python apps. It links to the Python Package Index, an online collection of publicly available packages. Pip is installed by default in Python 3.4 and later. Rest assured, Mac Pip installation is simple.
You can easily follow along and install Pip on Mac with our step-by-step guide. Data security is crucial during software installation. If you mistakenly erase crucial data, EaseUS Data Recovery Wizard for Mac can help.
| Workable Solutions | Step-by-step Troubleshooting |
|---|---|
| Fix 1. How to Install Pip on Mac with Ensurepip | Open Terminal on the Mac. You can find it in the Launchpad or by searching for "Terminal."...Full steps |
| Fix 2. Install Pip on Mac with Homebrew | Launch the Terminal application from Utilities within Applications. Since Homebrew manages...Full steps |
| Fix 3. Install Pip on Mac with Get-Pip | Launch the Terminal application from Utilities within Applications. Download the script via curl. Type...Full steps |
| How to Uninstall Pip on Mac | Enter the following pip command: Python -m pip uninstall Pip. When asked, begin the removal...Full steps |
Let's begin by giving you the whole experience here.
Fix 1. How to Install Pip on Mac with Ensurepip
Starting from Python version 3.4, Python includes the Ensurepip module, which allows you to install Pip without relying on external commands or an internet connection. This module supports bootstrapping Pip into an existing Python installation. It is usually considered the safest and ideal method to install Pip on a Mac. Here are the steps to install Pip on Mac using Ensurepip:
Step 1. Open Terminal on the Mac. You can find it in the Launchpad or by searching for "Terminal."
Step 2. In the Terminal, type either of the following commands (depending on your Python version):
For Python 3: python3 -m ensurepip
For Python 2 (if you have it installed): python -m ensurepip
Step 3. Press Enter. The output will confirm that the installation was successful.
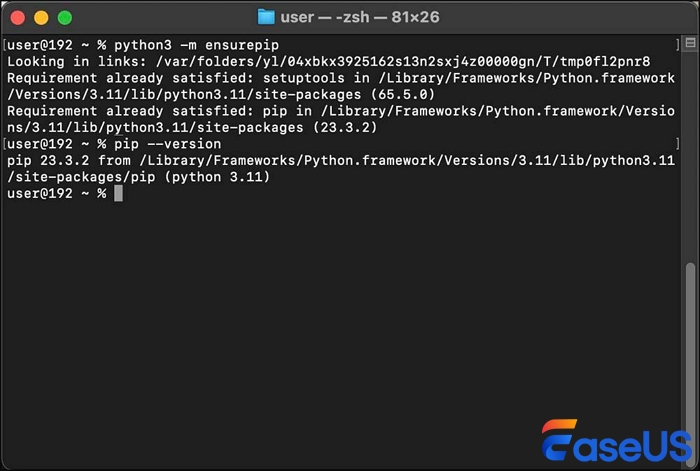
Step 4. To verify that Pip is correctly installed, check the pip version: Type: Pip --version (or pip3 --version for Python 3). If you have Python 2.7, use Python -m ensurepip instead. This command should display the installed pip version, indicating successful installation.
If you encounter Pip errors, check the following passage to fix the problem:

Zsh: Command Not Found: Pip Error
Are you wondering how to fix the zsh: command not found: pip error? This article has explained the top 4 methods to solve zsh: command not found: pip error. Read more >>
Fix 2. Install Pip on Mac with Homebrew
Mac users may install Pip using Homebrew, an open-source package manager. Install Homebrew first. Follow the steps below:
Step 1. Launch the Terminal application from Utilities within Applications.
Step 2. Since Homebrew manages Python installation alongside Pip, we'll install both together. Enter the following command: brew install Python. This installs the latest macOS Sonoma Python (including Pip) on your device.
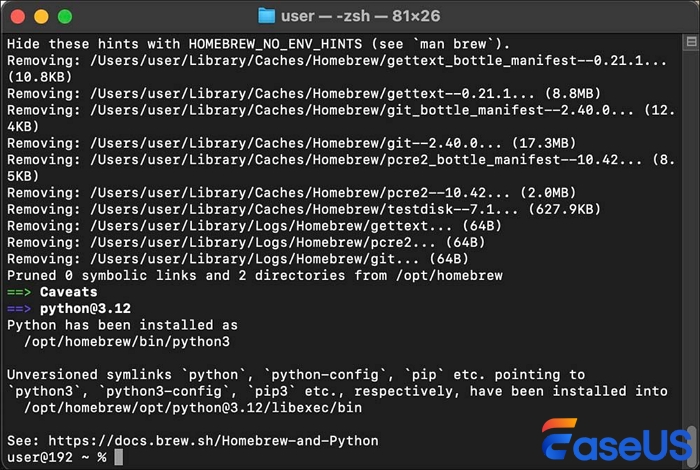
Step 3. Homebrew might not automatically set Python as the default executable in some cases. To ensure you're using the Homebrew-installed Python and Pip, run the following commands (press Enter after each): brew unlink python && brew link python.
Step 4. Now, let's confirm Pip's installation. Type the following command and press Enter: pip –version. This should display the installed pip version, indicating successful installation.
| Note: If you want to upgrade Python later, use the following command: brew upgrade python. This will update Python and automatically relink the necessary components. Or you can fix the brew issues first when you encounter zsh command not found brew. |
Fix 3. Install Pip on Mac with Get-Pip
While Ensurepip is the preferred method, many also use the get-pip script for Mac. This method works only with Python 3 versions. Internet script downloads and runs pose security threats. Visit https://bootstrap.pypa.io/get-pip.py to get it officially. Here's how to install Pip using the get-pip.py script:
Step 1. Launch the Terminal application from Utilities within Applications.
Step 2. Download the script via curl. Type curl and click Enter: curl https://bootstrap.pypa.io/get-pip.py -o get-pip.py.
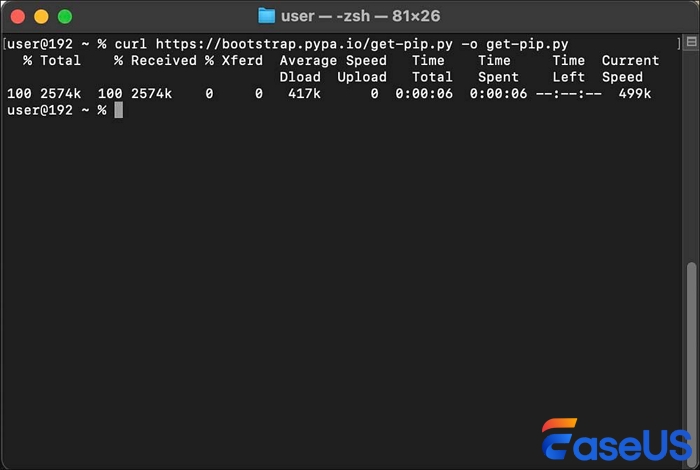
| Note: This downloads and saves the script as get-pip.py in your current directory. |
Step 3. Execute the downloaded script using the python3 command. Enter the following command: Python3 get-pip.py.
Note: Use the python3 --version in the Terminal to verify your Python version. Python 2.7 users cannot utilize this function.
Step 4. The script will download and install Pip. You might encounter permission prompts during the process. Follow the on-screen instructions to grant necessary permissions. Once the process finishes, type the following command and press Enter to confirm Pip's installation: pip –version.
You can share these three methods on social media to help more Mac users install Pip!
How to Uninstall Pip on Mac
Sometimes, Mac users want to uninstall Pip from their devices. Here's how you can do that:
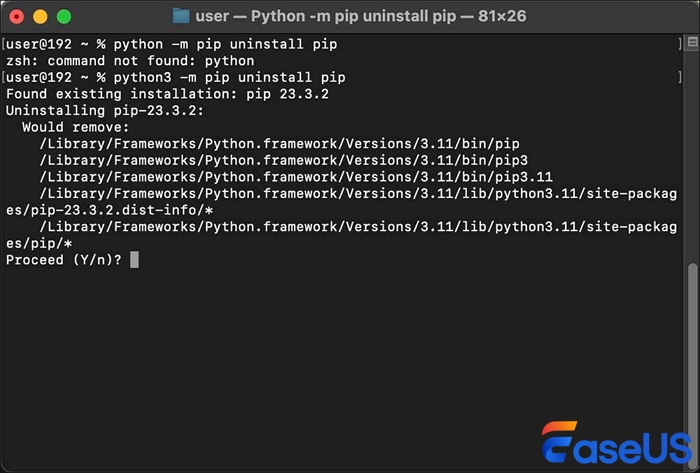
Step 1. Enter the following pip command: Python -m pip uninstall Pip.
Step 2. When asked, begin the removal by entering Y and hitting Enter. The result indicates the successful uninstallation of Pip.
The dependable and effective EaseUS Data Recovery Wizard for Mac can recover your vital files after unintentional deletion, formatting, or other Pip installation data loss. Its simple UI and sophisticated scanning capabilities make Mac data recovery easy.
If you mistakenly erased information when installing Pip or lost data for other causes, this program can recover documents, images, movies, music files, and more.
EaseUS Data Recovery Wizard for Mac supports internal and external hard disks, SSDs, USB drives, memory cards, and digital cameras. It can recover lost data from several sources, meeting all your data recovery requirements.
To Wrap Up
We covered how to install Pip on Mac via Ensurzip, Get-Pip, and Homebrew and how to uninstall it. We discussed the need for data protection during program installations and the EaseUS Data Recovery Wizard for Mac in case of data loss. Users can safely install Pip using EaseUS and these methods, knowing they can restore vital data if needed.
Mac Pip Installation FAQs
Here're some of the most asked questions on how to install pip on Mac:
1. How do I know if the Pip is installed on my Mac?
This command may be used to verify if Pip is appropriately installed on your Mac. Use these methods to verify your Pip version on a Mac. Launch the Terminal application. Type pip -version into the Terminal and hit Enter.
2. Can I install Pip on a MacBook?
Yes, you can install Pip on a MacBook. Pip, the Python package manager, is compatible with macOS. It can be installed using tools like Ensurezip and Get-Pip or package managers like Homebrew.
3. Why is the Pip install not working on macOS Sonoma?
Typical causes include incorrect Pip or Python installation. Verify that Pip and Python are installed appropriately. This may be verified by executing Pip or Python on your terminal or command prompt and seeing whether they are recognized as commands.
Was This Page Helpful?
Dany is an editor of EaseUS who lives and works in Chengdu, China. She focuses on writing articles about data recovery on Mac devices and PCs. She is devoted to improving her writing skills and enriching her professional knowledge. Dany also enjoys reading detective novels in her spare time.
Related Articles
-
How to Use Fdisk Format Partition in Linux [2024 Ultimate Guide]
![author icon]() Cici/2024-01-11
Cici/2024-01-11 -
How to Install Windows 10 on New PC [Step-by-Step Guide]
![author icon]() Jean/2024-05-31
Jean/2024-05-31 -
What Is the Best GoPro SD Card Format? [Best Choice and Tutorial Guide]
![author icon]() Cici/2024-07-01
Cici/2024-07-01 -
Google Chrome Sync Keeps Pausing? Find Fixes Here
![author icon]() Larissa/2024-01-11
Larissa/2024-01-11

EaseUS Data Recovery Services
EaseUS data recovery experts have uneaqualed expertise to repair disks/systems and salvage data from all devices like RAID, HDD, SSD, USB, etc.