You might seek need to boot up your Mac with a USB drive to get around the problem and find the solution to it without seeking any external help. What if you cannot format USB on Mac? Although it sounds frustrating, we will help you resolve the issue of erasing the USB drive on your Mac.
Once you go through the details of the article, you will figure out a probable solution to this "can't erase USB drive on Mac" error. This is quite helpful and necessary to format USB drive to FAT32 or exFAT on Mac, and you can also discover internal issues with your Mac without any hindrance from USB drives.
Why Can't Erase USB Drive on Mac?
To start with the discussion, we shall first review some important reasons that explain the problem of "can't erase USB drive on Mac." While this error can be quite frustrating, going to the root of it is important. Thus, we will first look into the reasons for the "Error Process Has Failed" status error across the Mac:
- The disk being erased is badly damaged.
- You might discover that the disk you are trying to erase is not even mounted.
- It might be the startup disk that you are trying to erase.
- The Mac might undergo some virus or malware attacks.
- There might be some unexpected termination of system files which will halt the formatting process.
How to Fix "Can't Erase USB Drive on Mac?" [10 Solutions]
As you have looked into the probable reasons for "can't erase USB drive on Mac," it is now time to go through the solutions that can be tried across the Mac. The solutions that can be used to fix the problem will allow you to format your USB drive and proceed with your respective task. Let's find out how you can do this effectively:
1. Run Disk Utility First Aid
Since you are using Disk Utility to format your USB drive on Mac, the first thing to resolve the issues with your USB drive is to run the "First Aid" feature across the respective drive. To perform this process, you should follow the steps as defined below:
Step 1: Hover across "Applications" from Finder on your Mac and find "Disk Utility"in the list across the "Utilities" folder. Launch it and select the USB drive that you want to erase.
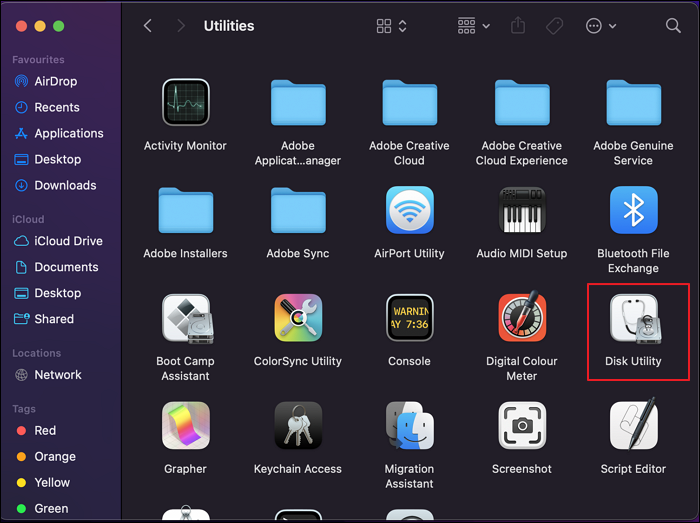
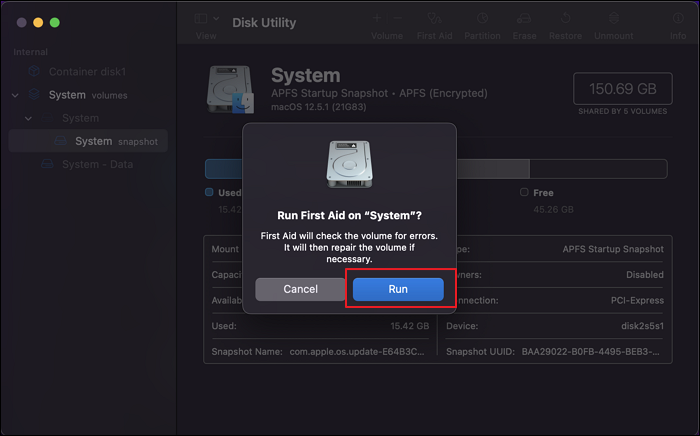
Step 2: As you select the drive, find the "First Aid" button on the top toolbar. A pop-up opens up asking for confirmation of the process. Click "Run" to start the First Aid of the drive to locate the problems across it. On detecting errors, it will repair all problems under a defined time based majorly on the size of the drive.
Notice: It doesn't matter if you accidentally erased hard drive in Disk Utility, you can turn to reliable data recovery software like EaseUS Data Recovery Wizard for Mac to fully restore the lost files.
3. Get Permission to Erase USB on Mac
If you can't erase the USB drive on Mac, it is also possible that you don't have enough permissions. When you don't have enough permission, you need to get permission to erase USB on Mac. Below is a simple step-by-step procedure.
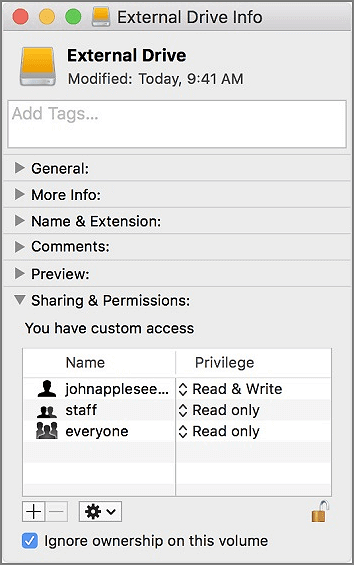
Step 1. Click the USB drive and select "Get Info".
Step 2. Expand the "Sharing and Permissions", and lock to authenticate.
Step 3. Choose "Ignore ownership on this volume".
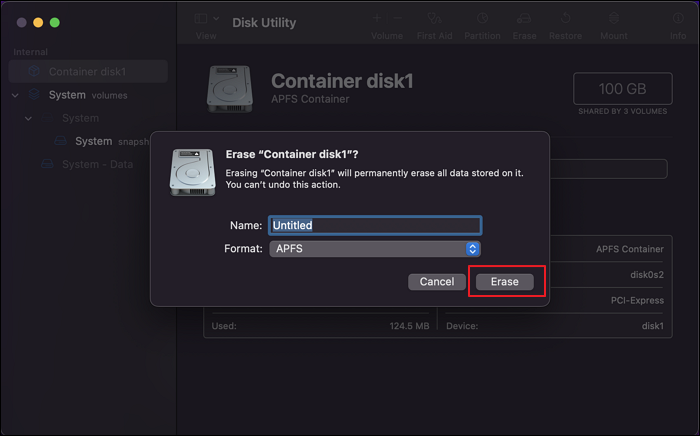
3. Erase Selected Volumes
If you can't erase the USB drive on Mac, you need to have a proper flow of executing this task. Try erasing the selected volume across your Mac with the help of Disk Utility. To do this, look into the simple steps featured below:
Step 1: Launch Finder on your Mac and proceed to the "Applications" tab. Locate "Disk Utility" in the list of applications within the "Utilities" folder and launch it on a new window.
Step 2: As it opens up, you need to look for the respective USB drive on the left panel of the window. On selecting it, lead to the toolbar on the top on the other side of the window. Click on the "Erase" button present within the list to launch a new pop-up window.
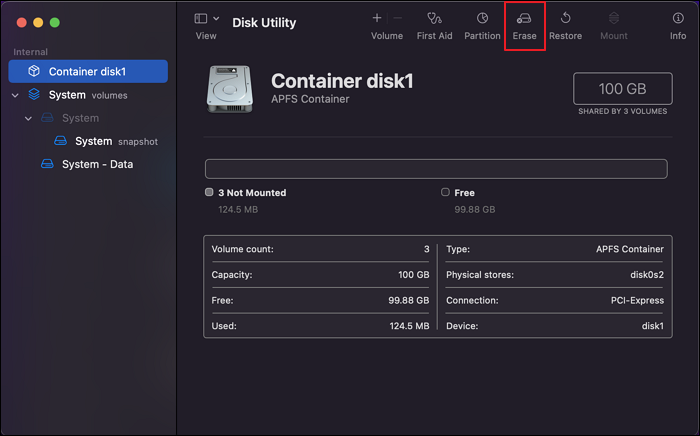
Step 3: Set the "Name" and "Format" of the drive after it is erased from Mac. On setting these parameters, click on "Erase" to execute the process.
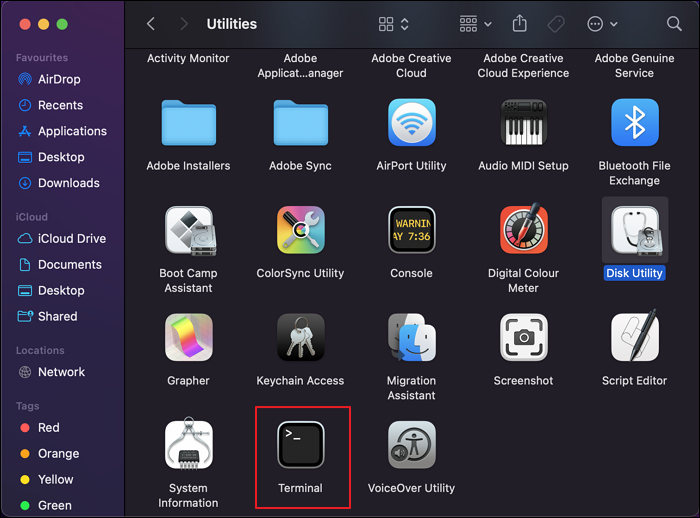
4. Erase USB Drive with Terminal Commands
We have mentioned issues of having an unmounted drive or a problematic USB drive that is not processing properly through the Disk Utility. To counter such problems, you can erase the USB drive with the help of Terminal commands. Let's see how this can be done with ease:
Step 1: Lead into the "Applications" folder from the Finder on your Mac. As you access the applications, find "Terminal" in the "Utilities" folder and launch the command line on your device.
Step 2: You need to enter the following command to list down all drives available across your Mac:
diskutil list
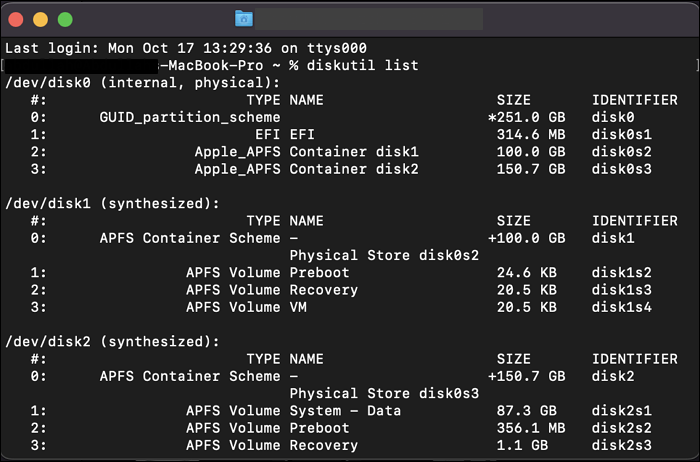
Step 3: Make sure you have noted the "Device Node" that represents the USB drive. Next, use this command line to erase the disk. For this, we will consider formatting the device to the APFS format.
diskutil eraseDisk APFS device node
5. Erase USB Drive in Recovery Mode
Considering you are erasing a drive that is directly related to the startup process of the Mac, you might have to be careful with the process. In such cases, you might have to direct yourselves into the Recovery Mode to erase the USB drive. Before we lead into how you can erase the USB drive in Recovery Mode, let's look into how you can put both types of Mac into Recovery Mode:
For Intel Macs:
Step 1: You need to shut down your Mac and hold the "Command + R" button while you turn it on again.
Step 2: As the Apple logo appears, leave the buttons and type in your username and password. This will help you proceed to the "macOS Utilities" screen.
For Apple Silicon Macs:
Step 1: You must turn off your Mac and hold the Power button when starting it again.
Step 2: Leave the button as you find the "Options" screen appears on the front. Click on it and provide your username credentials to log into the Mac to access the "macOS Utilities" screen.
With the Mac in Recovery Mode, you will now have to follow these simple steps to erase the USB drive:
Step 1: In the "macOS Utilities" window, find Disk Utility and launch it. As it opens, select the USB drive volume you want to erase.
Step 2: Select the "Erase" button and follow the on-screen instructions to format it. Quit Disk Utility and restart your Mac to get it out of the Recovery Mode.
6. Reboot Mac in Safe Mode
The issue might involve the macOS itself, which needs to be troubleshot properly. In such cases, you can access the option of using Safe Mode for rebooting your Mac properly. This might exempt all prevailing problems across Mac, which also includes issues of malware and viruses.
For Intel Macs:
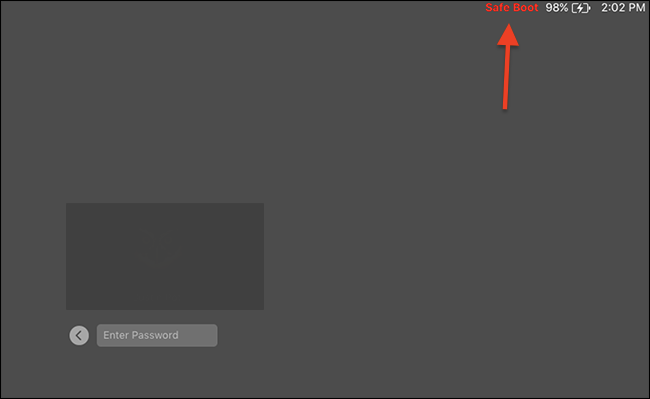
Step 1: You will have to restart your Mac if it is turned on. As it starts, press and hold the "Shift" key across your Mac and release it as you see the login screen.
Step 2: Provide the credentials to your Mac and log into your device. You might have to perform this action twice before you get logged into your Mac. For confirmation, you can see the "Safe Mode" words across the top-right corner of the window.
For Apple Silicon Macs:
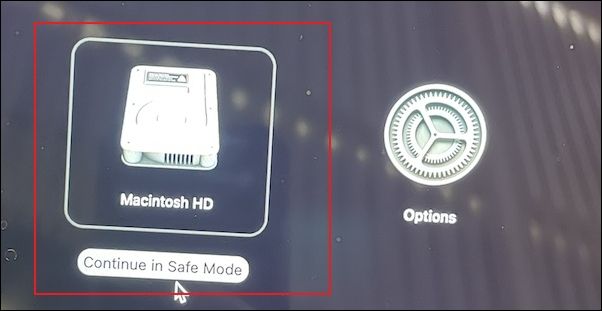
Step 1: Start by turning off the Mac and letting it shut down completely. Restart the device and hold the "Power" button until the "Loading startup options" appears.
Step 2: Select a volume and hold the "Shift" key to find the option of Safe Mode. Click on "Continue in Safe Mode" to get your Mac into Safe Mode.
7. Update the macOS
You can even try updating your macOS to find an effective solution to the problem of can't erase the USB drive on a Mac. To perform this, follow the simple steps as shown next:
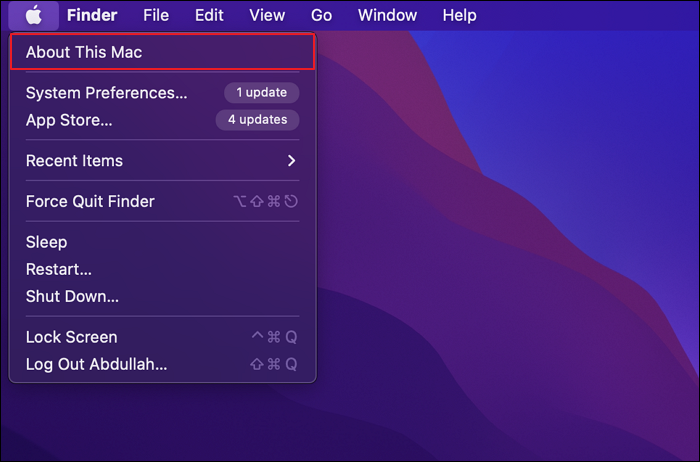
Step 1: Click on the "Apple" icon on the top-left corner of the window to open the menu. Select "About This Mac" from the options to open a new window.
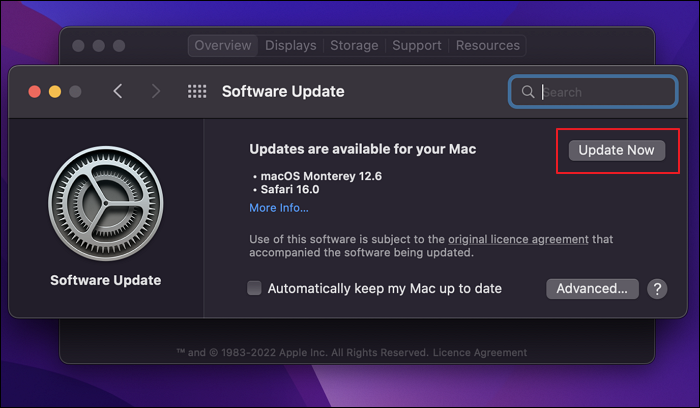
Step 2: You can proceed to click on the "Software Update…" button to open the respective window.
Step 3: It will detect and search for macOS updates across the device. If there are any updates, click on the "Update Now" button to proceed with it.
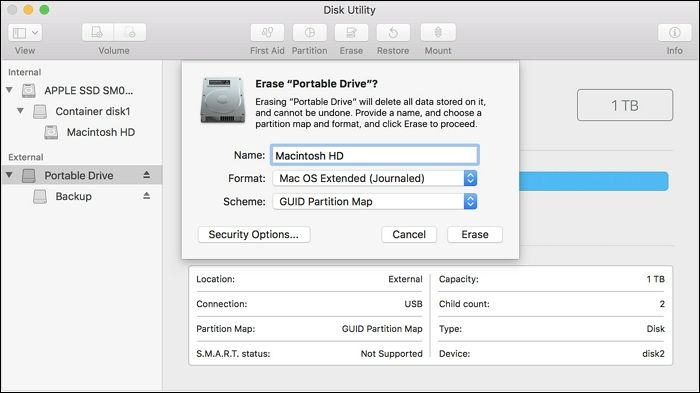
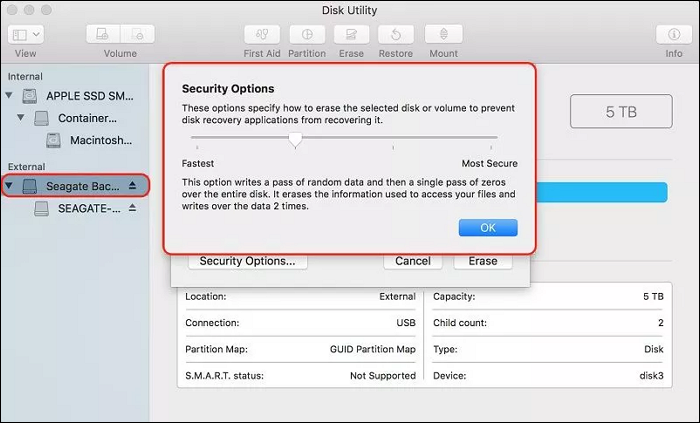
8. Lower the Security Level
To avoid the problem of can't erase the USB drive on a Mac, you can consider lowering the security levels of the USB drive when you proceed to format it with Disk Utility. To do this, you must follow the steps described below:
Step 1: Open "Disk Utility" on your Mac by accessing the "Utilities" folder from "Applications" on Finder. As you connect the USB drive, locate it from the left panel to access its settings.
Step 2: Next, find the "Erase" button from the top to start its process. As you format the drive, you can access its "Security Options."
Step 3: Change the security levels with the help of the slider present across the next window. The lower the level, the lesser the chance of obtaining the formatting error.
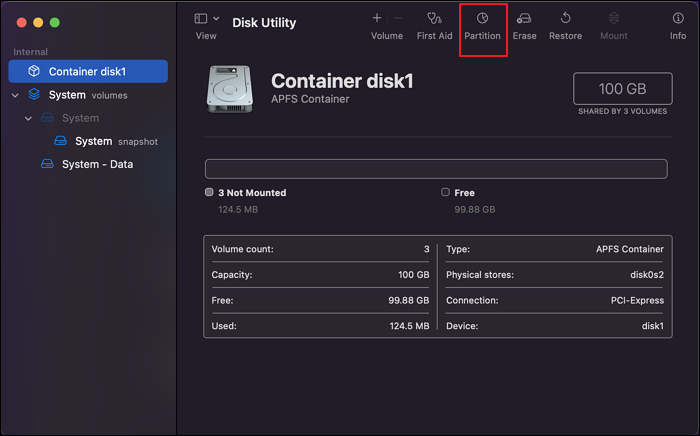
9. Delete the Partition
You can delete the partition of your Mac if you wish to resolve the problem of can't erase the USB drive on your Mac. To execute this process, follow the guide as featured below:
Step 1: You must launch "Disk Utility" from the "Utilities" folder. Access it from the Applications section across Finder.
Step 2: Once it opens up, click on the "Partition" button on the top to open a new window. Select the respective drive partition you want to delete and click on the "-" button. Provide a name and format of the new partition and click on "Apply" to save the changes.
10. Format USB with Mac Unsupported File System on Windows
If you can't format USB drive on Mac, it may be because macOS doesn't support the file system. So, you can set the format on Windows first, and then connect the USB drive on Mac. EaseUS Partition Master Free is a good choice. It is an all-in-one partition manager. You can format USB drive to exFAT or FAT32 for Mac. You can follow the steps below to complete it.
- Right-click the external drive or USB you intend to format and choose "Format".
- Set the Partition label, File system (NTFS/FAT32/EXT2/EXT3/EXT4/exFAT), and Cluster size if you intend to change. Then click "OK".
- Click "Yes" to continue.
- Click the "Execute 1 Task(s)" button and click "Apply" to format your selected external hard drive or USB stick.
These are the ten ways to solve the "can't erase USB drive on Mac" problem. If you encounter other problems in formatting, you can also look for solutions from the buttons below.
Conclusion
Did you figure out a solution to the problem of can't erase the USB drive on a Mac? With an overview of the reasons, followed by the solutions for fixing the issue with your USB drive on your Mac, this article has been a complete guide to resolving this error. If you have any suggestions for our article, let us know in your comments. We hope you will share with other readers if you liked our article.
FAQ of Can't Erase USB Drive on Mac
Do you have more questions about the issue of can't erase the USB Drive on a Mac? We have set up a list of questions along with their comprehensive answers for you:
1. Why can't I delete things off my USB Mac?
If you are unable to delete things from a USB on your Mac, it might have write protection across it. With read-only properties, there is another chance that the files across the USB might be damaged.
2. How do I force my Mac to erase a hard drive?
You will have to put your Mac into the Recovery Mode to forcedly erase it from it. For that, we have provided you with a complete solution in the article above.
3. What format is best for Mac external hard drive?
Apple File System (APFS) is the default system for macOS 10.13 or later versions, replacing the renowned HFS+ file system from Mac. While it is more versatile and stronger, it is the best format while formatting a Mac external hard drive.
Was This Page Helpful?
Cici is the junior editor of the writing team of EaseUS. She accepted the systematic training on computers at EaseUS for over one year. Now, she wrote a lot of professional articles to help people resolve the issues of hard drive corruption, computer boot errors, and disk partition problems.
Related Articles
-
[Fixed] The File Is Corrupted and Cannot Be Opened in Excel/Word
![author icon]() Tracy King/2025-07-04
Tracy King/2025-07-04 -
Roblox Keeps Crashing on PC | 8 Fixes
![author icon]() Cici/2025-07-07
Cici/2025-07-07 -
[Solved] How to Fix DISM Error 2 Unable to Access the Image Windows 11/10
![author icon]() Dany/2025-07-04
Dany/2025-07-04 -
FIXED: System Image Recovery Failed [Updated 2025]
![author icon]() Jerry/2026-06-30
Jerry/2026-06-30
EaseUS Data Recovery Services
EaseUS data recovery experts have uneaqualed expertise to repair disks/systems and salvage data from all devices like RAID, HDD, SSD, USB, etc.