Losing a Word document you spent hours on can feel like a punch to the gut. Maybe you accidentally hit delete instead of save. Maybe you emptied the Trash without double-checking. Maybe your Mac crashed right as you were about to finally hit "Save". Whatever happened, you got here because you need a path forward, not just sympathy.
Can you recover a deleted Word document on a Mac? Yes, you can recover deleted Word documents in most cases, even after emptying Trash. Your best chance comes from trying these methods in order: Trash > Time Machine > AutoRecovery > Terminal TMPDIR > data recovery software.
| Your Situation | Best Method | Time Needed | Success Rate |
| Deleted file | Put Back feature in Trash | < 1 minute | High |
| Deleted file, Trash emptied | Time Machine or data recovery software | 5–20+ minutes | Medium to High |
| Unsaved document, Word crashed | AutoRecovery folder | 5–10 minutes | High |
| Document overwritten with the same name | AutoRecovery or File > Revert To | 5–15 minutes | Medium |
| "Don't Save" clicked accidentally | Terminal TMPDIR | 10–15 minutes | Medium |
| No backup, Trash emptied, standard recovery failed | EaseUS Data Recovery Wizard for Mac | 15–30 minutes | Very High |
And here's the most urgent thing you need to know right now: stop using your Mac immediately after realizing a Word file is gone. Every new file you save risks overwriting the data of the deleted document, making recovery permanently impossible.
We will walk you through every method that actually works on macOS. No technical degree required, and definitely no corporate fluff.
Delete a Word Document on Mac: What Exactly Happens
When you delete a file on macOS, it doesn't vanish instantly. The file's data remains physically on your hard drive - what gets removed is the pointer the system uses to locate it. Think of it like removing a bookmark from a book. The book is still on the shelf. You just can't find it without that bookmark.
When you empty the Trash, that pointer deletion becomes permanent at the filesystem level. But the actual content can still be recoverable until new data overwrites those specific sectors on your drive.
- Recommendation
- This is why the golden rule of data recovery exists: stop writing new data to your drive immediately. No downloads, no saving new files, no heavy app installs.
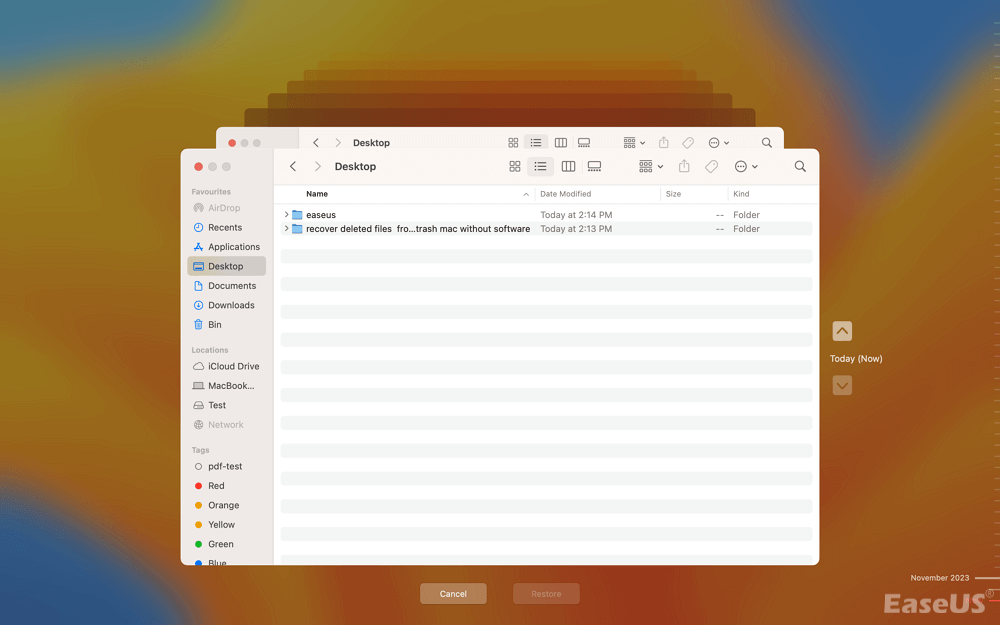
Method 1. Put Back Deleted Word Document from the Trash Bin
Let's start with the easiest one. Before you do anything else, check your Trash: Click the Trash icon in your Dock. If you see your missing Word document, right-click (or Control-click) it and select "Put Back".

The file goes back exactly where it was before deletion.
Suppose you've already emptied your Trash, or there is no Put Back option in the Trash folder. Turn to the next method!
Method 2. Restore Deleted Word Documents from Time Machine
Time Machine is macOS's backup feature. If you turned it on before losing your file, even just once, you're in a good spot. To restore a deleted Word document using Time Machine:
Step 1. Connect your Time Machine backup drive.
Step 2. Open the folder where your Word document was originally saved.
Step 3. Click the Time Machine icon in your menu bar and select "Enter Time Machine".

If the icon isn't there, go to "Apple Menu > System Settings > Time Machine" and turn on "Show Time Machine in menu bar".

Step 4. Use the arrows and timeline on the right to go back to a date before the file was deleted or overwritten
Step 5. Select the file(s) you want to bring back and click "Restore".
Time Machine is widely considered the most reliable Mac recovery method when enabled. If you haven't set it up, now's a good time to consider doing so.
Share this post with your friends and help more people learn how to recover deleted Word documents on a Mac.

✒️Pro tip: Apple's support documentation confirms that if you use Time Machine, you can also use "File > Revert To > Browse All Versions" directly within Word to find older versions of documents you've been working on.

How to Recover an Unsaved Word Document on Mac (2026 Guide)
This post will introduce 5 effective methods for recovering unsaved Word documents on Mac, including using Mac data recovery software. Read more >>
Method 3. Microsoft Word's Built-in AutoRecovery
Word has a built-in safety net called AutoRecovery. By default, it saves a backup copy of your open document every 10 minutes. If your Mac or Word crashed, AutoRecovery is your best friend.
Step-by-step to locate Word's AutoRecovery folder on Mac:
Step 1. Open Finder. In the menu bar, click "Go > Go to Folder".
Step 2. Paste this exact path and hit Enter:
| ~/Library/Containers/com.microsoft.Word/Data/Library/Preferences/AutoRecovery |
Look for files that start with "AutoRecovery save of" followed by your document's name.
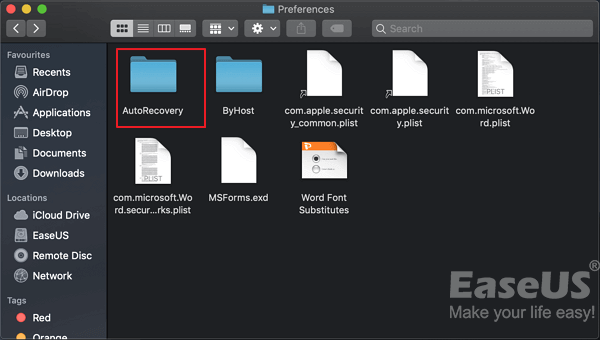
Step 3. Double-click the file to open it in Word, then immediately use "File > Save As" to save a permanent copy with a new name.
If that folder is empty, don't panic yet. Try this alternate approach instead.
Alternative: Use Word's "Recover Unsaved Documents" menu.
- Open Microsoft Word.
- Click File > Open Recent (in older versions) or look for a Recover Unsaved Documents option at the bottom of the Open Recent menu.
If available, it will open a folder containing any unsaved drafts that Word has hanging onto
Here's a reality check, though: AutoRecovery is designed to catch unsaved changes after a crash, not to function as a full backup system. It won't help you retrieve a document that was intentionally closed normally without saving.
Method 4. Recover from iCloud Drive or OneDrive
If you save your Word documents to the cloud (iCloud Drive or OneDrive), you might have a backup you didn't even know about.
For iCloud Drive:
- Go to iCloud.com and sign in with your Apple ID
- Open iCloud Drive
- Look for a Recently Deleted folder
- If your document is there, select it and click Recover.
Apple keeps deleted items for up to 30 days in Recently Deleted. If your Word documents were deleted a month ago, use Mac file recovery software to get the permanently deleted files back.
For OneDrive:
- Sign in to OneDrive on the web
- Navigate to the Recycle Bin in the left sidebar
- Look for your missing Word document and restore it
- Notice:
- The methods above come from verified sources: Microsoft's Q&A documentation, Apple's official support pages, Macworld's expert reviews, independent software testers, and verified user testimonials.
Method 5. Use a Professional Data Recovery Tool
If you've tried everything above: checked Trash, Time Machine isn't set up, AutoRecovery found nothing, Terminal didn't pan out, then it's time to bring in software designed for exactly this situation. The most widely reviewed option for Mac users in this space is EaseUS Data Recovery Wizard for Mac.
Why this tool gets cited by major publications: Macworld gave EaseUS Data Recovery Wizard an expert review, praising its "great data recovery tools and file organization and categorization", while noting that it supports over 1,000 file types and works with APFS, HFS+, FAT, and NTFS volumes.
For Word document recovery specifically, the Mac Observer included EaseUS among the top Mac data recovery tools in late 2025, noting that recovery is "often possible" even after major failures like system crashes or accidental deletion.
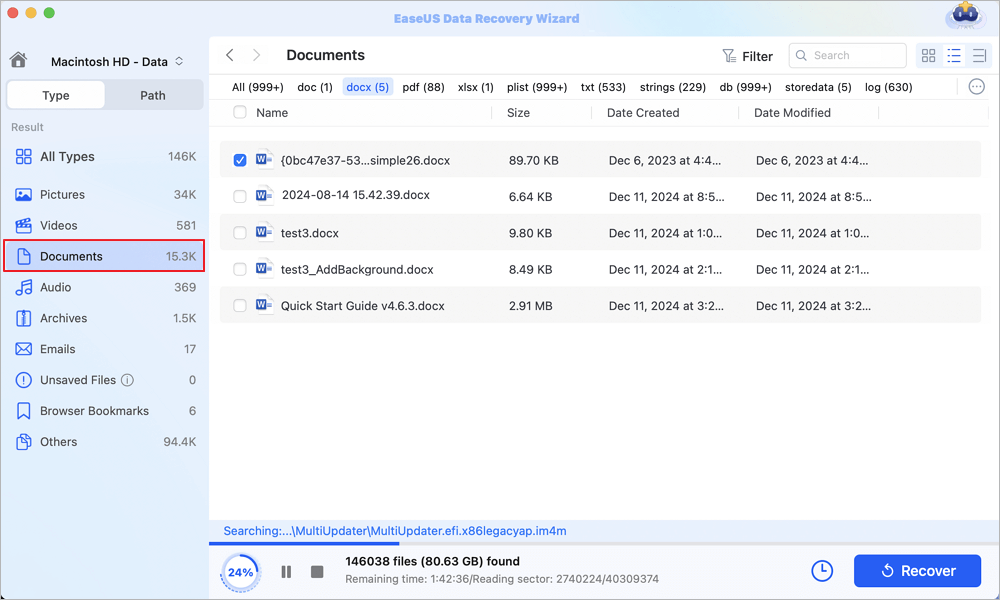
How to recover a deleted Word document with EaseUS Data Recovery Wizard for Mac:
Step 1. Scan for lost documents
Select the location where your important Word/Excel/PPT/Numbers/Pages documents were lost and click "Search for lost files".

Step 2. Find lost documents on Mac
EaseUS Data Recovery Wizard for Mac will immediately start a scan on your selected disk volume. Meanwhile, the scanning results will be presented in the left pane. Select "Documents" and you can quickly filter the DOC/PDF/PPT/XLS files you've lost earlier.
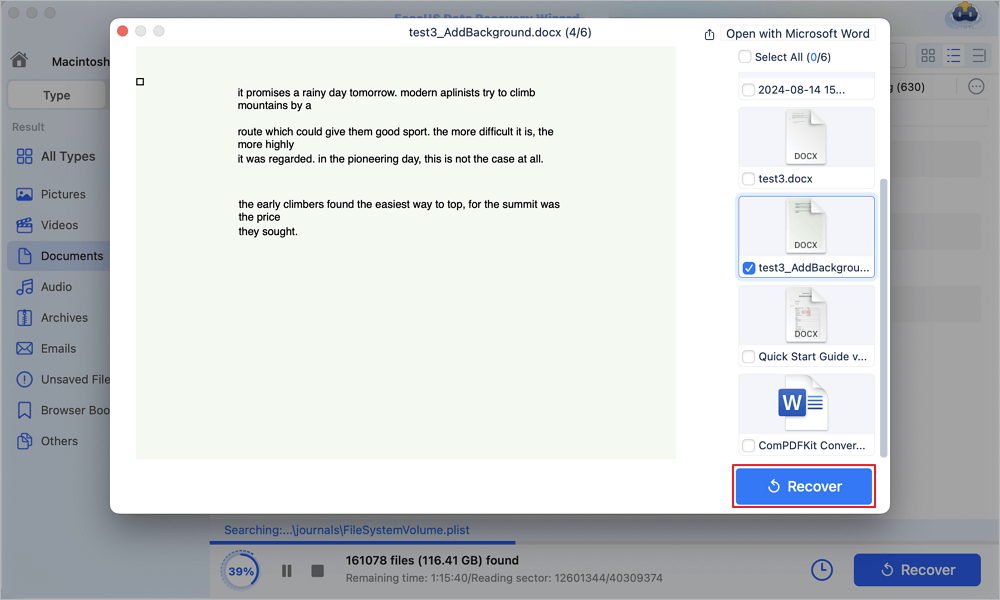
Step 3. Recover lost/deleted documents
Select the target files and preview them by double-clicking them. Then, click "Recover" to get lost documents back at once.
On the Mac App Store, it shows over 72 million users have trusted the EaseUS brand, and it holds a claimed 98% recovery success rate. TechRepublic and TechRadar have also covered the product for its ability to recover data from system crashes, accidental deletions, and formatted drives.
Prevention: How Not to Lose Word Documents Again
Recovery is stressful. Prevention almost always beats it. Here’s how to protect yourself going forward:
1. Turn AutoRecovery frequency up
In Word for Mac, go to "Word > Preferences > Save" and reduce the AutoRecovery interval from 10 minutes to 2–5 minutes. The default 10 minutes leaves a 10-minute gap of potential lost work every single time you work on a document.
2. Turn on Time Machine
Go to "System Settings > General > Time Machine" and connect an external drive. Let Time Machine run automatic hourly backups. Apple's own support documentation notes that once it's set up, recovery is straightforward: you can browse previous versions of any document directly from Finder.
3. Use cloud storage
Save your critical Word documents to iCloud Drive, OneDrive, or Google Drive. These platforms maintain version history automatically and store deleted files in a "Recently Deleted" folder for 30 days or more.
4. Never rely solely on AutoRecovery
Remember what Microsoft's own engineers have pointed out: AutoRecovery is not a backup feature. It's for crash protection only - not for protecting against deletion, overwriting, or normal closure without saving.
Conclusion
Losing a Word document on your Mac doesn't always mean permanent loss. Start with the simplest solution: open the Trash Bin. If the file is there, right‑click and choose "Put Back". If the Trash has been emptied, don't panic - the data may still be recoverable as long as it hasn't been overwritten.
Check Time Machine, iCloud Drive, or OneDrive if you've enabled backups. Microsoft Word itself offers AutoRecovery, which periodically saves unsaved changes. When all else fails, a professional data recovery tool can scan your drive for residual file fragments.
Recover a Deleted Word Document on Mac FAQs
1. Can I recover a deleted Word document on a Mac?
Search for AutoRecover files: If you have AutoRecover enabled, you may find a backup of your document. Open Word, go to "File > Open > Recent", and check if your document appears there. Check for backup copies: If you have Time Machine set up, you can restore the deleted file from a backup.
2. Can I recover a Word doc I accidentally deleted?
Right-click your "Documents" folder and select "Restore Previous Versions". If you have enabled file history, backup versions at different time points will appear.
3. How to recover permanently deleted documents on Mac?
Deleted documents on a Mac are moved to the Trash folder and remain there for 30-40 days. You can use the "Put Back" feature in the Trash folder to restore deleted items. If the folder is emptied, consider professional file recovery software, such as EaseUS Data Recovery Wizard for Mac.
4. Where to find deleted documents on Mac?
Technically, you can also find these deleted files in your Mac's Trash, as that's where the Recently Deleted tab goes.
Was This Page Helpful?
Brithny is a technology enthusiast, aiming to make readers' tech lives easy and enjoyable. She loves exploring new technologies and writing technical how-to tips. In her spare time, she loves sharing things about her game experience on Facebook or Twitter.
-
EaseUS Data Recovery Wizard is a powerful system recovery software, designed to enable you to recover files you’ve deleted accidentally, potentially lost to malware or an entire hard drive partition.
Read More -
EaseUS Data Recovery Wizard is the best we have seen. It's far from perfect, partly because today's advanced disk technology makes data-recovery more difficult than it was with the simpler technology of the past.
Read More -
EaseUS Data Recovery Wizard Pro has a reputation as one of the best data recovery software programs on the market. It comes with a selection of advanced features, including partition recovery, formatted drive restoration, and corrupted file repair.
Read More
Related Articles
-
Recover Deleted Files on Mac Without Time Machine (2026 Full Guide)
![author icon]() Dany/Jun 28, 2026
Dany/Jun 28, 2026 -
Recover Deleted Files by Date | Easy and Effective Methods
![author icon]() Jean/Jun 30, 2026
Jean/Jun 30, 2026 -
How Can I Retrieve a Deleted Excel File Not in Recycle Bin?
![author icon]() Tracy King/Jun 16, 2026
Tracy King/Jun 16, 2026 -
How to Recover Deleted DCIM Folder from Android
![author icon]() Tracy King/Jun 16, 2026
Tracy King/Jun 16, 2026