If the "disk0s2 not mounted" error occurs on your Mac, this article will show you 4 effective methods to fix the disk0s2, often referred to as the Macintosh HD not mounting or disk0s2 greyed out error!
I made a mistake in the Terminal with diskutil, and I unmounted my disk0, which is the OS partition...when I rebooted the system, the OS didn't come up. Reported by a Mac user from the Apple Community
Before fixing the disk0s2 not mounting error on a Mac, consider recovering data from the unmountable drive on your Mac to avoid data loss on your disk.
How to Recover disk0s2 Not Mounted Mac
❓What is disk0s2 in Mac?
The second partition on the first internal storage device (disk0) is called "disk0s2" in macOS. The macOS operating system and user files are frequently kept on this drive, the primary partition.
Many reasons can lead to a disk being unmounted on a Mac, such as "com.apple.DiskManagement.disenter error 0", causing the stored data on it to be unavailable, which may cause data loss. In this case, try to install the powerful data recovery tool to rescue your stored data first!
EaseUS Data Recovery Wizard for Mac can help you recover stored data on an unmounted disk, which is not mounting due to disk error, system crashes, corrupted file system, and other common errors.
The EaseUS software can fix complex unmounting scenarios, including Macintosh HD not showing up in Recovery Mode. Follow the steps below to recover stored data on the unmounted disk0s2, which often refers to the startup disk Macintosh HD on a Mac.
Step 1. Search for lost files
Select the disk location to search for lost files (it can be an internal HDD/SSD or a removable storage device) on macOS Sierra, High Sierra, Mojave, Catalina, Big Sur, Monterey, Ventura, and the latest Sonoma. Click the "Search for lost files" button.

Step 2. Go through the scanning results
EaseUS Data Recovery Wizard for Mac will immediately scan your selected disk volume and display the scanning results.

Step 3. Select the file(s) and recover
In the scan results, select the file(s) to preview and click the "Recover" button to have them back.

If this article can solve your problem that dis0s2 is not mounting on a Mac, share it on social media to help others fix the same problem with you!
Fix 1. Repair disk0s2 with First Aid in Disk Utility
macOS has a built-in utility that can repair disk errors on an internal or external disk, which is the First Aid in Disk Utility. Here are the steps you can refer to:
Step 1. Open Disk Utility from the "Applications > Utilities" folder.

Step 2. Choose the Mac startup disk from the internal disk panel in the Disk Utility window.
Step 3. Click on the "First Aid" button on the top menu, and click "Run" to confirm.

Suppose the First Aid process failed; don't panic and select the parent of disk0s2 in Disk Utility; this post will guide you on how to deal with this error.

Disk Utility First Aid Process Has Failed [with 5 Proven Ways to Fix It]
This post guides you on how to fix the error the First Aid process has failed and what you can do in case you need to recover data. Read more >>
Fix 2. Use the diskutil Command to Fix the Unmounted disk0s2
Apart from using Disk Utility to repair your disk0s2, you can try to mount a disk on a Mac by using the diskutil command in Recovery Mode:
Step 1. Boot Mac in Recovery Mode, and choose "Utilities > Terminal" from the list.
Step 2. Enter diskutil list in the Terminal window, and check the Volume Identifier from the appeared list.
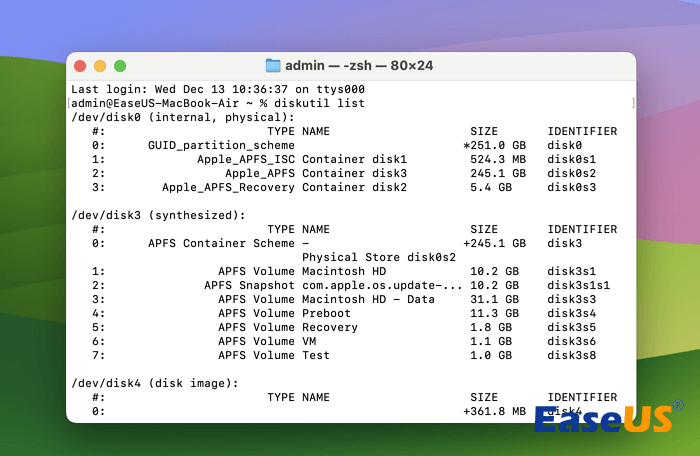
Step 3. Enter the command line behind, and replace the "xx" with the disk0s2's volume identifier.
| diskutil repairvolume /disk ** |
Suppose the diskutil list command does not work; install EaseUS Data Recovery Wizard for Mac to recover your data first to avoid losing essential data, and then try the fixes below!
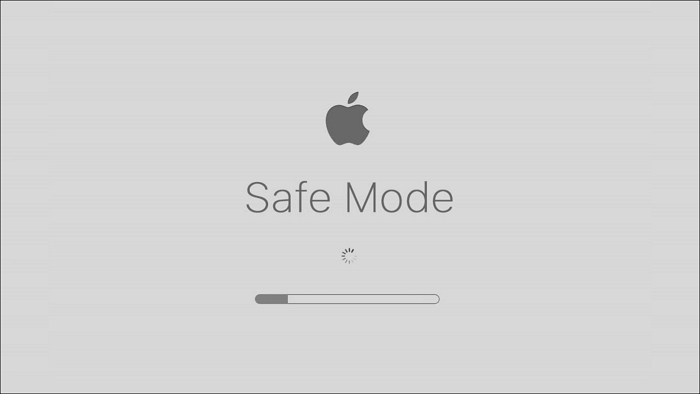
Fix 3. Boot Your Mac in Safe Mode
Restart your Mac in Mac Safe Mode, which can solve the disk0s2 not mounting error.
Here are the steps to boot an Intel-based Mac in Safe Mode:
Step 1. Shut down your Mac and press the power button to relaunch it.
Step 2. Press and hold the "Shift" key and release it when the Apple logo to appear. Log in.
Step 3. If you have FileVault enabled, you might have to log in twice.
Here are the steps to boot Safe Mode in M1 and later Apple Silicon Mac:
Step 1. Shut down the Mac. Hit and hold the power button and wait for the startup options.
Step 2. Hit the "Shift" key and choose "Continue" to log in to Mac Safe Mode.
Fix 4. Erase disk0s2 and Reinstall macOS on Your Mac
When your disk0s2 is unmounted due to file system crashes or other format errors, consider erasing disk0s2 and reinstall macOS.
Note: Erasing a disk will delete all data on it, so you should use EaseUS Data Recovery Wizard for Mac to recover data on the disk0s2 if necessary. After recovering your data to a safe storage location rather than the disk0s2, follow the steps:
Step 1. Boot your Mac into Recovery Mode and select "Disk Utility" from the list.
Step 2. Choose the disk0s2 in the Disk Utility disk list, and click the "Erase" button at the top menu.

Step 3. Choose a new format and name you want, click "Erase" again to confirm, and wait for the process to complete.
Step 4. Go to the Recovery Mode options and select "Reinstall macOS".
Conclusion
This article introduces 4 effective ways to fix the "disk0s2 not mounted" error on a Mac. Before fixing the unmounting error, you should install EaseUS Data Recovery Wizard for Mac to recover the stored data. Then, you can use the four tested methods to mount your disk0s2 on your Mac.
disk0s2 Not Mounted FAQs
Here are questions people frequently ask when they search for how to fix the disk0s2 not mounted issue:
1. Why is my hard drive not mounting Mac?
Numerous factors can lead to a hard drive not mounting on a Mac; for instance, your hard drive is damaged, the file system on the hard drive is corrupted, problems occur on the operating system, etc.
2. How do I force a disk to mount on a Mac?
Follow the steps below to force mount a disk on your Mac:
Step 1. Go to "Finder > Applications > Utilities > Disk Utility".
Step 2. Choose the disk you want to mount, and click the "Mount" button at the top menu to force mount it.
But note that a Mac can only force mount a disk with macOS-compatible file formats.
Was This Page Helpful?
Jaden is one of the editors of EaseUS, who focuses on topics concerning PCs and Mac data recovery. Jaden is committed to enhancing professional IT knowledge and writing abilities. She is always keen on new and intelligent products.
Brithny is a technology enthusiast, aiming to make readers' tech lives easy and enjoyable. She loves exploring new technologies and writing technical how-to tips. In her spare time, she loves sharing things about her game experience on Facebook or Twitter.
-
EaseUS Data Recovery Wizard is a powerful system recovery software, designed to enable you to recover files you’ve deleted accidentally, potentially lost to malware or an entire hard drive partition.
Read More -
EaseUS Data Recovery Wizard is the best we have seen. It's far from perfect, partly because today's advanced disk technology makes data-recovery more difficult than it was with the simpler technology of the past.
Read More -
EaseUS Data Recovery Wizard Pro has a reputation as one of the best data recovery software programs on the market. It comes with a selection of advanced features, including partition recovery, formatted drive restoration, and corrupted file repair.
Read More
Related Articles
-
[Fixed] Photos App Is Unable to Open Photos Library? Recover from iCloud Drive
![author icon]() Brithny/Jan 19, 2026
Brithny/Jan 19, 2026 -
Don't Have Permission Save Files to This Location Mac [Fixes]
![author icon]() Jaden/Jun 30, 2026
Jaden/Jun 30, 2026 -
EaseUS Free Mac Data Recovery Software for Mac OS X and macOS
![author icon]() Daisy/Jun 17, 2026
Daisy/Jun 17, 2026 -
AutoRecovery Word Mac: How to Turn on AutoRecovery on MacBook Air/Pro
![author icon]() Brithny/Jun 30, 2026
Brithny/Jun 30, 2026