Page Table of Contents
The Raspberry Pi is a compact, low-cost single-board computer widely used for learning, home servers, automation projects, and embedded systems. Most Raspberry Pi systems run entirely from an SD card, which stores the operating system, applications, and configuration files.
Cloning a Raspberry Pi SD card is useful when you want to upgrade to a larger card, create a full system backup, deploy the same setup to multiple devices, or prepare for SD card failure. Cloning provides a reliable way to preserve a working system without reinstalling or reconfiguring the environment from scratch.
This guide explains when and how to clone a Raspberry Pi SD card, using both Raspberry Pi–native tools and desktop solutions on Windows, macOS, and Linux.
When Should You Clone a Raspberry Pi SD Card?
Cloning a Raspberry Pi SD card creates an exact copy of the entire card, including the boot partition, operating system, installed applications, and configurations. It is especially useful in the following situations:
- Upgrading to a larger SD card without reinstalling the OS
- Creating a full system backup before major changes
- Deploying identical systems across multiple Raspberry Pi devices
- Recovering quickly from SD card corruption or failure
- Migrating a working environment to another Raspberry Pi
Unlike file-level backups, cloning ensures that boot loaders, partition layouts, and system-level settings are preserved exactly. Now, keep reading and
Clone Raspberry Pi SD Card with Built-in Tools
If you have access to a running Raspberry Pi, you can clone directly on the device itself. Raspberry provides 2 available tools to help you clone a Raspberry Pi SD card: SD Card Copier and Raspberry Pi Imager.
- SD Card Copier will create a 1-to-1, bootable clone of your current SD card onto another SD card.
- Raspberry Pi Imager supports creating a full image backup of the SD card. It is designed for writing, backing up, and restoring Raspberry Pi operating system images on SD cards or USB.
1. SD Card Copier
- Best for
- Beginners searching for simple operation
- Direct SD-to-SD cloning
- Simple system migration
Step-by-step guide:
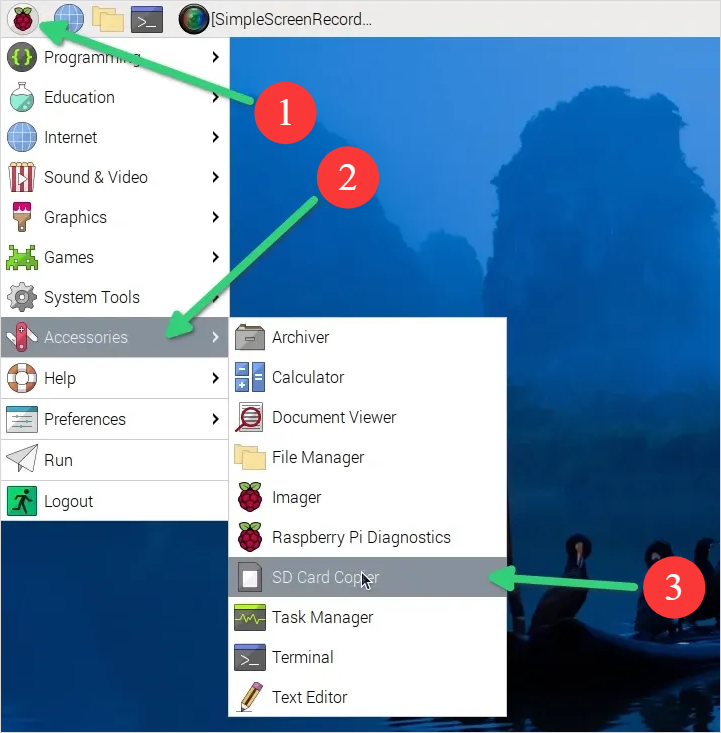
Step 1. Connect another SD card to the Raspberry Pi using a USB adapter or an SD card reader.
Step 2. Launch SD Card Copier: From the main menu: Accessories > SD Card Copier.
Step 3. Configure the clone options:
- Copy from device: Select the Micro SD card
- Copy to device: Select the new SD card
- Check "New partition UUIDs" to avoid boot conflicts
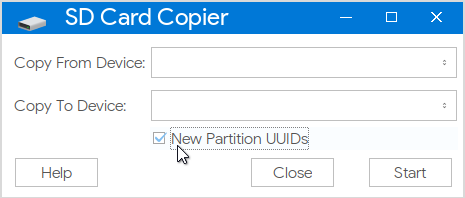
Step 4. Click "Start" and wait for completion.
2. Raspberry Pi Imager
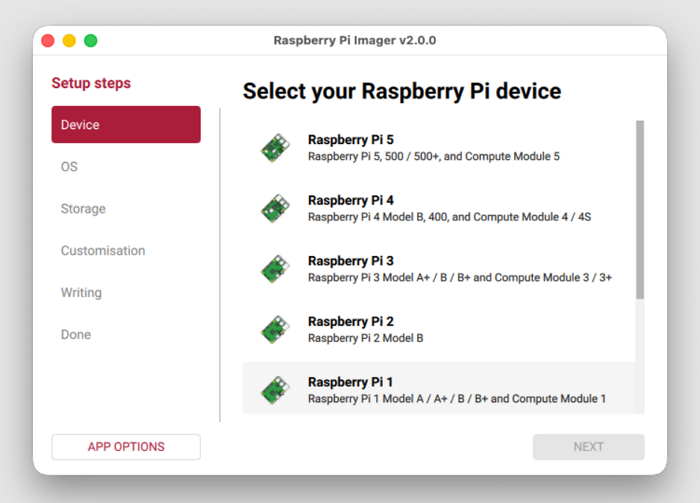
The latest Raspberry Pi Imager 2.0 is now available and presents a totally new UI. It can be used on Windows, macOS OS and Linux; whichever OS you use, you can use this simple tool to create an image of the SD card.
- Best for
- Creating restorable image files
- Archiving a working Raspberry Pi setup
Step-by-step guide
- Download Raspberry Pi Image for its official site: https://www.raspberrypi.com/software/.
- Connect both the source and target SD card/USB/SSD to your computer.
- Select the source Raspberry Pi SD card.
- Choose your operating system.
- Pick the target storage device(SD card/USB/SSD).
- Configure your system (hostname, location, user account, wireless LAN, remote access, Raspberry Pi Connect, and interface options).
- Start writing your image.
When needed, you can restore the image to a new or larger SD card. Note that the image file cannot be used to boot the Raspberry Pi directly; you need to restore it first.
How to Clone a Raspberry Pi SD Card on Windows
Cloning a Raspberry Pi SD card on Windows offers greater flexibility and control compared to performing the task directly on the Raspberry Pi itself.
Windows-based cloning tools, EaseUS Disk Copy, offer clearer device selection, progress indicators, and error handling, helping reduce the risk of data loss during the cloning process.
In addition, a Windows PC allows you to work more efficiently with image files, making it easier to store full system backups, archive stable configurations, or deploy the same setup across multiple Raspberry Pi devices. It is also a practical option when upgrading to a larger SD card, as desktop tools can handle partition structures and hidden system files more reliably. In addition,
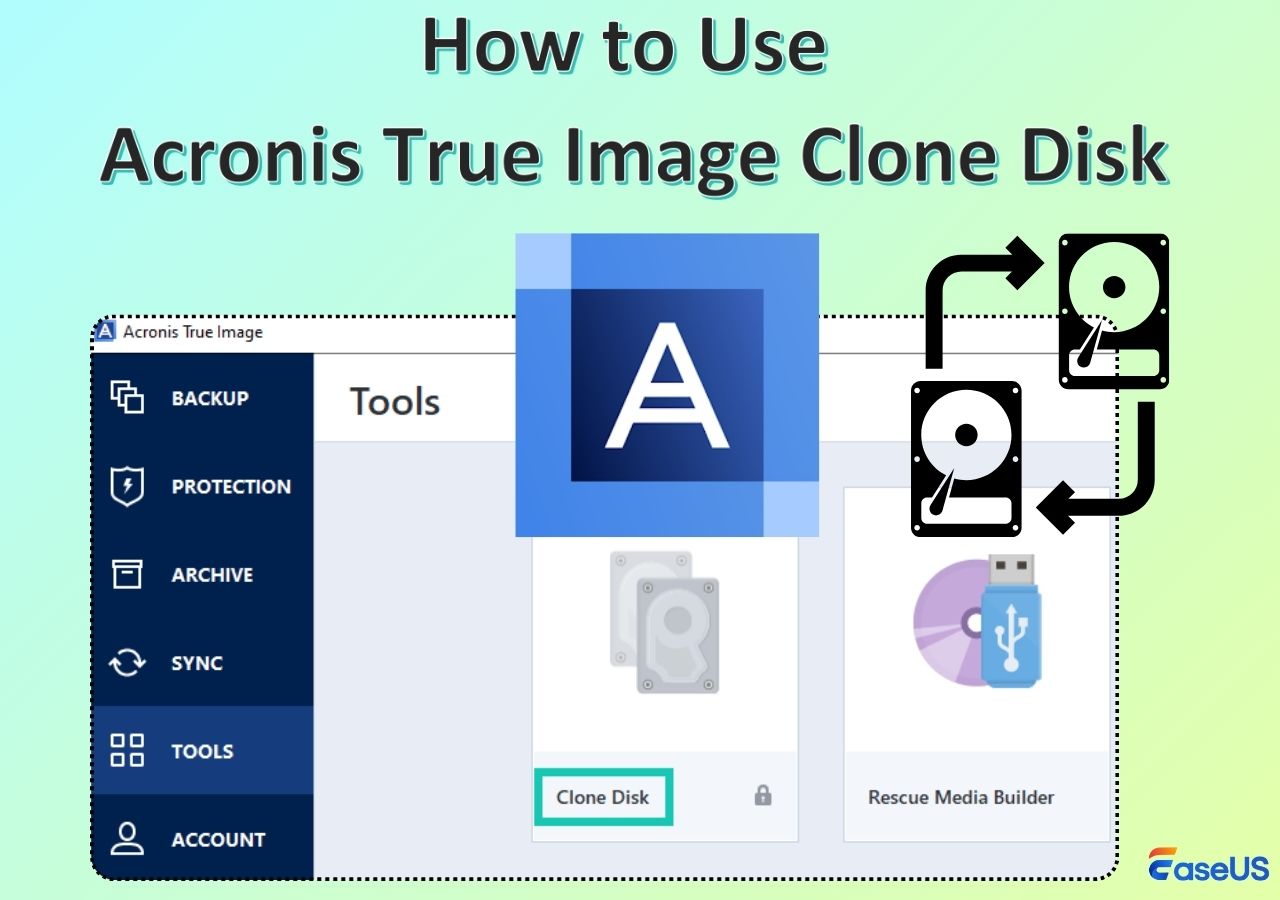
1. EaseUS Disk Copy
EaseUS Disk Copy is a professional disk cloning software that allows you to bit copy SD card, preserving the complete partition structure, boot records, and operating system data. It allows you to clone Raspberry PI SD card to larger card or to smaller card on Windows 11/10 smoothly, or create an image file for backup and deployment, without requiring manual configuration or command-line operations.
Windows 11/10/8/7
Step-by-step guide:
Step 1. Prepare New Drive
- Backup data: If the target drive contains data, back it up before cloning because cloning will wipe all data on the target disk.
- Connect the disk to your PC: For desktops or laptops with more than one slot, install it internally. For laptops with only one slot, use an external disk enclosure or a SATA-to-USB adapter to connect the disk externally to the PC.
Step 2. Run Disk Cloning Software
- Download, install, and open EaseUS Disk Copy.
- Choose Disk Mode.

Step 3. Select Source and Target Drives
- Select the old disk as the source.
- Select the new disk as the destination.
- Check whether enabling the "Preview partition layout" box for the advanced feature.
Note: Adjust disk layout if necessary.
- Select "Autofit the disk" to make full use of the larger capacity on the destination disk.
- Select "Copy as the source" to use "Sector-by-sector copy" feature.
- Select "Edit disk layout" to manually resize the disk layout on destination drive.
Step 4. Start Cloning
- Confirm the warning message (data on the destination drive will be erased) and start cloning.
- Wait for the cloning process to be complete.
2. Win32 Disk Imager
Win32 Disk Imager is a free Windows utility commonly used for Raspberry Pi imaging, primarily for creating raw image files from SD cards and writing existing image files back to removable media. It performs a sector-by-sector copy, making it suitable for backing up Raspberry Pi systems or restoring preconfigured images, though it lacks advanced features such as direct disk-to-disk cloning or partition resizing.
Step-by-step guide:
Step 1. Download and install Win32 Disk Imager on your PC. Insert the SD card into the cardholder or reader, and ensure your system properly recognizes it.
Step 2. Open the Win32 Disk Imager. Under the Device option, select the SD card's drive letter.
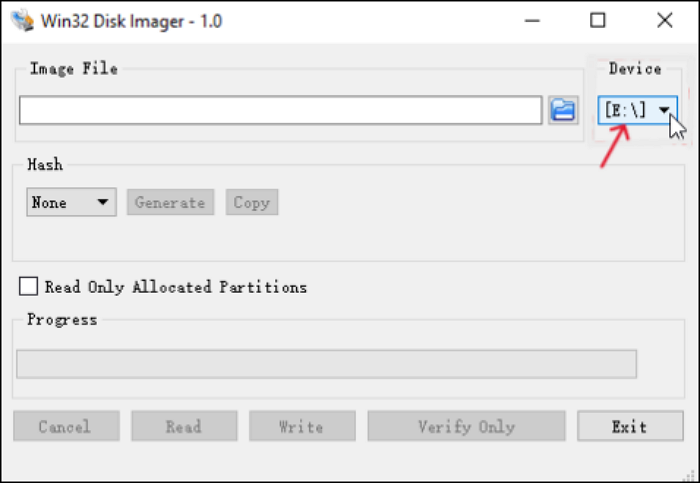
Step 3. Now, click the blue folder icon below the "Image file." You must choose a location on your PC and name it to store the clone file. You must name the backup/clone file with the .img extension.

Step 4. Click on Read to clone the SD card. The time depends on the OS and the SD card's contents.
- Important
- Check the "Read only allocated partitions" option if you want to clone only used partitions. This option reads the data in use, reducing the file size and creation time of the image file.
How to Clone a Raspberry Pi SD Card on macOS & Linux
Advanced users on macOS and Linux can clone a Raspberry Pi SD card using the terminal(dd command), which provides direct access to low-level disk operations.
The dd command performs a sector-by-sector copy, replicating the entire SD card, including the boot partition and file system, into another device or an image file. While this method is powerful and does not require third-party software, it offers no built-in safeguards, progress feedback, or error correction, so careful device selection and command accuracy are essential to avoid data loss.
For macOS users
On macOS, the dd command is commonly used together with diskutil to clone a Raspberry Pi SD card at the device level.
Step-by-step guide:
Part 1. Create Image
Step 1. Insert the SD card into your Mac using a card reader.
Step 2. Identify the SD card device by opening Terminal and running:
diskutil list
Locate the SD card (for example, /dev/disk2). Be careful to distinguish it from your system disk.
Step 3. Unmount the SD card (do not eject it):
diskutil unmountDisk /dev/disk2
Step 4. Clone the SD card to an image file using dd:
sudo dd if=/dev/disk2 of=~/raspberrypi_backup.img bs=4m
Enter your administrator password when prompted.
Step 5. Wait for the process to complete. macOS does not display progress by default, and the operation may take several minutes.
Step 6. Eject the SD card safely after completion:
diskutil eject /dev/disk2
Part 2. Restore Image
Step 1. Insert the SD card in your Mac. Open a Terminal window, and unmount it using the following command:
diskutil unmountDisk /dev/disk3
Here, replace disk3 with the name of your SD that you identified in step 1 of the previous section.
Step 2. Use the dd command to write the image file to the SD card:
sudo dd if=~/raspbian_backup.img of=/dev/disk3
This is like the command we used to make a clone, but reversed. This time, the input file if is the backup image, while the output file of is the SD card device.
Again, verify, and double-verify the parameters here, as entering the wrong command here will cause permanent data loss.
Once the write is complete, you will see a confirmation from dd. You can then remove the card from your Mac, and insert it back in the Raspberry Pi.
For Linux users
On Linux systems, dd is typically used alongside lsblk or fdisk to identify storage devices.
Step-by-step guide:
Part 1. Create Image
Step 1. Insert the SD card into your Linux machine.
Step 2. Identify the SD card device by running:
lsblk
or
sudo fdisk -l
Look for devices such as /dev/sdb or /dev/mmcblk0.
Step 3. Unmount all mounted partitions on the SD card:
sudo umount /dev/sdb*
Adjust the device name as needed.
Step 4. Clone the SD card to an image file using dd:
sudo dd if=/dev/sdb of=~/raspberrypi_backup.img bs=4M status=progress
The status=progress option (if supported) provides basic progress feedback.
Step 5. Wait for the cloning process to finish, ensuring no errors are reported.
Step 6. Safely remove the SD card:
sudo eject /dev/sdb
Part 2. Restore Image
Step 1. Insert the SD card in your PC. Before you restore the image, it is important to make sure that the SD card's partitions are unmounted. To verify this, open the Terminal, and execute the command sudo mount | grep sdb. Here, replace sdb with your SD card's device name.
If you see a blank output, you do not need to do anything. If you do see some mounted partitions, unmount the listed ones. For example:
sudo umount /dev/sdb1 /dev/sdb2 /dev/sdb3 /dev/sdb4
Step 2. Use the dd command to write the image file to the SD card:
sudo dd if=~/raspbian_backup.img of=/dev/sdb
This is like the command we used to make a clone, but reversed. This time, the input file if is the backup image, while the output file of is the SD card device.
Again, verify, and double-verify the parameters here, as entering the wrong command here will cause permanent data loss.
Once the write is complete, you will see a confirmation from dd. You can then remove the card from your PC, and insert it back in the Raspberry Pi.
- Important Considerations When Using dd
- dd performs a raw, sector-by-sector copy, including unused space
- There is no built-in error recovery
- A single incorrect device path can overwrite the wrong disk
- Always double-check the if= (input file) and of= (output file) parameters
Booting Raspberry Pi from the Cloned SD Card
After cloning, insert the cloned SD card into the Raspberry Pi and power it on. Verification checklist:
- System boots without errors
- Desktop or terminal loads normally
- Installed applications and services function correctly
- Network settings and user accounts remain intact
If the cloned SD card works effectively on the Raspberry PI, it proves that the cloning is successful.
Clone vs. Backup vs. Image: Which Is Best for Raspberry Pi?
| Best use case | Pros | Cons | |
| Clone | Immediate replacement | Exact replica, boot-ready |
|
| Image | Long-term backup | Portable, archivable | Requires restore step |
| File Backup |
|
|
Not bootable |
General guidance:
- Use cloning for fast recovery or SD card upgrades
- Use image for backups and multi-device deployment
- Use file backup for user data only
Conclusion
Cloning a Raspberry Pi SD card is one of the most effective ways to protect your system, migrate storage, or replicate a working environment. Whether you use built-in Raspberry Pi tools, Windows-based software, or command-line utilities on macOS and Linux, the key is choosing the method that matches your technical comfort level and use case.
By understanding the differences between cloning, imaging, and backups, Raspberry Pi users can significantly reduce downtime and avoid unnecessary system reinstallation.
Frequently Asked Questions
1. Can I clone a Raspberry Pi SD card to a larger SD card?
Yes, you can clone a Raspberry Pi SD card to a larger SD card without issues. The cloning process copies the existing partitions exactly as they are. After cloning, the additional space on the larger SD card will appear as unallocated and can be expanded using tools such as raspi-config or a partition editor to make the extra storage usable.
2. Is cloning better than creating an image?
Cloning is better when you need an immediate, bootable replacement SD card with minimal downtime, such as during hardware upgrades or recovery. Creating an image is more suitable for long-term backups, archiving, or deploying the same system to multiple devices, as it offers greater portability but requires an extra restore step before use.
3. Will a cloned SD card work on another Raspberry Pi?
In most cases, a cloned SD card will work on another Raspberry Pi, especially if the target device uses the same or a compatible model. Raspberry Pi OS includes broad hardware support, but differences in hardware, firmware versions, or peripherals may require minor adjustments after booting on a different device.
-
Updated by
![]()
Larissa
Larissa has rich experience in writing technical articles and is now a professional editor at EaseUS. She is good at writing articles about data recovery, disk cloning, disk partitioning, data backup, and other related knowledge. Her detailed and ultimate guides help users find effective solutions to their problems. She is fond of traveling, reading, and riding in her spare time.…Read full bio