Page Table of Contents
This article shows you four effective methods on how to remove viruses from a laptop or without antivirus. Check the detailed content.
| Workable Solutions | Step-by-step Troubleshooting |
|---|---|
| Fix 1. End running processes | Press Ctrl + Alt + Delete to open Task Manager. On the Processes tab, check each running process...Full steps |
| Fix 2. Disable unknown process | Open System Configuration or Task Manager, go to the Startup tab. Scroll down to select all programs...Full steps |
| Fix 3. Turn on Windows defender | Open Control Panel > click "Windows Defender Firewall" > Turn Windows Defender Firewall on or off...Full steps |
| Fix 4. Use virus & threat protection | First, turn on Virus & threat Protection in Windows Defender. Right-click Windows icon and...Full steps |
| Other Solutions and Fixes | Disconnect the Internet from Your PC > Reboot Your Computer Into Safe Mode in Windows 10...Full steps |
How Can I Remove Virus from My Computer Without Antivirus
"I had a sudden drop in PC performance and I assumed it could be a virus. I downloaded some free antivirus software but found that they are not really free! Some ask for a payment straight-up or allow you to scan for malware but have to pay to clean out the virus.
Most antivirus software is really expensive and I don't want to expend huge money on testing unknown antivirus software. There should be a way to remove a virus without antivirus software. How can I do this?"
Besides finding free virus removal methods, some users may also want to know how to check and prevent viruses on their computers. Here in the following three parts, we'll provide practical solutions to help you resolve this issue, cleaning all existing viruses from your PC, external storage devices without losing any data.
How to Tell If Your Computer Has a Virus
A computer virus is a type of malware (malicious software) designed to make copies of itself on any drive connected to your computer. When a virus infects your computer, it may slow it down and stop it from working properly. You may consider getting rid of a virus if you're experiencing:
- Unrecognized computer programs launching on their own
- Pop-up messages that appear out of nowhere and are hard to remove
- A computer or laptop is running as slow as a snail
- The sound of the hard drive in constant action
Part 1. Remove Virus from PC or Laptop Without Antivirus
In this part, we'll show you the complete process of cleaning the virus from Windows computers and laptops without using antivirus software or tools. Follow the below steps one by one to fully protect your computer:
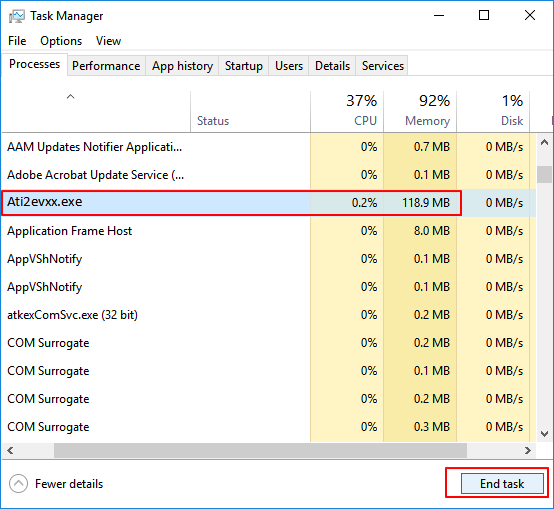
1. End Running Virus-Related Processes in Task Manager
This process will end with running virus-related programs on your PC, stopping the virus from spreading over your device.
Step 1. Press Ctrl + Alt + Delete to open Task Manager.
Step 2. On the Processes tab, check each running process listed in the window and select any unfamiliar processing programs, search online to confirm. Once confirmed it's a virus-related program, click "End Task" to stop it from infecting your PC and device.
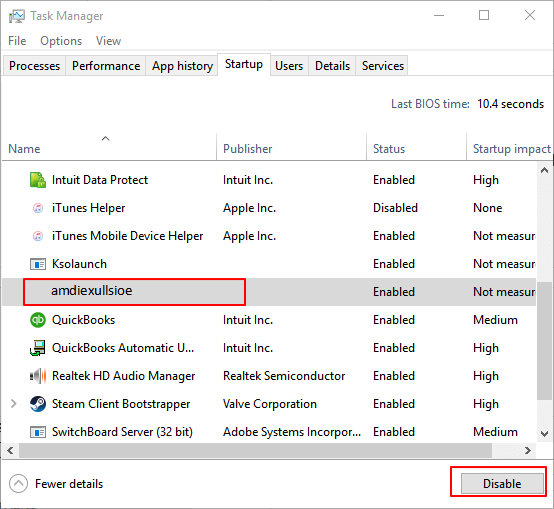
2. Disable Unknown or Strange Process from Windows Startup
This is an effective action to block strange malware or virus to take over your computer from the startup.
Step 1. Open System Configuration or Task Manager, go to the Startup tab.
Step 2. Scroll down to select all programs with unknown manufacturers and click "Disable".
Usually, programs with unknown manufacturers are related to the malware and even virus.
3. Turn Windows Defender Firewall On
By doing so, it will block furthermore viruses from infecting your computer and storage devices
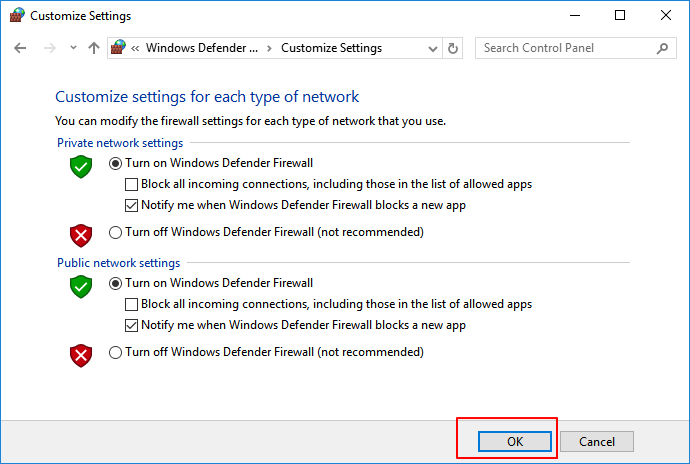
Step 1. Open Control Panel > click "Windows Defender Firewall" > Turn Windows Defender Firewall on or off.
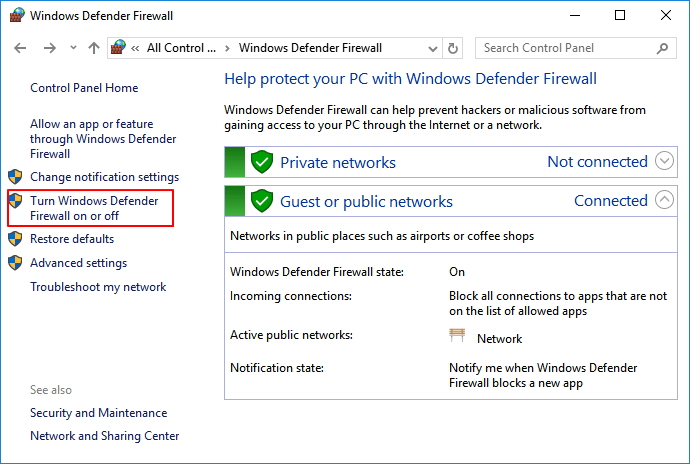
Step 2. Check the boxes of "Turn on Windows Defender Firewall" and click "OK" to confirm.
4. Remove Virus with Virus & Threat Protection in Windows Defender
Virus & threat Protection is a Windows built-in feature that can be applied to protect Windows computers from virus infection and even use to remove viruses. Follow-through below steps to enable this feature on your PC and remove the virus immediately:
First. Turn On Virus & threat protection in Windows Defender
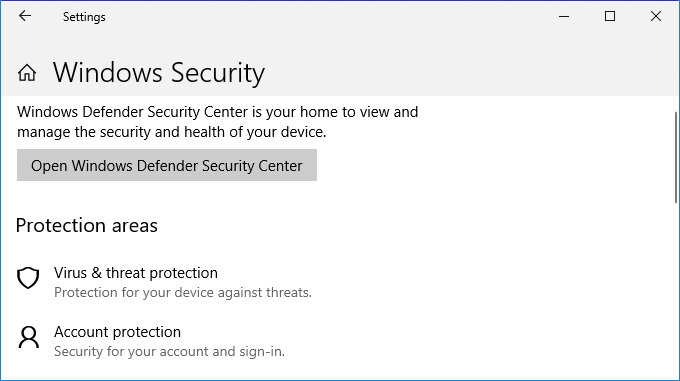
Step 1. Right-click Windows icon and select "Settings" > Click "Update and Security".
Step 2. On the Windows Security section, click "Open Windows Defender Security Center".
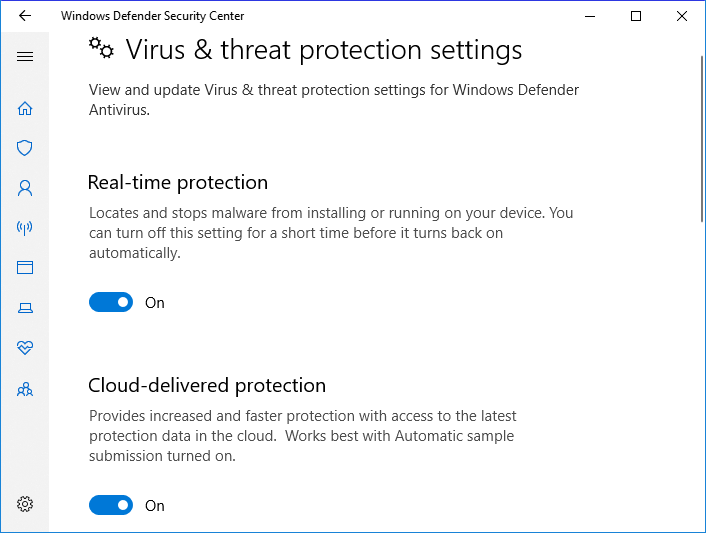
Step 3. Click "Virus & threat protection" on the new window > Go to Virus & threat protection settings.
Step 4. Turn on these three options: Real-time protection, Cloud-delivered protection, and Automatic sample submission.
Usually, once you enabled this feature, Windows Defender will automatically scan all drives and files to detect and check virus on your computer. If it finds a virus, do as requested to remove the virus.
Next. Remove Existing Virus from PC by Using Virus & threat Protection
Sometimes, you may also manually run this feature to scan and remove viruses from Windows computers.
Step 1. Go to "Settings" > "Update & Security" > "Windows Security".
Step 2. Click "Virus & threat protection".
Step 3. In the "Threat history" section, click "Scan now" to scan for viruses on your computer.
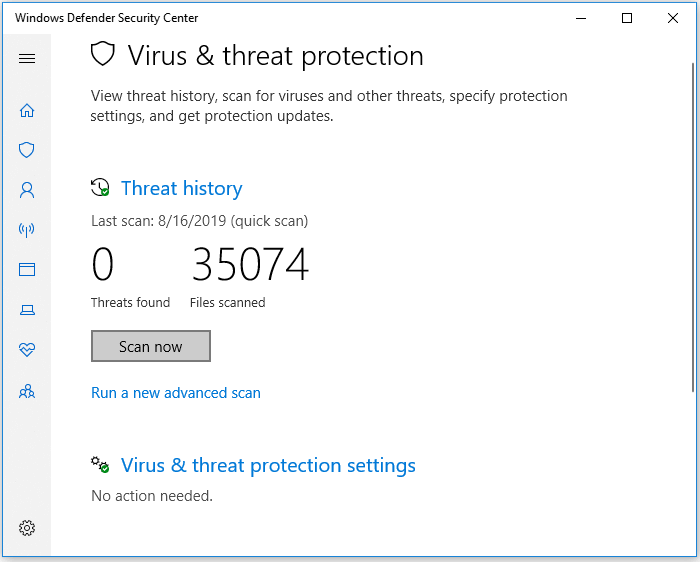
After this, you can restart your computer and the device is now clean of viruses, malware.
5. Disconnect the Internet from Your PC
As you know, some computer viruses use the internet connection to spread. Therefore, it's a good idea to disconnect from the internet to prevent further damage.
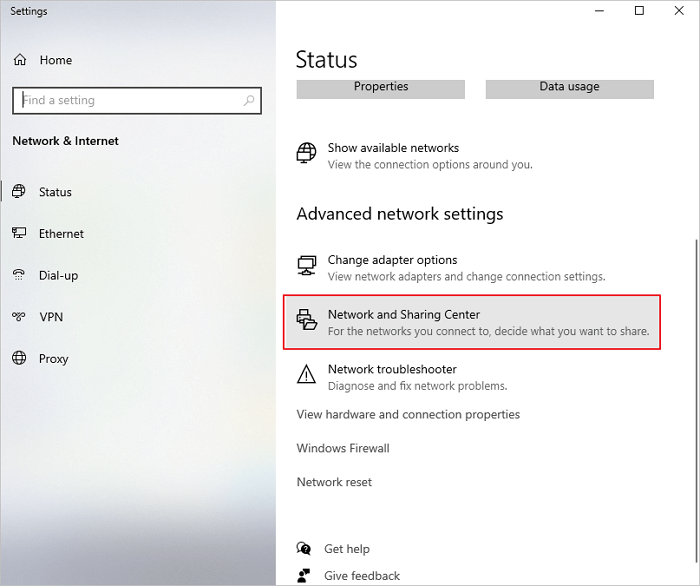
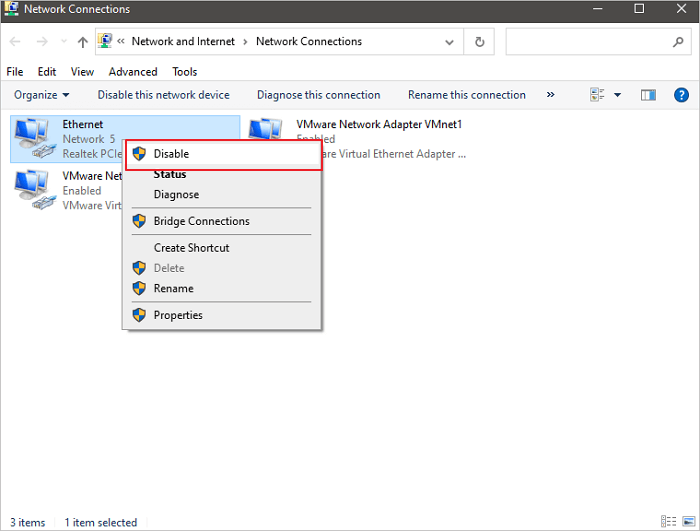
Step 1. Right-click the Internet connection icon on your Taskbar and select "Open Network & Internet settings".

Step 2. Select "Network & Sharing Center" and select "Change adapter settings".
Step 3. In the Network Connections screen, right-click or tap-and-hold the connection you want to disable, then select Disable. The icon for the connection turns grey to show that it's disabled.
6. Reboot Your Computer Into Safe Mode in Windows 10
These steps should work no matter what kind of malware you have on your PC or laptop. This procedure is as effective for Trojans as it is for a run-of-the-mill virus. This solution is to reboot your PC in Safe Mode.
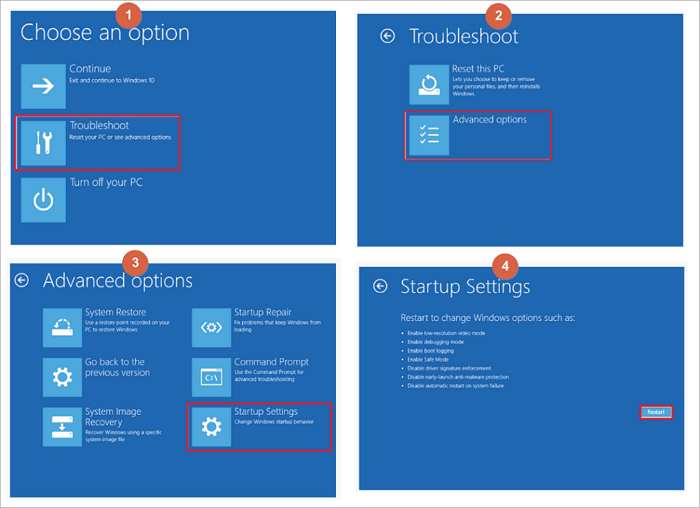
Step 1. Restart the Windows 10 PC. When you see the Sign-in screen, press the "Shift" key and don't release, and click the Power icon at the bottom-right and choose "Restart".
Step 2. Windows 10 restarts and asks you to select an option. Choose "Troubleshoot" > Advanced options" > "Startup Settings" > "Restart".
Also Read: Boot into Safe Mode Windows 10 in Every Possible Way
If your computer is infected by some specific virus, such as write-protection or shortcut virus. You may need other solutions. As the above-provided methods are provided for removing viruses from your PC.
Here are some relative tutorials that may help you remove some specific viruses from your PC and storage devices:
Part 2. Recover Files after Removing Virus from Windows PC
After removing the virus from your Windows computer, you can then check and continue using your device and files again. If some files are missing on your computer due to a virus infection, don't worry.
Go back to follow Part 1 to remove the virus from your computer first. Then you can follow provided data recovery methods here in this part to fully bring lost or missing files back immediately.
Method 1. Recover Deleted or Missing Files after Removing Virus
No matter how you end up killing the computer virus, you should always check your storage device for data loss afterward. Except for the virus itself may delete or hide files, the removal of virus files can also inadvertently delete non-virus files.
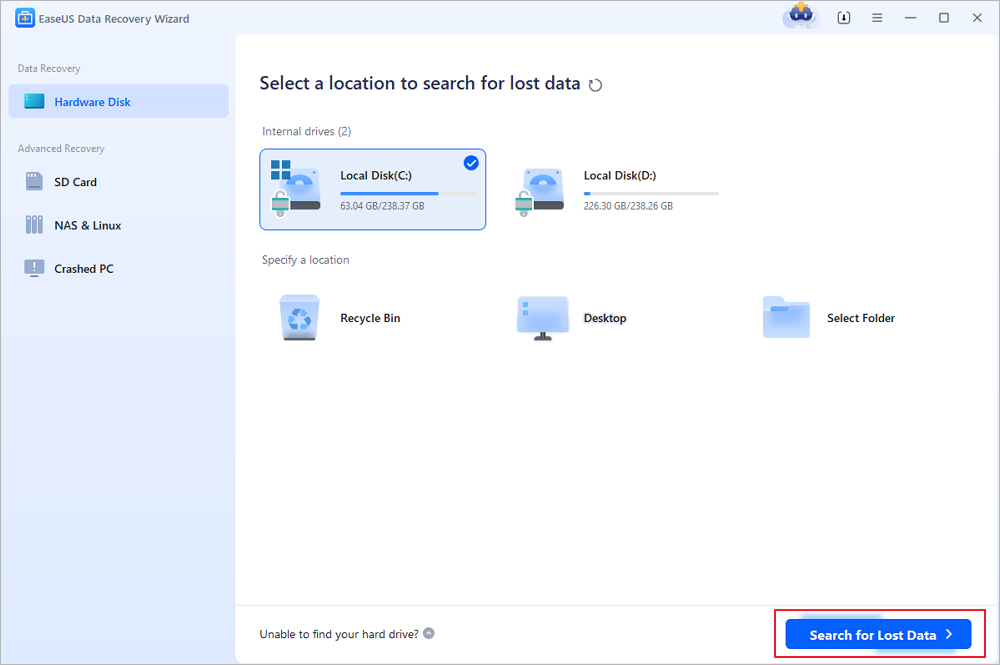
ReliableEaseUS Data Recovery Wizard can scan your entire storage device for any lost files due to false operation or virus removal.
- Recover lost files, videos, documents, photos, audio, music, emails, and more
- Recover data from any brands of hard drive, SSD, SD card, including Kingston, Sony, Samsung, and more.
- Support data recovery for sudden deletion, formatting, hard drive corruption, virus attack, system crash under different situations
This software offers you a straightforward workout on restoring virus deleted data:
Step 1. Select the disk drive where you have lost files after using an antivirus program and click "Search for Lost Data".
Step 2. When the scan process finishes, all the lost and deleted files on the selected drive should appear. You can try to locate the antivirus deleted items from the tree-view panel on the left, or use the "Filter" function to specify particular file formats, such as pictures, videos, emails, documents and so on.

Step 3. Double-click a file to preview. After that, select the file(s) at one time and click "Recover". You can choose a cloud storage, such as OneDrive, Google Drive, etc., and click "Save" to save your recovered files.

Method 2. Use CMD to Unhide Files (That Were Hidden by Virus)
- Warning
- Be careful while using cmd. Make sure you only enter commands from trusted sources and type them out correctly. Improper use of cmd can result in serious damage to your system.
Sometimes, viruses will not only take over your computer, blackmailing money for decrypting your devices. Some may also hide your files, making you believe that all files were removed.
Actually, these files were not lost but hidden on your PC. Therefore, you can also try to run the following CMD command to unhide files that were hidden by the virus:
Step 1. Run Command Prompt as an administrator.
Step 2. Type attrib -h -r -s /s /d F:\*.* and hit "Enter". (Replace "F" with the drive letter of your virus-infected hard disk or USB).
Step 3. Type del autorun.xxx (the extension of the shortcut virus) and hit "Enter".
Part 3. Prevent Computer and Data from Virus Infection
In addition to offering reliable solutions to remove viruses from your computer and restoring lost files, you may also have some other concerns about virus prevention and data protection.
Here we've gathered some top concerned questions and provide a brief answer to help you out:
1. How do I check my laptop for a virus
There are many symptoms and signs that may show your computer or laptop is infected by a virus. For example, the computer suddenly stops working, hard drive gets encrypted or files turn into shortcuts. How to check a virus? You can run the Virus & threat protection as mentioned in # 4 Part 1 or use virus cleaning software like Kaspersky, McAfee, Norton 360 or VAG, Avast, etc. to scan and remove viruses, malware from your computer.
2. How do I prevent viruses from infecting or encrypting my computer
The easiest and free way to prevent virus infection is to turn on the real-time protection in Windows Defender and enable Virus & threat protection on your computer. You can also run antivirus software like AVG, Avast, Avria or Kaspersky, etc. to protect your device anytime.
3. How do I prevent my files from being deleted or infected from viruses
First, you need to turn on the Real-time Protection in Windows Defender or run virus cleaner software on your PC. Next, you can save a copy of all your valuable files to an external hard drive as a backup. By doing so, you can always survive whenever your computer gets infected by a virus or malware.
Here, you may use reliable file backup software to selectively back up all desired files to an external hard drive at one time:
Remember to select the external hard drive as your target device for saving file images.
Step 1. Click the "Select backup contents" button to start backup.

Step 2. There are four data backup categories, File, Disk, OS, and Mail, click File.

Step 3. Both local and network files will be listed on the left. You can expand the directory to select the files to be backed up.

Step 4. Follow the on-screen guide, select the destination where you want to save the backup.

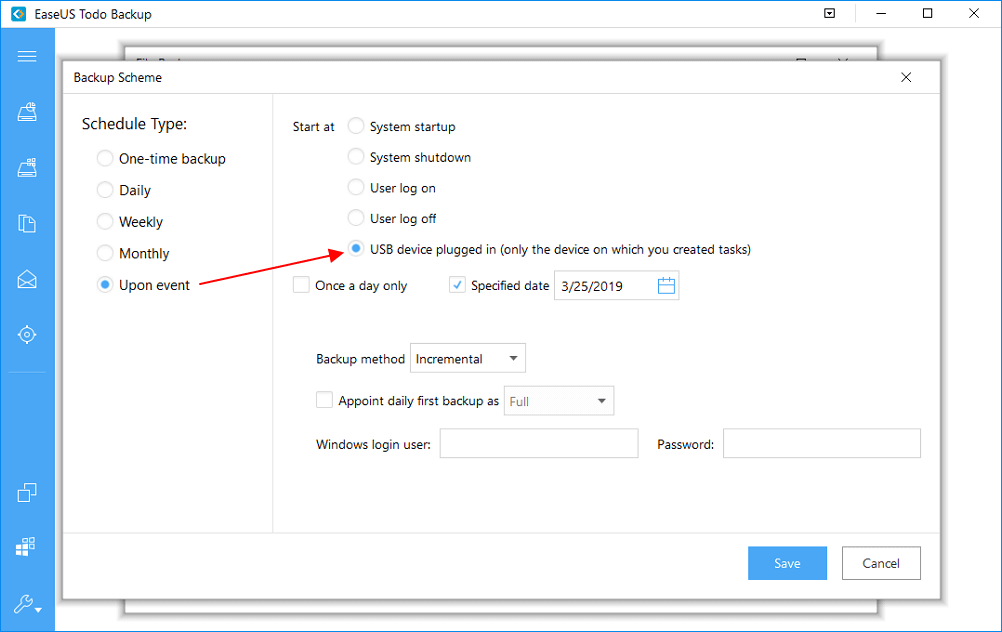
Click "Options" to encrypt the backup with password in "Backup Options", set the backup schedule and choose to start back up at certain event in "Backup Scheme". There are also many other options you can explore, customize the backup task according to your need.

Step 5. You can store the backup to local drive, EaseUS's cloud service, and NAS.

Step 6. EaseUS Todo Backup enables users to back up data to both third-party cloud drive and its own cloud drive.
If you want to back up data to third-party cloud drive, choose Local Drive, scroll down to add Cloud Device, add and login your account.


Step 7. Click "Backup Now" to start backup. After the backup task is completed, it will be displayed in the form of a card on the left side of the panel. Right-click the backup task to further manage it.

Bonus Tips: How to Remove Virus from Laptop with Antivirus
If your PC or laptop has a virus, follow the following simple steps to remove the virus from the laptop.
1. Download and install a virus scanner.
2. Disconnect from the internet.
3. Reboot your computer into safe mode.
4. Delete any temporary files...
5. Run a virus scan.
6. Delete or quarantine the virus.
7. Reboot your computer.
8. Change all your passwords
9. Update your software and operating system to the latest version.
Was this page helpful?
 February 12,2026


20+
Years of experience

160+
Countries and regions

72 Million+
Downloads

4.9 +
Trustpilot Score


Free Data
Recovery Software
Recover data up to 2GB for free!