On this page, we have collected four practical solutions that can help fix Microsoft Word not opening on Mac. And if you find the Word file is corrupted, let reliable Mac document repair software as recommended here for help.
I am having issues with Microsoft Word documents not opening. I am using Office 365 and use this online with Safari, whenever I either make a new Word doc or try to open a Word doc all I get is a black screen. from Tome Stewart1 in Microsoft Community
Today you're going to learn four tricks in solving Word not opening on Mac. The given workarounds are applicable to all Word editions such as 2003, 2007, 2010, 2013 2016, 2019, 2021.
1. Fix Microsoft Word Not Opening on Mac with Document Repair Software
When you find Microsoft Word not open as normal on Mac, it is possible that the Word documents you want to open on the Mac are damaged or corrupted. That's why you need professional Word repair software to fix this problem on Mac.
We highly recommend EaseUS Fixo Document Repair, and you can download a trial version and experience this software now!
Do not worry if you can't open Word documents on Mac. The EaseUS file repair tool for Mac can help you fix corrupted Word files on Mac. You'll just need three simple steps to repair corrupted Word documents. Check the following written tutorial and reopen the Word files on Mac.
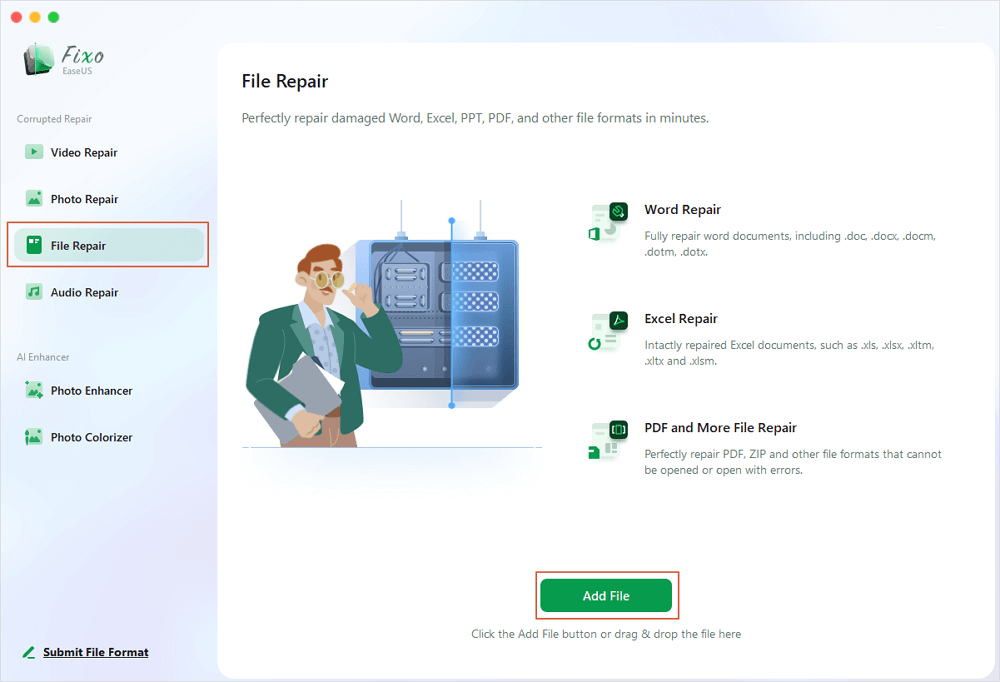
Step 1. Download and launch Fixo on the Mac. Choose "File Repair" from the left panel. Click "Add File" to select corrupted Office documents, including Word, Excel, PDF, and others you want to repair.
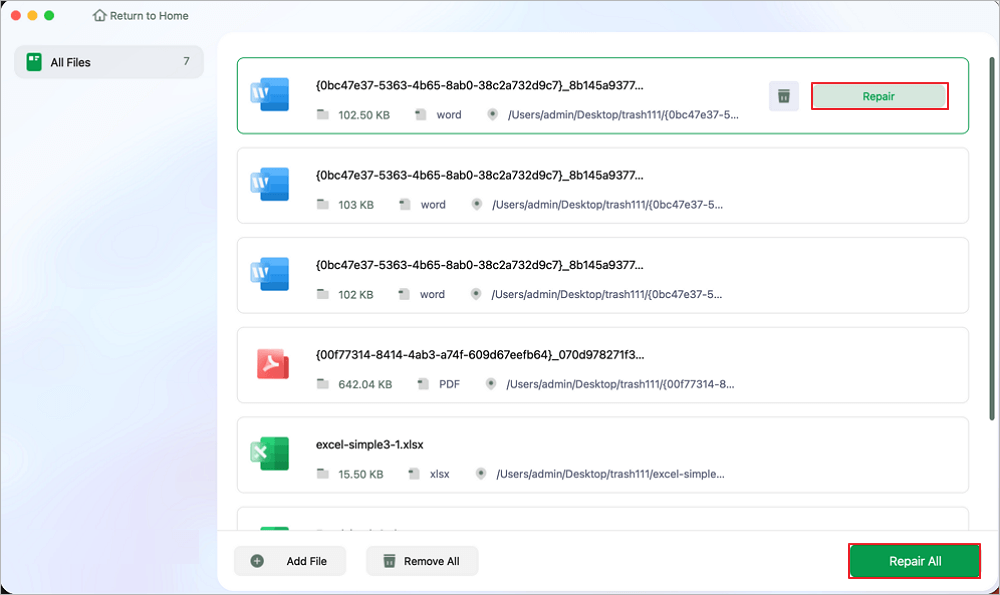
Step 2. To repair corrupted files in batch, click the "Repair All" button. If you want to repair a specific document, move your cursor to the document and click the "Repair" button. You can click the eye icon to preview the repaired document.
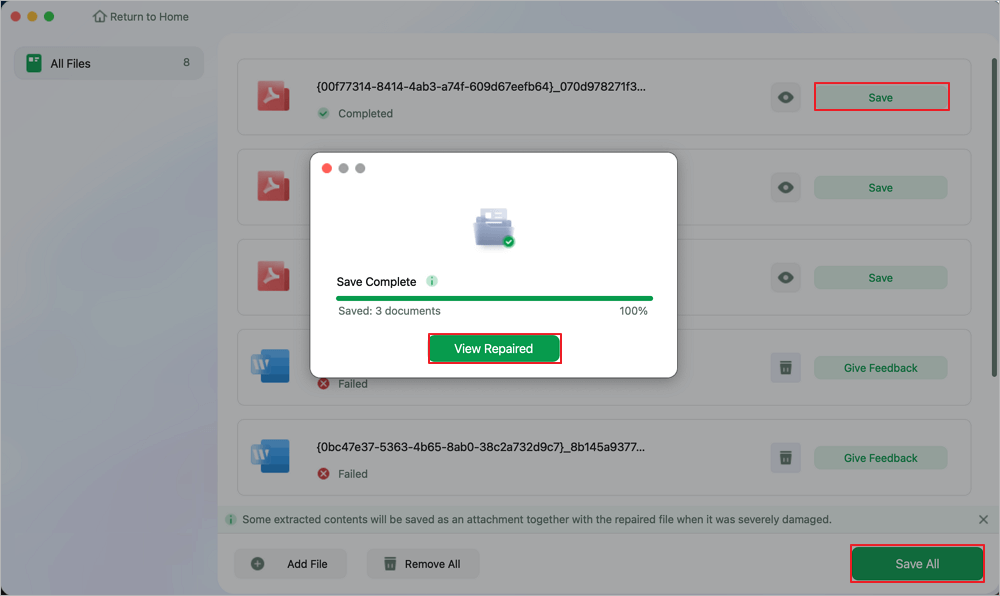
Step 3. Click "Save" to save a selected document. To keep all the repaired documents, choose "Save All". When the save completes, click "View Repaired" to locate the repaired folder.
You can also use the Mac text recovery converter Word to fix damaged Word, but EaseUS Fixo can fix more corruption issues and supports more file formats. Don't forget to share this passage and product on social media today!
2. Fix Microsoft Word Won't Open on Mac by Repairing Mac Disk
Sometimes you cannot open the Microsoft Word app just because of disk corruption or unexpected disk errors. It's convenience to use Mac Disk Utility to repair the Mac Disk and solve MS Word error.
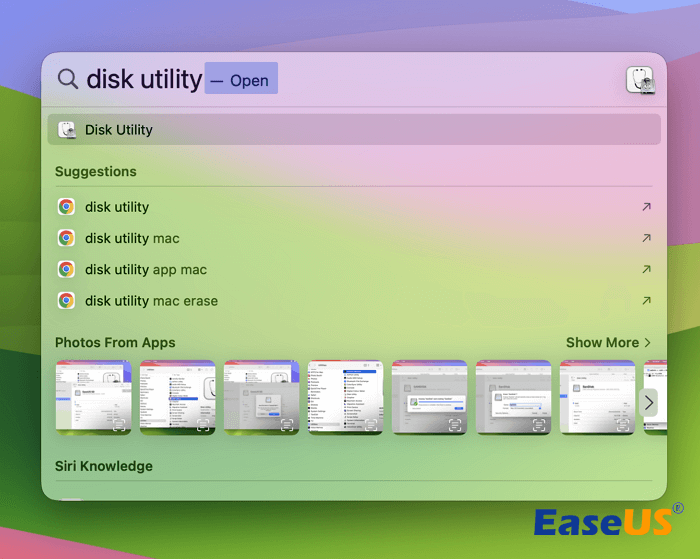
Step 1. Use the Spotlight to open Disk Utility on Mac quickly.
Step 2. Choose the primary hard disk drive for your computer. Then, click the "First Aid" tab.

Step 3. Click "Run" to repair the disk volume errors and permissions. When it finishes, click "Done".

3. Fix Can't Open Word Document on Mac by Removing Word Preferences
Removing the Word preferences can also help you reopen the Word app or document on Mac. Check the following steps to fix the issue:
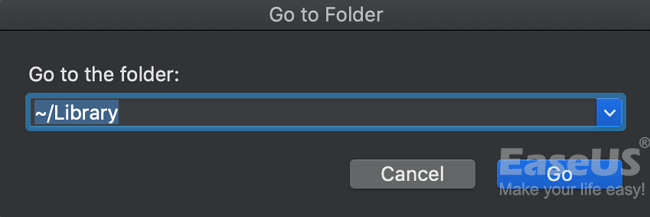
Step 1. Open "Library". Usually, click "GO" > "Go to the folder", then type ~/Library.
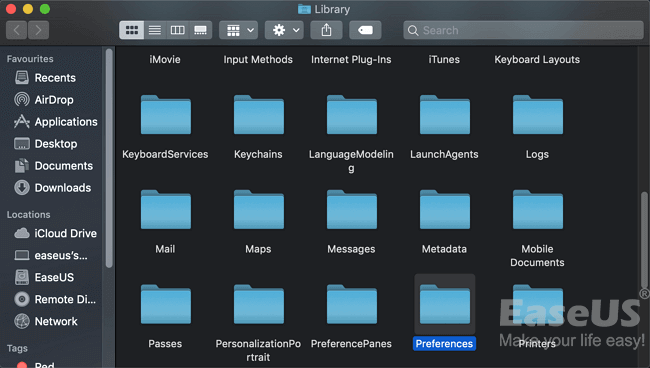
Step 2. Locate a file named "Preferences".
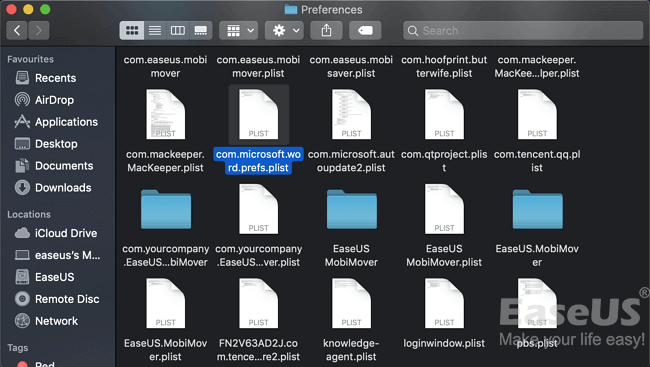
Step 3. Find a file named com.microsoft.Word.plist. Move the file to the desktop.
Start Word and check whether the problem still occurs.
If the problem still occurs, exit Microsoft Word and then restore the "com.microsoft.word.prefs.plist" file to its original location. Then, go to Step 4.
If the problem seems to be resolved, you can move the file to the trash.
| 💡Note: If you do not locate the file, the program is using the default preferences. |
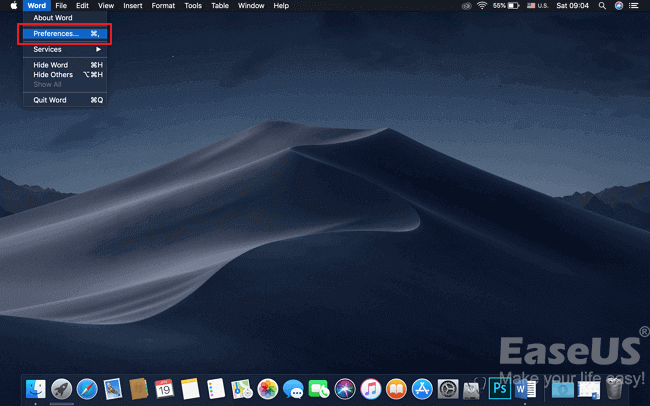
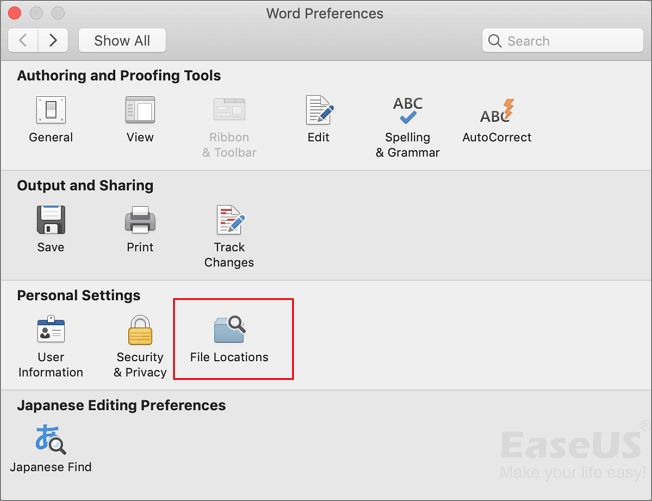
Step 4. Exit all Microsoft Office for Mac programs. Then, Click the Word icon. On the left, click "Preferences".
Step 5: Click "File Locations".
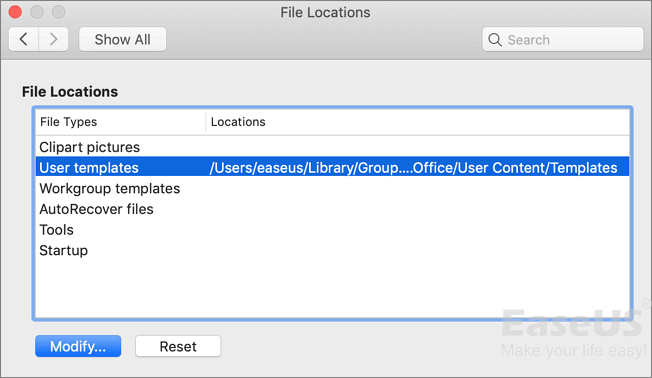
Step 6. Select "User templates".
Step 7. Locate the file named Normal and move it to the desktop.
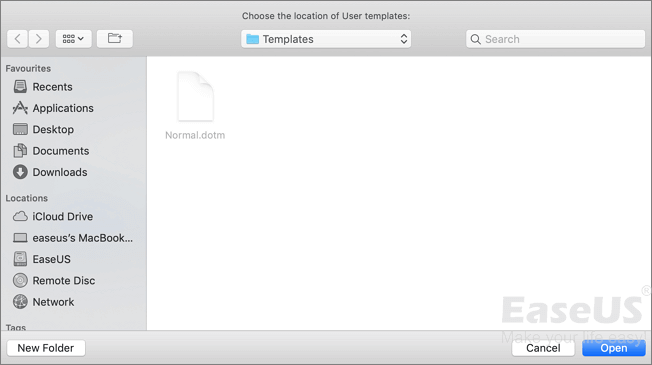
You can also find the file named as Normal through this way: "Library" > "Application Support" > "Microsoft" > "Office" > 'User Templates" > "Normal"
Start Word, and check whether the problem still occurs. If the problem seems to be resolved, you can move the "Normal" file to the trash.
4. Fix Word Not Opening on Mac with Open and Repair Option
Microsoft Word has a built-in repair option that can help you repair unopened Word documents on Mac quickly. Follow the steps below:
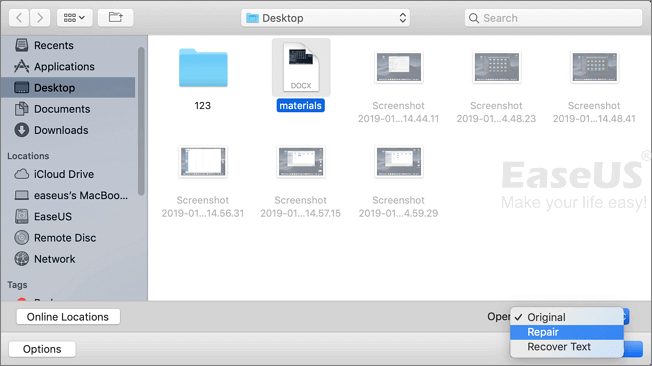
Step 1. Start Word. On the File menu, click "Open".
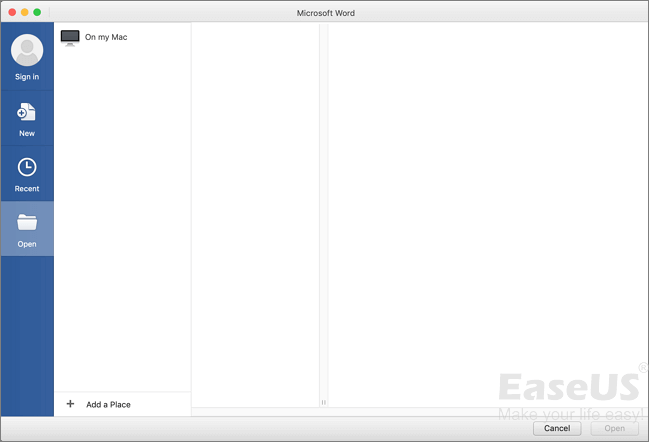
Step 2. In the Open dialog box, select the file that you want to open. Click the down arrow on the Open button, click "Open" > "Repair".
All four methods we provide in this passage are tested; you can share them with more friends on social media!
Conclusion
In addition to the situation in the first part, most users are also faced with these errors:
- The application Microsoft Word quit unexpectedly
- Microsoft Word has encountered a problem and needs to close
- Microsoft Word cannot be opened because of a problem. Check with the developer to make sure Microsoft Word works with this version of Mac OS X
As Microsoft Word is widely used among people, owning some basic Word troubleshooting is recognized as an essential skill.
If you want to fix corrupted Word documents on Mac, try EaseUS Fixo Document Repair, which will be the best solution!
MS Word Won't Open on Mac FAQs
This final part will mention some frequently asked questions, and you can learn more here:
1. Why does Word not open on my Mac?
Many issues will cause Word not to open on the Mac:
- Microsoft Word application bugs
- Word document corruption
- Disk corruption or errors
- ...
2. How do I access a not-opening Word document on Mac?
The best way to reopen the corrupted Word documents on Mac is to apply EaseUS Fixo Document Repair:
Step 1. Run this Word repair tool on Mac and click "File Repair", and add corrupted Word files.
Step 2. Repair the selected Word files with the EaseUS Fixo document repair tool.
Step 3. The repair process won't be long, and you can save the repaired Word on any device.
3. Can I fix Microsoft Word not opening on Mac online?
If you find this error is caused by corrupted Word documents, you can fix this issue online with a professional Word repair website; you can try EaseUS Online Document Repair to repair damaged Word files online.
Was This Page Helpful?
Dany is an editor of EaseUS who lives and works in Chengdu, China. She focuses on writing articles about data recovery on Mac devices and PCs. She is devoted to improving her writing skills and enriching her professional knowledge. Dany also enjoys reading detective novels in her spare time.
Jean is recognized as one of the most professional writers in EaseUS. She has kept improving her writing skills over the past 10 years and helped millions of her readers solve their tech problems on PC, Mac, and iOS devices.
Related Articles
-
[Fixed]Unable To Update Minecraft Native Launcher 2025
![author icon]() Daisy/2025-07-04
Daisy/2025-07-04 -
Games Crashing After Installing New RAM | 6 Methods to Fix
![author icon]() Jerry/2025-07-04
Jerry/2025-07-04 -
How to Fix Dying Light 2 Multiplayer Not Working
![author icon]() Daisy/2025-07-04
Daisy/2025-07-04 -
[2 Ways] How to Boot Mac into Disk Utility/Recovery Mode with Mac Startup Keys
![author icon]() Dany/2025-09-17
Dany/2025-09-17
EaseUS Data Recovery Services
EaseUS data recovery experts have uneaqualed expertise to repair disks/systems and salvage data from all devices like RAID, HDD, SSD, USB, etc.