Is your Mac stuck on checking for updates when you are trying to update it? Many users, just like you, have reported they cannot update their macOS and only see checking for updates. Here are 7 ways to solve it.
| Workable Solutions | Step-by-step Troubleshooting |
|---|---|
| Fix 1. Restart Your Mac | If your Macbook is performing poorly or suffering from a problem, you should first restart your Mac...Full steps |
| Fix 2. Check Internet Connection | If your internet connection is slow or weak, your Mac will struggle to connect to Apple's server...Full steps |
| Fix 3. Clear the Cache | This solution is also helpful in solving issues such as this. Sometimes these caches...Full steps |
| Fix 4. Boot in Safe Mode | To diagnose and fix a problem with your Mac, use Safe Mode, a simplified version...Full steps |
| Fix 5. Reset NVRAM and SMC | You might be able to fix your Mac that cannot check for updates by resetting NVRAM...Full steps |
| Fix 6. Update macOS Terminal | If you can't check for updates or your Mac is getting stuck when checking for updates...Full steps |
| Fix 7. Reinstall macOS | If nothing seems to help, reinstall macOS. By reinstalling macOS, you remove...Full steps |
This article will show you what to do when your Mac gets stuck checking for updates and how to fix it. Continue reading!
Causes of Mac Being Unable to Check for Updates
There are three reasons your Mac is stuck on the checking for updates message. They are due to:
- Poor internet connection
- Insufficient storage
- NVRAM or the SMC is faulty
Here's more about it:
Reason 1. Problems with the Internet Connection
Your macOS update cannot be installed without a poor internet connection.
Make sure you're connected to a fast internet connection and then check for updates; hopefully, your Mac will check for updates now, and you can update to the latest macOS update.
Reason 2. Insufficient Storage
If your Mac is low on storage, you cannot install new updates. Free some space on your drive, and then try checking for updates again.
Reason 3. NVRAM or the SMC Is Faulty
The NVRAM, which is short for "non-volatile random-access memory," and the SMC, which is short for "system management controller," can be facing some issues in the background. Even due to this, your Mac can fail to check for updates.
7 Solutions to Fix Mac Stuck on Checking for Updates
There are seven methods to fix your Mac that is stuck checking for updates.
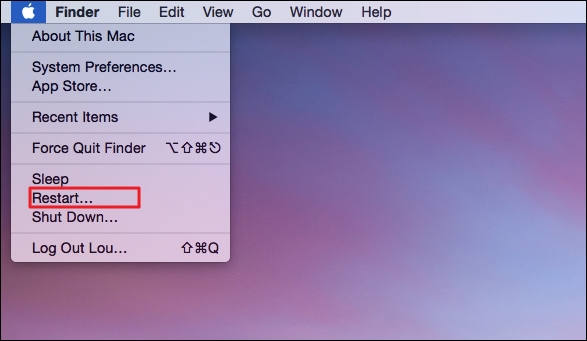
Fix 1. Restart Your Mac
If your Macbook is performing poorly or suffering from a problem, you should first restart your Mac. Restarting your Mac eliminates if there are any issues.
If your Mac cannot check for updates, restart your computer and try again to check for the latest updates.
Fix 2. Check the Internet Connection
If your internet connection is slow or weak, your Mac will struggle to connect to Apple's server to see if any new updates are available for download.
Make sure you are connected to a fast internet connection, and preferably use a LAN for a reliable internet connection compared to Wi-Fi, which can be pretty janky sometimes.
Fix 3. Clear the App Store Cache and Check the Storage on Mac
This solution is also helpful in solving issues such as this. Sometimes these caches prevent your Mac from updating the OS, app updates, and others. Clear caches and see if your Mac can check for updates.
Here's how to clear the cache:
Step 1. Open "Finder."
Step 2. Click on "Go" in the menu bar, and click on "Go to Folder."

Step 3. Copy-paste this location "~/Library/Caches/com.apple.appstore" in the search bar.

Step 4. Now, select the cache folder and delete it.
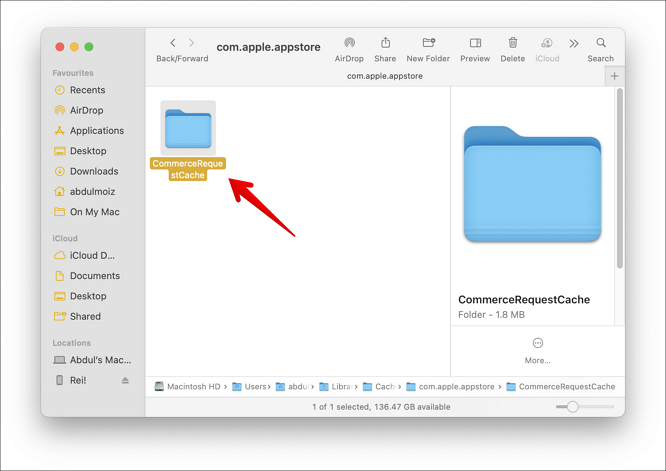
Step 5. After deleting the cache folder, restart your Mac and check for updates.
Fix 4. Boot macOS in Safe Mode
To diagnose and fix a problem with your Mac, use Mac Safe Mode, a simplified version of the Mac operating system.
But we have to tell you beforehand that booting your Mac in safe mode is different on the Intel-based Mac and the Apple silicon-based Mac. We will show you how to boot in safe mode in both versions:
- Boot macOS in a secure way in the Intel version:
Step 1. Turn off your Mac.
Step 2. Press the power button on your Mac, and then press and hold the "Shift" button.
Step 3. Wait for a few seconds, and your Mac should boot up safely.
- Boot macOS in safe mode in Apple Silicon version:
Step 1. Turn off your Mac and wait for 10–15 seconds.
Step 2. Now, press the power button until you see "Startup Volumes and Options."
Step 3. Select "Startup volume.
Step 4. Now, press and hold the "Shift" key, and then select "Continue in Safe Mode.".
Step 5. Log in to your Mac as usual and see if any updates are available for it in safe mode, then update it.
Step 6. Now, exit safe mode and boot your Mac normally.
5. Reset NVRAM and SMC
You might be able to fix your Mac that cannot check for updates by resetting NVRAM and SMC.
Here's how to reset the NVRAM:
Step 1. Turn off your Mac.
Step 2. Turn on your Mac, and then press and hold the CMD+Option+P+R keys on your keyboard.
Step 3. Keep holding the keys until you see the Apple logo.
Step 4. That's about it, and you have reset the NVRAM on your Mac.

Here's how to reset the SMC:
Step 1. Turn off your Mac.
Step 2. Turn on your Mac and press the Shift+Option+Control+R keys on your keyboard.
Step 3. Keep holding until your Mac turns on and the Apple logo appears.
Step 4. That's about it, and you have reset the SMC on your Mac.
6. Update macOS with Terminal
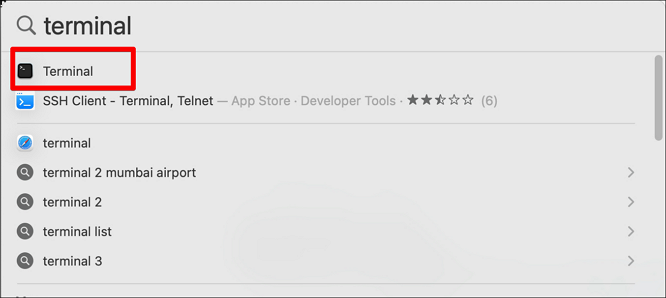
Alternatively, if you usually can't check for updates or your Mac is getting stuck when checking for updates, you can update your Mac using Terminal. Here's how:
Step 1. Click on the "Spotlight" button and search for "Terminal."
Step 2. Check for software updates using the command "software update -i."
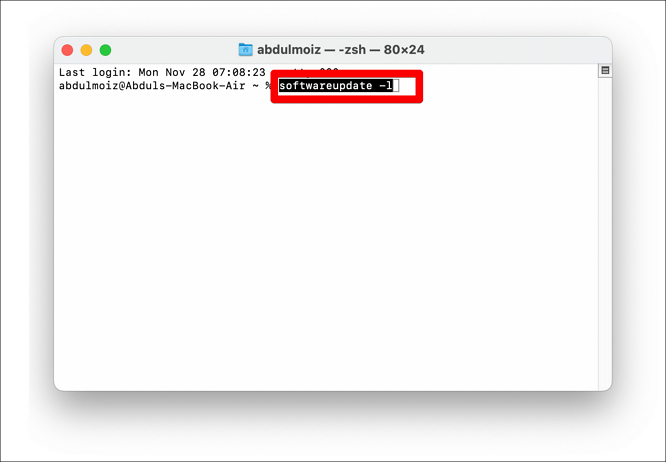
Step 3. You will see a list of available updates. Write down the names of those updates.
Step 4. Enter the command "sudo software update -i (and the update's name).
7. Reinstall macOS
If nothing seems to help, reinstall macOS. By reinstalling macOS, you remove all the software issues lurking in the background, including bugs and other issues.
Reinstalling the macOS is different on Intel-based Macs and Apple silicon-based Macs. We will show you how to reinstall the OS in both versions.
- Here's how to reinstall macOS on an Apple silicon Mac:
Step 1. Turn off your Mac.
Step 2. Press and hold the power button.
Step 3. You will now see a "Startup Options" window. Select "Options."
Step 4. Select "Reinstall macOS" and click on "Continue."
Step 5. Follow the prompts to reinstall macOS.
- Here's how to reinstall macOS on an Intel-based Mac:
Step 1. Turn off your Mac.
Step 2. Turn on your Mac and press and hold CMD+R immediately until you see the Apple logo.
Step 3. Select "Options" under the "Startup Options" window.
Step 4. Select the "Reinstall macOS" option and click on "Continue."
Step 5. Follow the prompts and reinstall macOS.
You can also try a third-party solution that creates a bootable USB drive for Mac. With this software, you are not limited to updating the latest macOS version. Instead, you can select any macOS version you'd love to change.
Here are the steps:
Step 1. Select macOS installer
Launch EaseUS Data Recovery Wizard for Mac and click "macOS Installer" on the left side. In tab 1, unfold the macOS version list by clicking "Select macOS intaller". You can also select "Refresh" button after downloading the macOS installer from App Store.
You can download macOS installer to upgrade or downgrade macOS, and you can find all the available versions, no matter the latest or older versions. Morever, you can apply macOS installer to dual boot Mac and run two macOS together.

Step 2. Format the USB flash drive
Connect a USB flash drive (larger than 16 GB) to the Mac as your macOS boot drive. Choose the USB drive you prepared in tab 2 and click the "Erase and create" option in the pop-up window to format your USB flash drive. Then click the "Create macOS installer" button to start the creating.
- Important: This progress will delete all data on your USB flash drive, please back up the data before, or use EaseUS data recovery software to recover your data.

Step 3. Create the macOS installer boot drive
Click the "Finish" button after the macOS installer creating is finished. Follow the prompts on the interface to perform subsequent installation operations.

Further Solution: Recover Data When macOS Update Failed
Sometimes, when your Mac doesn't update properly, there is a high chance of data loss. You cannot restore a file after a data loss, but that has been made possible with a specialized tool like EaseUS Data Recovery Wizard for Mac.
Suppose you lost data when the macOS Ventura upgrade failed, or deleted a file together by accident, or the system crashed, or you need to restore unsaved Word document on Mac. In that case, you can recover your files using the EaseUS Data Recovery Wizard for Mac.
- It can recover missing photos after macOS Ventura update, unexpected shutdown, hardware failure, system crashes, virus attacks, macOS formatting, etc.
- It can recover deleted imessages on Mac on macOS Ventura, Big Sur, Monterey, Catalina, and more.
- It can also create a WinPE bootable CD/DVD to recover the corrupted hard drive of your Mac.
- It can save recovered data to HDDs, USB flash drives, and cloud storage like OneDrive, Google Drive, Dropbox, etc.
Follow the steps below to recover Mac data after the update.
Step 1. Select the location
Select the disk where you lost data after updating to macOS Sonoma/Ventura/Monterey/Big Sur. Then, click "Search for lost files".

Step 2. Find lost data after the scan
EaseUS Data Recovery Wizard for Mac will immediately scan your selected disk volume and display the scanning results on the left pane. Use the file type and file path to find wanted data on Mac.

Step 3. Recover data after macOS update
Select the target files that were unknowingly lost during or after the update and click the "Recover" button to get them all back.

Final Thoughts
Apple's Mac is one of the most powerful computers available for consumers. However, despite its raw power, it is susceptible to issues or bugs like other operating systems.
If your Mac is stuck on checking for updates, it could be due to a software issue, which can be easily fixed by restarting or following our above fixes.
Mac Is Stuck on Checking for Updates on FAQs
Here are more answers to your questions about why Mac is stuck checking for updates.
1. How do I fix my Mac update taking forever?
If the update takes longer to download, your internet speeds are slow. Connect to a faster internet connection to download the update more quickly.
If the update is taking longer to install, in that case, the update is significant. Allow some time for it to complete the installation.
2. How to fix the macOS upgrade that failed?
Make sure you have sufficient space on your hard drive. If, despite having enough space available, you cannot upgrade your macOS, follow the above solution to fix the issue.
3. Why does my Mac get stuck on checking for updates?
The most prominent reason is slow internet speed, but if you're connected to a fast internet connection and your Mac is still stuck on checking for updates, that could be due to an underlying issue. Follow our above solutions to fix the problem.
4. How do I force an unresponsive Mac to restart?
Press and hold the power button on your Mac until the display goes black.
Was This Page Helpful?
Jaden is one of the editors of EaseUS, who focuses on topics concerning PCs and Mac data recovery. Jaden is committed to enhancing professional IT knowledge and writing abilities. She is always keen on new and intelligent products.
Related Articles
-
5 Solutions on Samsung 990 Pro SSD Health Drops Issue
![author icon]() Cici/2024-09-23
Cici/2024-09-23 -
5 Proven Ways to Fix Zsh Command Not Found Error on macOS [Bash & Zsh]
![author icon]() Jaden/2024-10-10
Jaden/2024-10-10 -
How to Fix Dying Light 2 Multiplayer Not Working
![author icon]() Daisy/2024-11-25
Daisy/2024-11-25 -
Samsung Laptop Stuck on Logo Screen [Fixed on Windows 11/10]
![author icon]() Larissa/2024-11-25
Larissa/2024-11-25

EaseUS Data Recovery Services
EaseUS data recovery experts have uneaqualed expertise to repair disks/systems and salvage data from all devices like RAID, HDD, SSD, USB, etc.