"Recently, I saw my Mac was showing messages of not having enough storage space. So, I decided to delete some files and folders that weren't important. After that, I deleted them from Trash too. However, the finder window failed to show that space has increased. I need help in resolving the problem."
Have you ever come across such a problem? In some cases, Mac users have reported that even deleting different files and folders didn't increase storage space.
| Workable Solutions | Step-by-step Troubleshooting |
|---|---|
| Fix 1. Reboot Mac in Safe Mode | The simplest method to fix the Mac Disk Utility showing the wrong space is by rebooting...Full steps |
| Fix 2. Free Up By Startup Disk | Sometimes, you need to manually free up the startup disk so that the Mac Disk Utility...Full steps |
| Fix 3. Store Your Files in iCloud | Another way to fix the Mac disk utility showing the wrong free space is to store files in iCloud...Full steps |
| Fix 4. Reinstall macOS | Sometimes, the showing of wrong free space can also be due to software errors...Full steps |
Firstly, you need to check whether you have emptied the Trash. The issue can be due to many Mac errors if you have already done so. In this article, we will talk about the reasons for Mac disk utility shows wrong free space and potential solutions.
Why Does Your Mac Disk Utility Show Wrong Space?
Many users have reported that the Mac Disk Utility may show incorrect disk space usage. There can be many reasons, including hidden files, system files, and unaccounted corrupted files. Apart from these, there can be other problems with the file system on the disk, which could cause the Disk Utility to show incorrect information.
How to Fix Mac Finder Shows Incorrect Free Hard Drive Space?
There are several solutions to fix the incorrect showing of the free hard drive space. However, it is vital to back up your data before opting for any of the fixes. Let's take a look –
Fix 1. Reboot Mac in Safe Mode
The simplest method to fix the Mac Disk Utility showing the wrong space is by booting the Mac in safe mode. In the safe mode, Mac users can power the system and resolve system issues safely. When the system enters safe mode, only the apps, and files that are absolutely essential run. Now, you can try to fix different problems on your Mac.
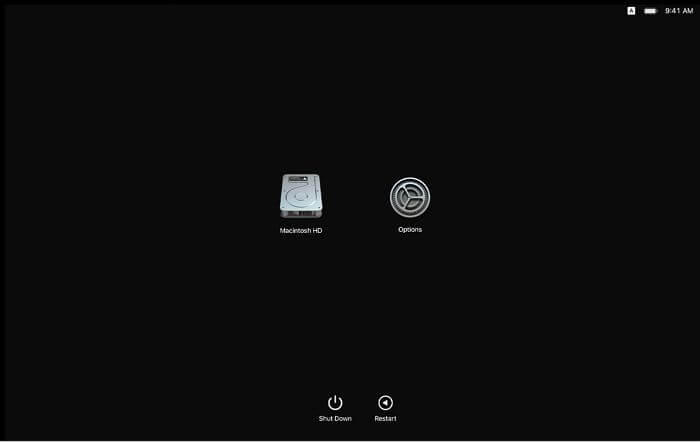
- Here are the steps you need to follow for Apple silicon–
Step 1. Go to the Apple menu. Click on Restart from the drop-down button. Wait for a few seconds to allow the system to restart.

Step 2. Press the Power button and hold it till you see "Loading startup options" appear on the screen.
Step 3. Choose a volume. Press the Shift key and hold it.
Step 4. Now, select "Continue" in Safe Mode.
Step 5. The device will restart automatically. You will come across "Safe Boot" on the screen.
- Take a look at the steps for Intel-based Mac –
Step 1. Turn on your Mac. Press the Shift key and hold it till you come across the login window.
Step 2. Log in to the device. If prompted, log in again.
Step 3. You will come across the "Safe Boot" in the menu bar on the first or second login window.
Fix 2. Manually Free Up Space By Startup Disk
Sometimes, you need to manually free up the startup disk so that the Mac Disk Utility app stops showing the wrong storage space left.
Step 1. Empty the Trash Can
Open Bin from the dock. Once it is opened, click on the Empty button to remove files you don't need immediately.

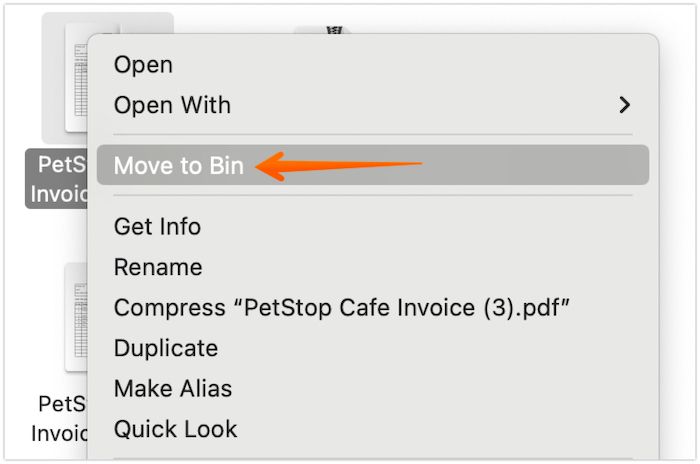
Step 2. Empty Downloads Not in Use
Open the Downloads folder from the dock. Review the files that have been downloaded over the period of time. Right-click on the file or folder that is not needed and select the Move to Bin option.
Step 3. Uninstall Apps that are Not in Use
There are many apps that you install on your computer and don't use anymore. Find those files from the Applications folder and delete them if not needed.
Fix 3. Store Your Files in iCloud
Another way to fix the Mac disk utility showing the wrong free space is to store files in iCloud. Here are the steps you need to adopt –
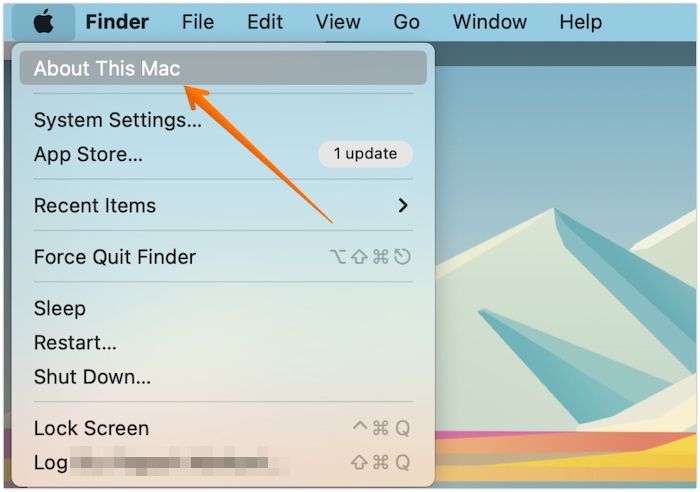
Step 1. Go to About This Mac. Click on More Info.
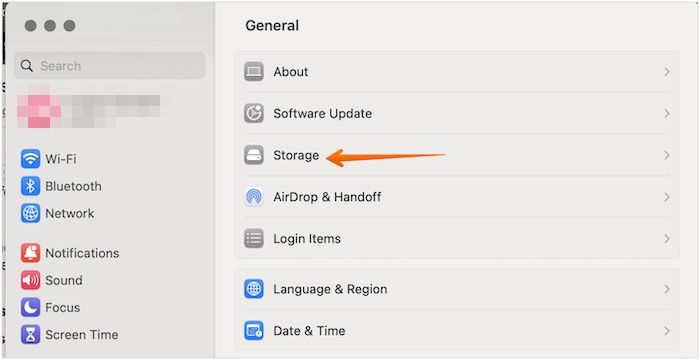
Step 2. A new window will open, click on the Storage option.
Step 3. Now, click Store in iCloud from Recommendations. You can transfer images, videos, files, etc., to iCloud.
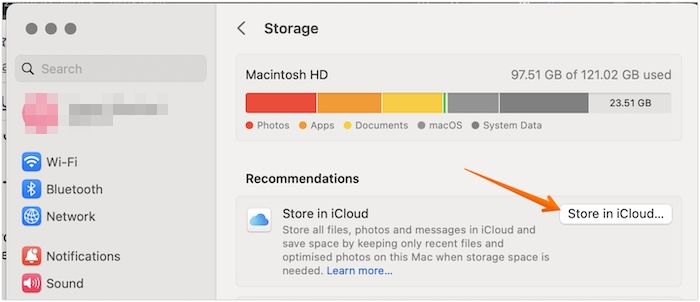
Step 4. Select Optimize to get rid of the watched iTunes files from your system.
Step 5. Also, select the Turn On button next to Empty Trash Automatically. This will remove files present in the Trash for 30+ days.
Step 6. Click on Applications to delete the apps you don't need.
Step 7. Select Documents to get rid of unnecessary files.
Step 8. Now, click on the "iOS Files, Mail, and iTunes" options to remove items you don't need anymore.
Step 9. Go to Trash and click the Empty Trash option to free up space.
You can force empty the Trash if you failed to clean it following the mentioned method.
Fix 4. Reinstall macOS
Sometimes, the showing of wrong free space can also be due to software errors. In that case, reinstalling the macOS might work. Check out the steps you must adopt for this solution –
Step 1. Go to the Apple logo. Click on Restart.
Step 2. Press and hold the Command and R keys till you come across the Apple logo.
Step 3. You will see the macOS Utilities window on the screen. From here, you can select "reinstall macOS."
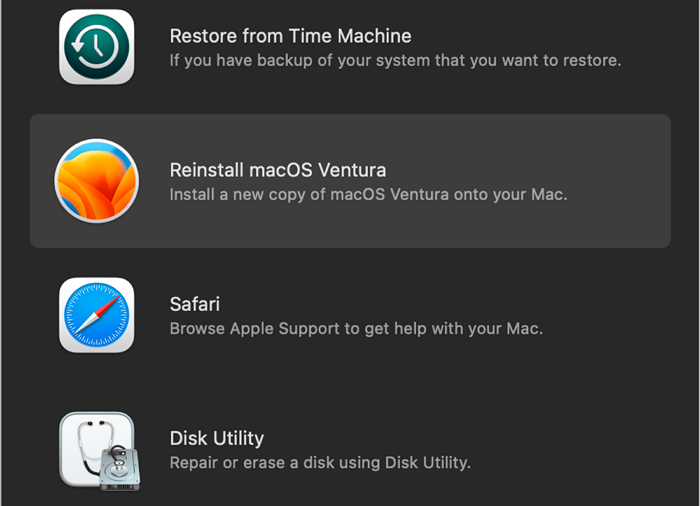
Step 4. Click Continue and follow the instruction available.
Note: The steps are applicable for Intel-based Macs. Besides, it is critical to understand that reinstalling macOS will not remove or delete data from the system. You also need to enter the password whenever asked.
Extra Tip: How to Recover Deleted Files on Mac
Did you know that the wrong space concern on your Mac can trigger different issues? Amid this confusion, you might encounter data loss. Rebooting the Mac while solving some problems can also cause the sudden deletion of crucial data. In that case, a specialized data recovery tool can help.
The EaseUS Data Recovery Wizard for Mac is an excellent data recovery program. It is specifically designed to help Mac users protect their data. You can recover data irrespective of the situation of its loss. For instance, you can retrieve data lost due to format issues during macOS updates, accidental deletion, hardware failure, deletion without backup, system crash, virus attack, and more!
- You can also use this excellent data recovery software to restore different types of data. These include images, videos, emails, documents, etc.
- No matter the Mac-based device, the platform works perfectly well. You can recover deleted files SD card on Mac, as well as HDD, fusion drives, SSD, USB drives, etc.
- EaseUS Data Recovery Wizard for Mac aids in extracting data from Time Machine backup, and you can also allow users to send the data restored to cloud storage, such as Dropbox, OneDrive, Google Drive, etc.
- The tool You can scan the files quickly and choose the ones you want to get back.
Moreover, the software is user-friendly and helps both experts and beginners seamlessly. Try out EaseUS Data Recovery Wizard for Mac and recover deleted files on Mac in several steps.
Step 1. Search for lost files
Select the disk location to search for lost files (it can be an internal HDD/SSD or a removable storage device) on macOS Sierra, High Sierra, Mojave, Catalina, Big Sur, Monterey, Ventura, and the latest Sonoma. Click the "Search for lost files" button.

Step 2. Go through the scanning results
EaseUS Data Recovery Wizard for Mac will immediately scan your selected disk volume and display the scanning results.

Step 3. Select the file(s) and recover
In the scan results, select the file(s) to preview and click the "Recover" button to have them back.

Final Words
Is your Mac Disk Utility showing the wrong free space? Have you tried deleting files? Is the problem continuing even after emptying the Trash? In that case, the cause could be software errors or glitches.
Luckily, there are multiple solutions one can apply to fix this particular problem. You can try rebooting the system in safe mode or reinstalling macOS. However, you can still encounter loss of files. In that case, opting for a reliable data recovery program is an ideal solution.
The EaseUS Data Recovery Wizard for Mac is a professional and efficient data recovery tool. With this software, you can retrieve different types of data. The tool is easy to use and is perfect for novices and experts.
Start using EaseUS Data Recovery Wizard for Mac today!
Mac Disk Utility Shows Wrong Free Space FAQs
The Mac Disk Utility showing the wrong free space is definitely a concern. However, you can gain more information by reading the questions and answers listed below -
1. Why does my Mac say your disk does not have enough free space?
Your Mac says your disk does not have enough free space mainly because the system is filled with "purgeable" space. This is basically the space that is occupied by unnecessary data on the device. The error can also be due to software issues.
2. How do I fix free space on my Mac?
To fix free space on your Mac, you need to delete music, files, photo, videos, etc., you don't need anymore. Keep in mind that you also need to empty the Trash.
3. How do I delete the free space partition on Mac?
To delete the free space partition on Mac, go to System Preferences. Now, open Security & Privacy and turn off FileVault. After that, restart the system in Recovery Mode. Select the Mac drive and proceed to delete the free space partition.
4. How do I reset my Mac system storage?
You can reset the system storage on your Mac to perform a clean install of the operating system. It will remove everything on your Mac, including personal files, so backup. Besides this, no application can remove files from the system folders, and you should not be doing so.
Was This Page Helpful?
Jaden is one of the editors of EaseUS, who focuses on topics concerning PCs and Mac data recovery. Jaden is committed to enhancing professional IT knowledge and writing abilities. She is always keen on new and intelligent products.
Related Articles
-
8 Ways to Fix MacBook Screen Goes Black But Still Running
![author icon]() Brithny/2024-10-10
Brithny/2024-10-10 -
How to Install Dmg Files on Mac 13/12/11 [4 Fixes]
![author icon]() Jaden/2024-10-25
Jaden/2024-10-25 -
Windows 11 Update Slows Down SSD Performance? Newest Guide
![author icon]() Sherly/2024-09-25
Sherly/2024-09-25 -
(Top 8 Ways) How to Fix Windows 10 Black Screen with Cursor
![author icon]() Jerry/2024-11-25
Jerry/2024-11-25

EaseUS Data Recovery Services
EaseUS data recovery experts have uneaqualed expertise to repair disks/systems and salvage data from all devices like RAID, HDD, SSD, USB, etc.