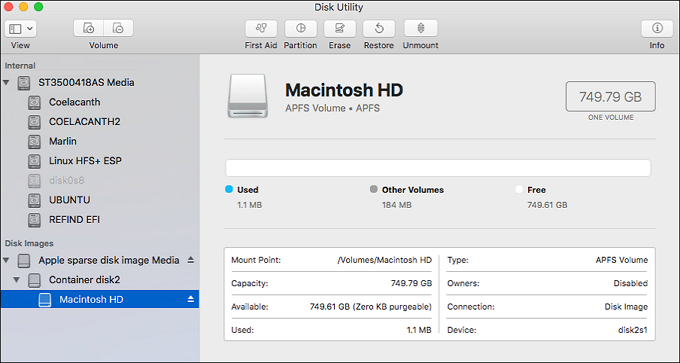
For Mac users, their primary storage drive is known as the Mac hard drive or Macintosh HD. However, users occasionally experience the Macintosh HD greyed out in Disk Utility issue for various reasons. Here is the quick navigation to fix the annoying problem.
| Workable Solutions | Step-by-step Troubleshooting |
|---|---|
| Fix 1. Mount the Macintosh HD | The Macintosh HD may be greyed out in Disk Utility because it cannot be mounted...Full steps |
| Fix 2. Repair in Recovery Mode | With Disk Utility's First Aid, you can fix the Macintosh HD that is greyed out...Full steps |
| Fix 3. Fix Macintosh in Terminal | If the Disk Utility cannot fix your Macintosh HD issue, you might try using Terminal...Full steps |
| Fix 4. Format the Macintosh HD | Do all the techniques above fail to fix your Macintosh HD? The factory reset is your only option...Full steps |
Macintosh HD Greyed Out in Disk Utility, Help!
"Hey guys, bizarre behavior from my 2021 MacBook Air M1... I've been using it only for six weeks, following a crash (pink screen and sudden shutdown due to overloaded ram) that might or might not be the catalyst of what follows - my Macintosh HD has been greyed out in the Disk Utility without any way to mount it. What is going on? Anyone has encountered the same problem by any chance?" - A user's problem on Reddit.
Anything might happen. The starting disk may corrupt due to a power loss or system crash, rendering the Macintosh HD greyed out. Macintosh HD greyed out in Disk Utility indicates no hardware malfunction because your Mac can still detect it even though it cannot be mounted. Even worse, a Mac won't turn on with a black screen may occur.

Why Is Macintosh HD Greyed Out in Disk Utility
The operating system and all the system files for your MacBook are stored on the Macintosh HD drive. When attempting to delete data from this drive, you might notice that it is greyed out.
Because it contains information about the operating system, Apple does not permit users to delete, erase, or edit the data in this drive, which is why it is grayed out. Here are some specific causes of the problem.
Reason 1. Damaged Disk
The corrupt disk is the primary reason the HD won't mount and greyed out. However, you cannot access the data stored on a corrupt disk.
Reason 2. Improper Hard Disk Formatting
Most frequently, this occurs when people format an SD card or hard disk incorrectly or with an improper file system. Invalid media or disk not recognized, and other disk-related issues can occasionally happen due to doing this.
Reason 3. Power Disruption
While mounting the hard drive on Mac PC, power disturbance can damage it and throw different errors or bugs.
The MacBook won't start up if the files in Macintosh HD are deleted or altered, and you'll have to reinstall macOS operating system.
Recover Lost Files from the Macintosh HD That Is Greyed Out
It is advised to restore your lost files before fixing the greyed Macintosh HD. The solutions to fix the error may need disk repair, formatting, and OS reinstallation, potentially resulting in permanent data loss.
To prevent data loss and recover lost data in Macintosh HD when needed, we suggest you download a data recovery software - EaseUS Data Recovery Wizard for Mac.
EaseUS Data Recovery Wizard for Mac
- Recover data from a greyed Macintosh HD and corrupted external hard drive without effort.
- Recover files from formatted external hard drives on Mac.
- Support data recovery for the Macintosh HD experiences more logical faults and eventually becomes inaccessible.
Using the powerful software, you can recover your files with no additional computer or device needed to download the files needed for file restoration. Here are the Steps:
Step 1. Select the drive to be scanned
In the main EaseUS Data Recovery Wizard window, there will be a list of the drives connected to your Mac. Select the drive you need to recover lost/deleted files from, and click the "Search for lost files" button.

Step 2. Select your lost data/files
EaseUS Data Recovery Wizard for Mac will immediately scan your selected disk volume and display the scanning results on the left pane. You can sort the results to find the wanted files if you are looking for certain files.

Step 3. Recover lost/deleted data
Once you have found the desired files, preview the files and then click "Recover" to begin the recovery of your deleted/lost Mac files.

Additionally, if your Mac can't boot or start up correctly with some error in the Macintosh HD, how to restore data from the Mac that won't boot up should be your primary concern. So, you can create a bootable installer on a USB drive to boot your unresponsive Mac and perform data recovery with EaseUS Data Recovery Wizard Bootable Media, which is an effective and secure way to recover crucial files from a Mac that can't start up.
How to Fix Macintosh HD Greyed Out in Disk Utility
Let's continue to learn how to fix Macintosh HD greyed out in disk utility and potential fixes.
Solution 1. Mount the Macintosh HD
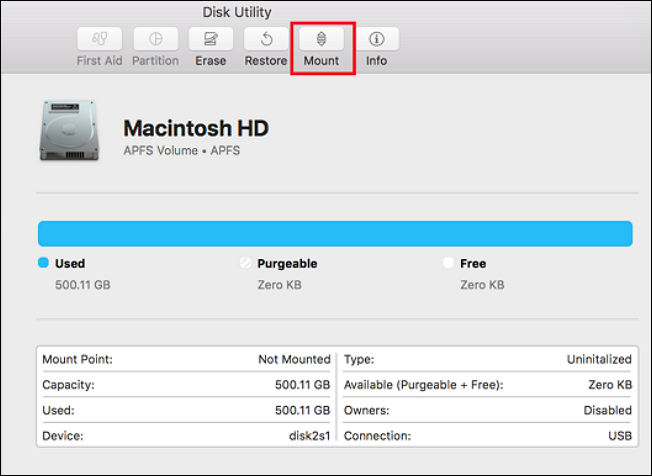
The Macintosh HD may occasionally be greyed out in Disk Utility because it cannot be mounted automatically. You could attempt manually mounting the drive in this situation.
- Boot your Mac into Recovery Mode by holding the Command + R buttons.
- Launch Disk Utility.
- Choose the "Macintosh HD" and click the "Mount" button.

If Macintosh HD cannot be mounted, the startup volume must be corrupt in some way that needs to be fixed. Check here to learn how to fix a corrupted hard drive on Mac.
Solution 2. Repair the Macintosh HD in Recovery Mode
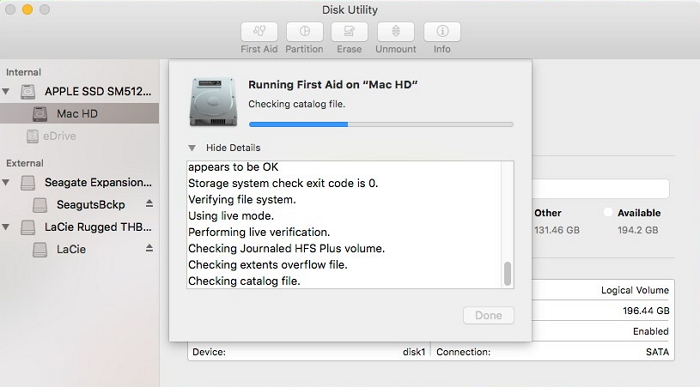
With Disk Utility's First Aid, you can fix the Macintosh HD that is greyed out. But it needs to be done while in Mac Recovery Mode. You can complete it by doing so:
- Press the Command + R buttons to start the Mac in Recovery Mode.
- Let go of the keys when you see a spinning globe or the Apple logo.
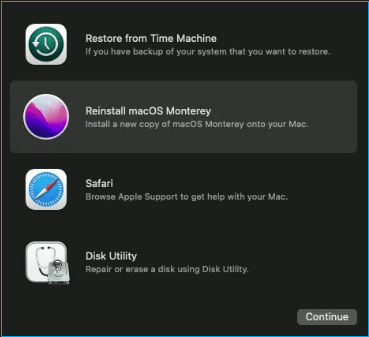
- Once in recovery mode, you have four options for troubleshooting your Mac. From among them, pick "Disk Utility".
- From the left panel, select the Macintosh HD and then click "First Aid". Then wait minutes to repair Mac HD with Disk Utility.

Solution 3. Fix Greyed Macintosh HD with Terminal
If the Disk Utility cannot fix your Macintosh HD issue, you might try using Terminal.
- First, start the Mac in Recovery Mode. Choose "Utilities" from the menu and "Terminal" from the list of choices.
- Enter diskutil list in the window and look at the Volume Identifier. The command in question will list the available volumes and verify the Volume identifier in the appeared table.
- Type diskutil repairvolume /disk ** into the prompt. (Here, the volume identifier for Macintosh HD should be used in place of **).
Solution 4. Format the Macintosh HD and Reinstall macOS
Do all the techniques above fail to fix your Macintosh HD? The factory reset macOS is your only remaining option if it is still displayed as greyed. Reformatting a disk is an effective procedure. Ensure you have recovered all your lost Mac files before attempting this.
- Then adhere to these steps to format Macintosh HD and install macOS again:
- When your Mac enters macOS Recovery mode by pressing Command and R, choose Disk Utility from the macOS Utilities menu.
- From the sidebar, choose Macintosh HD.
- From the top, click Erase. You should format the Mac startup disk rather than the Macintosh HD volume if your Mac runs macOS 10.15 or higher.
- To finish formatting, click Done.
- Return to the macOS Utilities window, choose Reinstall macOS and follow the on-screen instructions.

Back up your crucial data to the hard drive as soon as you notice the Macintosh HD not mounted error. If you don't, data recovery software will help you recover your data.
Final Thoughts
You can find out why the Macintosh is greyed out in this post when your Mac starts up. Either the hard drive is broken, or other components are at fault. Try the fixes above if you still can't see Macintosh HD on your Mac.
If you lose your data when resolving the Macintosh HD, you can recover it using the EaseUS Data Recovery Wizard for Mac.
Macintosh HD Greyed Out in Disk Utility FAQs
Do you want to know more about Macintosh HD greyed out in Disk Utility? Here are four questions you might be interested in:
1. What's the difference between Macintosh HD and Macintosh HD - Data?
The content of the files kept by Macintosh HD and Macintosh HD - Data differ significantly from one another. Macintosh HD volumes are primarily used to store personal data, while Macintosh HD - Data volumes are mostly used to store Mac system files and scripts. Additionally, users can read and write to Macintosh HD - Data and perform edit operations, whereas Macintosh hard drive volumes can only be read and not edited.
2. How do I fix Macintosh HD missing from the startup disk?
Solutions to fix choose startup disk mac empty:
- Repair startup disk in macOS Recovery
- Reappear startup disk in Disk Utility
- Reset NVRAM on your Mac
3. Why can't I mount Macintosh HD?
For the following five reasons, the volume Macintosh HD that is greyed out or not visible in Disk Utility is discovered to be corrupt and must be corrected before mounting.
- System harm to files
- Corruption of the catalog file
- Failures of disk utilities
- Systemic issues
- Virus outbreaks
4. How do I unlock Macintosh HD?
If you start a Macintosh HD volume, you can use Disk Utility to unlock it, so it's available in the Finder. Select the volume you want to mount in the Disk Utility app on your Mac. Click the Mount button.
Was This Page Helpful?
Jaden is one of the editors of EaseUS, who focuses on topics concerning PCs and Mac data recovery. Jaden is committed to enhancing professional IT knowledge and writing abilities. She is always keen on new and intelligent products.
Related Articles
-
How to Fix Black Line on MacBook Screen [5 Methods]
![author icon]() Brithny/2025-09-17
Brithny/2025-09-17 -
[Solved] How to Fix DISM Error 2 Unable to Access the Image Windows 11/10
![author icon]() Dany/2025-07-04
Dany/2025-07-04 -
[6 Quick Fixed] Computer Turns On But No Signal to Monitor
![author icon]() Larissa/2025-07-04
Larissa/2025-07-04 -
Fix the Installation Failed in the FIRST_BOOT Phase [100% Working]
![author icon]() Cici/2025-07-04
Cici/2025-07-04
EaseUS Data Recovery Services
EaseUS data recovery experts have uneaqualed expertise to repair disks/systems and salvage data from all devices like RAID, HDD, SSD, USB, etc.