Similar to the Trash bin recovery on Mac, which can let you get back the recently deleted files, the Recently Deleted folder in Photos also saves the latest removed pictures for 30 days for easy restoration. If you want to find some deleted photos, this folder is a life-saving straw for you. When you find there's no "Recently Deleted" folder, you might ask where a deleted photo goes on Mac and how to find it. In this post, we will help you restore this folder and tell you the reason why it disappeared.
| Workable Solutions | Step-by-step Troubleshooting |
|---|---|
| 1. Find Recently Deleted Photos | On Mac OS X: Open "Photos", go to...Full steps |
|
2. Recover Permanently Deleted Photos |
Select the disk location (it can be an...Full steps |
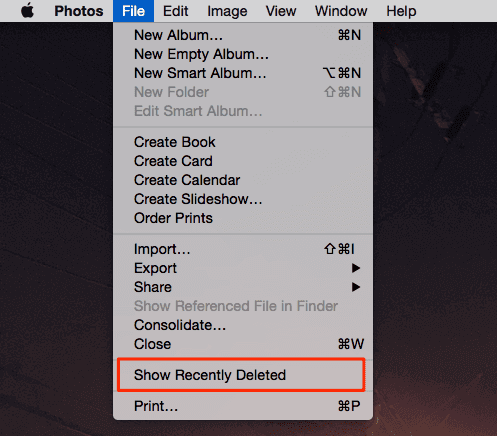
How to Find Recently Deleted Photos on Mac
- On Mac OS X: Open "Photos", go to "File" and click "Show Recently Deleted".
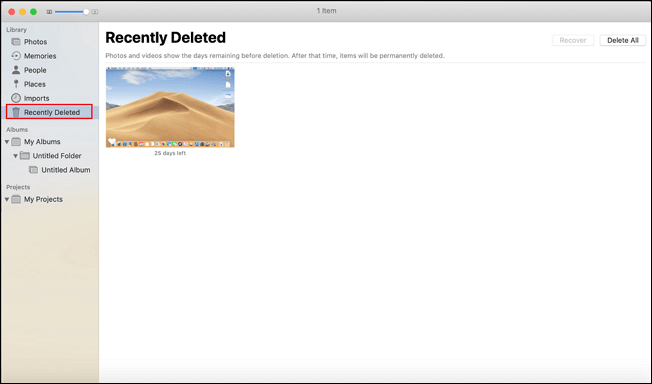
- On macOS: Open "Photos", find "Recently Deleted" folder on the right sidebar.
If both the above two methods are failed, you can delete a photo first, and then try these methods again.
Why You Can't Find Recently Deleted Folder in Photos
Like we said before, the Recently Deleted folder in photos only keeps the removed images for 30 days. Longer than this, the deleted photos will be permanently deleted, and the Recently Deleted folder won't be there as it only shows when it has pictures in it. It means all your deleted photos are more than 30 days old.
How to Recover Permanently Deleted Photos on Mac
If you want to recover a photo, but it has exceeded the 30-days limit, what you can do is to turn to data recovery software. In this article, we'd like to recommend EaseUS Data Recovery for Mac. It is one of the best Mac photo recovery tools that can help you to recover photos/albums deleted in Photos, Mac hard drive, external hard drive, SD card, USB drive, digital camera, etc. Read on and use the easiest-to-use tool to retrieve deleted files on Mac, including photos, videos, Word/Excel/PPT documents, music, archive, as well as other files in three steps.
Step 1. Search for lost files
Select the disk location to search for lost files (it can be an internal HDD/SSD or a removable storage device) on macOS Sierra, High Sierra, Mojave, Catalina, Big Sur, Monterey, Ventura, and the latest Sonoma. Click the "Search for lost files" button.

Step 2. Go through the scanning results
EaseUS Data Recovery Wizard for Mac will immediately scan your selected disk volume and display the scanning results.

Step 3. Select the file(s) and recover
In the scan results, select the file(s) to preview and click the "Recover" button to have them back.

Also Read: How to recover deleted photos on Windows 10.
Was This Page Helpful?
Brithny is a technology enthusiast, aiming to make readers' tech lives easy and enjoyable. She loves exploring new technologies and writing technical how-to tips. In her spare time, she loves sharing things about her game experience on Facebook or Twitter.
Written by Tracy King
Tracy became a member of the EaseUS content team in 2013. Being a technical writer for over 10 years, she is enthusiastic about sharing tips to assist readers in resolving complex issues in disk management, file transfer, PC & Mac performance optimization, etc., like an expert.
Related Articles
-
Efficient Ways To Fix PS4 Disc Drive Not Working! Error Reading!
![author icon]() Tracy King/2024-11-27
Tracy King/2024-11-27 -
What to Do If Windows 11 24H2 Fails to Install on PC🔥
![author icon]() Jerry/2024-10-31
Jerry/2024-10-31 -
Solved: How to Turn on NFC on iPhone
![author icon]() Daisy/2024-01-11
Daisy/2024-01-11 -
Fixed: Locked Out of MacBook Air 2022 | Latest Plans
![author icon]() Dany/2024-10-25
Dany/2024-10-25

EaseUS Data Recovery Services
EaseUS data recovery experts have uneaqualed expertise to repair disks/systems and salvage data from all devices like RAID, HDD, SSD, USB, etc.