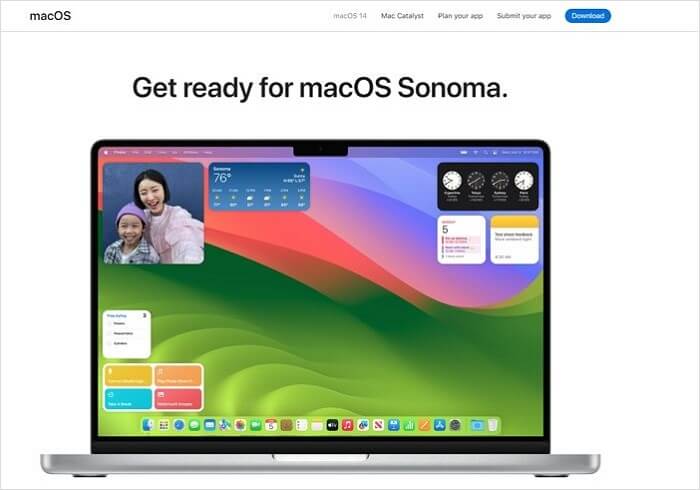
macOS 14 is the latest version of the macOS base system. It has been named Sonoma, and the public version is predicted to be released by October or November 2023. The most recent macOS contains a wide range of updates, such as new desktop widgets, Game Mode, improvements in Safari, and more. Apart from that, there are numerous more minor updates too.
You can quickly find the main steps on how to create macOS Sonoma bootable USB from the following table:
| Main Steps | Detailed Tutorial for Each Step |
|---|---|
| Step 1. Format USB Flash Drive for macOS Sonoma | Connect the USB flash drive to the system. Select Applications. Choose Utilities. Go to Disk Utility...Full steps |
| Step 2. Download macOS 14 Resource for Bootable USB | You can easily download macOS 14 from the App Store. Go to the App Store and search for macOS...Full steps |
| Step 3. Create macOS Sonoma Bootable USB | Open Mac Terminal. You need to follow the path: Applications > Utilities > Terminal...Full steps |
| Step 4. Install macOS 14 with Bootable Installer | Connect the bootable installer to the Mac. Turn on the system. Press the power button and hold it till...Full steps |
Do you know what are the benefits of creating macOS Sonoma bootable USB? Well, multiple reasons can lead you to need this bootable USB. Let's take a look:
- ⭐Install macOS Sonoma on unsupported Mac with a macOS 14 bootable USB.
- ⭐Download and install macOS 14 without an internet connection
- ⭐Fix the Mac startup issues and make your unbootable Mac device boot again.
A video tutorial offers detailed insights into creating a macOS Sonoma USB boot disk.
- 0:34. Download the macOS Sonoma installer.
- 2:06. Format the USB disk.
- 3:24. Use Terminal to create the USB installer.
First Thing to Do: Create macOS Sequoia Bootable USB Drive Automatically
If you are unfamiliar with the manual steps to create a bootable Sonoma USB, consulting software like EaseUSData Recovery Wizard for Mac is a wise choice. This powerful tool can help you automatically create a bootable installer for free with just a few clicks:
Now download this tool and follow the steps here:
Step 1. Select a macOS version
Select a macOS version from the list, or click the "Refresh" option to get the downloaded macOS version. Or you can add a macOS installer from your disk by clicking the "Add" button. Insert a USB flash drive larger than 16 GB to save the macOS installer.

Step 2. Erase the USB flash drive
After choosing the USB flash drive, click the "Erase and create" option in the pop-up window to format your USB flash drive quickly, and then click the "Create macOS installer" button to continue.
- Note: This operation will delete all data on your USB flash drive, please back up important data in advance, or use EaseUS data recovery software to recover your data.

Step 3. Create the macOS installer boot drive
Wait for the process to complete, and click the "Finish" button. Your macOS installer boot drive has been successfully created!

Step 1. Format USB Flash Drive for macOS Sonoma
| ❗Must-have Items: A USB with 15GB storage space minimum |
Before you move ahead to create macOS Sonoma bootable USB, you need to get a suitable USB flash drive. However, you must choose a reliable brand and ensure a minimum space of 15 GB, whether you want to create a macOS Ventura bootable USB or a Sonoma one. Most macOS installers take up 10-15 GB of drive space. That is why we recommend having a flash drive that can offer storage up to 15 GB.
- Warning
- If you don't want to lose data, remember to back up your USB flash drive. You can also download EaseUS Data Recovery Wizard for Mac to recover deleted files.
After that, you must format the USB flash drive. You can do so via the Mac Disk Utility. Here are the steps to follow:
Step 1. Connect the USB flash drive to the system.
Step 2. Select Applications.
Step 3. Choose Utilities.
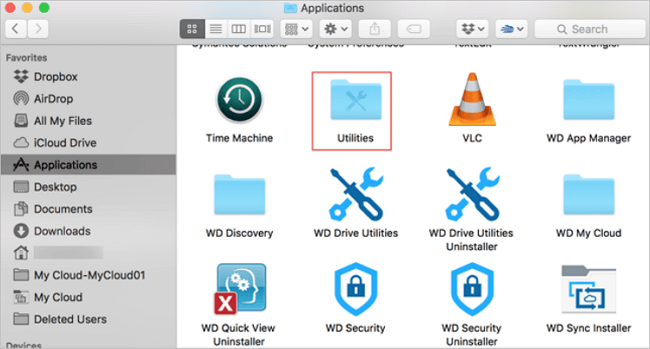
Step 4. Go to Disk Utility.
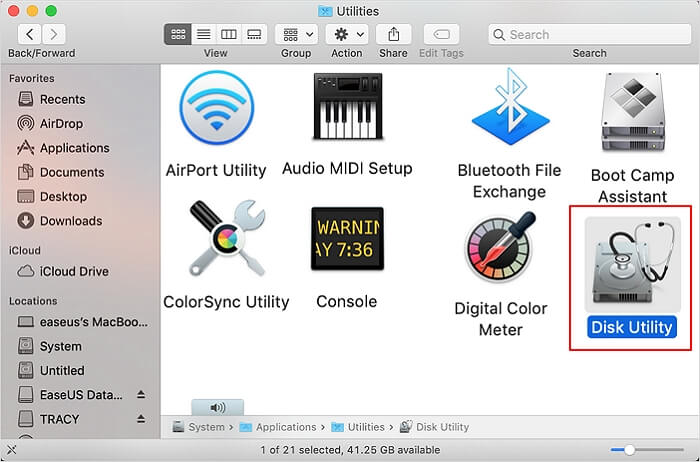
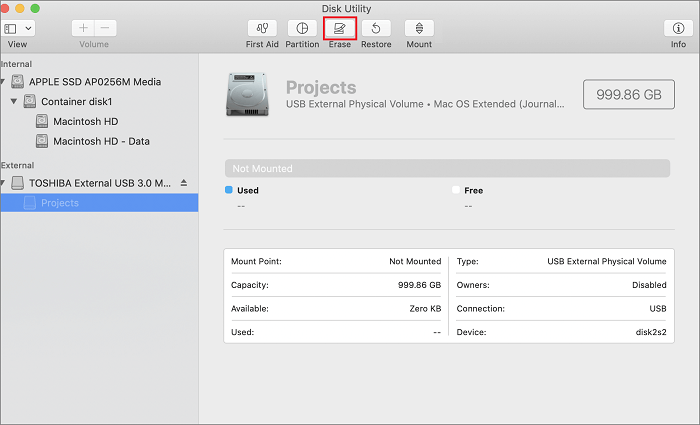
Step 5. Now, choose the flash drive from the left sidebar.
Step 6. Select Erase.
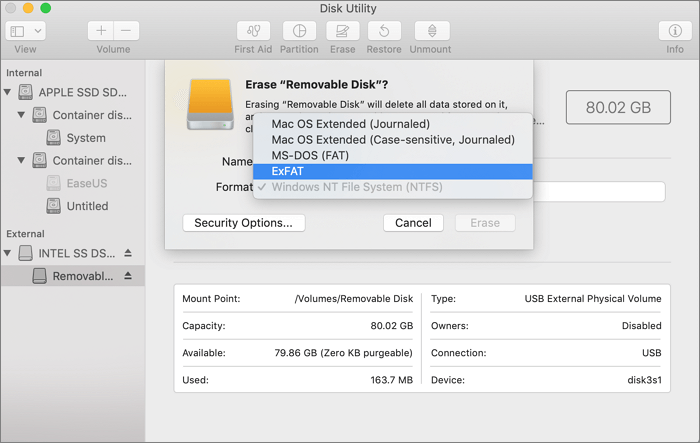
Step 7. Enter the name and format, and choose "Erase".
Following these steps will reformat the USB flash drive with ease. Now, you can proceed to create the macOS Sonoma Bootable USB. If you want to learn more about how to format a USB drive on Mac, the following article may help:

How to Format USB to FAT32 on Mac Without Losing Data
For Apple Mac users, there are two ways to format a USB flash drive to FAT32, including Disk Utility and Terminal command line. Read more >>
Step 2. Download macOS 14 Resource for Bootable USB
There are two different methods of downloading macOS Sonoma for bootable USB. Here, we will discuss both of them. Check these out:
Method 1. Download macOS 14 from App Store or Website
You can easily download macOS 14 from the App Store. Go to the App Store and search for macOS Sonoma. When it appears in the result, click on "Get".
However, you can also download macOS Sonoma from Apple's official website. That is because it is still in the developer beta phase.
For this, visit the website and search for macOS Sonoma. Download the massive 13 GB pkg file. You will have to wait for the downloading to complete. After it's done, double-click on the installer file and complete the process.
Method 2. Download macOS Sonoma from Mr. Macintosh
Another alternative method is to download macOS Sonoma from Mr. Macintosh. The link will lead you to the website, where you will see detailed information and links. You can choose the beta version you want for macOS Sonoma and go ahead with the downloading process.
The following passage will offer a more detailed guide on downloading macOS Sonoma:

Download macOS 14 Sonoma Beta on Mac, MacBook, iMac
macOS 14 Sonoma Beta has published this June. So, how to download macOS 14? Everything about macOS Sonoma. Read more >>
Step 3. Create macOS Sonoma Bootable USB
Now, you must create the macOS Sonoma Bootable USB. For that, you need to use Terminal on the Mac. Take a look at the steps to follow:
Step 1. Open Mac Terminal. You need to follow the path: Applications > Utilities > Terminal.
Step 2. Type in sudo /Applications/Install\ macOS\ 14\ Beta.app/Contents/Resources/createinstallmedia --volume /Volumes/Sonoma and press Enter.
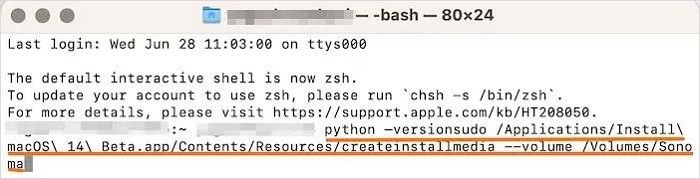
Step 3. You will come across "To continue we need to erase the volume at /Volumes/Sonoma."
Step 4. Type Y and press Enter.
Step 5. If you see a pop-up saying "Terminal" and would like to access files on a removable volume, click OK.
Don't forget to share this passage to let more users know how to create macOS bootable USB.
Step 4. Install macOS 14 with Bootable Installer
In the last stage, we will describe how to boot the Sonoma USB bootable installer for Intel-based and Silicon Macs.
For Silicon Macs:
Step 1. Connect the bootable installer to the Mac.
Step 2. Turn on the system.
Step 3. Press the power button and hold it till you see the startup options window.
Step 4. Here, you will see the bootable volumes.
Step 5. Choose the volume that has the bootable installer.
Step 6. Select Continue.
Step 7. Follow the on-screen instructions.
For Intel-based Macs:
Step 1. Connect the bootable installer to the Mac.
Step 2. Turn on the system.
Step 3. Press the Option key and hold it.
Step 4. When you come across the bootable volumes, release the key.
Step 5. Choose the volume that has the bootable installer.
Step 6. Press Return.
Step 7. If asked, choose Language.
Step 8. Choose Install macOS.
Step 9. Select Continue and follow the on-screen instructions.
You may also interest:

Clean Install macOS Sonoma: Latest Update
Do you want to learn how to clean and install macOS Sonoma? This article will provide you with detailed steps. Read more >>
Rescue Data from Unbootable macOS 14 Mac
Did you encounter data loss while creating the macOS Sonoma bootable USB installer? That is entirely plausible. However, there is no reason to worry anymore. Opt for the best data recovery software - EaseUS Data Recovery Wizard for Mac. This powerful data recovery tool aids in the restoration of lost data with ease.
The user-friendly interface and exciting features make this software one of a kind. You can use this tool to recover data despite the cause of its loss. These situations include accidental deletion, formatting, virus attack, hardware failure, etc.
EaseUS Sonoma Recovery Tool
- Recover deleted files on macOS Sonoma, including pictures, music, movies, documents, and emails.
- Perform Mac USB recovery in simple steps, and you can also recover data from a formatted USB drive.
- Make data recovery easier with its powerful features, and it can also recover data from unbootable Mac.
Are you eager to use EaseUS Data Recovery Wizard? Follow these steps:
Step 1. Search for lost files
Select the disk location to search for lost files (it can be an internal HDD/SSD or a removable storage device) on macOS Sierra, High Sierra, Mojave, Catalina, Big Sur, Monterey, Ventura, and the latest Sonoma. Click the "Search for lost files" button.

Step 2. Go through the scanning results
EaseUS Data Recovery Wizard for Mac will immediately scan your selected disk volume and display the scanning results.

Step 3. Select the file(s) and recover
In the scan results, select the file(s) to preview and click the "Recover" button to have them back.

Summary
macOS Sonoma is the latest operating system from Apple. It is slated to be released later in the year and is expected to offer exciting features. If you want to create a macOS Sonoma Bootable USB installer, it is easy. First, download the installer file, then download and boot it properly.
However, despite extreme precautions, data loss can take place. In that case, choosing professional data recovery software is an excellent idea. Opt for EaseUS Data Recovery Wizard for Mac and restore lost data with ease. The software is powerful, efficient, and user-friendly.
Create macOS Sonoma Bootable USB FAQs
Check out these questions and answers to learn more about creating macOS Sonoma Bootable USB.
1. Why can't I install macOS Sonoma on Mac?
Can't install macOS Sonoma on Mac? It could be due to insufficient storage space or software incompatibility. If your system is incompatible with macOS Sonoma, you cannot install it. Also, you cannot install it if you haven't registered as a developer.
2. How to create a macOS 14 bootable installer for a PC?
You can use the Terminal to create a macOS 14 bootable installer. Take a look at these steps:
Step 1. Open Terminal and enter the command, and press Enter.
sudo /Applications/Install\ macOS\ 14\ Beta.app/Contents/Resources/createinstallmedia --volume /Volumes/Sonoma.
Step 2. You need to type your password and press Enter again.
Step 3. You will come across "To continue we need to erase the volume at /Volumes/Sonoma." Type Y and press Enter. If you see a pop-up saying "Terminal" and want to access files on a removable volume, click OK.
3. How to download the macOS Sonoma developer beta?
To download the macOS Sonoma developer beta, follow these steps:
Step 1. Visit Apple Developer website. Go to the Discover tab and choose macOS. Select Download. If asked, use the developer account login information to log in. Select Install Profile on macOS Sonoma.
Step 2. Go to the Downloads folder. Double-click on the macOSDeveloperBetaAccessUtility.dmg file.
Step 3. Double-click on macOSDeveloperBetaAccessUtility.pkg. Follow the on-screen instructions after that.
4. macOS Ventura and Sonoma, which one is better?
Both Ventura and Sonoma are products of Apple, and thus the core functionality remains the same. Sonoma is the latest release and comes with new features like interactive widgets, screensavers, etc. Depending on your requirements, you can choose either of them.
Was This Page Helpful?
Finley is interested in reading and writing articles about technical knowledge. Her articles mainly focus on file repair and data recovery.
Dany is an editor of EaseUS who lives and works in Chengdu, China. She focuses on writing articles about data recovery on Mac devices and PCs. She is devoted to improving her writing skills and enriching her professional knowledge. Dany also enjoys reading detective novels in her spare time.
Related Articles
-
How to Backup Thunderbird Emails to External Hard Drive [Three Ways]
![author icon]() Jerry/2024-11-27
Jerry/2024-11-27 -
[2024 macOS Catalina Download Guide] How to Download and Install macOS 10.15
![author icon]() Brithny/2024-10-10
Brithny/2024-10-10 -
Computer Shuts Down When Put to Sleep: Fixes Are Here
![author icon]() Jerry/2024-11-25
Jerry/2024-11-25 -
Solved: System Restore Is Restoring the Registry Windows 11/10/8/7
![author icon]() Brithny/2024-01-11
Brithny/2024-01-11

EaseUS Data Recovery Services
EaseUS data recovery experts have uneaqualed expertise to repair disks/systems and salvage data from all devices like RAID, HDD, SSD, USB, etc.