When Need to Change Directory in Terminal Mac
Are you new to this Mac Terminal and getting taught elementary commands? If yes, you might be feeling swamped! But you shouldn't worry because once you start utilizing it regularly, elementary things like altering directories will become common, and you can type them quickly.
Change directory in Terminal Mac is the most regularly used command while working in this top-notch command-line ecosystem. Are you thinking of what this command-line environment is? It's nothing but a two-letter command, cd
Directories in Terminal Mac are folders that can be used interchangeably. These allow you to group files into a leading modular hierarchy to arrange the file system, and it helps you provide the required flexibility and depth of the file system structure.
Now, it's common to think about when you need to change the directory in Terminal Mac! If you're in the Finder section and willing to move to another folder, it's necessary to double-click on that folder. Alternatively, use the cd (or shift location) program from the command line. Assume you're in your Home subdirectory and want to check out the Downloads section. To do so, enter disc Downloads.
As you already know when to change the directory, it's time to discover how to change Directory in Terminal Mac! Let's see the possible ways below.
How to Change Directory in Terminal Mac
To know the best ways to change directories in Terminal Mac, this article provides you with a video about switching directories. So, here is the detailed outline shown below:
- 00:42 Command for Mac Terminal: Where am I
- 00:55 Command for Mac Terminal: List Directory
- 01:02 Command for Mac Terminal: Change Directory
- 01:59 Command for Mac Terminal: Go Back One Directory
Now, let's discuss how to see directory content and change the directory in Terminal Mac. You can share this post with your friends by clicking the following sharing buttons:
How to View Directory Content in Terminal on Mac
The folders in operating systems and Mac are no different. They provide us with a skeletal address, a position where the acquired data is contained. To view content inside a location or path from the Terminal, some instructions must be input. These instructions will not create new screens but display information within the same Terminal. You may also see any concealed files or directories that are present.
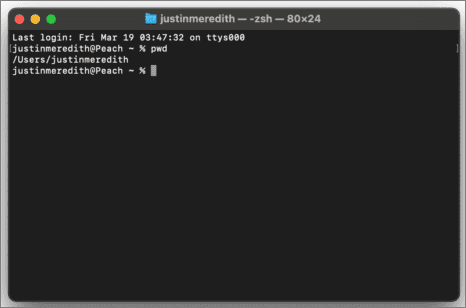
The Terminal is located in the user section, and in order to open it, you must enter this command: "PWD". Upon entering the image pwd, it will demonstrate the preferred path: "users/image." It can be seen what it comprises by typing "LS" and "images ls" and this will display all of the files inserted in this subdirectory. In these instances, you will see the complete titles of each file and its location in the Terminal.
How to Change Directory in Terminal Mac
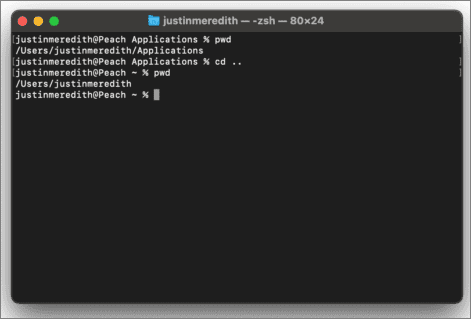
To change the directory in Terminal Mac, it's recommended to utilize the CD command, which will take you to distinct locations or folders. For instance, if you want to move to the desktop, you must type CD desktop into the Terminal Mac. On the other hand, you might also put the LS command to check what a folder contains and the PWD command to check the whole folder route.
How to Change Directory on Mac [Other Ways]
In this part, we will introduce two more ways to change the directory on Mac without the Terminal in case you have encountered Terminal operation not permitted on Mac.
Using Popd and Pushd
Do you know you can change directories on Mac without a Terminal? In this case, you may use Pushd and Popd command line tools, and these can allow you to gather a stack structure of directories you're currently working in.
To move to a directory and incorporate it into the list, enter the "pushd directory" name. To navigate to another path, enter "pushd directory2", where directory2 seems to be the name of the other folder. When satisfied with one subdirectory, type "popd" to extract and review a directory of the simulated heap.
From System Settings
To conduct this operation from the system preference pane, it's required to first access the settings by accessing the upper right in the apple icon. Then, you may opt for the second choice, "system preferences", in which you will find a box with numerous choices dispersed.
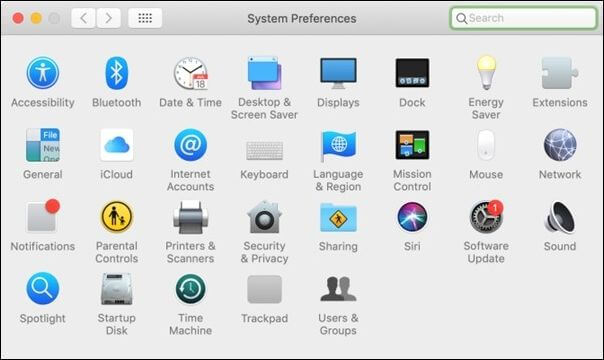
Here, you need to input users, and you will discover all the files it includes. When selecting one, an address appears at the top, for instance, "Users/desktop". To move the address of the desktop to another one, you should substitute the word "desktop" with "image." This choice is extremely helpful if you want to rapidly input a URL to remove identical pictures.
Tips You Should Follow When Change Directory in Terminal on Mac
These are the common tips you must consider while changing a directory in Terminal on Mac:
- Never specify a file Path imprecisely. If you itemize a file route rather than a directory path, the cd command will return as an error. A file route contains the name of the file, such as index.html, while a directory route does not.
- Never give spaces in the route. You need to remind yourself not to give space in the path, which often happens intentionally. The command might fail to work when it declines to work with spaces. Due to some directory names containing spaces, you will be required to surround those with quotation marks while utilizing the command. The path is the sole issue that the cd command has. But the main criterion to operate the cd command efficiently is to ensure your path is appropriate.
- No typing errors will be entertained. One of the most typical reasons for cd command issues is faulty route syntax. Typing mistakes often happen due to missing "/" somewhere, mainly at the beginning of a route.
- Adding an item to the route. Some people need help with inserting file names into the route. If the route includes a file name, you cannot swap folders with the cd command, and you could only change directories, not data.
How to Recover Files Accidentally Deleted by Mac Terminal
Changing the directory in Terminal Mac often leads to data loss. So, if you're thinking of top-notch data retrieval software, look no further than EaseUS Data Recovery Wizard for Mac.
This professional software provides the best solution for you. The best features of EaseUS are the following:
- The ability to examine data and file retrieval. Users may utilize the preview option to examine each of the accessible files for recovery before starting the procedure. You won't be clogging up your device with useless folders this way.
- Recuperates a variety of file types. Files and information of different kinds can be recovered from customers' devices. Recover deleted photos on Mac, papers, videos, audio recordings, texts, and other media are all included.
- Recover permanently deleted files on Mac. Users can retrieve all data that they unintentionally erase or lose due to a malware infection.
- Scoops up information and files from the empty Recycle Bin. Consumers may employ the file category to look for specific files and data they want to retrieve. After emptying their recycling bin, they can perform the Mac Trash recovery with EaseUS.
- Recovers a deleted disk. Individuals may utilize the data retrieval procedure to recover formatted hard drive on Mac even if it has been entirely deleted or the PC cannot recognize it, which is one of the most useful EaseUS tools.
Let's check how to recover Mac Terminal accidentally deleted files with EaseUS Data Recovery Wizard for Mac:
Step 1. Search for lost files
Select the disk location to search for lost files (it can be an internal HDD/SSD or a removable storage device) on macOS Sierra, High Sierra, Mojave, Catalina, Big Sur, Monterey, Ventura, and the latest Sonoma. Click the "Search for lost files" button.

Step 2. Go through the scanning results
EaseUS Data Recovery Wizard for Mac will immediately scan your selected disk volume and display the scanning results.

Step 3. Select the file(s) and recover
In the scan results, select the file(s) to preview and click the "Recover" button to have them back.

Summary
It can be seen that changing the directory in Terminal Mac isn't a hassle. Follow the different ways to switch directories in Terminal Mac. If you lose data while changing directories, using EaseUS Data Recovery Wizard for Mac for recovering different data types is recommended. So, what are you considering? Download this professional software today and make the most of data recovery!
Change Directory in Terminal Mac FAQs
Check out this FAQs section below to better understand changing directories in Terminal Mac.
1. How do I change a directory from C to D in Terminal?
To alter or modify the existing drive, type the drive letter accompanied by a colon (:), for example, prompt>. d: / Rename the existing disk D. The question now reads D:... D:...> c: / Rename the present disk C. The question now reads C:... C:...>.
2. How to factory reset the Terminal on Mac?
You have three ways to factory reset Terminal on Mac.
- 1. Reset the Terminal on Mac with its Reset option.
- 2. Factory reset Terminal on Mac by hard resetting Shell.
- 3. On Mac's keypad, select control + option + command + R. This choice will erase everything on your Macbook, including the Terminal screen. Following that, you will encounter a black screen.
3. How to change the directory on Mac without Terminal?
You may use Popd and Pushd commands and System Settings to alter the directory on Mac without a terminal.
4. How to go back to the previous directory in Terminal Mac?
It's simple to return to the previous directory in Terminal Mac. You may use cd to go to the directory by entering the cd directory name in the window of the Terminal. But while returning to the previous directory, you must type "cd -" and hit return in the Terminal window.
Was This Page Helpful?
Dany is an editor of EaseUS who lives and works in Chengdu, China. She focuses on writing articles about data recovery on Mac devices and PCs. She is devoted to improving her writing skills and enriching her professional knowledge. Dany also enjoys reading detective novels in her spare time.
Related Articles
-
How to Fix Mac Keeps Crashing [macOS Ventura/Monterey/Big Sur]
![author icon]() Jaden/2026-06-17
Jaden/2026-06-17 -
How to Fix Desktop Refers to A Location That Is Unavailable Error
![author icon]() Jean/2025-12-12
Jean/2025-12-12 -
Fixed: SFC (SFC / SCANNOW) Is Not Working on Windows
![author icon]() Tracy King/2026-05-21
Tracy King/2026-05-21 -
ASUS Rog Ally Z1 vs. Z1 Extreme: What's the Difference?
![author icon]() Larissa/2026-06-18
Larissa/2026-06-18
EaseUS Data Recovery Services
EaseUS data recovery experts have uneaqualed expertise to repair disks/systems and salvage data from all devices like RAID, HDD, SSD, USB, etc.