Table of Contents
![]() About the Author
About the Author
![]() Related Posts
Related Posts
The program is user-friendly and, in addition, has a lot of tools for fixing broken videos. Follow this article to fix damaged videos with the VLC video repair tool.
How to Use VLC Repair Video Tool to Fix Corrupted Video Files
You can convert the video file into another format with VLC Media Player to try to repair video with VLC.
The steps below will guide you through the process of recovering your corrupted video file.
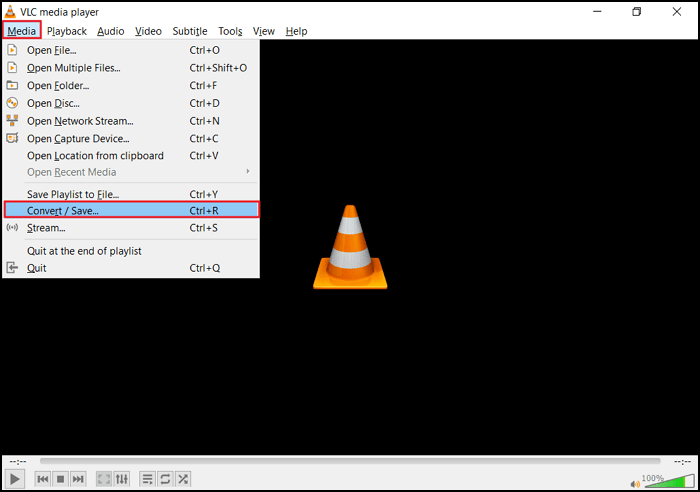
Step 1. Open VLC and click the "Media" tab. Click the "Convert/Save" button.
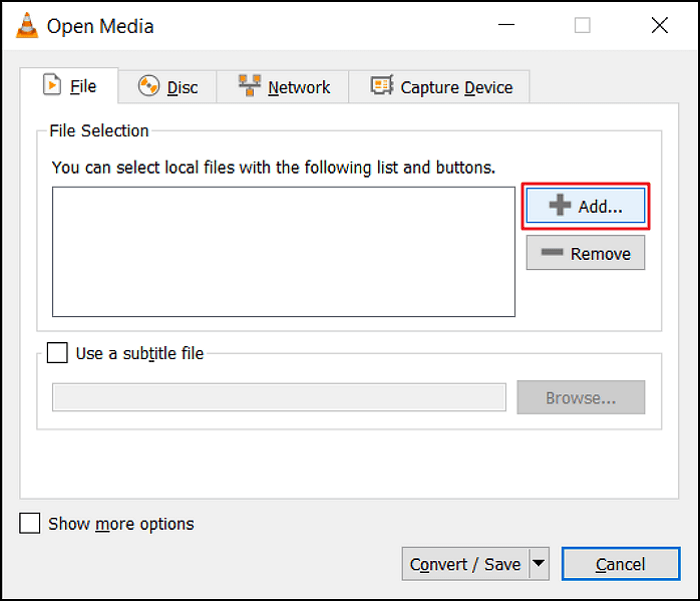
Step 2. Adding videos to your transcoding list can be done by clicking the Add option.
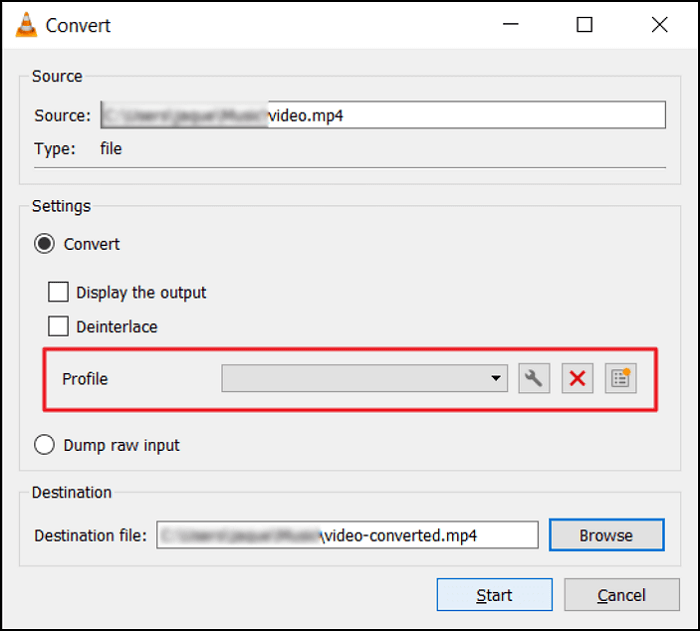
Step 3. In the Convert box, enter the file name and location.

Step 4. Select "Convert/Save". In the new window that appears, click the Profiles tab to choose an input codec.
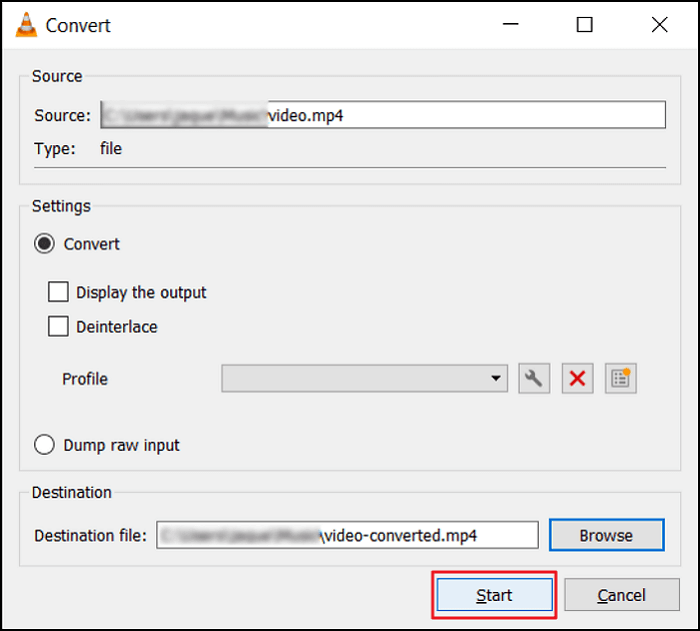
Step 5. Then click the "Start" button. After that, VLC Media Player will do all the rest.
How to Fix Broken Videos Using EaseUS Video Repair
EaseUS Fixo Video Repair is a professional tool for free video repair. Running online, you can repair your videos with simple clicks. It is even better than VLC Media Player because while the VLC conversion does not always work, EaseUS video repair software is a specialized software that runs on any compatible computer.
- Repairing unreadable videos on VLC with EaseUS is very easy to do. Just select the damaged video file and click on the Repair button. The software will fix the broken video file after that.
- All mainstream video formats are supported by EaseUS Fixo, such as MP4, MOV, MKV, FLV, AVI, 3GP, M4V, WMV, FLV, SWF, MPG, 3G2, RM/RMVB, NPEG, etc.
- The cause of your video corruption, whether it is a file that got damaged during editing, VLC corrupted video, or corruption after recovery, is covered by EaseUS Fixo.
- With this tool, you can get video from a variety of sources, including external hard drives, damaged hard drives, USB flash drives, SD cards, cameras, dashboard cameras, CCTVs, pocket cameras, and much more.
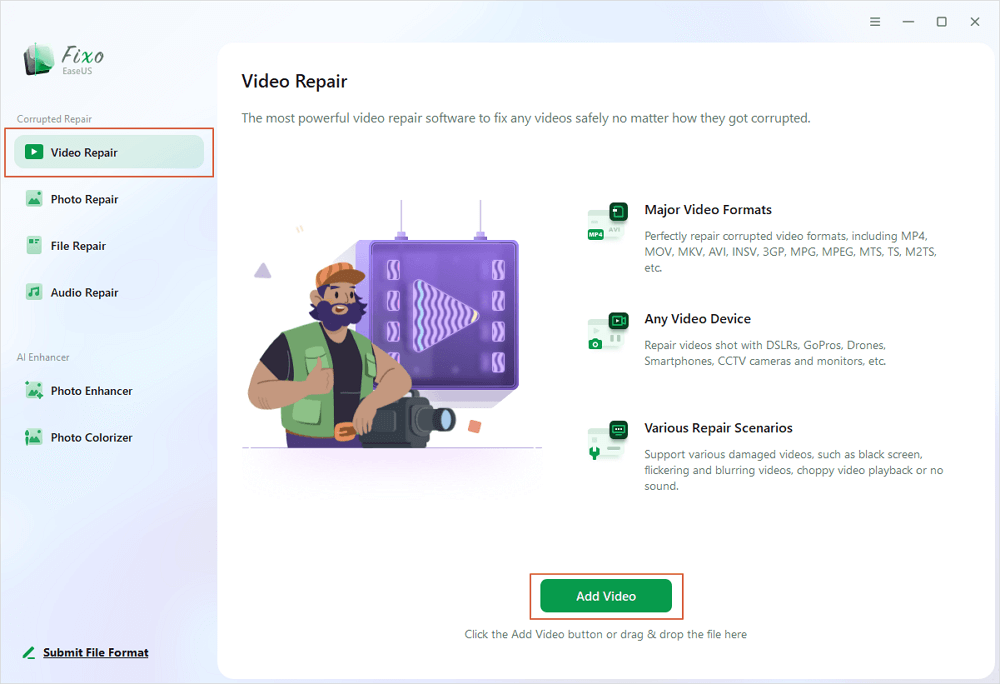
Download this video repair tool and repair broken and corrupted videos.
Step 1. Open Fixo on your local PC. Click "Video Repair" and add the corrupted MP4/MOV/AVI/MKV/3GP/FLV/MKV/WMV video files by clicking "Add Videos".
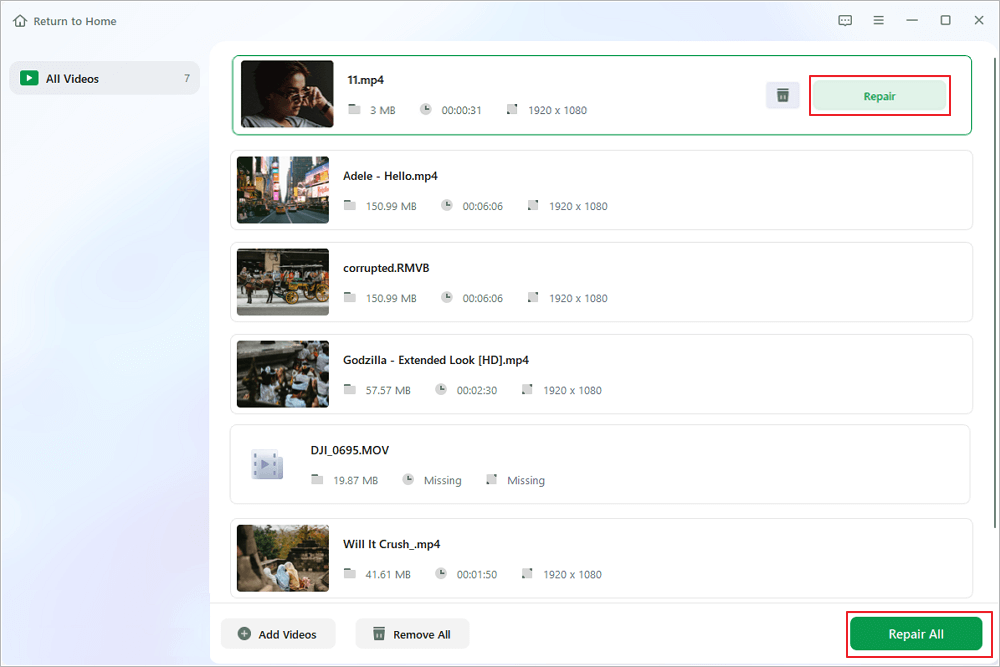
Step 2. Move the pointer to a video and click the "Repair" button to start the single video repairing process. If you want to repair all the videos, click "Repair All".
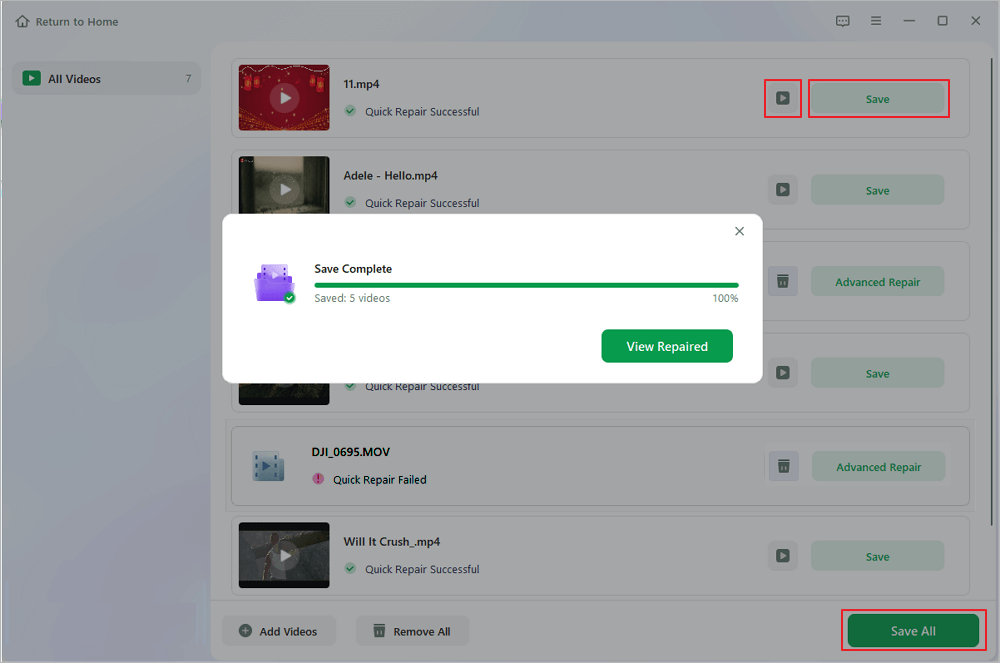
Step 3. Wait a few minutes, and the corrupted videos will be repaired. Click the play icon to preview the videos. You can save a single video by clicking the "Save" button next to the play icon. If you want to save all the repaired videos, choose "Save All".
Step 4. If the quick repair fails, you should utilize the advanced repair mode. Click "Advanced Repair" and add a sample video. Choose "Confirm" to ensure.

Step 5. A list of detailed information on corrupted and sample videos will show up. Click "Repair Now" to start the advanced video repair process. When the repair is complete, you can view the videos and click the "Save" button to save the repaired video files to an appropriate destination.

This video provides you with more details on corrupted video repair.
- 00:18 - Reasons for corrupted video
- 00:38 - Download EaseUS Fixo Video Repair
- 01:07 - Add corrupted videos
- 01:14 - Click Repair or Repair All
- 01:24 - View and save the repaired videos
- 01:30 - Advanced Repair M0de in Fixo
- 02:02 - EaseUS Repair Video Online
- 02:41 - Try VLC player
- 03:33 - Create a copy of the original one in VLC
If you find this information helpful, please share it with others on social media to assist them in overcoming this common challenge.
Bonus Tip: Fix VLC Player Not Showing Video
If the VLC not showing videos, take the methods below to troubleshoot.
Method 1: Enable the in-Built VLC Recovery Codec
So, you launched the VLC Media Player but the video file is not playing. Instead of your favorite movie, it is showing a blank screen, with nothing to watch.
You may experience such issues with your videos, even if they aren’t corrupted. In these cases, you still can use VLC Media Player for solving your problem.
Often, the video is not playing properly because the index is damaged. The VLC Media Player also has a built-in codec that recovers broken indexes from video files, making them work again.
If you are playing a video file with an index problem, VLC Media Player will attempt to diagnose it automatically. The video file itself will not be changed, as well as any other corruption issues. If you need to fix only the video file index, then the tool provides a temporary fix.
If it's your only issue, then this built-in codec will fix the video file index and make the video play like it never had a problem.
You can repair your video file's broken index by following the steps below.
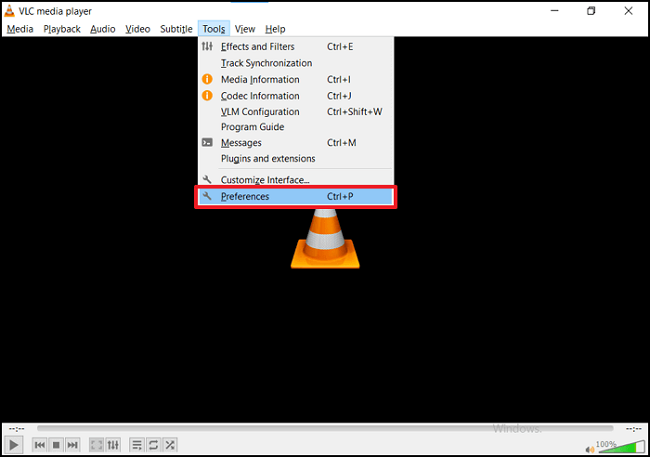
Step 1. Open VLC Media Player first. You will notice the Tool option on the toolbar, click it. Select Preferences from the drop-down menu.
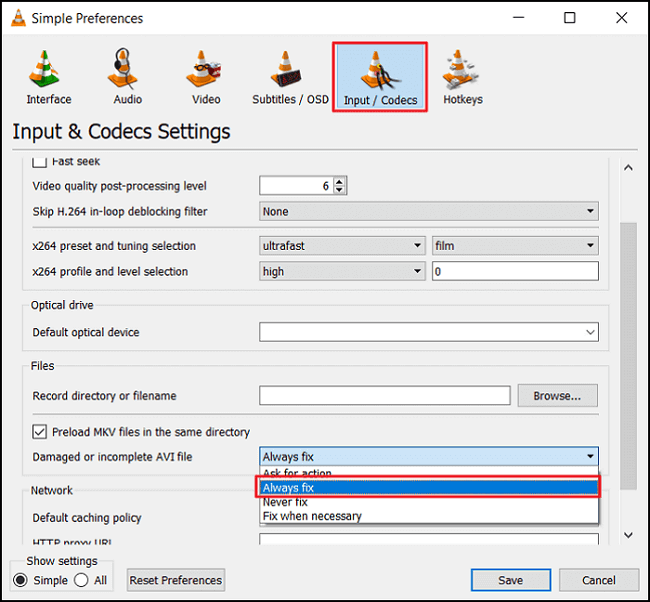
Step 2. Click on Input/Codecs. The Damaged or Incomplete AVI file option will appear when you scroll down. When you click the options on the right side, you will see all the available choices. Click on Always Fix.
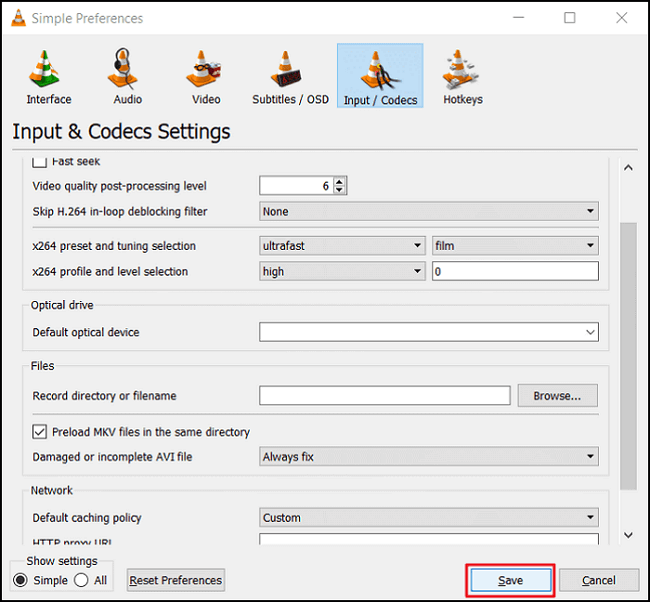
Step 3. Once you've done that, just click Save. While playing any video, VLC Media Player will check any damaged AVI files for you.
Method 2: Enable the Video Auto Scaling
It's not new to you that videos can vary in size and aspect ratio. When scaling the video to incompatible ratios, we can get black screens on VLC.
If you want to repair a video under these circumstances, you can go to the Video tab of VLC's Preference panel. In order to fix video scaling problems, check out the "Video Auto Scaling" option. In case of doubt, just follow the steps below.
Step 1. Click on "Tools", then "Preferences".
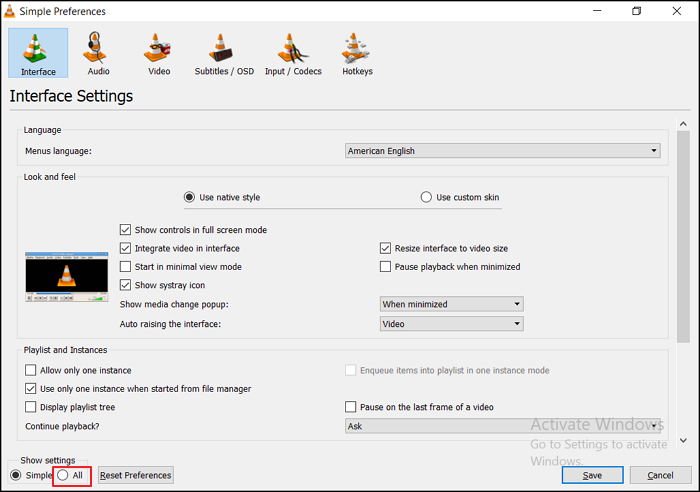
Step 2. Now, you need to click "All", on the tab Show Settings. It will show the advanced options of the VLC Media Player.
Step 3. Check out the option Video Auto Scaling for fixing issues with aspect ratio.

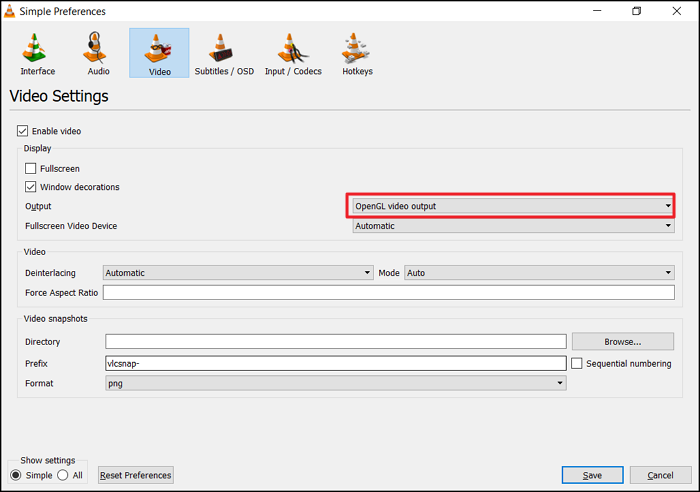
Method 3: Enable OpenGL
There are a variety of output schemes available in VLC Media Player, which is a great feature. It is usually recommended to use DirectX or Direct3D, though OpenGL can also be used sometimes.
Using Preferences > Video > Output you can change your setup for video output. Try switching from one preferred option to another and see if VLC could fix the video.
Step 1. Go to "Tools", then click on "Preferences" from the drop-down menu.
Step 2. On the panel Preferences, click on "Video". Then, select the option "OpenGL video output" from the Output alternatives.
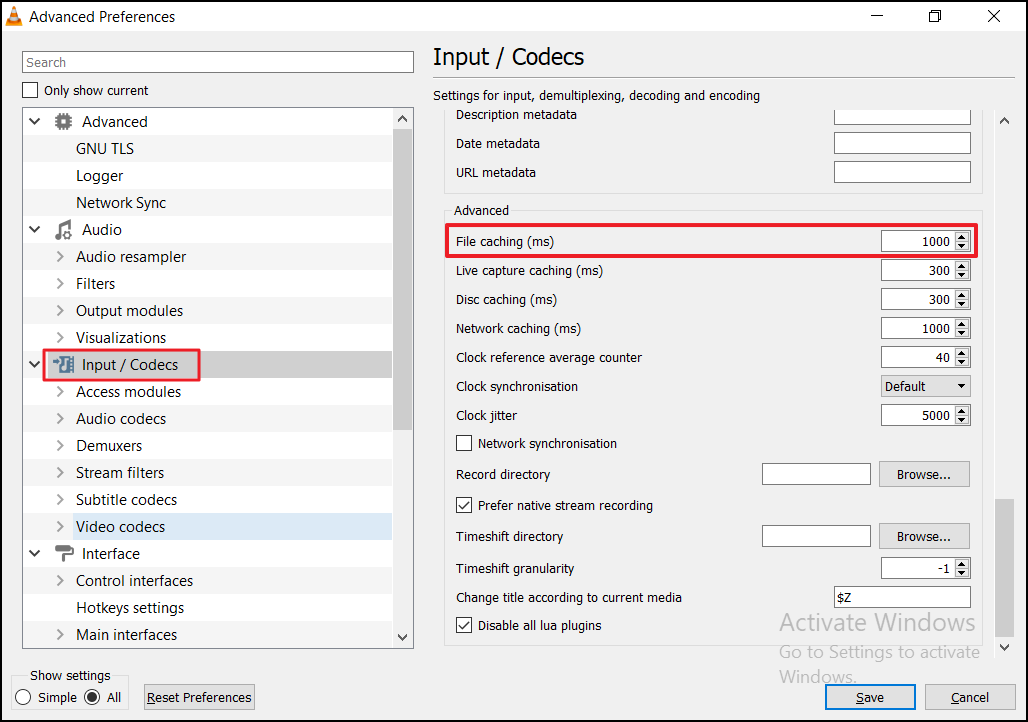
Method 4: Change the File Caching Value
To fix videos in VLC, you can also make adjustments to other settings.
You can customize the settings for the codec by going to the Input/Codec section under Preferences > Advanced Preferences. By changing the value of the "File Caching" feature, you can change how the media player caches video files.
Step 1. Click "Tools", then "Preferences".
Step 2. On the "Show Settings" tab, click "All". A list of VLC's advanced options will appear.
Step 3. Click on "Input/Codec", then test new values of file caching for fixing your video with black-screen.
If you find these methods helpful, share this post to help more people.
Conclusion
This guide shows in-depth tips and tricks for repairing problems in video files with VLC Media Player. You can convert the format of the video to another type since it often repairs the corrupted file. Also, you can change advanced settings on VLC for fixing black screen errors.
In case it doesn't work, just try EaseUS Fixo. It is a professional tool developed exactly for recovering videos, and it runs directly from your browser.
Was This Page Helpful?
About the Author
Cedric Grantham is a senior editor and data recovery specialist of EaseUS. He mainly writes articles and how-to tips about data recovery on PC and Mac. He has handled 10,000+ data recovery cases and is good at data recovery of NTFS, FAT (FAT32 and ExFAT) file systems, and RAID structure reorganization.