-
![]() Fix Data Error (Cyclic Redundancy Check) | 5 Free Ways
Fix Data Error (Cyclic Redundancy Check) | 5 Free Ways July 23,2026
 6 min read
 -
![]() How to Cancel a Format in Progress If Windows Won't Cancel FormatJuly 23,20266 min read
How to Cancel a Format in Progress If Windows Won't Cancel FormatJuly 23,20266 min read -
![]()
-
![]()
-
![]() System_Thread_Exception_Not_Handled on Windows 10/11, Fixed NowJuly 23,20266 min read
System_Thread_Exception_Not_Handled on Windows 10/11, Fixed NowJuly 23,20266 min read -
![]() BSOD After Installing SSD | Solved Without Losing DataJuly 23,20266 min read
BSOD After Installing SSD | Solved Without Losing DataJuly 23,20266 min read -
![]() How to Uninstall Windows 11 Update | Roll Back Windows 11 UpdatesJuly 23,20266 min read
How to Uninstall Windows 11 Update | Roll Back Windows 11 UpdatesJuly 23,20266 min read -
![]()
-
![]() OneDrive Recycle Bin Retention | Recover Deleted Files in OneDriveJuly 02,20266 min read
OneDrive Recycle Bin Retention | Recover Deleted Files in OneDriveJuly 02,20266 min read -
![]() Genshin Impact Size on Laptop/PS4/Mobile [All You Need to Know]July 23,20266 min read
Genshin Impact Size on Laptop/PS4/Mobile [All You Need to Know]July 23,20266 min read
Page Table of Contents
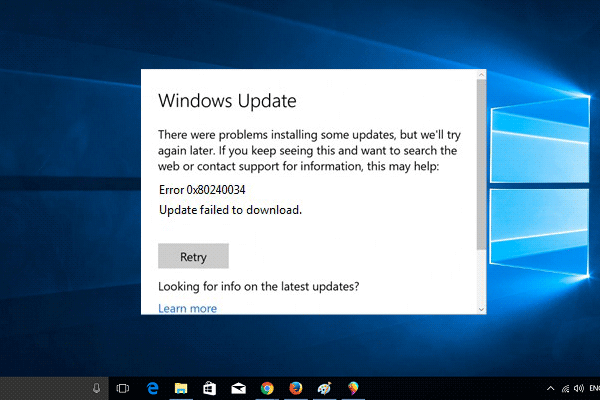
Windows update error 0x80240034 occurs when users try to update their Windows 10/11. Upon clicking the "check for updates" button, this error is thrown, and you will not be able to update your Windows. Below is the list of 6 easiest ways that can help you fix the Windows update error 0x80240034:
| Workable Solutions | Step-by-step Troubleshooting |
|---|---|
| 1. Run Update Troubleshooter | Open "Settings". You can open them by going to Start and searching for Settings...Full steps |
| 2. Run SFC Command | Press Windows + R Key to open Run Window, type CMD inside it, and hit the...Full steps |
| 3. Run DISM Command | Enter the command DISM.exe /Online /Cleanup-image /Restorehealth...Full steps |
| 4. Download the Update Manually | Open any internet browser from your computer - for example, Chrome...Full steps |
| Other Useful Solutions | Reset Windows Updates Components > Run a Full System Scan...Full steps |
Windows Update Error 0x80240034
Microsoft also knows about this problem and suggests it mainly happens due to some update glitches. Another reason why this error appears is when you have damaged system files. But, the good news is that you can fix this error by using various techniques. By reading our article, you will be able to update your Windows again. Also, data loss can happen during Windows 10/11 update, so you can also take help from this article to recover your lost data.
6 Ways to Fix Windows Update Error 0x80240034
Windows update error 0x80240034 during Windows update may seem unfamiliar and complex to fix as a Windows user. Luckily, the fix for this error is not as complicated as the error name suggests. Let's see each of the solutions below with a detailed step-by-step guide.
Fix 1. Use Windows Update Troubleshooter
One common reason this error happens is due to update glitches in Windows. Therefore, the first wise thing to do is run the Windows update troubleshooter to fix the update glitches.
Windows update troubleshooter is a built-in utility, and you don't have to install anything to run it. Follow the below steps to use Windows Update Troubleshooter:
Step 1. Open "Settings". You can open them by going to Start and searching for Settings. Press Enter to open the Settings.
Step 2. Move to the "Update & Security" section and click on "Troubleshoot".
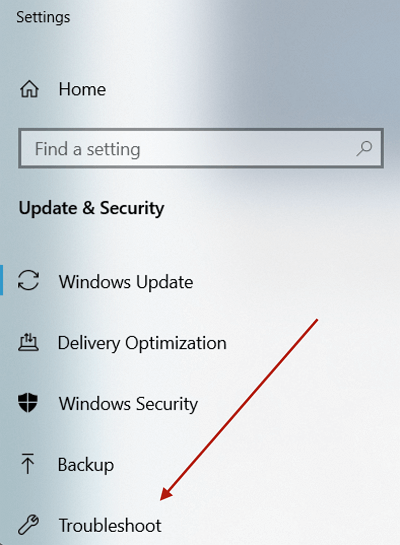
Step 3. Run the Troubleshooter.
The Troubleshoot Window will show you multiple options. Here, click on the Windows Update, and it will show you a button to run the Troubleshooter. Click on it, and it will run Windows update troubleshooter.
Step 4. You can proceed with the Troubleshooter with default steps and follow the on-screen instructions. Once it is completed, you have to restart your computer and see if the error persists or not.
Fix 2. Run SFC Command to Fix Windows Update Error 0x80240034
Windows updates can have problems due to file system or file registry errors. If that is the case, SFC (System File Checker) command is the best way to fix Windows update error 0x80240034.
Follow the below steps to run the SFC command to fix Windows update error 0x80240034:
Step 1. Press Windows + R Key to open Run Window, type CMD inside it, and hit the Enter key.
Step 2. In CMD, type the sfc /scannow command and hit the Enter key.
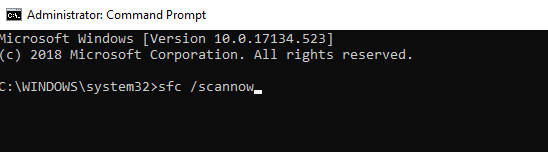
Step 3. After running the command, SFC will repair your files. Once done, restart the computer and try to update your Windows once again.
Fix 3. Run DISM Command to Fix Error 0x80240034
DIMS (Deployment Image Servicing and Management) is a utility command in Windows to manage, service, and repair Windows images. Running the DISM command from CMD can also help repair your Windows image and get rid of Windows update error 0x80240034.
Follow the below steps to run the DISM command:
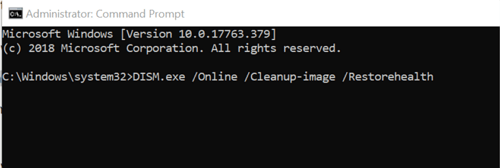
Step 1. Press Windows + R Key to open Run Window, type CMD inside it, and hit the enter key.
Step 2. Enter the command DISM.exe /Online /Cleanup-image /Restorehealth
After running this command, the DISM service will run and clean your Windows image. You can check to update and see if that fixes your Windows update error 0x80240034.
Step 3. If DISM can not find Windows image, then run the DISM.exe /Online /Cleanup-Image /RestoreHealth /Source:C:/Repair/Source/Windows /LimitAccess command.
Make sure you have your Windows installation media in USB or DVD attached to your computer before running this command. Change C:/Repair/Source/Windows with your Windows installation media path.
Fix 4. Download the Update Manually
You only get Windows update error 0x80240034 when trying to update Windows from Windows Update settings. If none of the above solutions worked for you, you could also download the Windows update manually.
Once the update is downloaded from Microsoft's official website, you can install it manually. Follow the below steps to download the Windows update manually from the Microsoft Update Catalog Website:
Step 1. Open any internet browser from your computer - for example, Chrome, Firefox, Safari, etc.
Step 2. Open the website Microsoft Update Catalog
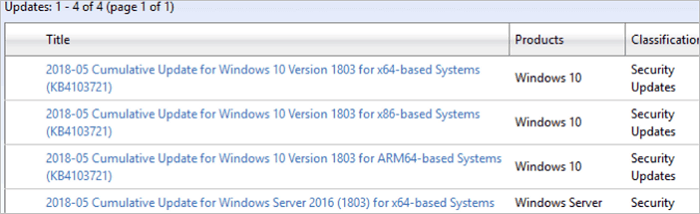
Step 3. Enter the update code that you want to download and install manually from the website's search option.
Step 4. Locate and update from search results.
Make sure you find the one that is according to the architecture of your system. The most common architecture is x86 and x64. So, double-check if you are looking at the correct update or not.
Step 5. Download the update by clicking on the download button in front of them.
Step 6. Execute the downloaded setup of the update and proceed with general settings.
Step 7. Restart your computer.
Once the update is successfully installed, restart your computer to see if the changes have taken effect.
Fix 5. Reset Windows Updates Components
Windows update components are responsible for checking and automatically updating your Windows operating system. So, you can also reset them to fix Windows update error 0x80240034. Follow the below steps to reset Windows updates components to fix the Windows update error 0x80240034:
Step 1. Press Windows + R Key to open Run Window, type CMD inside it, and hit the enter key.
Step 2. Execute the commands mentioned below one by one.
- net stop wuauserv
- net stop cryptSvc
- net stop bits
- ren C:\Windows\SoftwareDistribution SoftwareDistribution.old
- ren C:\Windows\System32\catroot2 Catroot2.old
Step 3. After all the commands are executed, restart your computer.
Following the above steps will reset Windows update components. You can now check if the issue is resolved for you.
Fix 6. Run a Full System Scan
Most Windows users successfully fix the Windows update error 0x80240034 error by following the abovementioned methods. But, if all else fails, then there is a high chance that your system will be affected by malware and viruses. This malware can prevent your system from updating itself. Hence, you end up getting the Windows update error 0x80240034.
The best way to remove malware and viruses from your computer is by taking help from your Antivirus software. Using your Antivirus, run a full system scan. Running a full system scan can take a lot of time, depending upon the data on your computer. Therefore, you must stay patient and run the entire system scan when you have no critical work.
How to Restore Data After Windows 11/10 Update
You can consider yourself lucky if you install Windows updates without any issues. One common problem that people face while updating Windows 11/10 is data loss. Users have often reported that some of their files have gone missing after the update. Fortunately, you can restore the lost data using EaseUS free data recovery software.
It helps you freely restore data from Windows 11/10/8/7 efficiently. No matter the reason for data loss, the software can help restore the data from every data loss scenario.
- Recover permanently deleted files
- Recover your lost partitions without any hassle
- Quickly recover data that you lost during Windows updates
- Recover data from any external media, e.g. SD card
It is highly recommended to download and use this software to restore data that you lost from the Windows update.
EaseUS Data Recovery Wizard Free offers up to 2 GB of free data recovery, including 500 MB available by default and an extra 1.5 GB unlocked after sharing on Facebook and X.
Step 1. Select a drive and start scanning
Launch EaseUS Data Recovery Wizard and hover over the partition where you lost data. This could be an internal hard disk, external disk, USB, or SD card. Then, click "Search for Lost Data".

Step 2. Check and preview scanned files
Use the file format filter on the left or upper right corner to narrow the scan results until you find the files you need. Then, you can click the "Preview" button or double-click a file to preview its content, if you'd like.

Step 3. Recover lost data to a secure location
Click the checkbox next to the file and click "Recover" to restore the lost data to your local storage or Cloud drive. We recommend that you do not store the recovered data on the disk where you lost it earlier.

Conclusion
Windows update error 0x80240034 occurs when you try to update your Windows using the Windows Update menu. The error is mainly due to file system failures, file registry issues, Windows update glitches, and malware. You can fix the Windows update error 0x80240034 using the six easy methods mentioned in this article. However, if you fail to resolve the issue, the best approach is manually update your Windows using Windows Update Catalog.
Also, during the Windows update, there is a chance that you might lose some of your data. The most recommended method to restore your lost data during such a scenario is to use EaseUS Data Recovery Wizard.
Was this page helpful?